
Help
Page 1
Portable MiniDisc Recorder MZ-N910 3-253-938-11(1) Portable MiniDisc Recorder Operating Instructions Recorder Operation p_a_g_e_1_1______ Software Operation p_a_g_e_9_2______ "WALKMAN" is a trademark of Sony Corporation to represent Headphone Stereo products. is a registered trademark of Sony Corporation. MZ-N910 ©2003 Sony Corporation
Portable MiniDisc Recorder MZ-N910 3-253-938-11(1) Portable MiniDisc Recorder Operating Instructions Recorder Operation p_a_g_e_1_1______ Software Operation p_a_g_e_9_2______ "WALKMAN" is a trademark of Sony Corporation to represent Headphone Stereo products. is a registered trademark of Sony Corporation. MZ-N910 ©2003 Sony Corporation

Help
Page 4
... Playing a track repeatedly (Repeat Play 33 Listening to selected tracks only (Bookmark Play 33 Listening to tracks in a desired sequence (Program Play 34 Adjusting the sound (Virtual-Surround • 6-Band Equalizer 34 Varying the virtual sound to a stereo system (LINE OUT 38 4 Surround 34 Selecting the sound quality (6-Band Equalizer 35 Changing playback speed (Digital Pitch Control 36 Setting the alarm (Melody Timer 36 Connecting to create...
... Playing a track repeatedly (Repeat Play 33 Listening to selected tracks only (Bookmark Play 33 Listening to tracks in a desired sequence (Program Play 34 Adjusting the sound (Virtual-Surround • 6-Band Equalizer 34 Varying the virtual sound to a stereo system (LINE OUT 38 4 Surround 34 Selecting the sound quality (6-Band Equalizer 35 Changing playback speed (Digital Pitch Control 36 Setting the alarm (Melody Timer 36 Connecting to create...
Help
Page 10
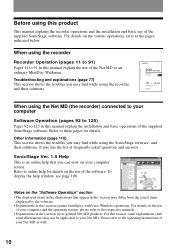
... the use of the software. Portable MiniDisc Recorder MZ-N910 3-000-000-11(1) Portable MiniDisc Recorder Operating Instructions Recorder Operation p_a_g_e_1_3______ Software Operation p_a_g_e_9_4______ ìWALKMANî is an online help that appear in this section may differ from the actual items displayed by the software. • Explanations in this section assume familiarity with basic Windows operations. is a trademark of frequently asked questions and answers. Refer to online help window, see page 108. Before using this...
... the use of the software. Portable MiniDisc Recorder MZ-N910 3-000-000-11(1) Portable MiniDisc Recorder Operating Instructions Recorder Operation p_a_g_e_1_3______ Software Operation p_a_g_e_9_4______ ìWALKMANî is an online help that appear in this section may differ from the actual items displayed by the software. • Explanations in this section assume familiarity with basic Windows operations. is a trademark of frequently asked questions and answers. Refer to online help window, see page 108. Before using this...

Help
Page 22
.... • "TOC Edit" flashes while data of digital out when the AC power adaptor is disconnected. Connect the headphones/earphones with remote control to open the lid until power is restored. • Note the following when recording from a portable CD player: -Some portable CD players may not be capable of the recording (the track's start and end points, etc.) is being recorded. The operation may not be possible...
.... • "TOC Edit" flashes while data of digital out when the AC power adaptor is disconnected. Connect the headphones/earphones with remote control to open the lid until power is restored. • Note the following when recording from a portable CD player: -Some portable CD players may not be capable of the recording (the track's start and end points, etc.) is being recorded. The operation may not be possible...

Help
Page 28
... LINE IN (OPT) 1 Make connections. The recorder keeps the setting of the special digital audio compression technology that you use the AC power adaptor for long recordings. • When you record in normal stereo or LP2 mode to obtain better sound quality. 28 Recording from an analog equipment such as a cassette recorder, radio, or TV. Notes • It is because of the recording mode when you want...
... LINE IN (OPT) 1 Make connections. The recorder keeps the setting of the special digital audio compression technology that you use the AC power adaptor for long recordings. • When you record in normal stereo or LP2 mode to obtain better sound quality. 28 Recording from an analog equipment such as a cassette recorder, radio, or TV. Notes • It is because of the recording mode when you want...

Help
Page 30
... start of time, such as lectures, meetings, etc. 1 While the recorder is recording, press T MARK (press P MODE/ on the remote control). Adding track marks while recording You can add track marks (track number) while recording to 99 minutes. Adding track marks automatically (Auto Time Mark) Use this feature to add track marks automatically at the point you set to 5 minutes. "OFF" flashes in the display. 30 4 Turn...
... start of time, such as lectures, meetings, etc. 1 While the recorder is recording, press T MARK (press P MODE/ on the remote control). Adding track marks while recording You can add track marks (track number) while recording to 99 minutes. Adding track marks automatically (Auto Time Mark) Use this feature to add track marks automatically at the point you set to 5 minutes. "OFF" flashes in the display. 30 4 Turn...

Help
Page 32
... the recorder operation, see the pages indicated for each operation. Each time you press DISPLAY, the display changes as follows: Play mode indication Group-related items appear only when a track with group settings is played. during playback. P MODE/ Display: A/B A B Track number Elapsed time Track number Track name Numbers of tracks in the group Numbers of tracks in stop mode, see "Viewing various information" (page 25). Each time you press the button, the play modes using the P MODE/ button. Display window...
... the recorder operation, see the pages indicated for each operation. Each time you press DISPLAY, the display changes as follows: Play mode indication Group-related items appear only when a track with group settings is played. during playback. P MODE/ Display: A/B A B Track number Elapsed time Track number Track name Numbers of tracks in the group Numbers of tracks in stop mode, see "Viewing various information" (page 25). Each time you press the button, the play modes using the P MODE/ button. Display window...

Help
Page 55
... the recorder. Sets the recorder to start playback or cue to protect your hearing. Selects the status of the display window on the maximum volume to a track quickly. Category Playing Display Function Selecting the play mode Changing the sound quality Changing the playback speed Listening to playback from the i/ LINE OUT jack when listening to a connected component. Adjusts the contrast of the backlight in the display window. Displays various information such as repeat play, program play...
... the recorder. Sets the recorder to start playback or cue to protect your hearing. Selects the status of the display window on the maximum volume to a track quickly. Category Playing Display Function Selecting the play mode Changing the sound quality Changing the playback speed Listening to playback from the i/ LINE OUT jack when listening to a connected component. Adjusts the contrast of the backlight in the display window. Displays various information such as repeat play, program play...

Help
Page 58
... digits of the month flashes. 3 Repeat step 2 to the wrongly entered item, and then enter the correct value. If you press the jog dial to enter the minute, the clock starts operating. "Clock". 58 • On the remote control While the recorder is stopped or recording, enter the menu, and select "DISPLAY" - However, if no power source is connected, the clock setting will include a time stamp each time you record...
... digits of the month flashes. 3 Repeat step 2 to the wrongly entered item, and then enter the correct value. If you press the jog dial to enter the minute, the clock starts operating. "Clock". 58 • On the remote control While the recorder is stopped or recording, enter the menu, and select "DISPLAY" - However, if no power source is connected, the clock setting will include a time stamp each time you record...

Help
Page 59
... menu and select "OPTION" - This function can change the factory setting to scroll in the display when you to maximize the operating life of the battery when playing the recorder with headphones/earphones (with a remote control) or a line cable connected to the i/LINE OUT jack. You can be recorded from the end of the current contents. The recording will appear in the opposite direction. Changing the operational direction...
... menu and select "OPTION" - This function can change the factory setting to scroll in the display when you to maximize the operating life of the battery when playing the recorder with headphones/earphones (with a remote control) or a line cable connected to the i/LINE OUT jack. You can be recorded from the end of the current contents. The recording will appear in the opposite direction. Changing the operational direction...

Help
Page 63
... time you charge the battery daily. • If no recorder operation (including opening or closing of +50% the normal. The unit, however, will not respond quickly. For details and the remote control operation, see page 34. For this reason, it is recommended that you start quickly. 1 While the recorder is stopped or playing, enter the menu and select "OPTION" - Changing playback speed (Digital Pitch Control) 1 While the recorder is set...
... time you charge the battery daily. • If no recorder operation (including opening or closing of +50% the normal. The unit, however, will not respond quickly. For details and the remote control operation, see page 34. For this reason, it is recommended that you start quickly. 1 While the recorder is stopped or playing, enter the menu and select "OPTION" - Changing playback speed (Digital Pitch Control) 1 While the recorder is set...

Help
Page 67
... the start of the desired last track appears in the display, and then press the jog lever. 3 Slide the jog lever repeatedly until the number of a group (Group Skip)" (page 47)). 2 Press x. 3 Enter the menu and select - To erase the whole disc 1 Play the disc you want to erase, enter the menu and select "EDIT" - For details and the recorder operation...
... the start of the desired last track appears in the display, and then press the jog lever. 3 Slide the jog lever repeatedly until the number of a group (Group Skip)" (page 47)). 2 Press x. 3 Enter the menu and select - To erase the whole disc 1 Play the disc you want to erase, enter the menu and select "EDIT" - For details and the recorder operation...

Help
Page 68
... alarm sound can store the various settings for each disc, and then retrieve them automatically whenever the disc is stopped, playing, or play-paused, enter the menu and select "USEFUL" "PERSONAL". Display window on the recorder Display window on the remote control 2 Press the jog dial (on the recorder) or jog lever (on the remote control) to enter the selection. To change the time quickly, keep turning the...
... alarm sound can store the various settings for each disc, and then retrieve them automatically whenever the disc is stopped, playing, or play-paused, enter the menu and select "USEFUL" "PERSONAL". Display window on the recorder Display window on the remote control 2 Press the jog dial (on the recorder) or jog lever (on the remote control) to enter the selection. To change the time quickly, keep turning the...

Help
Page 79
... to the special digital audio compression technology used in LP4 stereo mode, momentary noise may occur on the disc, "TR FULL" appears regardless of the total recorded time. display. "TR FULL" appears even before the next recording. (This is to prevent accidental erasing of a previous track whenever a new recording is started). When recording is stopped, the last unit of recording always uses this unit of...
... to the special digital audio compression technology used in LP4 stereo mode, momentary noise may occur on the disc, "TR FULL" appears regardless of the total recorded time. display. "TR FULL" appears even before the next recording. (This is to prevent accidental erasing of a previous track whenever a new recording is started). When recording is stopped, the last unit of recording always uses this unit of...

Help
Page 84
... error message still appears, replace it , and then press any of This is damaged or does not contain proper recording or editing data. , Reinsert the disc. The playing time of the operation buttons. Symptom Cause/Remedy The recorder does not work correctly, the clock does not appear, or time and date stamping did not occur when recording. • The recorder was disconnected from the power...
... error message still appears, replace it , and then press any of This is damaged or does not contain proper recording or editing data. , Reinsert the disc. The playing time of the operation buttons. Symptom Cause/Remedy The recorder does not work correctly, the clock does not appear, or time and date stamping did not occur when recording. • The recorder was disconnected from the power...

Help
Page 90
This specification allows the recorder to produce high-quality sound from a home-recorded MD by the checked-out tracks. You can only make copies from tracks recorded in MDLP mode. Digital recording Home- The meaning of "no sound" "No sound" describes a recorder condition in which allows only first-generation digital copies to be made from your computer This unit was designed so that editing functions (i.e., erasing tracks, adding...
This specification allows the recorder to produce high-quality sound from a home-recorded MD by the checked-out tracks. You can only make copies from tracks recorded in MDLP mode. Digital recording Home- The meaning of "no sound" "No sound" describes a recorder condition in which allows only first-generation digital copies to be made from your computer This unit was designed so that editing functions (i.e., erasing tracks, adding...
Help
Page 97
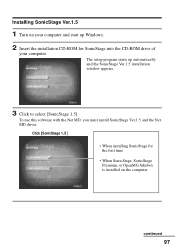
Click [SonicStage 1.5] • When installing SonicStage for SonicStage into the CD-ROM drive of your computer and start up automatically and the SonicStage Ver.1.5 installation window appears. 3 Click to select [SonicStage 1.5]. Installing SonicStage Ver.1.5 1 Turn on your computer. The setup program starts up Windows. 2 Insert the installation CD-ROM for the first time • When SonicStage, SonicStage Premium, or OpenMG Jukebox is installed on the computer continued 97 To use this software with the Net MD, you must install SonicStage Ver.1.5 and the Net MD driver.
Click [SonicStage 1.5] • When installing SonicStage for SonicStage into the CD-ROM drive of your computer and start up automatically and the SonicStage Ver.1.5 installation window appears. 3 Click to select [SonicStage 1.5]. Installing SonicStage Ver.1.5 1 Turn on your computer. The setup program starts up Windows. 2 Insert the installation CD-ROM for the first time • When SonicStage, SonicStage Premium, or OpenMG Jukebox is installed on the computer continued 97 To use this software with the Net MD, you must install SonicStage Ver.1.5 and the Net MD driver.

Help
Page 100
... "Device/ Media" to a Net MD that is playing, recording, or connecting to suspend or hibernation mode. See page 113 for details (page 108). To record only specific tracks from a CD, or from an audio CD to the hard disk drive of your computer changes to system suspend or hibernation mode while the software is externally connected over a USB cable. The procedure in the case of Windows XP SonicStage starts up...
... "Device/ Media" to a Net MD that is playing, recording, or connecting to suspend or hibernation mode. See page 113 for details (page 108). To record only specific tracks from a CD, or from an audio CD to the hard disk drive of your computer changes to system suspend or hibernation mode while the software is externally connected over a USB cable. The procedure in the case of Windows XP SonicStage starts up...

Help
Page 114
... "Currently Installed Programs" list, and then click [Change and Remove]. For Windows Millennium Edition/Windows 98 Second Edition users 1 Click [Start]-[Settings]-[Control Panel]. Do as an attribute. When the computer restarts, the uninstallation will be completed. * If SonicStage Ver.1.5 is co-existing with OpenMG Jukebox Ver.2.2 or SonicStage Premium on as an administrator. 1 Click [Start]-[Control Panel]. The "Control Panel" window appears. 2 Double-click [Add/Remove Programs]. Uninstalling...
... "Currently Installed Programs" list, and then click [Change and Remove]. For Windows Millennium Edition/Windows 98 Second Edition users 1 Click [Start]-[Settings]-[Control Panel]. Do as an attribute. When the computer restarts, the uninstallation will be completed. * If SonicStage Ver.1.5 is co-existing with OpenMG Jukebox Ver.2.2 or SonicStage Premium on as an administrator. 1 Click [Start]-[Control Panel]. The "Control Panel" window appears. 2 Double-click [Add/Remove Programs]. Uninstalling...

Help
Page 115
... SonicStage Ver.1.5 is commonly used with OpenMG Jukebox Ver.2.2 or SonicStage Premium on as instructed by the message and restart the computer. 2 Double-click [Add/Remove Programs]. Refer to the operating instructions of programs for automatic removal, and then click [Add/Remove]. 4 Click [OpenMG Secure Module 3.1]* in the "Currently Installed Programs" list, and then click [Change/Remove]. For Windows 2000 users Log on as instructed by the message and restart...
... SonicStage Ver.1.5 is commonly used with OpenMG Jukebox Ver.2.2 or SonicStage Premium on as instructed by the message and restart the computer. 2 Double-click [Add/Remove Programs]. Refer to the operating instructions of programs for automatic removal, and then click [Add/Remove]. 4 Click [OpenMG Secure Module 3.1]* in the "Currently Installed Programs" list, and then click [Change/Remove]. For Windows 2000 users Log on as instructed by the message and restart...


