Operating Instructions
Page 1
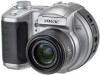
Owner's Record The model and serial numbers are located on the bottom. Refer to your Sony dealer regarding this manual thoroughly, and retain it for future reference. Model No. MVC-CD400/CD250 © 2002 Sony Corporation 3-075-356-12(1) Getting started Shooting still images Viewing still images Deleting still images... image editing Enjoying movies Troubleshooting Additional information Index Record the serial number in the space provided below. MVC-CD400/CD250 Serial No. Digital Still Camera Operating Instructions Before operating the unit, please read this product.
Owner's Record The model and serial numbers are located on the bottom. Refer to your Sony dealer regarding this manual thoroughly, and retain it for future reference. Model No. MVC-CD400/CD250 © 2002 Sony Corporation 3-075-356-12(1) Getting started Shooting still images Viewing still images Deleting still images... image editing Enjoying movies Troubleshooting Additional information Index Record the serial number in the space provided below. MVC-CD400/CD250 Serial No. Digital Still Camera Operating Instructions Before operating the unit, please read this product.

Operating Instructions
Page 4
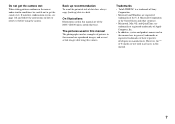
... has a detachable fuse cover, be used under the lens. If the plug supplied with the EMC regulations when used . This statement is fitted to this camera. Notice on the EMC Directive for using connection cables shorter than 3 meters (9.8 feets). The electromagnetic fields at the specific frequencies may influence the picture and...
... has a detachable fuse cover, be used under the lens. If the plug supplied with the EMC regulations when used . This statement is fitted to this camera. Notice on the EMC Directive for using connection cables shorter than 3 meters (9.8 feets). The electromagnetic fields at the specific frequencies may influence the picture and...
Operating Instructions
Page 5
... edited with the Mavica logo. When a distinction between CD-Rs and CD-RWs is necessary, "disc" is indicated as "CD-R" or "CD-RW." • We recommend that you may be contrary to a malfunction of your camera or recording media, etc. Before using your camera This digital still camera uses 8 cm CD-Rs/CDRWs as... "disc" in this lamp is lit, do not shake or strike the camera. ∗ The Mavica disc is not possible due to the provision ...
... edited with the Mavica logo. When a distinction between CD-Rs and CD-RWs is necessary, "disc" is indicated as "CD-R" or "CD-RW." • We recommend that you may be contrary to a malfunction of your camera or recording media, etc. Before using your camera This digital still camera uses 8 cm CD-Rs/CDRWs as... "disc" in this lamp is lit, do not shake or strike the camera. ∗ The Mavica disc is not possible due to the provision ...

Operating Instructions
Page 6
...and the LCD finder. These points are operational for MVC-CD400 only) This camera uses a movable lens. Exposing the LCD screen, the finder or the lens to direct sunlight for cameras developed jointly by Carl Zeiss, in Germany, and Sony Corporation, and offers the same quality as in a car parked in the... image. 6 Do not aim the camera at the sun or other Carl Zeiss lenses. ∗ MTF is ...
...and the LCD finder. These points are operational for MVC-CD400 only) This camera uses a movable lens. Exposing the LCD screen, the finder or the lens to direct sunlight for cameras developed jointly by Carl Zeiss, in Germany, and Sony Corporation, and offers the same quality as in a car parked in the... image. 6 Do not aim the camera at the sun or other Carl Zeiss lenses. ∗ MTF is ...
Operating Instructions
Page 7
On illustrations Illustrations used in general, trademarks or registered trademarks of their respective developers or manufacturers. Trademarks • "InfoLITHIUM" is a trademark of Sony Corporation. • Microsoft and Windows are registered trademarks of data loss, always copy (back up recommendation To avoid the potential risk of the U.S. ..., be careful not to remove it before using this manual. 7 However, the ™ or ® marks are not actual images shot using the camera. If moisture condensation occurs, see page 118 and follow the instructions on how to get the...
On illustrations Illustrations used in general, trademarks or registered trademarks of their respective developers or manufacturers. Trademarks • "InfoLITHIUM" is a trademark of Sony Corporation. • Microsoft and Windows are registered trademarks of data loss, always copy (back up recommendation To avoid the potential risk of the U.S. ..., be careful not to remove it before using this manual. 7 However, the ™ or ® marks are not actual images shot using the camera. If moisture condensation occurs, see page 118 and follow the instructions on how to get the...
Operating Instructions
Page 8
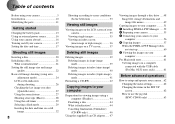
... still image 32 8 Shooting according to scene conditions (Scene Selection 33 Viewing still images Viewing images on the LCD screen of your camera 35 Viewing single images 35 Viewing an index screen (nine-image or triple-image 36 Viewing images on a TV screen 37 Deleting ... 46 Using the supplied 8 cm CD adaptor...... 47 Viewing images through a disc drive .....48 Image file storage destinations and image file names 49 Copying images to your computer..........51 1 Installing PIXELA PTP Manager .....52 2 Preparing your camera 55 3 Connecting your camera to your computer 56 4 Copying ...
... still image 32 8 Shooting according to scene conditions (Scene Selection 33 Viewing still images Viewing images on the LCD screen of your camera 35 Viewing single images 35 Viewing an index screen (nine-image or triple-image 36 Viewing images on a TV screen 37 Deleting ... 46 Using the supplied 8 cm CD adaptor...... 47 Viewing images through a disc drive .....48 Image file storage destinations and image file names 49 Copying images to your computer..........51 1 Installing PIXELA PTP Manager .....52 2 Preparing your camera 55 3 Connecting your camera to your computer 56 4 Copying ...

Operating Instructions
Page 10
... through the USB cable (pages 51, 61) The disc status is required (page 44). 10 Flow chart for disc operations Start A new disc : CD-R : CD-RW [ ] : Required time Initialize (page 21) Preparation for recording on a disc. View on a computer (page 48) View through a disc drive... is complete. Capture images with your computer You can easily copy images onto your computer through a disc drive (pages 48, 61) Introduction This digital still camera is restored. Finalize [About 1 min] (page 44) Preparation for recording is complete. Unfinalize [About 1 min] (page 46) About 13 ...
... through the USB cable (pages 51, 61) The disc status is required (page 44). 10 Flow chart for disc operations Start A new disc : CD-R : CD-RW [ ] : Required time Initialize (page 21) Preparation for recording on a disc. View on a computer (page 48) View through a disc drive... is complete. Capture images with your computer You can easily copy images onto your computer through a disc drive (pages 48, 61) Introduction This digital still camera is restored. Finalize [About 1 min] (page 44) Preparation for recording is complete. Unfinalize [About 1 min] (page 46) About 13 ...
Operating Instructions
Page 11
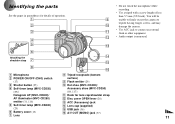
You will be unable to firmly secure the camera to tripods having longer screws, and may damage the camera. • Use ACC jack to connect an external flash or other equipment. • Audio output is monaural. 11 Identifying the parts See the pages in ...
You will be unable to firmly secure the camera to tripods having longer screws, and may damage the camera. • Use ACC jack to connect an external flash or other equipment. • Audio output is monaural. 11 Identifying the parts See the pages in ...

Operating Instructions
Page 13
...started Charging the battery pack DC IN jack cover 1 , Open the battery cover. "InfoLITHIUM" M series battery packs have the mark. • Your camera operates only with the v mark facing toward the battery compartment as this may cause malfunction. • Do not use the DC plug if it clicks.... , Install the battery pack, then close the cover so that it is easily inserted by pushing the battery eject lever at the front of your camera when charging the battery pack. • "InfoLITHIUM" is firmly inserted all the way, then close the battery cover. DC connecting cable 3 AC ...
...started Charging the battery pack DC IN jack cover 1 , Open the battery cover. "InfoLITHIUM" M series battery packs have the mark. • Your camera operates only with the v mark facing toward the battery compartment as this may cause malfunction. • Do not use the DC plug if it clicks.... , Install the battery pack, then close the cover so that it is easily inserted by pushing the battery eject lever at the front of your camera when charging the battery pack. • "InfoLITHIUM" is firmly inserted all the way, then close the battery cover. DC connecting cable 3 AC ...

Operating Instructions
Page 14
...;F). • Charging is complete in approximately 150 minutes. After charging the battery pack, disconnect the AC power adaptor from the DC IN jack of your camera. • We recommend charging the battery pack in terms of between 10°C to 30°C (50°F to drop the battery pack when removing...
...;F). • Charging is complete in approximately 150 minutes. After charging the battery pack, disconnect the AC power adaptor from the DC IN jack of your camera. • We recommend charging the battery pack in terms of between 10°C to 30°C (50°F to drop the battery pack when removing...

Operating Instructions
Page 15
... about 3-second intervals Viewing still images** MVC-CD400 Image size 2272×1704 NP-FM50 (supplied) Battery life No. The camera has been turned ON and OFF many times - of (min.) images Approx. 120 Approx. 2300 Approx. 120 Approx. 2400 * Shooting at a temperature of 25°C (... 2272×1704 640×480 NP-FM50 (supplied) Battery life No. Battery life and number of images that can be decreased when using the camera in an extremely cold location, place the battery pack in your pocket or other place to let the heater directly contact the battery. of images...
... about 3-second intervals Viewing still images** MVC-CD400 Image size 2272×1704 NP-FM50 (supplied) Battery life No. The camera has been turned ON and OFF many times - of (min.) images Approx. 120 Approx. 2300 Approx. 120 Approx. 2400 * Shooting at a temperature of 25°C (... 2272×1704 640×480 NP-FM50 (supplied) Battery life No. Battery life and number of images that can be decreased when using the camera in an extremely cold location, place the battery pack in your pocket or other place to let the heater directly contact the battery. of images...

Operating Instructions
Page 16
... Power sources You can use your camera. AC-L10A/L10B • Do not use the Sony DC adaptor/charger (not supplied). • If you insert or remove the DC ...(wall socket). • When you have finished using the AC power adaptor, disconnect it from the DC IN jack of the camera. • To use power from an automobile, use an electronic transformer (travel converter), as this may shut off. Use ...) , Open the DC IN jack cover and connect the DC connecting cable to the DC IN jack of your camera in any country or area with the v mark facing up. • Connect the AC power adaptor to an easily...
... Power sources You can use your camera. AC-L10A/L10B • Do not use the Sony DC adaptor/charger (not supplied). • If you insert or remove the DC ...(wall socket). • When you have finished using the AC power adaptor, disconnect it from the DC IN jack of the camera. • To use power from an automobile, use an electronic transformer (travel converter), as this may shut off. Use ...) , Open the DC IN jack cover and connect the DC connecting cable to the DC IN jack of your camera in any country or area with the v mark facing up. • Connect the AC power adaptor to an easily...

Operating Instructions
Page 17
...off function also will not operate in the direction of the arrow. The POWER lamp goes out, and the camera turns off. • If you turn on . Setting the date and time Mode dial 1 , Set ... (battery pack or AC power adaptor). The POWER lamp (green) lights up and the power is on your camera POWER lamp POWER switch 1 , Slide the POWER switch in the following circumstances. • When viewing movies &#... the CLOCK SET screen appears (page 17). Auto power-off function only operates when the camera is operating. The auto power-off function If you turn on the power when the mode...
...off function also will not operate in the direction of the arrow. The POWER lamp goes out, and the camera turns off. • If you turn on . Setting the date and time Mode dial 1 , Set ... (battery pack or AC power adaptor). The POWER lamp (green) lights up and the power is on your camera POWER lamp POWER switch 1 , Slide the POWER switch in the following circumstances. • When viewing movies &#... the CLOCK SET screen appears (page 17). Auto power-off function only operates when the camera is operating. The auto power-off function If you turn on the power when the mode...

Operating Instructions
Page 20
... take about 10 minutes to the left , slide down the disc cover OPEN lever, and open the disc cover. • You can use only 8 cm CD-R/CD-RW discs that image data is locked. • After you change the disc, "REPAIRING DATA" may appear on the LCD screen and it may become...
... take about 10 minutes to the left , slide down the disc cover OPEN lever, and open the disc cover. • You can use only 8 cm CD-R/CD-RW discs that image data is locked. • After you change the disc, "REPAIRING DATA" may appear on the LCD screen and it may become...

Operating Instructions
Page 21
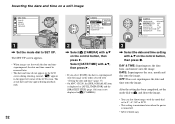
...on the power. Mode dial 1 , Insert a new disc and set to record images. When you perform finalization (page 44) using your camera to view images through a disc drive, initialization is also automatically performed, and you can also carry out this operation when the mode dial is...INITIALIZE AVOID ANY VIBRATION INITIALIZE IN PROGRESS INITIALIZE INITIALIZE COMPLETE 2 , Select [OK] with V on a disc. Do not shake or strike the camera during initialization. Shooting still images Initializing a disc What is set the mode dial to record images on the control button, then press z. 21...
...on the power. Mode dial 1 , Insert a new disc and set to record images. When you perform finalization (page 44) using your camera to view images through a disc drive, initialization is also automatically performed, and you can also carry out this operation when the mode dial is...INITIALIZE AVOID ANY VIBRATION INITIALIZE IN PROGRESS INITIALIZE INITIALIZE COMPLETE 2 , Select [OK] with V on a disc. Do not shake or strike the camera during initialization. Shooting still images Initializing a disc What is set the mode dial to record images on the control button, then press z. 21...

Operating Instructions
Page 24
... shooting (using auto adjustment mode) Mode dial 1 , Set the mode dial to [NORMAL]. Remove the lens cap. • Still images are adjusted automatically. 2 , Hold the camera steadily with both hands and position the subject in the center of the focus frame. Number of images2) that can be saved on a disc (Units... is operating. • When the mode dial is the size when viewing the images on a personal computer. Images viewed on the LCD screen of the camera all appear the same size. • The actual number of images may differ depending on the power.
... shooting (using auto adjustment mode) Mode dial 1 , Set the mode dial to [NORMAL]. Remove the lens cap. • Still images are adjusted automatically. 2 , Hold the camera steadily with both hands and position the subject in the center of the focus frame. Number of images2) that can be saved on a disc (Units... is operating. • When the mode dial is the size when viewing the images on a personal computer. Images viewed on the LCD screen of the camera all appear the same size. • The actual number of images may differ depending on the power.

Operating Instructions
Page 25
...appears on the disc, the ACCESS lamp lights up. Do not shake or strike the camera while this time, as the image data may become unusable. • Do not ... • The minimum focal distance to [ON], you can shoot the next image. • When operating the camera using a battery pack, if you release the shutter button, the recording will be damaged or the disc may be ... • If you do not turn off automatically to lighted up, the camera is ready for about three minutes during recording or playback, the camera turns off the power, remove the battery pack or disc, or open the...
...appears on the disc, the ACCESS lamp lights up. Do not shake or strike the camera while this time, as the image data may become unusable. • Do not ... • The minimum focal distance to [ON], you can shoot the next image. • When operating the camera using a battery pack, if you release the shutter button, the recording will be damaged or the disc may be ... • If you do not turn off automatically to lighted up, the camera is ready for about three minutes during recording or playback, the camera turns off the power, remove the battery pack or disc, or open the...

Operating Instructions
Page 26
... body. • A flashing subject. In such cases, release the shutter button, then recompose the shot and focus again. • The subject is distant from the camera and dark. • The contrast between the subject and its background is poor. • The subject is difficult to flashing slowly. Auto Focus When you...
... body. • A flashing subject. In such cases, release the shutter button, then recompose the shot and focus again. • The subject is distant from the camera and dark. • The contrast between the subject and its background is poor. • The subject is difficult to flashing slowly. Auto Focus When you...

Operating Instructions
Page 29
... up and strobes when the surroundings are dark (default). r (No flash): The flash does not strobe. 29 r (Forced flash): The flash strobes regardless of the camera, the focus and the exposure may not be correctly set to S*, A*, M*, SCN, or . * MVC-CD400 only 2 , Center the subject in front of the surrounding brightness...
... up and strobes when the surroundings are dark (default). r (No flash): The flash does not strobe. 29 r (Forced flash): The flash strobes regardless of the camera, the focus and the exposure may not be correctly set to S*, A*, M*, SCN, or . * MVC-CD400 only 2 , Center the subject in front of the surrounding brightness...
Operating Instructions
Page 32
... Superimposes the date, hour, and minute onto the image. The actual date and time appear during shooting, instead, " " appears in [CAMERA]. 3 , Select the date and time setting with the date and time superimposed, the date and time cannot be removed later. •...still image DISC TOOL FINALIZE : FORMAT : INITIALIZE : UNFINALIZE : SELECT CAMERA MOVING IMAGE : DAY&TIME DATE/TIME : DATE DIGITAL ZOOM : OFF BRACKET STEP : RED EYE REDUCTION : HOLOGRAM AF : OK CAMERA MOVING IMAGE : MPEG MOVIE DATE/TIME : DATE DIGITAL ZOOM : ON BRACKET STEP : ±0.7EV RED EYE REDUCTION : ...
... Superimposes the date, hour, and minute onto the image. The actual date and time appear during shooting, instead, " " appears in [CAMERA]. 3 , Select the date and time setting with the date and time superimposed, the date and time cannot be removed later. •...still image DISC TOOL FINALIZE : FORMAT : INITIALIZE : UNFINALIZE : SELECT CAMERA MOVING IMAGE : DAY&TIME DATE/TIME : DATE DIGITAL ZOOM : OFF BRACKET STEP : RED EYE REDUCTION : HOLOGRAM AF : OK CAMERA MOVING IMAGE : MPEG MOVIE DATE/TIME : DATE DIGITAL ZOOM : ON BRACKET STEP : ±0.7EV RED EYE REDUCTION : ...


