Instruction Manual
Page 1
MHS-CM1/CM3 © 2009 Sony Corporation 4-123-313-11(1) Instruction Manual Before operating the unit, please read this manual thoroughly, and retain it for future reference. Mobile HD Snap Camera For details on the advanced operations, please access "Mobile HD Snap Camera Handbook" contained on the supplied CD-ROM via a computer.
MHS-CM1/CM3 © 2009 Sony Corporation 4-123-313-11(1) Instruction Manual Before operating the unit, please read this manual thoroughly, and retain it for future reference. Mobile HD Snap Camera For details on the advanced operations, please access "Mobile HD Snap Camera Handbook" contained on the supplied CD-ROM via a computer.
Instruction Manual
Page 5
... JPEG*1 format. Read "Precautions" (page 34) before using your camera if necessary (page 13). [ About this camera are compressed/recorded in "AVCHD format" like a Digital HD Video camera recorder. • Still images recorded by this camera cannot be repairable. • Do not aim the camera at the sun or other than...
... JPEG*1 format. Read "Precautions" (page 34) before using your camera if necessary (page 13). [ About this camera are compressed/recorded in "AVCHD format" like a Digital HD Video camera recorder. • Still images recorded by this camera cannot be repairable. • Do not aim the camera at the sun or other than...
Instruction Manual
Page 7
... 14 Useful functions for shooting 16 Viewing/Editing images 18 Changing the settings - Menu/Setup 21 Menu items 21 Enjoying your computer 22 Viewing "Mobile HD Snap Camera Handbook" (PDF 22 What you can do with a Windows computer 22 Using your camera 4 Enjoying the camera 8 Getting started 10 Checking the accessories...
... 14 Useful functions for shooting 16 Viewing/Editing images 18 Changing the settings - Menu/Setup 21 Menu items 21 Enjoying your computer 22 Viewing "Mobile HD Snap Camera Handbook" (PDF 22 What you can do with a Windows computer 22 Using your camera 4 Enjoying the camera 8 Getting started 10 Checking the accessories...
Instruction Manual
Page 8
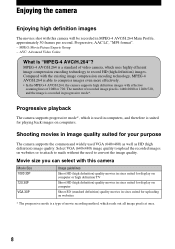
... The camera supports progressive mode*, which reads out all image pixels at once. 8 Select VGA (640×480) image quality to record HD (high definition) images. Enjoying the camera Enjoying high definition images The movies shot with this camera Movie Size 1080 30P 720 30P VGA 30P...the camera supports high definition images with effective scanning lines of movie recording method, which is used VGA (640×480) as well as HD (high definition) image quality. Compared with this camera will be recorded in progressive mode*. Movie size you can select with the existing image...
... The camera supports progressive mode*, which reads out all image pixels at once. 8 Select VGA (640×480) image quality to record HD (high definition) images. Enjoying the camera Enjoying high definition images The movies shot with this camera Movie Size 1080 30P 720 30P VGA 30P...the camera supports high definition images with effective scanning lines of movie recording method, which is used VGA (640×480) as well as HD (high definition) image quality. Compared with this camera will be recorded in progressive mode*. Movie size you can select with the existing image...
Instruction Manual
Page 9
...* When the capacity of "Memory Stick PRO Duo" media of the camera is recommended to upload images outside home. B Shooting in vivid and fine HD (high definition) image quality. By marking Sharemarks on how to use the software, refer to your PC or on websites* You can enjoy uploading images... on high definition TV (page 19) You can enjoy images in HD (high definition) image quality Select the image size suited for your camera, see page 17. B Enjoying the recorded image x Playing back on network services, ...
...* When the capacity of "Memory Stick PRO Duo" media of the camera is recommended to upload images outside home. B Shooting in vivid and fine HD (high definition) image quality. By marking Sharemarks on how to use the software, refer to your PC or on websites* You can enjoy uploading images... on high definition TV (page 19) You can enjoy images in HD (high definition) image quality Select the image size suited for your camera, see page 17. B Enjoying the recorded image x Playing back on network services, ...
Instruction Manual
Page 10
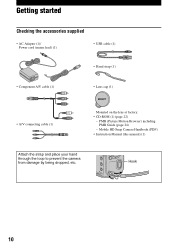
Getting started Checking the accessories supplied • AC Adaptor (1)/ Power cord (mains lead) (1) • USB cable (1) • Hand strap (1) • Component A/V cable (1) • Lens cap (1) • A/V connecting cable (1) Mounted on the lens at factory. • CD-ROM (1) (page 22) - Hook 10 Mobile HD Snap Camera Handbook (PDF) • Instruction Manual (this manual) (1) Attach the strap and place your hand through the loop to prevent the camera from damage by being dropped, etc. PMB (Picture Motion Browser) including PMB Guide (page 24) -
Getting started Checking the accessories supplied • AC Adaptor (1)/ Power cord (mains lead) (1) • USB cable (1) • Hand strap (1) • Component A/V cable (1) • Lens cap (1) • A/V connecting cable (1) Mounted on the lens at factory. • CD-ROM (1) (page 22) - Hook 10 Mobile HD Snap Camera Handbook (PDF) • Instruction Manual (this manual) (1) Attach the strap and place your hand through the loop to prevent the camera from damage by being dropped, etc. PMB (Picture Motion Browser) including PMB Guide (page 24) -

Instruction Manual
Page 17
... cm (4×6") VGA: Shoot at a small image size for e-mail attachment (Movie Size): 1080 30P: Shoot HD (high definition) quality movies in sizes suited for display on computer or high definition TV 720 30P: Shoot HD (high definition) quality movies in sizes suited for display on computer VGA 30P: Shoot SD (standard...
... cm (4×6") VGA: Shoot at a small image size for e-mail attachment (Movie Size): 1080 30P: Shoot HD (high definition) quality movies in sizes suited for display on computer or high definition TV 720 30P: Shoot HD (high definition) quality movies in sizes suited for display on computer VGA 30P: Shoot SD (standard...
Instruction Manual
Page 19
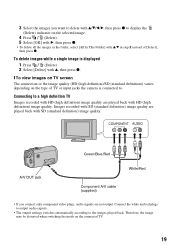
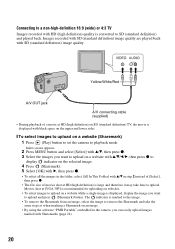
...displayed 1 Press (Delete). 2 Select [Delete] with v, then press z. [ To view images on TV screen The connection or the image quality (HD (high definition)/SD (standard definition)) varies depending on the type of [Select], then press z. Connect the white and red plugs to output audio ...signals. • The output settings switches automatically according to a high definition TV Images recorded with HD (high definition) image quality are played back with HD (high definition) image quality. Therefore, the image may be distorted when switching the mode on the connected ...
...displayed 1 Press (Delete). 2 Select [Delete] with v, then press z. [ To view images on TV screen The connection or the image quality (HD (high definition)/SD (standard definition)) varies depending on the type of [Select], then press z. Connect the white and red plugs to output audio ...signals. • The output settings switches automatically according to a high definition TV Images recorded with HD (high definition) image quality are played back with HD (high definition) image quality. Therefore, the image may be distorted when switching the mode on the connected ...
Instruction Manual
Page 20
...• To select images to upload on a website (Sharemark) 1 Press (Play) button to set the camera to playback mode. Movies shot at HD (high definition) is converted to SD (standard definition) and played back. The indicator is marked to the image. • To remove the Sharemark... image quality are played back with SD (standard definition) image quality. Connecting to a non-high-definition 16:9 (wide) or 4:3 TV Images recorded with HD (high definition) quality is large and therefore it may take the same steps as when marking a Sharemark on the selected image. 4 Press (Sharemark). 5...
...• To select images to upload on a website (Sharemark) 1 Press (Play) button to set the camera to playback mode. Movies shot at HD (high definition) is converted to SD (standard definition) and played back. The indicator is marked to the image. • To remove the Sharemark... image quality are played back with SD (standard definition) image quality. Connecting to a non-high-definition 16:9 (wide) or 4:3 TV Images recorded with HD (high definition) quality is large and therefore it may take the same steps as when marking a Sharemark on the selected image. 4 Press (Sharemark). 5...
Instruction Manual
Page 21
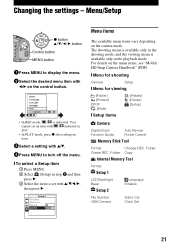
... Connect Language Initialize Video Out Clock Set 21 Changing the settings - Menu items The available menu items vary depending on the menu items, see "Mobile HD Snap Camera Handbook" (PDF). [ Menu for shooting Camera Setup [ Menu for viewing (Folder) (Protect) DPOF (Slide) (Rotate) (Divide) (Setup) [ Setup items Camera Digital Zoom Function...
... Connect Language Initialize Video Out Clock Set 21 Changing the settings - Menu items The available menu items vary depending on the menu items, see "Mobile HD Snap Camera Handbook" (PDF). [ Menu for shooting Camera Setup [ Menu for viewing (Folder) (Protect) DPOF (Slide) (Rotate) (Divide) (Setup) [ Setup items Camera Digital Zoom Function...
Instruction Manual
Page 22
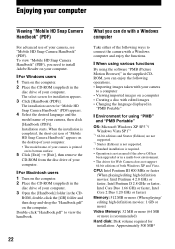
... language and the model name of your camera, then click [Handbook (PDF)]. When the installation is completed, the short-cut icon of "Mobile HD Snap Camera Handbook" appears on the desktop of your computer. • The model name of your camera is printed on its bottom surface. 5...Viewing imported images on the computer. 2 Place the CD-ROM (supplied) in the disc drive of both Windows XP and Vista. To view "Mobile HD Snap Camera Handbook" (PDF), you can enjoy the following operations. • Importing images taken with your camera to view the handbook. Installation starts. ROM...
... language and the model name of your camera, then click [Handbook (PDF)]. When the installation is completed, the short-cut icon of "Mobile HD Snap Camera Handbook" appears on the desktop of your computer. • The model name of your camera is printed on its bottom surface. 5...Viewing imported images on the computer. 2 Place the CD-ROM (supplied) in the disc drive of both Windows XP and Vista. To view "Mobile HD Snap Camera Handbook" (PDF), you can enjoy the following operations. • Importing images taken with your camera to view the handbook. Installation starts. ROM...
Instruction Manual
Page 26
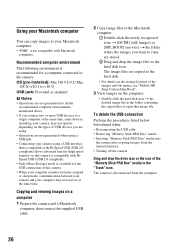
... the internal memory • Turning off the camera Drag and drop the drive icon or the icon of the images and file names, see "Mobile HD Snap Camera Handbook". 3 View images on the computer. • Double-click the hard disk icon t the desired image file in the folder containing the copied...
... the internal memory • Turning off the camera Drag and drop the drive icon or the icon of the images and file names, see "Mobile HD Snap Camera Handbook". 3 View images on the computer. • Double-click the hard disk icon t the desired image file in the folder containing the copied...
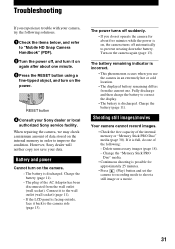
Instruction Manual
Page 31
... items below, and refer to the wall outlet (wall socket) (page 11). - The battery is facing outside, face it to "Mobile HD Snap Camera Handbook" (PDF). 2Turn the power off, and turn it is discharged. If the LCD panel is discharged. Fully discharge and then... charge the battery to prevent wearing down the battery. However, Sony dealer will neither copy nor save your Sony dealer or local authorized Sony service facility. RESET button 4Consult your data. Charge the battery (page 11). - The power turns off...
... items below, and refer to the wall outlet (wall socket) (page 11). - The battery is facing outside, face it to "Mobile HD Snap Camera Handbook" (PDF). 2Turn the power off, and turn it is discharged. If the LCD panel is discharged. Fully discharge and then... charge the battery to prevent wearing down the battery. However, Sony dealer will neither copy nor save your Sony dealer or local authorized Sony service facility. RESET button 4Consult your data. Charge the battery (page 11). - The power turns off...
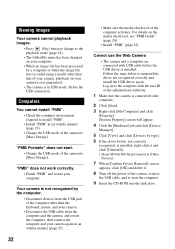
Instruction Manual
Page 32
... other than that of your camera, playback on your camera is not guaranteed. • The camera is installed, right-click it and click [Uninstall]. • [Sony Mobile HD Snap Camera] in [Other Devices] 7 When [Confirm Device Removal] screen appears, click [OK] and delete it. 8 Turn off the power of the camera, remove...
... other than that of your camera, playback on your camera is not guaranteed. • The camera is installed, right-click it and click [Uninstall]. • [Sony Mobile HD Snap Camera] in [Other Devices] 7 When [Confirm Device Removal] screen appears, click [OK] and delete it. 8 Turn off the power of the camera, remove...


