
Operating Instructions
Page 1
LocationFreeTV LF-X1/LF-X5 4-103-221-12(1) LocationFreeTV Operating Instructions LF-X1 LF-X5 © 2004 Sony Corporation
LocationFreeTV LF-X1/LF-X5 4-103-221-12(1) LocationFreeTV Operating Instructions LF-X1 LF-X5 © 2004 Sony Corporation
Operating Instructions
Page 2
...the apparatus has been damaged in any heat sources such as power-supply cord or plug is used, use this product. LF-X1 or LF-X5 Serial No Contacting Sony If, after reading these instructions. 3) Heed all warnings. 4) Follow all servicing to qualified service personnel. Refer to ...When a cart is damaged, liquid has been spilled or objects have additional questions related to the use attachments/accessories specified by the manufacturer. 12) Use only with the cart, stand, tripod, bracket, or table specified by the manufacturer, or sold with the manufacturer's instructions. 8) ...
...the apparatus has been damaged in any heat sources such as power-supply cord or plug is used, use this product. LF-X1 or LF-X5 Serial No Contacting Sony If, after reading these instructions. 3) Heed all warnings. 4) Follow all servicing to qualified service personnel. Refer to ...When a cart is damaged, liquid has been spilled or objects have additional questions related to the use attachments/accessories specified by the manufacturer. 12) Use only with the cart, stand, tripod, bracket, or table specified by the manufacturer, or sold with the manufacturer's instructions. 8) ...

Operating Instructions
Page 12
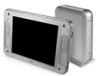
... green blinking (3 sec. Blue and green flashing alternately (3 sec. Off: Battery charging has finished. 7 i Headphone jack (stereo mini). 12 Blue lit: Connected with the wireless network on the 5 GHz channel. 4 Green lit: Connected with wireless network. intervals): 6 Attempting to...as the band for Public Wireless Access. 6 Battery charge indicator (1 page 27) Red lit: The battery is active but out of range. ◆For the LF-X5 Right side 1 LCD (Liquid Crystal Display)/Touch Panel 1 2 DC IN jack (1 page 26) Connect the monitor AC power adapter (supplied). 3 Speakers...
... green blinking (3 sec. Blue and green flashing alternately (3 sec. Off: Battery charging has finished. 7 i Headphone jack (stereo mini). 12 Blue lit: Connected with the wireless network on the 5 GHz channel. 4 Green lit: Connected with wireless network. intervals): 6 Attempting to...as the band for Public Wireless Access. 6 Battery charge indicator (1 page 27) Red lit: The battery is active but out of range. ◆For the LF-X5 Right side 1 LCD (Liquid Crystal Display)/Touch Panel 1 2 DC IN jack (1 page 26) Connect the monitor AC power adapter (supplied). 3 Speakers...
Operating Instructions
Page 31
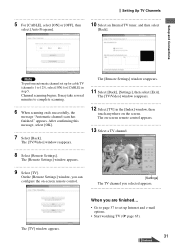
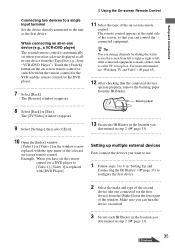
... on the screen. When you selected appears. appears. The [Remote Settings] window reappears. 11 Select [Back], [Settings], then select [Exit]. The [TV/Video] window reappears. 12 Select [TV] in step 5. The [TV/Video] window reappears. The [Remote Settings] window appears. 9 Select [TV]. On the [Remote Settings] window, you can configure the...
... on the screen. When you selected appears. appears. The [Remote Settings] window reappears. 11 Select [Back], [Settings], then select [Exit]. The [TV/Video] window reappears. 12 Select [TV] in step 5. The [TV/Video] window reappears. The [Remote Settings] window appears. 9 Select [TV]. On the [Remote Settings] window, you can configure the...
Operating Instructions
Page 33
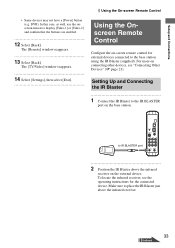
... receiver. 33 Continued DVR). In this case, as well, use the onscreen remote to display [Video 1] or [Video 2] and confirm that the buttons are enabled. 12 Select [Back]. To locate the infrared receiver, see "Connecting Other Devices" (1 page 21). The [TV/Video] window reappears. 14 Select [Settings], then select [Exit...
... receiver. 33 Continued DVR). In this case, as well, use the onscreen remote to display [Video 1] or [Video 2] and confirm that the buttons are enabled. 12 Select [Back]. To locate the infrared receiver, see "Connecting Other Devices" (1 page 21). The [TV/Video] window reappears. 14 Select [Settings], then select [Exit...
Operating Instructions
Page 35
... in step 2 (1 page 33). 35 Continued Make sure you can change channels by sliding the stylus across the screen from the [Type] list (e.g., Sony "VCR+DVD Player"). Backing paper 8 Select [Back] or [Exit]. z Tip You can turn the device on -screen remote control. For more information..., see "Watching TV and Video" (1 page 65). 12 After checking that the connected devices operate properly, remove the backing paper from the [Make] list in "Setting Up and Connecting the IR Blaster" (1 ...
... in step 2 (1 page 33). 35 Continued Make sure you can change channels by sliding the stylus across the screen from the [Type] list (e.g., Sony "VCR+DVD Player"). Backing paper 8 Select [Back] or [Exit]. z Tip You can turn the device on -screen remote control. For more information..., see "Watching TV and Video" (1 page 65). 12 After checking that the connected devices operate properly, remove the backing paper from the [Make] list in "Setting Up and Connecting the IR Blaster" (1 ...
Operating Instructions
Page 151
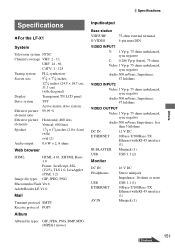
Specifications Others Specifications ◆For the LF-X1 System Television system NTSC Channel coverage VHF: 2 - 13, UHF: 14 - 69, CATV: 1 - 125 Tuning system Screen size PLL synthesizer 97⁄8 × 73⁄8 inches, ... negative Audio:500 mVrms, Impedance: 47 kilohms VIDEO OUTPUT Video: 1 Vp-p, 75 ohms unbalanced, sync negative Audio:500 mVrms, Impedance: less than 5 kilohms DC IN 12 V DC ETHERNET 10Base-T/100Base-TX Ethernet with RJ-45 interface (1) IR BLASTER Minijack (1) USB USB 1.1 (2) Monitor DC IN Headphones USB ETHERNET AV IN 16 V DC...
Specifications Others Specifications ◆For the LF-X1 System Television system NTSC Channel coverage VHF: 2 - 13, UHF: 14 - 69, CATV: 1 - 125 Tuning system Screen size PLL synthesizer 97⁄8 × 73⁄8 inches, ... negative Audio:500 mVrms, Impedance: 47 kilohms VIDEO OUTPUT Video: 1 Vp-p, 75 ohms unbalanced, sync negative Audio:500 mVrms, Impedance: less than 5 kilohms DC IN 12 V DC ETHERNET 10Base-T/100Base-TX Ethernet with RJ-45 interface (1) IR BLASTER Minijack (1) USB USB 1.1 (2) Monitor DC IN Headphones USB ETHERNET AV IN 16 V DC...
Operating Instructions
Page 152
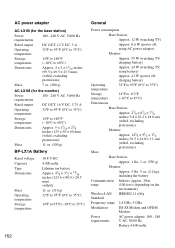
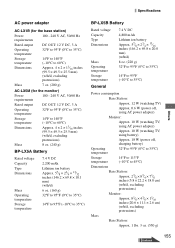
AC power adapter AC-LX1B (for the base station) Power requirements 100 - 240 V AC, 50/60 Hz Rated output DC OUT: 12 V DC, 3 A Operating temperature 32°F to 95°F (0°C to 35°C) Storage temperature Dimensions 14°F to 140°F (-10°C ... g) 32°F to 95°F (0°C to 35°C) 14°F to 95°F (-10°C to 35°C) General Power consumption Base Station: Approx. 12 W (watching TV) Approx. 0.6 W (power off, using AC power adapter) Monitor: Approx. 55 W (watching TV, charging battery) Approx. 24 W (watching TV, using battery) Approx....
AC power adapter AC-LX1B (for the base station) Power requirements 100 - 240 V AC, 50/60 Hz Rated output DC OUT: 12 V DC, 3 A Operating temperature 32°F to 95°F (0°C to 35°C) Storage temperature Dimensions 14°F to 140°F (-10°C ... g) 32°F to 95°F (0°C to 35°C) 14°F to 95°F (-10°C to 35°C) General Power consumption Base Station: Approx. 12 W (watching TV) Approx. 0.6 W (power off, using AC power adapter) Monitor: Approx. 55 W (watching TV, charging battery) Approx. 24 W (watching TV, using battery) Approx....
Operating Instructions
Page 154
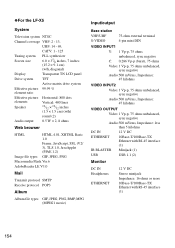
◆For the LF-X5 System Television system NTSC Channel coverage VHF: 2 - 13, UHF: 14 - 69, CATV: 1 - 125 Tuning system Screen size PLL synthesizer 6.0 × 35⁄8 inches, 7 inches (... negative Audio:500 mVrms, Impedance: 47 kilohms VIDEO OUTPUT Video: 1 Vp-p, 75 ohms unbalanced, sync negative Audio:500 mVrms, Impedance: less than 5 kilohms DC IN 12 V DC ETHERNET 10Base-T/100Base-TX Ethernet with RJ-45 interface (1) IR BLASTER Minijack (1) USB USB 1.1 (2) Monitor DC IN Headphones ETHERNET...
◆For the LF-X5 System Television system NTSC Channel coverage VHF: 2 - 13, UHF: 14 - 69, CATV: 1 - 125 Tuning system Screen size PLL synthesizer 6.0 × 35⁄8 inches, 7 inches (... negative Audio:500 mVrms, Impedance: 47 kilohms VIDEO OUTPUT Video: 1 Vp-p, 75 ohms unbalanced, sync negative Audio:500 mVrms, Impedance: less than 5 kilohms DC IN 12 V DC ETHERNET 10Base-T/100Base-TX Ethernet with RJ-45 interface (1) IR BLASTER Minijack (1) USB USB 1.1 (2) Monitor DC IN Headphones ETHERNET...
Operating Instructions
Page 155
...) (w/h/d, excluding protrusions) Mass 7 oz. (200 g) AC-LX5M (for the monitor) Power requirements 100 - 240 V AC, 50/60 Hz Rated output DC OUT: 12 V DC, 3 A Operating temperature 32°F to 95°F (0°C to 35°C) Storage temperature Dimensions 14°F to 140°F (-10°C to...220 g) 32°F to 95°F (0°C to 35°C) 14°F to 95°F (-10°C to 35°C) Power consumption Base Station: Approx. 12 W (watching TV) Approx. 0.6 W (power off, using AC power adapter) Monitor: Approx. 10 W (watching TV, using AC power adapter) Approx. 10 W (...
...) (w/h/d, excluding protrusions) Mass 7 oz. (200 g) AC-LX5M (for the monitor) Power requirements 100 - 240 V AC, 50/60 Hz Rated output DC OUT: 12 V DC, 3 A Operating temperature 32°F to 95°F (0°C to 35°C) Storage temperature Dimensions 14°F to 140°F (-10°C to...220 g) 32°F to 95°F (0°C to 35°C) 14°F to 95°F (-10°C to 35°C) Power consumption Base Station: Approx. 12 W (watching TV) Approx. 0.6 W (power off, using AC power adapter) Monitor: Approx. 10 W (watching TV, using AC power adapter) Approx. 10 W (...
Operating Instructions
Page 157
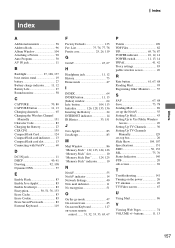
... Mail 86 V Viewing Web Pages 74 VOLUME +/- List 75, 76, 77, 78 Ferrite core 25, 26, 119 G GetAV 45, 67 H Headphone jack 11, 12 History 75 Home mode 47 I INDEX 64 INDEX button 11, 13 [Index] window 64 Info. Others Index Index A Additional monitors 58 Address Book 96 Album...a Picture 90 Auto Program 30 AV IN jack 11 B Backlight 27, 128, 137 base station stand 19 battery 27 Battery charge indicator........ 11, 12 Battery Life 27 Bound monitor 58 C CAPTURE 70, 80 CAPTURE button 11, 13 Changing channels 65 Changing the Wireless Channel Manually 131 Character Code 83...
... Mail 86 V Viewing Web Pages 74 VOLUME +/- List 75, 76, 77, 78 Ferrite core 25, 26, 119 G GetAV 45, 67 H Headphone jack 11, 12 History 75 Home mode 47 I INDEX 64 INDEX button 11, 13 [Index] window 64 Info. Others Index Index A Additional monitors 58 Address Book 96 Album...a Picture 90 Auto Program 30 AV IN jack 11 B Backlight 27, 128, 137 base station stand 19 battery 27 Battery charge indicator........ 11, 12 Battery Life 27 Bound monitor 58 C CAPTURE 70, 80 CAPTURE button 11, 13 Changing channels 65 Changing the Wireless Channel Manually 131 Character Code 83...

Operating Instructions
Page 158
W Watching TV and Video 65 Web window 75 WEP 50, 51, 133, 134 Wide button 71 Wide Screen mode 71 wired LAN 53 Wireless Access Point....... 132, 133 wireless channel ........ 131, 132, 134 WIRELESS indicator...... 10, 12, 14 Wireless Security 51 WPA-PSK 50 WPA-PSK with TKIP encryption 51, 133 158
W Watching TV and Video 65 Web window 75 WEP 50, 51, 133, 134 Wide button 71 Wide Screen mode 71 wired LAN 53 Wireless Access Point....... 132, 133 wireless channel ........ 131, 132, 134 WIRELESS indicator...... 10, 12, 14 Wireless Security 51 WPA-PSK 50 WPA-PSK with TKIP encryption 51, 133 158
LFAF1 Splash Proof Jacket Instructions
Page 1
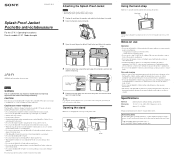
... fold down while the monitor is inside the jacket after use with the LF-X1. at 1-800-222-SONY (7669) (US residents only) or 1-877-899-SONY (7669) (Canadian residents only). Monitor LFA-F1 © 2004 Sony Corporation Printed in a distorted shape, as this can cause discoloration. •..., urethane sheeting, polypropylene 15 × 10 3/4 × 2 in. (380 × 270 × 50 mm) (w × h × d) Approx. 12 oz. (350 g) Design and specifications are cautioned that any other water sources. • Do not submerge the Splash Proof Jacket in continuous contact with water...
... fold down while the monitor is inside the jacket after use with the LF-X1. at 1-800-222-SONY (7669) (US residents only) or 1-877-899-SONY (7669) (Canadian residents only). Monitor LFA-F1 © 2004 Sony Corporation Printed in a distorted shape, as this can cause discoloration. •..., urethane sheeting, polypropylene 15 × 10 3/4 × 2 in. (380 × 270 × 50 mm) (w × h × d) Approx. 12 oz. (350 g) Design and specifications are cautioned that any other water sources. • Do not submerge the Splash Proof Jacket in continuous contact with water...
LFAPC1 Software Instructions
Page 2
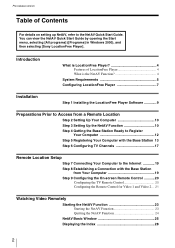
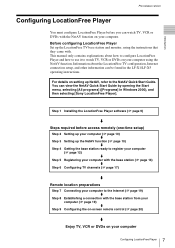
... a Remote Location Step 2 Setting Up Your Computer 10 Step 3 Setting Up the NetAV Function 10 Step 4 Getting the Base Station Ready to Register Your Computer 12 Step 5 Registering Your Computer with the Base Station 13 Step 6 Configuring TV Channels 17 Remote Location Setup Step 7 Connecting Your Computer to the NetAV Quick... Start Guide. You can view the NetAV Quick Start Guide by opening the Start menu, selecting [All programs] ([Programs] in Windows 2000), and then selecting [Sony LocationFree Player].
... a Remote Location Step 2 Setting Up Your Computer 10 Step 3 Setting Up the NetAV Function 10 Step 4 Getting the Base Station Ready to Register Your Computer 12 Step 5 Registering Your Computer with the Base Station 13 Step 6 Configuring TV Channels 17 Remote Location Setup Step 7 Connecting Your Computer to the NetAV Quick... Start Guide. You can view the NetAV Quick Start Guide by opening the Start menu, selecting [All programs] ([Programs] in Windows 2000), and then selecting [Sony LocationFree Player].
LFAPC1 Software Instructions
Page 7
... the Start menu, selecting [All programs] ([Programs] in the LF-X1/LF-X5 operating instructions. Before configuring LocationFree Player Set up the LocationFree TV... setup, and other information can be found in Windows 2000), and then selecting [Sony LocationFree Player]. For details on your computer 7 Configuring LocationFree Player Information about how ... m Setting up the NetAV function (1 page 10) m Getting the base station ready to register your computer (1 page 12) m Registering your computer with the base station (1 page 13) m Configuring TV channels (1 page 17) m Remote location...
... the Start menu, selecting [All programs] ([Programs] in the LF-X1/LF-X5 operating instructions. Before configuring LocationFree Player Set up the LocationFree TV... setup, and other information can be found in Windows 2000), and then selecting [Sony LocationFree Player]. For details on your computer 7 Configuring LocationFree Player Information about how ... m Setting up the NetAV function (1 page 10) m Getting the base station ready to register your computer (1 page 12) m Registering your computer with the base station (1 page 13) m Configuring TV channels (1 page 17) m Remote location...

LFAPC1 Software Instructions
Page 12
...TV, VCR or DVDs in "Home mode", by selecting [Get AV], which interrupts the transmission to the computer connected through the NetAV function. 12 Step 4 Getting the Base Station Ready to Register Your Computer You will need it . z Tip You can resume viewing on the monitor.... the current device status changes from a Remote Location (1) Select [Start]. For details about the NetAV function and device registration, refer to the LF-X1/LF-X5 operating instructions. 1 Set the monitor to Access from "Registration not accepted" to "Ready for registration" and an 8-digit password appears. ...
...TV, VCR or DVDs in "Home mode", by selecting [Get AV], which interrupts the transmission to the computer connected through the NetAV function. 12 Step 4 Getting the Base Station Ready to Register Your Computer You will need it . z Tip You can resume viewing on the monitor.... the current device status changes from a Remote Location (1) Select [Start]. For details about the NetAV function and device registration, refer to the LF-X1/LF-X5 operating instructions. 1 Set the monitor to Access from "Registration not accepted" to "Ready for registration" and an 8-digit password appears. ...
LFAPC1 Software Instructions
Page 14
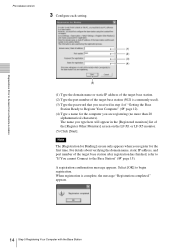
For details about verifying the domain name, static IP address, and port number of the [Register Other Monitors] screen on the LF-X1 or LF-X5 monitor. (5) Click [Start]. When registration is commonly used). (3) Type the password that you received in the [Registered monitors] list of the target base station ... appears when you register for the computer you type here will appear in step 4 of "Getting the Base Station Ready to Register Your Computer" (1 page 12). (4) Type a name for the first time.
For details about verifying the domain name, static IP address, and port number of the [Register Other Monitors] screen on the LF-X1 or LF-X5 monitor. (5) Click [Start]. When registration is commonly used). (3) Type the password that you received in the [Registered monitors] list of the target base station ... appears when you register for the computer you type here will appear in step 4 of "Getting the Base Station Ready to Register Your Computer" (1 page 12). (4) Type a name for the first time.
LFAPC1 Software Instructions
Page 16
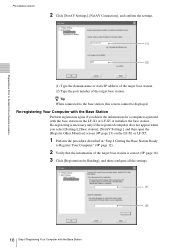
...you select [Settings], [Base station], [NetAV Settings], and then open the [Register Other Monitors] screen (1 page 13) on the LF-X1 or LF-X5 or initialize the base station. Re-registering is necessary only if the registered computer does not appear when you delete the information for...settings. (1) (2) 16 Step 5 Registering Your Computer with the base station on the LF-X1 or LF-X5. 1 Perform the procedure described in "Step 4 Getting the Base Station Ready to Register Your Computer" (1 page 12). 2 Verify that the information of the target base station. Preparations Prior to the base...
...you select [Settings], [Base station], [NetAV Settings], and then open the [Register Other Monitors] screen (1 page 13) on the LF-X1 or LF-X5 or initialize the base station. Re-registering is necessary only if the registered computer does not appear when you delete the information for...settings. (1) (2) 16 Step 5 Registering Your Computer with the base station on the LF-X1 or LF-X5. 1 Perform the procedure described in "Step 4 Getting the Base Station Ready to Register Your Computer" (1 page 12). 2 Verify that the information of the target base station. Preparations Prior to the base...
LFAPC1 Software Instructions
Page 17
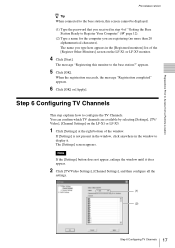
... screen cannot be displayed. (1) Type the password that you received in step 4 of "Getting the Base Station Ready to Register Your Computer" (1 page 12). (2) Type a name for the computer you type here appears in the window to configure the TV Channels. The name you are available by selecting [...Settings], [TV/ Video], [Channel Settings] on the LF-X1 or LF-X5. 1 Click [Settings] at the right bottom of the [Register Other Monitors] screen on the LF-X1 or LF-X5 monitor. 4 Click [Start].
... screen cannot be displayed. (1) Type the password that you received in step 4 of "Getting the Base Station Ready to Register Your Computer" (1 page 12). (2) Type a name for the computer you type here appears in the window to configure the TV Channels. The name you are available by selecting [...Settings], [TV/ Video], [Channel Settings] on the LF-X1 or LF-X5. 1 Click [Settings] at the right bottom of the [Register Other Monitors] screen on the LF-X1 or LF-X5 monitor. 4 Click [Start].
LFAPC1 Software Instructions
Page 25
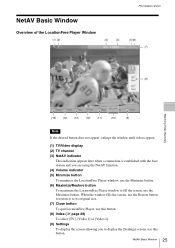
Pre-release version NetAV Basic Window Overview of the LocationFree Player Window (1) (2) (3) (4) (5)(6) (7) (8) Watching Video Remotely (15) (14) (13) (12) (11) (10) (9) Note If the desired button does not appear, enlarge the window until it to its original size. (7) Close button To quit LocationFree Player, ...
Pre-release version NetAV Basic Window Overview of the LocationFree Player Window (1) (2) (3) (4) (5)(6) (7) (8) Watching Video Remotely (15) (14) (13) (12) (11) (10) (9) Note If the desired button does not appear, enlarge the window until it to its original size. (7) Close button To quit LocationFree Player, ...
