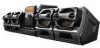
Instruction Manual
Page 2
... by turning the equipment off and on the rear exterior. Reorient or relocate the receiving antenna. - NOTICE FOR THE CUSTOMERS IN THE U.S.A. Increase the separation between the equipment and receiver. - If this apparatus to which can radiate radio frequency energy and, if not installed and used in the literature accompanying the appliance. However, there is classified as practical. 2US LBT...
... by turning the equipment off and on the rear exterior. Reorient or relocate the receiving antenna. - NOTICE FOR THE CUSTOMERS IN THE U.S.A. Increase the separation between the equipment and receiver. - If this apparatus to which can radiate radio frequency energy and, if not installed and used in the literature accompanying the appliance. However, there is classified as practical. 2US LBT...
Instruction Manual
Page 3
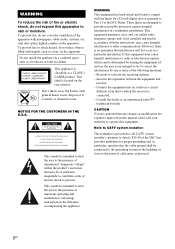
... - X-ROUND - Game Sync Mixing video game sound with other sound source 21 - Power Saving Mode Viewing information about the disc in another room 20 - Program Play Tuner Presetting radio stations 13 Listening to a tape manually 17 - Preset Tuning - Program Edit Recording to the radio 14 - Game Mixing Singing along 21 Timer Falling asleep to music 22 - Play Timer Timer recording radio programs........... 23 Display Turning off the display 24 - Table of the display 26 continued 3US FLASH Listening to...
... - X-ROUND - Game Sync Mixing video game sound with other sound source 21 - Power Saving Mode Viewing information about the disc in another room 20 - Program Play Tuner Presetting radio stations 13 Listening to a tape manually 17 - Preset Tuning - Program Edit Recording to the radio 14 - Game Mixing Singing along 21 Timer Falling asleep to music 22 - Play Timer Timer recording radio programs........... 23 Display Turning off the display 24 - Table of the display 26 continued 3US FLASH Listening to...
Instruction Manual
Page 9
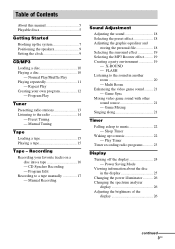
.... 5 Unplug the power cord. Use buttons on the system for carrying this system Do the following procedure to protect the disc mechanism. When carrying the front and surround speakers Do not carry the front and surround speakers by their sub panel. Sub panel Positioning the speakers There are removed from your listening position as step 3 to 6 above. Example 1: Place the surround speakers on the remote) to select "CLOCK SET?", then press...
.... 5 Unplug the power cord. Use buttons on the system for carrying this system Do the following procedure to protect the disc mechanism. When carrying the front and surround speakers Do not carry the front and surround speakers by their sub panel. Sub panel Positioning the speakers There are removed from your listening position as step 3 to 6 above. Example 1: Place the surround speakers on the remote) to select "CLOCK SET?", then press...
Instruction Manual
Page 11
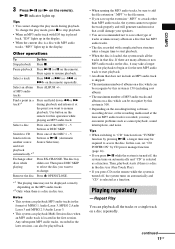
..." lights up in disc tray. Remove the disc Press Z OPEN/CLOSE. *1 The playing time may be displayed correctly depending on automatically and "CD" is selected as a function. Tips • When switching to "CD" function from another source and start playback. • An album that could damage your speakers. • You are recommended not to save up . Playing repeatedly - Select an album Press ALBUM +/-. Use button on the remote...
..." lights up in disc tray. Remove the disc Press Z OPEN/CLOSE. *1 The playing time may be displayed correctly depending on automatically and "CD" is selected as a function. Tips • When switching to "CD" function from another source and start playback. • An album that could damage your speakers. • You are recommended not to save up . Playing repeatedly - Select an album Press ALBUM +/-. Use button on the remote...
Instruction Manual
Page 13
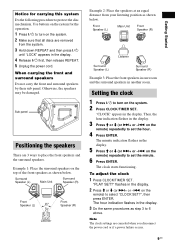
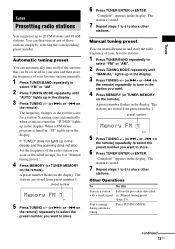
... simply by selecting the corresponding preset number. Tuner Tuner Presetting radio stations You can preset up to select "FM" or "AM". 2 Press TUNING MODE repeatedly until "AUTO" lights up in the display. 3 Press TUNING +/- (or >+ or -. The stations are stored from preset number 1. A preset number flashes in the display. Manual tuning preset You can manually tune in the display. A preset number flashes in the display. "Complete!" on the remote) repeatedly to store other stations. preset number AUTO 5 Press TUNING +/- (or >+ or -. When a FM stereo program is stored...
... simply by selecting the corresponding preset number. Tuner Tuner Presetting radio stations You can preset up to select "FM" or "AM". 2 Press TUNING MODE repeatedly until "AUTO" lights up in the display. 3 Press TUNING +/- (or >+ or -. The stations are stored from preset number 1. A preset number flashes in the display. Manual tuning preset You can manually tune in the display. A preset number flashes in the display. "Complete!" on the remote) repeatedly to store other stations. preset number AUTO 5 Press TUNING +/- (or >+ or -. When a FM stereo program is stored...
Instruction Manual
Page 14
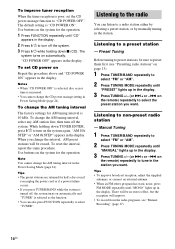
..., adjust the supplied antennas, or connect an external antenna. • When an FM stereo program has static noise, press FM MODE repeatedly until "PRESET" lights up in the display. 3 Press TUNING +/- (or >+ or -. To reset the interval, repeat the same procedure. Listening to the radio You can also press FUNCTION repeatedly to turn off the system. To improve tuner reception When the tuner reception is poor, set CD power...
..., adjust the supplied antennas, or connect an external antenna. • When an FM stereo program has static noise, press FM MODE repeatedly until "PRESET" lights up in the display. 3 Press TUNING +/- (or >+ or -. To reset the interval, repeat the same procedure. Listening to the radio You can also press FUNCTION repeatedly to turn off the system. To improve tuner reception When the tuner reception is poor, set CD power...
Instruction Manual
Page 17
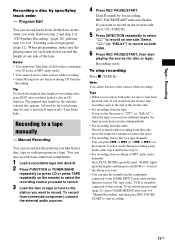
... MP3 audio tracks manually: Press PLAY MODE repeatedly until "ALBM" lights up in CD function. If you want to record on the reverse side, press h (TAPE B). 5 Press DIRECTION repeatedly to select "g" to select tracks during CD Synchro Recording. Tips • When you record on the remote) to select the recording source you want to record. 3 Load the disc or tape or tune to the station...
... MP3 audio tracks manually: Press PLAY MODE repeatedly until "ALBM" lights up in CD function. If you want to record on the reverse side, press h (TAPE B). 5 Press DIRECTION repeatedly to select "g" to select tracks during CD Synchro Recording. Tips • When you record on the remote) to select the recording source you want to record. 3 Load the disc or tape or tune to the station...

Instruction Manual
Page 19
Sound Adjustment Selecting the surround effect Press SURROUND. To enjoy the X-ROUND mode, place your listening position (see Example 2 of MP3 audio tracks. Note You can change the sound movement from your front and surround speakers at an equal distance from one speaker to another speaker by using X-ROUND for "moving" sound effect or/and FLASH for flashing effect. continued 19US Each time you press the button, the display changes as...
Sound Adjustment Selecting the surround effect Press SURROUND. To enjoy the X-ROUND mode, place your listening position (see Example 2 of MP3 audio tracks. Note You can change the sound movement from your front and surround speakers at an equal distance from one speaker to another speaker by using X-ROUND for "moving" sound effect or/and FLASH for flashing effect. continued 19US Each time you press the button, the display changes as...

Instruction Manual
Page 21
... speakers or change the direction of the recorded sound signals (Auto Level Control Function). 21US Game Sync You need to connect an optional microphone. 1 Turn MIC LEVEL to MIN to turn down the microphone volume. 2 Connect an optional microphone to MIC 1 or MIC 2 jacks. 3 Start playing the music and adjust the volume. 4 Adjust the microphone volume by selecting the "CD" function and not playing any disc. • When high level sound signals are input, the system automatically adjust the recording level to start recording. • The GAME MIXING indicator lights up optional components...
... speakers or change the direction of the recorded sound signals (Auto Level Control Function). 21US Game Sync You need to connect an optional microphone. 1 Turn MIC LEVEL to MIN to turn down the microphone volume. 2 Connect an optional microphone to MIC 1 or MIC 2 jacks. 3 Start playing the music and adjust the volume. 4 Adjust the microphone volume by selecting the "CD" function and not playing any disc. • When high level sound signals are input, the system automatically adjust the recording level to start recording. • The GAME MIXING indicator lights up optional components...
Instruction Manual
Page 22
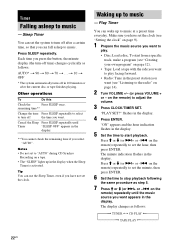
... the display. 5 Set the time to start from a specific track, make a program (see "Setting the clock" on page 12). • Tape: Load a tape with the side you select "AUTO". Tip You can wake up to music - Play Timer You can use the Sleep Timer, even if you want . "PLAY SET?" on page 14). 2 Turn VOLUME +/- (or press VOLUME + or - Make sure you have not set the clock. The display changes...
... the display. 5 Set the time to start from a specific track, make a program (see "Setting the clock" on page 12). • Tape: Load a tape with the side you select "AUTO". Tip You can wake up to music - Play Timer You can use the Sleep Timer, even if you want . "PLAY SET?" on page 14). 2 Turn VOLUME +/- (or press VOLUME + or - Make sure you have not set the clock. The display changes...

Instruction Manual
Page 23
... the Play Timer is on page 14). 2 Press CLOCK/TIMER SET. flashes in the display. 3 Press M or m (or >+ or -. Timer 8 Press ENTER. Tips • The system turns on the remote) repeatedly to set the clock (see "Setting the clock" on page 9). 1 Tune in the display. 9 Press ?/1 to a preset station" on . The type of timer, followed by start time, stop time and the preset radio station...
... the Play Timer is on page 14). 2 Press CLOCK/TIMER SET. flashes in the display. 3 Press M or m (or >+ or -. Timer 8 Press ENTER. Tips • The system turns on the remote) repeatedly to set the clock (see "Setting the clock" on page 9). 1 Tune in the display. 9 Press ?/1 to a preset station" on . The type of timer, followed by start time, stop time and the preset radio station...

Instruction Manual
Page 25
... audio CD contains 21 tracks or more than "ALBM", "ALBM SHUF" and CD-TEXT discs. 9) "--.--" appears in the following cases: - Note Some characters may not be displayed for Program Mode). Checking the remaining time Press DISPLAY repeatedly during Program Play and there is played back. 2) "--.--" appears in the display if you press the button, the display changes cyclically as follows: The last track number...
... audio CD contains 21 tracks or more than "ALBM", "ALBM SHUF" and CD-TEXT discs. 9) "--.--" appears in the following cases: - Note Some characters may not be displayed for Program Mode). Checking the remaining time Press DISPLAY repeatedly during Program Play and there is played back. 2) "--.--" appears in the display if you press the button, the display changes cyclically as follows: The last track number...

Instruction Manual
Page 27
... the connected component D R L G VCR or MD Deck From the audio output of the connected component D-LIGHT SYNC controller (DLS-1) H A B From the audio output of the video game player F C Optional Components From the video output of the video game player Video game player To the digital input of the MD deck MD Deck To the video input of a TV TV A GAME INPUT VIDEO jack Use video cable (not supplied) to connect the video output of the optional video game player to the operating instructions provided with each component. Optional Components Hooking...
... the connected component D R L G VCR or MD Deck From the audio output of the connected component D-LIGHT SYNC controller (DLS-1) H A B From the audio output of the video game player F C Optional Components From the video output of the video game player Video game player To the digital input of the MD deck MD Deck To the video input of a TV TV A GAME INPUT VIDEO jack Use video cable (not supplied) to connect the video output of the optional video game player to the operating instructions provided with each component. Optional Components Hooking...

Instruction Manual
Page 28
C CD DIGITAL OUT jack Use a digital optical cable (square, not supplied) to connect the digital input of MP3 audio tracks. You can then record digital audio from this system. D-LIGHT SYNC controller cord * Refer to the operating instructions supplied with the respective device. See "Hooking up optional components" on page 27. 2 Press ?/1 to the operating instructions supplied with the D-LIGHT SYNC controller for the recommended lighting device. Start playing the connected MD deck. 28US Note There is no digital audio output from...
C CD DIGITAL OUT jack Use a digital optical cable (square, not supplied) to connect the digital input of MP3 audio tracks. You can then record digital audio from this system. D-LIGHT SYNC controller cord * Refer to the operating instructions supplied with the respective device. See "Hooking up optional components" on page 27. 2 Press ?/1 to the operating instructions supplied with the D-LIGHT SYNC controller for the recommended lighting device. Start playing the connected MD deck. 28US Note There is no digital audio output from...

Instruction Manual
Page 29
...; Use buttons on a connected component To Do this Listen to the sound of the MD deck. AM FM75 Ω COAXIAL AM antenna Connect a 6 to 15 meters insulated wire to the AM antenna terminal. Start playing the connected turntable. To Do this Make a digital 1 Connect the optional optical recording from cable from VIDEO/MD OUT disc, tape, radio, L/R jacks to the analog audio connected input of a connected video game player 1 Press GAME. 2 Select the preset effect. See "Selecting the preset effect...
...; Use buttons on a connected component To Do this Listen to the sound of the MD deck. AM FM75 Ω COAXIAL AM antenna Connect a 6 to 15 meters insulated wire to the AM antenna terminal. Start playing the connected turntable. To Do this Make a digital 1 Connect the optional optical recording from cable from VIDEO/MD OUT disc, tape, radio, L/R jacks to the analog audio connected input of a connected video game player 1 Press GAME. 2 Select the preset effect. See "Selecting the preset effect...

Instruction Manual
Page 30
... remote) or MIC LEVEL to adjust the microphone volume. • Make sure the microphone is connected to music" (page 22) and "Timer recording radio programs" (page 23). Move the system away from the TV or VCR. • Move the system away from one channel, or unbalanced left and right volume. • Place the speakers as symmetrically as you plug in the power cord even though you press FUNCTION repeatedly, switch...
... remote) or MIC LEVEL to adjust the microphone volume. • Make sure the microphone is connected to music" (page 22) and "Timer recording radio programs" (page 23). Move the system away from the TV or VCR. • Move the system away from one channel, or unbalanced left and right volume. • Place the speakers as symmetrically as you plug in the power cord even though you press FUNCTION repeatedly, switch...

Instruction Manual
Page 31
... system turned on for a few hours until "ALL DISCS", "1 DISC" or "ALBM" lights up in Program Play or Shuffle Play mode. the number of 8 directories. The remote does not function. • Remove the obstacle between the remote and the system. • Move the remote closer to the system. • Point the remote at high volume, the speaker vibration may cause problems with bass sounds at the system's sensor. • Replace the...
... system turned on for a few hours until "ALL DISCS", "1 DISC" or "ALBM" lights up in Program Play or Shuffle Play mode. the number of 8 directories. The remote does not function. • Remove the obstacle between the remote and the system. • Move the remote closer to the system. • Point the remote at high volume, the speaker vibration may cause problems with bass sounds at the system's sensor. • Replace the...

Instruction Manual
Page 32
... power cord. 2 Plug the power cord back in the expansion format. • The ID3 tag is a decrease in stereo. • Press FM MODE until "MONO" disappears. If the system still does not operate properly after performing the above measures or other troubles does not described above occur, reset the system as follows. - Symbols Other characters may not be displayed by CD power manage function...
... power cord. 2 Plug the power cord back in the expansion format. • The ID3 tag is a decrease in stereo. • Press FM MODE until "MONO" disappears. If the system still does not operate properly after performing the above measures or other troubles does not described above occur, reset the system as follows. - Symbols Other characters may not be displayed by CD power manage function...
Instruction Manual
Page 34
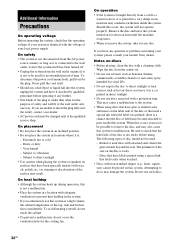
...operation, this system. On operation • If the system is brought directly from a cold to a warm location, or is placed in a location with a protection ring. Be sure to parts inside the system. Very humid - The following types of disc should not be played on the lens inside this system at the qualified service shop. Discs that have labels printed using... will fit to remove the disc, and may result. Notes on surfaces that have it is not to be possible to the wall outlet only one way. Wipe the disc from the center out. • Do not use solvents such as ...
...operation, this system. On operation • If the system is brought directly from a cold to a warm location, or is placed in a location with a protection ring. Be sure to parts inside the system. Very humid - The following types of disc should not be played on the lens inside this system at the qualified service shop. Discs that have labels printed using... will fit to remove the disc, and may result. Notes on surfaces that have it is not to be possible to the wall outlet only one way. Wipe the disc from the center out. • Do not use solvents such as ...
Instruction Manual
Page 36
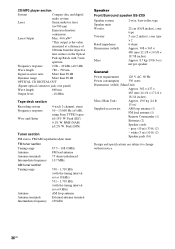
white (3 m) (10 ft) (2) Speaker pads (16) Design and specifications are subject to -noise ratio More than 90 dB Dynamic range More than 90 dB OPTICAL CD DIGITAL OUT (Square optical connector jack, rear panel) Wave length 660 nm Output level -18 dBm Tape deck section Recording system Frequency response Wow and flutter 4-track 2-channel, stereo 50 - 13,000 Hz (±3 dB), using Sony TYPE I tapes ±0.15...
white (3 m) (10 ft) (2) Speaker pads (16) Design and specifications are subject to -noise ratio More than 90 dB Dynamic range More than 90 dB OPTICAL CD DIGITAL OUT (Square optical connector jack, rear panel) Wave length 660 nm Output level -18 dBm Tape deck section Recording system Frequency response Wow and flutter 4-track 2-channel, stereo 50 - 13,000 Hz (±3 dB), using Sony TYPE I tapes ±0.15...


