Primary User Manual
Page 7
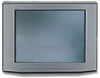
Contents Introducing the FD Trinitron Wega Overview 1 Presenting the FD Trinitron Wega 2 Package Contents 3 Using the Remote Control 3 Using the Features Overview 29 Using Favorite Channels 30 Using Twin View 31 Using the Freeze Function 34 Installing ... Receiver 25 Connecting a Camcorder 26 Using the CONTROL S Feature 27 Setting Up the TV Automatically 28 Using the Menus Overview 35 Using the Video Menu 36 Using the Audio Menu 38 Using the Channel Menu 40 Using the Parent Menu 42 Using the Timer Menu 46 Using the Setup Menu 47...
Contents Introducing the FD Trinitron Wega Overview 1 Presenting the FD Trinitron Wega 2 Package Contents 3 Using the Remote Control 3 Using the Features Overview 29 Using Favorite Channels 30 Using Twin View 31 Using the Freeze Function 34 Installing ... Receiver 25 Connecting a Camcorder 26 Using the CONTROL S Feature 27 Setting Up the TV Automatically 28 Using the Menus Overview 35 Using the Video Menu 36 Using the Audio Menu 38 Using the Channel Menu 40 Using the Parent Menu 42 Using the Timer Menu 46 Using the Setup Menu 47...
Primary User Manual
Page 12
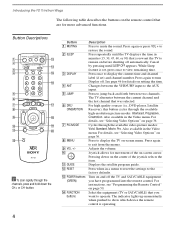
Introducing the FD Trinitron Wega The following table describes the buttons on the remote control that was selected. qs...to turn Display off automatically. Also available in a menu to reset the settings to display the TV on page 36. Press to the factory defaults. Displays the satellite program guide. Turn on before shutting off . The TV ...) that you have programmed into the remote control. For details, see "Programming the Remote Control" on page 36. Joystick allows for details on -screen cursor. Pressing down the CH+ or CH- For instructions, see "Selecting Video Options" ...
Introducing the FD Trinitron Wega The following table describes the buttons on the remote control that was selected. qs...to turn Display off automatically. Also available in a menu to reset the settings to display the TV on page 36. Press to the factory defaults. Displays the satellite program guide. Turn on before shutting off . The TV ...) that you have programmed into the remote control. For details, see "Programming the Remote Control" on page 36. Joystick allows for details on -screen cursor. Pressing down the CH+ or CH- For instructions, see "Selecting Video Options" ...
Primary User Manual
Page 43
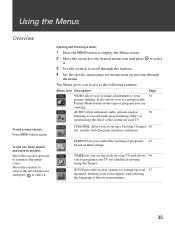
... choosing a menu: 1 Press the MENU button to display the Menu screen. 2 Move the joystick to the desired menu icon and press to select it . Page 36 38 CHANNEL allows you to set the clock on your TV and allows 46 you to program your video inputs, and selecting the language of...
... choosing a menu: 1 Press the MENU button to display the Menu screen. 2 Move the joystick to the desired menu icon and press to select it . Page 36 38 CHANNEL allows you to set the clock on your TV and allows 46 you to program your video inputs, and selecting the language of...
Primary User Manual
Page 44
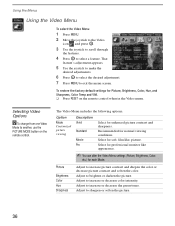
... MENU. 2 Move the joystick to the Video icon and press . 3 Use the joystick to scroll through the features. 4 Press to sharpen or soften the picture. 36 The Video Menu includes the following options. Option Mode Customized picture viewing Description Vivid Standard Movie Pro Select for normal viewing conditions. Adjust to select...
... MENU. 2 Move the joystick to the Video icon and press . 3 Use the joystick to scroll through the features. 4 Press to sharpen or soften the picture. 36 The Video Menu includes the following options. Option Mode Customized picture viewing Description Vivid Standard Movie Pro Select for normal viewing conditions. Adjust to select...
Primary User Manual
Page 63
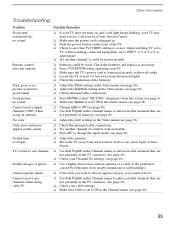
...menu to add receivable channels that are not presently in memory (see page 40). ❏ Adjust the Color settings in the Video menu (see page 36). ❏ Check the antenna/cable connections. ❏ Try another channel; dryers. ❏ Use Auto Program in the Channel menu to add receivable channels... least 3-4 feet away from fluorescent lights. ❏ Check the orientation of the TV. ❏ Check to see page 40). 55 Call your local Sony Service Center. ❏ Make sure the power cord is correct: when watching TV, set to TV; Check the batteries and replace as cars, neon ...
...menu to add receivable channels that are not presently in memory (see page 40). ❏ Adjust the Color settings in the Video menu (see page 36). ❏ Check the antenna/cable connections. ❏ Try another channel; dryers. ❏ Use Auto Program in the Channel menu to add receivable channels... least 3-4 feet away from fluorescent lights. ❏ Check the orientation of the TV. ❏ Check to see page 40). 55 Call your local Sony Service Center. ❏ Make sure the power cord is correct: when watching TV, set to TV; Check the batteries and replace as cars, neon ...
Primary User Manual
Page 66
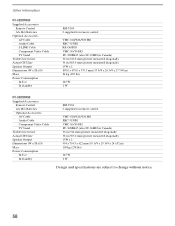
... diagonally 34 in (863.4 mm) picture measured diagonally 15W x 2 898.0 x 678.0 x 579.5 mm (35 3/8 x 26 3/4 x 27 7/8 in) 84 kg (185 lbs) 245 W 2 W KV-36XBR450 Supplied Accessories Remote Control AA (R6) Batteries Optional Accessories AV Cable Audio Cable Component Video Cable TV Stand Visible Screen Size Actual CRT Size Speaker... Standby RM-Y184 2 supplied for remote control VMC-810/820/830 HG RKC-515HG VMC-10/30 HG SU-36XBR45 (also SU-36HS2 in Canada) 36 in (914 mm) picture measured diagonally 38 in (965.2 mm) picture measured diagonally 15W x 2 994 x 754.5 x 622 mm (39 1/4 x 29 3/4 x 24 1/2 ...
... diagonally 34 in (863.4 mm) picture measured diagonally 15W x 2 898.0 x 678.0 x 579.5 mm (35 3/8 x 26 3/4 x 27 7/8 in) 84 kg (185 lbs) 245 W 2 W KV-36XBR450 Supplied Accessories Remote Control AA (R6) Batteries Optional Accessories AV Cable Audio Cable Component Video Cable TV Stand Visible Screen Size Actual CRT Size Speaker... Standby RM-Y184 2 supplied for remote control VMC-810/820/830 HG RKC-515HG VMC-10/30 HG SU-36XBR45 (also SU-36HS2 in Canada) 36 in (914 mm) picture measured diagonally 38 in (965.2 mm) picture measured diagonally 15W x 2 994 x 754.5 x 622 mm (39 1/4 x 29 3/4 x 24 1/2 ...
Primary User Manual
Page 67
... video connectors, connecting 23 E Enhanced picture resolution, 16:9 48 enlarging picture, a Twin View picture 33 Extended Data Service 47 59 brightness, adjusting 36 C cable box, connecting with VCR 15 connecting 10-13 setting ON/OFF 40 with VCR, connecting 14 cable box, using with TV remote control...camcorder, connecting 26 Caption Vision 47 CATV. Index 16:9 (widescreen) 2, 48 A Adding channels to the channel list 40 Adjusting the picture definition 36 Adjusting the audio Steady sound 38 Activating Twin View 31 ANT button 4 antenna, connecting 10 Aspect ratio, 16:9 in Twin View 32 Audio menu...
... video connectors, connecting 23 E Enhanced picture resolution, 16:9 48 enlarging picture, a Twin View picture 33 Extended Data Service 47 59 brightness, adjusting 36 C cable box, connecting with VCR 15 connecting 10-13 setting ON/OFF 40 with VCR, connecting 14 cable box, using with TV remote control...camcorder, connecting 26 Caption Vision 47 CATV. Index 16:9 (widescreen) 2, 48 A Adding channels to the channel list 40 Adjusting the picture definition 36 Adjusting the audio Steady sound 38 Activating Twin View 31 ANT button 4 antenna, connecting 10 Aspect ratio, 16:9 in Twin View 32 Audio menu...
Primary User Manual
Page 68
... setting up 40 using 30 Favorites button 5 features 2 Freeze, using 34 Front Panel controls 8 G Guide button 4 H Hookups 10-26 hue, adjusting 36 I inputs, labeling 48 Installation 10-26 J Jump button 4 L label channels 41 video inputs 48 Languages, setting for closed captioning 48 Locking programs 42-45... Satellite receiver 54 VCR 53 Remote control, buttons 4-6 Reset button 4 resetting Audio options 38 factory settings 28 Timer options 46 Video options 36 S SAT/CABLE Function button 4 SAT/CABLE Power button 4 satellite receiver connecting 19, 20 using with TV remote control 54 Setting favorite ...
... setting up 40 using 30 Favorites button 5 features 2 Freeze, using 34 Front Panel controls 8 G Guide button 4 H Hookups 10-26 hue, adjusting 36 I inputs, labeling 48 Installation 10-26 J Jump button 4 L label channels 41 video inputs 48 Languages, setting for closed captioning 48 Locking programs 42-45... Satellite receiver 54 VCR 53 Remote control, buttons 4-6 Reset button 4 resetting Audio options 38 factory settings 28 Timer options 46 Video options 36 S SAT/CABLE Function button 4 SAT/CABLE Power button 4 satellite receiver connecting 19, 20 using with TV remote control 54 Setting favorite ...
Primary User Manual
Page 69
..., connecting 15 with cable, connecting 14 with satellite receiver, connecting 20 VCR/DVD Power button 6 Velocity Modulation 2, 37 video inputs, labeling 48 Video menu 35, 36 Video Modes, selecting 36 W Wega, described 2 widescreen 48 widescreen, described 2 Z zoom feature, with Twin View 33 Index 61
..., connecting 15 with cable, connecting 14 with satellite receiver, connecting 20 VCR/DVD Power button 6 Velocity Modulation 2, 37 video inputs, labeling 48 Video menu 35, 36 Video Modes, selecting 36 W Wega, described 2 widescreen 48 widescreen, described 2 Z zoom feature, with Twin View 33 Index 61


