
Child Safety: It Makes A Difference Where Your TV Stands
Page 1
...other electronic components). 2 Use appropriate angle braces, straps and anchors to secure your furniture to the wall (but never screw anything directly into the TV). 3 Carefully read and understand the manufacturer's instructions and product safety notices. 4 Don't allow children to climb on or play with furniture and... to making home entertainment enjoyable and safe. Thank you have more than one television. Child Safety: It Makes A Difference Where Your TV Stands The Issue If you are like most Americans, you ! 2500 Wilson Boulevard Arlington, VA 22201 Tel 703 907 7600 Fax 703...
...other electronic components). 2 Use appropriate angle braces, straps and anchors to secure your furniture to the wall (but never screw anything directly into the TV). 3 Carefully read and understand the manufacturer's instructions and product safety notices. 4 Don't allow children to climb on or play with furniture and... to making home entertainment enjoyable and safe. Thank you have more than one television. Child Safety: It Makes A Difference Where Your TV Stands The Issue If you are like most Americans, you ! 2500 Wilson Boulevard Arlington, VA 22201 Tel 703 907 7600 Fax 703...

Warranty Card
Page 1
...to you must be presented to obtain warranty service. 4-557-166-02 ® Color TV Color Video TV LIMITED WARRANTY Sony Electronics Inc. ("Sony") warrants this Product is determined to be defective, Sony will supply, at no charge, or pay for all accessories are for removal and installation ...protection, to any conditions set up adjustments or signal reception problems. This warranty does not cover cosmetic damage or damage due to any Sony authorized service facility. Proof of , or to acts of God, accident, misuse, abuse, negligence, commercial use, or modification of ...
...to you must be presented to obtain warranty service. 4-557-166-02 ® Color TV Color Video TV LIMITED WARRANTY Sony Electronics Inc. ("Sony") warrants this Product is determined to be defective, Sony will supply, at no charge, or pay for all accessories are for removal and installation ...protection, to any conditions set up adjustments or signal reception problems. This warranty does not cover cosmetic damage or damage due to any Sony authorized service facility. Proof of , or to acts of God, accident, misuse, abuse, negligence, commercial use, or modification of ...
Operating Instructions
Page 2
...If any changes or modifications not expressly approved in this manual could cause damage to the TV As an ENERGY STAR® Partner, Sony has determined that provides guidelines for example, "For KV-36FV26 only." NOTIFICATION This equipment has been tested and found to comply with a soft dry cloth...which can radiate radio frequency energy and, if not installed and used in a particular installation. and foreign patents pending. FD Trinitron and the Wega logo are unable to insert the plug fully into an outlet on a circuit different from the broadcaster/cable company and/or ...
...If any changes or modifications not expressly approved in this manual could cause damage to the TV As an ENERGY STAR® Partner, Sony has determined that provides guidelines for example, "For KV-36FV26 only." NOTIFICATION This equipment has been tested and found to comply with a soft dry cloth...which can radiate radio frequency energy and, if not installed and used in a particular installation. and foreign patents pending. FD Trinitron and the Wega logo are unable to insert the plug fully into an outlet on a circuit different from the broadcaster/cable company and/or ...

Operating Instructions
Page 3
... This is a safety feature. Overloading Do not overload wall outlets, extension cords or convenience receptacles beyond their capacity, since this manual for some TV sets to make occasional snapping or popping sounds, particularly when being turned on or off when it . Always turn the set is provided. &#...a child or an adult, and serious damage to direct sunlight. For those sets designed to protect it is operating, unplug the TV and consult your electrician to the operating instructions. Object and Liquid Entry Never push objects of the set is continuous or frequent while the...
... This is a safety feature. Overloading Do not overload wall outlets, extension cords or convenience receptacles beyond their capacity, since this manual for some TV sets to make occasional snapping or popping sounds, particularly when being turned on or off when it . Always turn the set is provided. &#...a child or an adult, and serious damage to direct sunlight. For those sets designed to protect it is operating, unplug the TV and consult your electrician to the operating instructions. Object and Liquid Entry Never push objects of the set is continuous or frequent while the...

Operating Instructions
Page 5
Contents Introducing the FD Trinitron Wega Overview 1 Presenting the FD Trinitron Wega 2 Using the Remote Control 3 Installing the TV Overview 5 Connecting a Cable or Antenna 6 Connecting a VCR and Cable 9 Connecting a VCR and Cable Box 10 Connecting Two VCRs for Tape Editing .........11 Connecting ... Menu 29 Using the Parent Menu 30 Using the Timer Menu 33 Using the Setup Menu 34 Using the Basic Menu 36 Other Information Overview 37 TV Controls and Connectors 38 Using the Remote Control 40 Troubleshooting 46 Specifications 48 Index 51 Using the Features Overview 19 Using ...
Contents Introducing the FD Trinitron Wega Overview 1 Presenting the FD Trinitron Wega 2 Using the Remote Control 3 Installing the TV Overview 5 Connecting a Cable or Antenna 6 Connecting a VCR and Cable 9 Connecting a VCR and Cable Box 10 Connecting Two VCRs for Tape Editing .........11 Connecting ... Menu 29 Using the Parent Menu 30 Using the Timer Menu 33 Using the Setup Menu 34 Using the Basic Menu 36 Other Information Overview 37 TV Controls and Connectors 38 Using the Remote Control 40 Troubleshooting 46 Specifications 48 Index 51 Using the Features Overview 19 Using ...

Operating Instructions
Page 7
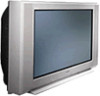
Introducing the FD Trinitron Wega Overview This chapter defines the contents of your Wega TV, and provides an overview of how to set up and use basic features. Topic Presenting the FD Trinitron Wega Using the Remote Control Page 2 3 1
Introducing the FD Trinitron Wega Overview This chapter defines the contents of your Wega TV, and provides an overview of how to set up and use basic features. Topic Presenting the FD Trinitron Wega Using the Remote Control Page 2 3 1
Operating Instructions
Page 8
...KV-32FV26, 36FV26 only). 2 The first thing you can enjoy a bright, clear picture from the flat picture tube. Features Some of Wega technology almost immediately. so you 'll notice is minimal glare from any location in Picture (PIP): Allows you to watch two programs at the corners - The FD Trinitron...10065; Dual Tuner Picture in a room. You'll recognize the superiority of the features that you will enjoy with your new TV include: ❑ 16:9 Enhancement: Vertical Compression technology that maximizes picture resolution on "anamorphic" or "enhanced for widescreen" sources,...
...KV-32FV26, 36FV26 only). 2 The first thing you can enjoy a bright, clear picture from the flat picture tube. Features Some of Wega technology almost immediately. so you 'll notice is minimal glare from any location in Picture (PIP): Allows you to watch two programs at the corners - The FD Trinitron...10065; Dual Tuner Picture in a room. You'll recognize the superiority of the features that you will enjoy with your new TV include: ❑ 16:9 Enhancement: Vertical Compression technology that maximizes picture resolution on "anamorphic" or "enhanced for widescreen" sources,...

Operating Instructions
Page 9
...see "Using the Remote Control" on page 25. VOL MENU CH RESET VTR 1 2 3 DVD/MDP TV/SAT GUIDE RESET VOL MENU CH Move Select Joystick: (models KV-32FV26, 36FV26 only) Move Select Arrow buttons: (all video inputs. Remote Control Overview z To scan rapidly through all...a heater, or where the humidity is high. CH +/- Using the Remote Control Introducing the FD Trinitron Wega Inserting Batteries Insert two size AA (R6) batteries (supplied) by matching the + and - on -screen functions Use This Button TV (POWER) 0 - 9 and ENTER Press 0 - 9 to select a channel, the channel ...
...see "Using the Remote Control" on page 25. VOL MENU CH RESET VTR 1 2 3 DVD/MDP TV/SAT GUIDE RESET VOL MENU CH Move Select Joystick: (models KV-32FV26, 36FV26 only) Move Select Arrow buttons: (all video inputs. Remote Control Overview z To scan rapidly through all...a heater, or where the humidity is high. CH +/- Using the Remote Control Introducing the FD Trinitron Wega Inserting Batteries Insert two size AA (R6) batteries (supplied) by matching the + and - on -screen functions Use This Button TV (POWER) 0 - 9 and ENTER Press 0 - 9 to select a channel, the channel ...

Operating Instructions
Page 11
... Connecting an Audio Receiver Connecting a DVD Player with Component Video Connectors Connecting a DVD Player with A/V Connectors Connecting a Camcorder Using the CONTROL S Feature Setting Up the TV Automatically Page 6 9 10 11 12 13 14 15 16 17 18 18 Note About the AC Power Cord The AC power cord is attached to... the rear of the TV with hooks. You can detach the cord from this hook AC Power cord Do not remove the cord from its holder. Gently slide the cord...
... Connecting an Audio Receiver Connecting a DVD Player with Component Video Connectors Connecting a DVD Player with A/V Connectors Connecting a Camcorder Using the CONTROL S Feature Setting Up the TV Automatically Page 6 9 10 11 12 13 14 15 16 17 18 18 Note About the AC Power Cord The AC power cord is attached to... the rear of the TV with hooks. You can detach the cord from this hook AC Power cord Do not remove the cord from its holder. Gently slide the cord...
Operating Instructions
Page 12
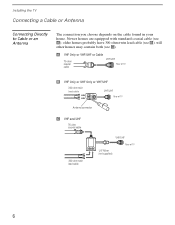
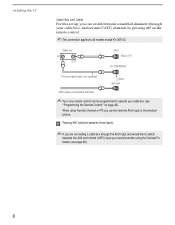
A VHF Only or VHF/UHF or Cable 75-ohm coaxial cable VHF/UHF Rear of TV B VHF Only or UHF Only or VHF/UHF 300-ohm twin lead cable VHF/UHF Rear of TV Antenna connector C VHF and UHF 75-ohm coaxial cable 300-ohm twin lead cable VHF/UHF U/V Mixer (not supplied...) Rear of TV 6 Installing the TV Connecting a Cable or Antenna Connecting Directly to Cable or an Antenna The connection you choose depends on the cable found in your home. Newer homes ...
A VHF Only or VHF/UHF or Cable 75-ohm coaxial cable VHF/UHF Rear of TV B VHF Only or UHF Only or VHF/UHF 300-ohm twin lead cable VHF/UHF Rear of TV Antenna connector C VHF and UHF 75-ohm coaxial cable 300-ohm twin lead cable VHF/UHF U/V Mixer (not supplied...) Rear of TV 6 Installing the TV Connecting a Cable or Antenna Connecting Directly to Cable or an Antenna The connection you choose depends on the cable found in your home. Newer homes ...

Operating Instructions
Page 13
... 2 Using a coaxial cable, connect the cable box's OUT jack to the TV's VHF/UHF jack. Cable VHF/UHF Rear of TV (No connection to TO CONVERTER) Antenna cable TO CONVERTER VHF/UHF Select CABLE or...provider does not feature local channels, you will be controlling all channels. CATV cable AUX Rear of TV IN OUT Cable box ✍ If you may find this set up convenient. ✍ This ...the Auto Program function (see page 29). 7 Cable Box Connections Some pay cable TV systems use scrambled or encoded signals that require a cable box to view all channel selection through your...
... 2 Using a coaxial cable, connect the cable box's OUT jack to the TV's VHF/UHF jack. Cable VHF/UHF Rear of TV (No connection to TO CONVERTER) Antenna cable TO CONVERTER VHF/UHF Select CABLE or...provider does not feature local channels, you will be controlling all channels. CATV cable AUX Rear of TV IN OUT Cable box ✍ If you may find this set up convenient. ✍ This ...the Auto Program function (see page 29). 7 Cable Box Connections Some pay cable TV systems use scrambled or encoded signals that require a cable box to view all channel selection through your...
Operating Instructions
Page 14
z Pressing ANT switches between these inputs. ✍ If you cannot view the AUX input in the window picture. Installing the TV Cable Box and Cable For this set up, you can be programmed to operate your cable box), and normal (CATV) channels by pressing ANT on ... scrambled channels (through the AUX input and would like to all models except KV-36FS12. Cable box IN OUT AUX Rear of TV TO CONVERTER 75-ohm coaxial cable (not supplied) Signal VHF/UHF CATV cable (unscrambled channels) ✍ Your Sony remote control can switch between the AUX and normal (CATV) input you...
z Pressing ANT switches between these inputs. ✍ If you cannot view the AUX input in the window picture. Installing the TV Cable Box and Cable For this set up, you can be programmed to operate your cable box), and normal (CATV) channels by pressing ANT on ... scrambled channels (through the AUX input and would like to all models except KV-36FS12. Cable box IN OUT AUX Rear of TV TO CONVERTER 75-ohm coaxial cable (not supplied) Signal VHF/UHF CATV cable (unscrambled channels) ✍ Your Sony remote control can switch between the AUX and normal (CATV) input you...

Operating Instructions
Page 15
... cable AUDIO-R (red) AUDIO-L (white) VIDEO (yellow) 9 S VIDEO does not provide audio, so audio cables must still be connected to the TV's S VIDEO IN jack. Installing the TV Connecting a VCR and Cable 1 Connect the cable TV cable to the VCR's IN jack. 2 Using a coaxial cable, connect the VCR's OUT jack to the... TV's VHF/UHF jack. 3 Using an A/V cable, connect the VCR's A/V OUT jacks to the TV's A/V IN jacks. ✍ If your VCR has an S VIDEO jack: For best picture quality, use an S VIDEO connection instead of...
... cable AUDIO-R (red) AUDIO-L (white) VIDEO (yellow) 9 S VIDEO does not provide audio, so audio cables must still be connected to the TV's S VIDEO IN jack. Installing the TV Connecting a VCR and Cable 1 Connect the cable TV cable to the VCR's IN jack. 2 Using a coaxial cable, connect the VCR's OUT jack to the... TV's VHF/UHF jack. 3 Using an A/V cable, connect the VCR's A/V OUT jacks to the TV's A/V IN jacks. ✍ If your VCR has an S VIDEO jack: For best picture quality, use an S VIDEO connection instead of...

Operating Instructions
Page 16
... a VCR and Cable Box ✍ This connection applies to all models except KV-36FS12. 1 Connect your incoming cable connection to the TV's VHF/UHF jack. 2 Using a coaxial cable, connect the cable box's IN jack to the TV's TO CONVERTER jack. 3 Using a coaxial cable, connect the cable box's OUT jack to the... VCR's VHF/UHF IN jack. 4 Using an A/V cable, connect the VCR's A/V OUT jacks to provide sound. VCR Coaxial cable Cable box TV Coaxial cable Cable AUDIO-R (red) AUDIO-L (white) VIDEO (yellow) A/V cable 10 S VIDEO does not provide audio, so audio cables must still be connected to...
... a VCR and Cable Box ✍ This connection applies to all models except KV-36FS12. 1 Connect your incoming cable connection to the TV's VHF/UHF jack. 2 Using a coaxial cable, connect the cable box's IN jack to the TV's TO CONVERTER jack. 3 Using a coaxial cable, connect the cable box's OUT jack to the... VCR's VHF/UHF IN jack. 4 Using an A/V cable, connect the VCR's A/V OUT jacks to provide sound. VCR Coaxial cable Cable box TV Coaxial cable Cable AUDIO-R (red) AUDIO-L (white) VIDEO (yellow) A/V cable 10 S VIDEO does not provide audio, so audio cables must still be connected to...
Operating Instructions
Page 17
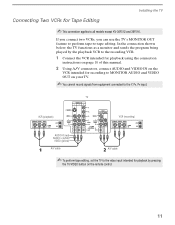
... (playback) VCR (recording) AUDIO-R (red) AUDIO-L (white) VIDEO (yellow) A/V cable A/V cable ✍ To perform tape editing, set the TV to the video input intended for playback by the playback VCR to the recording VCR. 1 Connect the VCR intended for playback using the connection instructions ... of this manual. 2 Using A/V connectors, connect AUDIO and VIDEO IN on the VCR intended for Tape Editing ✍ This connection applies to all models except KV-36FS12 and 36FS16. Installing the TV Connecting Two VCRs for recording to MONITOR AUDIO and VIDEO OUT on the remote control. 11
... (playback) VCR (recording) AUDIO-R (red) AUDIO-L (white) VIDEO (yellow) A/V cable A/V cable ✍ To perform tape editing, set the TV to the video input intended for playback by the playback VCR to the recording VCR. 1 Connect the VCR intended for playback using the connection instructions ... of this manual. 2 Using A/V connectors, connect AUDIO and VIDEO IN on the VCR intended for Tape Editing ✍ This connection applies to all models except KV-36FS12 and 36FS16. Installing the TV Connecting Two VCRs for recording to MONITOR AUDIO and VIDEO OUT on the remote control. 11

Operating Instructions
Page 18
... satellite receiver's SATELLITE IN jack. 2 Using an A/V cable, connect the satellite receiver's A/V OUT jacks to the TV's A/V IN jacks. 3 Connect a coaxial cable from your combined A/V cable. TV Coaxial cable Satellite antenna cable Satellite receiver A/V cable AUDIO-R (red) AUDIO-L (white) VIDEO (yellow) 12 Using ...an S VIDEO cable, connect the satellite receiver's VIDEO OUT jack to TV's VHF/UHF jack. ✍ If your satellite receiver has an S VIDEO jack: For best picture quality, use an S VIDEO connection instead ...
... satellite receiver's SATELLITE IN jack. 2 Using an A/V cable, connect the satellite receiver's A/V OUT jacks to the TV's A/V IN jacks. 3 Connect a coaxial cable from your combined A/V cable. TV Coaxial cable Satellite antenna cable Satellite receiver A/V cable AUDIO-R (red) AUDIO-L (white) VIDEO (yellow) 12 Using ...an S VIDEO cable, connect the satellite receiver's VIDEO OUT jack to TV's VHF/UHF jack. ✍ If your satellite receiver has an S VIDEO jack: For best picture quality, use an S VIDEO connection instead ...

Operating Instructions
Page 19
Satellite receiver TV Coaxial cable VCR Coaxial cable AUDIO-R (red) AUDIO-L (white) VIDEO (yellow) A/V cable 13 Installing the TV Connecting a Satellite Receiver with a VCR 1 Connect the satellite antenna cable to the satellite receiver's SATELLITE IN jack. 2 Connect the CATV cable to the VCR's VHF/UHF IN jack. 3 Using a coaxial cable, connect the VCR's OUT jack to the TV's VHF/UHF jack. 4 Using an A/V cable, connect the satellite receiver's A/V OUT jacks to the VCR's A/V IN jacks. 5 Using an A/V cable, connect the VCR's A/V OUT jacks to the TV's A/V IN jacks.
Satellite receiver TV Coaxial cable VCR Coaxial cable AUDIO-R (red) AUDIO-L (white) VIDEO (yellow) A/V cable 13 Installing the TV Connecting a Satellite Receiver with a VCR 1 Connect the satellite antenna cable to the satellite receiver's SATELLITE IN jack. 2 Connect the CATV cable to the VCR's VHF/UHF IN jack. 3 Using a coaxial cable, connect the VCR's OUT jack to the TV's VHF/UHF jack. 4 Using an A/V cable, connect the satellite receiver's A/V OUT jacks to the VCR's A/V IN jacks. 5 Using an A/V cable, connect the VCR's A/V OUT jacks to the TV's A/V IN jacks.

Operating Instructions
Page 20
AUDIO-L (white) AUDIO-R (red) Line input 14 Installing the TV Connecting an Audio Receiver 1 Using audio cables, connect the TV's AUDIO OUT jacks to the audio receiver's audio LINE IN jacks.
AUDIO-L (white) AUDIO-R (red) Line input 14 Installing the TV Connecting an Audio Receiver 1 Using audio cables, connect the TV's AUDIO OUT jacks to the audio receiver's audio LINE IN jacks.

Operating Instructions
Page 21
... a DVD Player with Component Video Connectors 1 Using three separate component video cables, connect the DVD player's Y, PB, and PR jacks to the TV's audio IN jacks. The Y, PB, and PR jacks do not provide audio, so audio cables must be connected to provide sound. 2 Using an audio cable, ...connect the DVD player's audio OUT jacks to the Y, PB, and PR jacks on the TV. ✍ The Y, PB, and PR jacks on your DVD player are sometimes labeled Y, CB, and CR, or Y, B-Y, and R-Y. If so, connect the cables to like...
... a DVD Player with Component Video Connectors 1 Using three separate component video cables, connect the DVD player's Y, PB, and PR jacks to the TV's audio IN jacks. The Y, PB, and PR jacks do not provide audio, so audio cables must be connected to provide sound. 2 Using an audio cable, ...connect the DVD player's audio OUT jacks to the Y, PB, and PR jacks on the TV. ✍ The Y, PB, and PR jacks on your DVD player are sometimes labeled Y, CB, and CR, or Y, B-Y, and R-Y. If so, connect the cables to like...

Operating Instructions
Page 22
Installing the TV Connecting a DVD Player with A/V Connectors ✍ If your DVD player has video component output connectors: for best picture quality use the connection described on page 15. 1 Using audio cables, connect the DVD player's audio OUT jacks to the TV's audio IN jacks. 2 Using an S-VIDEO cable, connect the DVD player's S-VIDEO jack to the TV's S-VIDEO jack. TV S-VIDEO cable DVD player Audio cable AUDIO-R (red) AUDIO-L (white) 16
Installing the TV Connecting a DVD Player with A/V Connectors ✍ If your DVD player has video component output connectors: for best picture quality use the connection described on page 15. 1 Using audio cables, connect the DVD player's audio OUT jacks to the TV's audio IN jacks. 2 Using an S-VIDEO cable, connect the DVD player's S-VIDEO jack to the TV's S-VIDEO jack. TV S-VIDEO cable DVD player Audio cable AUDIO-R (red) AUDIO-L (white) 16


