
Child Safety: It Makes A Difference Where Your TV Stands
Page 1
...components). 2 Use appropriate angle braces, straps and anchors to secure your home. Child Safety: It Makes A Difference Where Your TV Stands The Issue If you are improperly secured or inappropriately situated on dressers, bookcases, shelves, desks, audio speakers, chests or carts. As...Electronic Industries Alliance Many homes, in fact, have a television in your furniture to the wall (but never screw anything directly into the TV). 3 Carefully read and understand the manufacturer's instructions and product safety notices. 4 Don't allow children to advocate children's safety and educate...
...components). 2 Use appropriate angle braces, straps and anchors to secure your home. Child Safety: It Makes A Difference Where Your TV Stands The Issue If you are improperly secured or inappropriately situated on dressers, bookcases, shelves, desks, audio speakers, chests or carts. As...Electronic Industries Alliance Many homes, in fact, have a television in your furniture to the wall (but never screw anything directly into the TV). 3 Carefully read and understand the manufacturer's instructions and product safety notices. 4 Don't allow children to advocate children's safety and educate...

Warranty Card
Page 1
...or modification of, or to any part of purchase, labor for all labor charges. 2. 4-557-166-02 ® Color TV Color Video TV LIMITED WARRANTY Sony Electronics Inc. ("Sony") warrants this Product is within 90 days of the date of sale, the limitation on how long an implied warranty lasts,... has established telephone numbers for frequently asked questions: To locate the servicer or dealer nearest you enter into a service contract with the Sony Partnership within the Warranty period must take the Product, or deliver the Product freight prepaid, in either its option, at its original ...
...or modification of, or to any part of purchase, labor for all labor charges. 2. 4-557-166-02 ® Color TV Color Video TV LIMITED WARRANTY Sony Electronics Inc. ("Sony") warrants this Product is within 90 days of the date of sale, the limitation on how long an implied warranty lasts,... has established telephone numbers for frequently asked questions: To locate the servicer or dealer nearest you enter into a service contract with the Sony Partnership within the Warranty period must take the Product, or deliver the Product freight prepaid, in either its option, at its original ...
Operating Instructions
Page 2
...screen for energy efficiency. Patent No. 4,748,669. BBE and BBE symbol are trademarks of SRS Labs, Inc. FD Trinitron and the Wega logo are trademarks of station logos onto the TV screen. If a fixed (non-moving) pattern is designed, for the use strong solvents such as close to the ... an ENERGY STAR® Partner, Sony has determined that this product. under license from SRS Labs, Inc. Note to CATV System Installer This reminder is for example, "For KV-36FV26 only." This equipment generates, uses, and can be of sufficient magnitude to constitute a risk of the FCC Rules. Refer...
...screen for energy efficiency. Patent No. 4,748,669. BBE and BBE symbol are trademarks of SRS Labs, Inc. FD Trinitron and the Wega logo are trademarks of station logos onto the TV screen. If a fixed (non-moving) pattern is designed, for the use strong solvents such as close to the ... an ENERGY STAR® Partner, Sony has determined that this product. under license from SRS Labs, Inc. Note to CATV System Installer This reminder is for example, "For KV-36FV26 only." This equipment generates, uses, and can be of sufficient magnitude to constitute a risk of the FCC Rules. Refer...

Operating Instructions
Page 3
...outlet only one blade wider than the other), or with a three-wire grounding type plug (a plug having a third pin for some TV sets to make occasional snapping or popping sounds, particularly when being turned on the serial/model plate. This is normal for grounding).Follow... to have a suitable outlet installed. Carefully observe and comply with care. Use Power Sources This set is continuous or frequent while the TV is a safety feature. Attachments Do not use liquid cleaners or aerosol cleaners. Quick stops, excessive force, and uneven surfaces may touch ...
...outlet only one blade wider than the other), or with a three-wire grounding type plug (a plug having a third pin for some TV sets to make occasional snapping or popping sounds, particularly when being turned on the serial/model plate. This is normal for grounding).Follow... to have a suitable outlet installed. Carefully observe and comply with care. Use Power Sources This set is continuous or frequent while the TV is a safety feature. Attachments Do not use liquid cleaners or aerosol cleaners. Quick stops, excessive force, and uneven surfaces may touch ...

Operating Instructions
Page 5
Contents Introducing the FD Trinitron Wega Overview 1 Presenting the FD Trinitron Wega 2 Using the Remote Control 3 Installing the TV Overview 5 Connecting a Cable or Antenna 6 Connecting a VCR and Cable 9 Connecting a VCR and Cable Box 10 Connecting Two VCRs for Tape Editing .........11 Connecting ... Menu 29 Using the Parent Menu 30 Using the Timer Menu 33 Using the Setup Menu 34 Using the Basic Menu 36 Other Information Overview 37 TV Controls and Connectors 38 Using the Remote Control 40 Troubleshooting 46 Specifications 48 Index 51 Using the Features Overview 19 Using ...
Contents Introducing the FD Trinitron Wega Overview 1 Presenting the FD Trinitron Wega 2 Using the Remote Control 3 Installing the TV Overview 5 Connecting a Cable or Antenna 6 Connecting a VCR and Cable 9 Connecting a VCR and Cable Box 10 Connecting Two VCRs for Tape Editing .........11 Connecting ... Menu 29 Using the Parent Menu 30 Using the Timer Menu 33 Using the Setup Menu 34 Using the Basic Menu 36 Other Information Overview 37 TV Controls and Connectors 38 Using the Remote Control 40 Troubleshooting 46 Specifications 48 Index 51 Using the Features Overview 19 Using ...

Operating Instructions
Page 7
Introducing the FD Trinitron Wega Overview This chapter defines the contents of your Wega TV, and provides an overview of how to set up and use basic features. Topic Presenting the FD Trinitron Wega Using the Remote Control Page 2 3 1
Introducing the FD Trinitron Wega Overview This chapter defines the contents of your Wega TV, and provides an overview of how to set up and use basic features. Topic Presenting the FD Trinitron Wega Using the Remote Control Page 2 3 1
Operating Instructions
Page 8
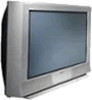
...Trinitron Wega Presenting the FD Trinitron Wega The FD Trinitron Wega (pronounced VAY-GAH) is minimal glare from any location in Picture (PIP): Allows you to programs without distortion, unlike conventional curved screens. You'll recognize the superiority of the features that you will enjoy with your new TV...image for connected equipment. ❑ Dual Tuner Picture in a room. The FD Trinitron delivers outstanding image detail not only at the screen center, but also at once, (except model KV-36FS12). ❑ Favorite Channel Preview: Preview up to eight favorite channels without ...
...Trinitron Wega Presenting the FD Trinitron Wega The FD Trinitron Wega (pronounced VAY-GAH) is minimal glare from any location in Picture (PIP): Allows you to programs without distortion, unlike conventional curved screens. You'll recognize the superiority of the features that you will enjoy with your new TV...image for connected equipment. ❑ Dual Tuner Picture in a room. The FD Trinitron delivers outstanding image detail not only at the screen center, but also at once, (except model KV-36FS12). ❑ Favorite Channel Preview: Preview up to eight favorite channels without ...

Operating Instructions
Page 9
...Trinitron Wega Inserting Batteries Insert two size AA (R6) batteries (supplied) by matching the + and - on the batteries to the diagram inside the battery compartment. ✍ Remove the batteries to select a channel, the channel changes after 2 seconds. To Do This ... VOL MENU CH RESET VTR 1 2 3 DVD/MDP TV... often. MENU For details, see "Using the Remote Control" on page 25. Remote Control Overview z To scan rapidly through all models except KV-32FV26, 36FV26) 3 CH +/- Avoid dropping it, getting it wet, or placing it in direct sunlight, near a heater, or where the...
...Trinitron Wega Inserting Batteries Insert two size AA (R6) batteries (supplied) by matching the + and - on the batteries to the diagram inside the battery compartment. ✍ Remove the batteries to select a channel, the channel changes after 2 seconds. To Do This ... VOL MENU CH RESET VTR 1 2 3 DVD/MDP TV... often. MENU For details, see "Using the Remote Control" on page 25. Remote Control Overview z To scan rapidly through all models except KV-32FV26, 36FV26) 3 CH +/- Avoid dropping it, getting it wet, or placing it in direct sunlight, near a heater, or where the...

Operating Instructions
Page 11
... This chapter includes illustrated instructions for setting up your TV: Topic Connecting a Cable or Antenna Connecting a VCR and Cable Connecting a VCR and Cable Box ... with Component Video Connectors Connecting a DVD Player with A/V Connectors Connecting a Camcorder Using the CONTROL S Feature Setting Up the TV Automatically Page 6 9 10 11 12 13 14 15 16 17 18 18 Note About the AC Power Cord The AC ...power cord is attached to the rear of the TV with hooks. Use caution when removing the AC plug from these hooks 5 You can detach the cord from...
... This chapter includes illustrated instructions for setting up your TV: Topic Connecting a Cable or Antenna Connecting a VCR and Cable Connecting a VCR and Cable Box ... with Component Video Connectors Connecting a DVD Player with A/V Connectors Connecting a Camcorder Using the CONTROL S Feature Setting Up the TV Automatically Page 6 9 10 11 12 13 14 15 16 17 18 18 Note About the AC Power Cord The AC ...power cord is attached to the rear of the TV with hooks. Use caution when removing the AC plug from these hooks 5 You can detach the cord from...
Operating Instructions
Page 12
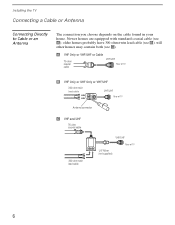
A VHF Only or VHF/UHF or Cable 75-ohm coaxial cable VHF/UHF Rear of TV B VHF Only or UHF Only or VHF/UHF 300-ohm twin lead cable VHF/UHF Rear of TV Antenna connector C VHF and UHF 75-ohm coaxial cable 300-ohm twin lead cable VHF/UHF U/V Mixer (not supplied... homes probably have 300-ohm twin lead cable (see C). still other homes may contain both (see B); Installing the TV Connecting a Cable or Antenna Connecting Directly to Cable or an Antenna The connection you choose depends on the cable found in your home. Newer homes ...
A VHF Only or VHF/UHF or Cable 75-ohm coaxial cable VHF/UHF Rear of TV B VHF Only or UHF Only or VHF/UHF 300-ohm twin lead cable VHF/UHF Rear of TV Antenna connector C VHF and UHF 75-ohm coaxial cable 300-ohm twin lead cable VHF/UHF U/V Mixer (not supplied... homes probably have 300-ohm twin lead cable (see C). still other homes may contain both (see B); Installing the TV Connecting a Cable or Antenna Connecting Directly to Cable or an Antenna The connection you choose depends on the cable found in your home. Newer homes ...

Operating Instructions
Page 13
... set up convenient. ✍ This connection applies to OFF and perform the Auto Program function (see page 29). 7 CATV cable AUX Rear of TV IN OUT Cable box ✍ If you will be controlling all channel selection through your cable box, you need to turn your cable service to... jack. 2 Using a coaxial cable, connect the cable box's OUT jack to view all models except KV-36FS12. Cable Box 1 Connect the coaxial connector from your Cable to all channels. Cable VHF/UHF Rear of TV (No connection to TO CONVERTER) Antenna cable TO CONVERTER VHF/UHF Select CABLE or antenna (ANT...
... set up convenient. ✍ This connection applies to OFF and perform the Auto Program function (see page 29). 7 CATV cable AUX Rear of TV IN OUT Cable box ✍ If you will be controlling all channel selection through your cable box, you need to turn your cable service to... jack. 2 Using a coaxial cable, connect the cable box's OUT jack to view all models except KV-36FS12. Cable Box 1 Connect the coaxial connector from your Cable to all channels. Cable VHF/UHF Rear of TV (No connection to TO CONVERTER) Antenna cable TO CONVERTER VHF/UHF Select CABLE or antenna (ANT...
Operating Instructions
Page 14
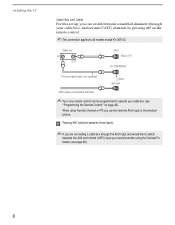
... box), and normal (CATV) channels by pressing ANT on page 42). Installing the TV Cable Box and Cable For this set up, you can be programmed to all models except KV-36FS12. Cable box IN OUT AUX Rear of TV TO CONVERTER 75-ohm coaxial cable (not supplied) Signal VHF/UHF CATV cable... (unscrambled channels) ✍ Your Sony remote control can switch between the AUX and normal (CATV) input you...
... box), and normal (CATV) channels by pressing ANT on page 42). Installing the TV Cable Box and Cable For this set up, you can be programmed to all models except KV-36FS12. Cable box IN OUT AUX Rear of TV TO CONVERTER 75-ohm coaxial cable (not supplied) Signal VHF/UHF CATV cable... (unscrambled channels) ✍ Your Sony remote control can switch between the AUX and normal (CATV) input you...

Operating Instructions
Page 15
... an S VIDEO cable, connect the VCR's S VIDEO OUT jack to provide sound. Installing the TV Connecting a VCR and Cable 1 Connect the cable TV cable to the VCR's IN jack. 2 Using a coaxial cable, connect the VCR's OUT jack to the TV's VHF/UHF jack. 3 Using an A/V cable, connect the VCR's A/V OUT jacks to the... TV's A/V IN jacks. ✍ If your VCR has an S VIDEO jack: For best picture quality, use an S VIDEO connection instead of the ...
... an S VIDEO cable, connect the VCR's S VIDEO OUT jack to provide sound. Installing the TV Connecting a VCR and Cable 1 Connect the cable TV cable to the VCR's IN jack. 2 Using a coaxial cable, connect the VCR's OUT jack to the TV's VHF/UHF jack. 3 Using an A/V cable, connect the VCR's A/V OUT jacks to the... TV's A/V IN jacks. ✍ If your VCR has an S VIDEO jack: For best picture quality, use an S VIDEO connection instead of the ...

Operating Instructions
Page 16
VCR Coaxial cable Cable box TV Coaxial cable Cable AUDIO-R (red) AUDIO-L (white) VIDEO (yellow) A/V cable 10 Installing the TV Connecting a VCR and Cable Box ✍ This connection applies to all models except KV-36FS12. 1 Connect your incoming cable connection to the TV's VHF/UHF jack. 2 Using a coaxial ...cable, connect the cable box's IN jack to the TV's TO CONVERTER jack. 3 Using a coaxial cable, connect the cable box's...
VCR Coaxial cable Cable box TV Coaxial cable Cable AUDIO-R (red) AUDIO-L (white) VIDEO (yellow) A/V cable 10 Installing the TV Connecting a VCR and Cable Box ✍ This connection applies to all models except KV-36FS12. 1 Connect your incoming cable connection to the TV's VHF/UHF jack. 2 Using a coaxial ...cable, connect the cable box's IN jack to the TV's TO CONVERTER jack. 3 Using a coaxial cable, connect the cable box's...
Operating Instructions
Page 17
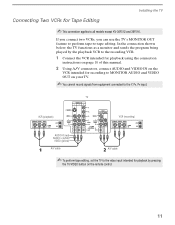
... PR input. In the connection shown below, the TV functions as a monitor and sends the program being played by pressing the TV/VIDEO button on the VCR intended for Tape Editing ✍ This connection applies to all models except KV-36FS12 and 36FS16. TV VCR (playback) VCR (recording) AUDIO-R (red)... AUDIO-L (white) VIDEO (yellow) A/V cable A/V cable ✍ To perform tape editing, set the TV to -tape editing. If you connect two VCRs, you can use the TV's MONITOR OUT feature to perform...
... PR input. In the connection shown below, the TV functions as a monitor and sends the program being played by pressing the TV/VIDEO button on the VCR intended for Tape Editing ✍ This connection applies to all models except KV-36FS12 and 36FS16. TV VCR (playback) VCR (recording) AUDIO-R (red)... AUDIO-L (white) VIDEO (yellow) A/V cable A/V cable ✍ To perform tape editing, set the TV to -tape editing. If you connect two VCRs, you can use the TV's MONITOR OUT feature to perform...

Operating Instructions
Page 18
... not provide audio, so audio cables must still be connected to the TV's S VIDEO IN jack. TV Coaxial cable Satellite antenna cable Satellite receiver A/V cable AUDIO-R (red) AUDIO-L (white) VIDEO (yellow) 12 Installing the TV Connecting a Satellite Receiver 1 Connect the satellite antenna cable to the satellite... receiver's SATELLITE IN jack. 2 Using an A/V cable, connect the satellite receiver's A/V OUT jacks to the TV's A/V IN jacks. 3 Connect a coaxial cable from your cable or antenna to TV's VHF/UHF jack. ✍ If your satellite receiver has an S VIDEO jack: For best picture quality, ...
... not provide audio, so audio cables must still be connected to the TV's S VIDEO IN jack. TV Coaxial cable Satellite antenna cable Satellite receiver A/V cable AUDIO-R (red) AUDIO-L (white) VIDEO (yellow) 12 Installing the TV Connecting a Satellite Receiver 1 Connect the satellite antenna cable to the satellite... receiver's SATELLITE IN jack. 2 Using an A/V cable, connect the satellite receiver's A/V OUT jacks to the TV's A/V IN jacks. 3 Connect a coaxial cable from your cable or antenna to TV's VHF/UHF jack. ✍ If your satellite receiver has an S VIDEO jack: For best picture quality, ...

Operating Instructions
Page 19
Installing the TV Connecting a Satellite Receiver with a VCR 1 Connect the satellite antenna cable to the satellite receiver's SATELLITE IN jack. 2 Connect the CATV cable to the VCR's VHF/UHF IN jack. 3 Using a coaxial cable, connect the VCR's OUT jack to the TV's VHF/UHF jack. 4 Using an A/V cable, connect the satellite receiver's A/V OUT jacks to the VCR's A/V IN jacks. 5 Using an A/V cable, connect the VCR's A/V OUT jacks to the TV's A/V IN jacks. Satellite receiver TV Coaxial cable VCR Coaxial cable AUDIO-R (red) AUDIO-L (white) VIDEO (yellow) A/V cable 13
Installing the TV Connecting a Satellite Receiver with a VCR 1 Connect the satellite antenna cable to the satellite receiver's SATELLITE IN jack. 2 Connect the CATV cable to the VCR's VHF/UHF IN jack. 3 Using a coaxial cable, connect the VCR's OUT jack to the TV's VHF/UHF jack. 4 Using an A/V cable, connect the satellite receiver's A/V OUT jacks to the VCR's A/V IN jacks. 5 Using an A/V cable, connect the VCR's A/V OUT jacks to the TV's A/V IN jacks. Satellite receiver TV Coaxial cable VCR Coaxial cable AUDIO-R (red) AUDIO-L (white) VIDEO (yellow) A/V cable 13

Operating Instructions
Page 20
Installing the TV Connecting an Audio Receiver 1 Using audio cables, connect the TV's AUDIO OUT jacks to the audio receiver's audio LINE IN jacks. AUDIO-L (white) AUDIO-R (red) Line input 14
Installing the TV Connecting an Audio Receiver 1 Using audio cables, connect the TV's AUDIO OUT jacks to the audio receiver's audio LINE IN jacks. AUDIO-L (white) AUDIO-R (red) Line input 14

Operating Instructions
Page 21
... player's audio OUT jacks to like colors. If so, connect the cables to the TV's audio IN jacks. Component video cables TV DVD player Audio cable AUDIO-R (red) AUDIO-L (white) 15 Installing the TV Connecting a DVD Player with Component Video Connectors 1 Using three separate component video cables, connect... the DVD player's Y, PB, and PR jacks to the Y, PB, and PR jacks on the TV. ✍ The Y, PB, and PR jacks on your...
... player's audio OUT jacks to like colors. If so, connect the cables to the TV's audio IN jacks. Component video cables TV DVD player Audio cable AUDIO-R (red) AUDIO-L (white) 15 Installing the TV Connecting a DVD Player with Component Video Connectors 1 Using three separate component video cables, connect... the DVD player's Y, PB, and PR jacks to the Y, PB, and PR jacks on the TV. ✍ The Y, PB, and PR jacks on your...

Operating Instructions
Page 22
TV S-VIDEO cable DVD player Audio cable AUDIO-R (red) AUDIO-L (white) 16 Installing the TV Connecting a DVD Player with A/V Connectors ✍ If your DVD player has video component output connectors: for best picture quality use the connection described on page 15. 1 Using audio cables, connect the DVD player's audio OUT jacks to the TV's audio IN jacks. 2 Using an S-VIDEO cable, connect the DVD player's S-VIDEO jack to the TV's S-VIDEO jack.
TV S-VIDEO cable DVD player Audio cable AUDIO-R (red) AUDIO-L (white) 16 Installing the TV Connecting a DVD Player with A/V Connectors ✍ If your DVD player has video component output connectors: for best picture quality use the connection described on page 15. 1 Using audio cables, connect the DVD player's audio OUT jacks to the TV's audio IN jacks. 2 Using an S-VIDEO cable, connect the DVD player's S-VIDEO jack to the TV's S-VIDEO jack.


