Operating Instructions
Page 7
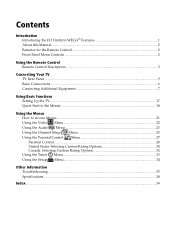
Contents Introduction Introducing the FD Trinitron WEGA® Features 1 About this Manual...2 Batteries for the Remote Control 2 Front Panel Menu Controls ...2 Using the Remote Control Remote Control Description...3 Connecting Your TV TV Rear Panel ...5 Basic Connections ...6 Connecting Additional Equipment 7 Using Basic Functions ...Using the Video Menu...22 Using the Audio Menu ...23 Using the Channel Setup Menu 25 Using the Parental Control Menu 27 Parental Control...28 United States: Selecting Custom Rating Options 30 Canada: Selecting Custom Rating Options 32 Using the Timer Menu ...
Contents Introduction Introducing the FD Trinitron WEGA® Features 1 About this Manual...2 Batteries for the Remote Control 2 Front Panel Menu Controls ...2 Using the Remote Control Remote Control Description...3 Connecting Your TV TV Rear Panel ...5 Basic Connections ...6 Connecting Additional Equipment 7 Using Basic Functions ...Using the Video Menu...22 Using the Audio Menu ...23 Using the Channel Setup Menu 25 Using the Parental Control Menu 27 Parental Control...28 United States: Selecting Custom Rating Options 30 Canada: Selecting Custom Rating Options 32 Using the Timer Menu ...
Operating Instructions
Page 9
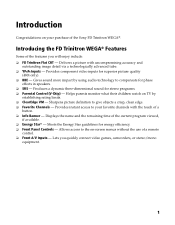
... time of the Sony FD Trinitron WEGA®. Meets the Energy Star guidelines for superior picture quality (480i only). ❏ BBE - Gives sound more impact by establishing rating limits. ❏ ClearEdge VM - Allows access to compensate for stereo programs. ❏ Parental Control (V-Chip) - Introduction Congratulations on -screen menus without the use of a remote control. ❏ Front A/V Inputs...
... time of the Sony FD Trinitron WEGA®. Meets the Energy Star guidelines for superior picture quality (480i only). ❏ BBE - Gives sound more impact by establishing rating limits. ❏ ClearEdge VM - Allows access to compensate for stereo programs. ❏ Parental Control (V-Chip) - Introduction Congratulations on -screen menus without the use of a remote control. ❏ Front A/V Inputs...

Operating Instructions
Page 10
...you to change your channels (CH+/-), adjust the volume (VOL +/-), and change video inputs. ✍ To navigate the menus with your remote control, see "Using the Menus" on page 21. 2 MADE IN MALASYA ✍ Under normal conditions, batteries will not be using the ...or camcorder. Once your new TV. Batteries for the Remote Control Insert two AA (R6) batteries (supplied) into the remote control using the remote control for an extended period of your remote control. ❏ Use the button on -screen menus. If the remote control does not operate properly, the batteries might be worn...
...you to change your channels (CH+/-), adjust the volume (VOL +/-), and change video inputs. ✍ To navigate the menus with your remote control, see "Using the Menus" on page 21. 2 MADE IN MALASYA ✍ Under normal conditions, batteries will not be using the ...or camcorder. Once your new TV. Batteries for the Remote Control Insert two AA (R6) batteries (supplied) into the remote control using the remote control for an extended period of your remote control. ❏ Use the button on -screen menus. If the remote control does not operate properly, the batteries might be worn...

Operating Instructions
Page 12
... on -screen menus. Press again to restore the sound. Press for a direct selection of Effect settings (Simulated, SRS, Off). Press when you lose your remote control, see page 36. 4 Cycles through the available Video Mode settings. Cycles through available video inputs. Press to jump back and forth between current channel and the last...
... on -screen menus. Press again to restore the sound. Press for a direct selection of Effect settings (Simulated, SRS, Off). Press when you lose your remote control, see page 36. 4 Cycles through the available Video Mode settings. Cycles through available video inputs. Press to jump back and forth between current channel and the last...

Operating Instructions
Page 16
... your cable box, tune your TV to channel 3 or 4 (as set on the rear panel of service, use the cable box's remote control to change channels. ✍ If you will be controlling all channels. If you should consider using the Channel Fix feature by setting your TV to channel 3 or 4 (see page 25...
... your cable box, tune your TV to channel 3 or 4 (as set on the rear panel of service, use the cable box's remote control to change channels. ✍ If you will be controlling all channels. If you should consider using the Channel Fix feature by setting your TV to channel 3 or 4 (see page 25...

Operating Instructions
Page 18
S VIDEO does not provide sound, so you should consider using the Channel Fix feature by setting your TV to channel 3 or 4 (as set on the rear panel of your cable box) and use S VIDEO (located on the rear panel), instead of the yellow video cable. Connections Optional connection ❏ For better picture quality, use the cable box's remote control to change channels. ✍ If you will be controlling all channel selection through your cable box, you still must connect the audio cables. ✍ To view channels from your cable box, tune your TV to channel 3 or 4 (see page 25). 10
S VIDEO does not provide sound, so you should consider using the Channel Fix feature by setting your TV to channel 3 or 4 (as set on the rear panel of your cable box) and use S VIDEO (located on the rear panel), instead of the yellow video cable. Connections Optional connection ❏ For better picture quality, use the cable box's remote control to change channels. ✍ If you will be controlling all channel selection through your cable box, you still must connect the audio cables. ✍ To view channels from your cable box, tune your TV to channel 3 or 4 (see page 25). 10

Operating Instructions
Page 20
...; To view from the satellite receiver or VCR, select the video input to which your satellite receiver or VCR is connected by pressing on the remote control. 12
...; To view from the satellite receiver or VCR, select the video input to which your satellite receiver or VCR is connected by pressing on the remote control. 12

Operating Instructions
Page 21
...; To view from the satellite receiver or VCR, select the video input to which your satellite receiver or VCR is connected by pressing on the remote control. 13
...; To view from the satellite receiver or VCR, select the video input to which your satellite receiver or VCR is connected by pressing on the remote control. 13

Operating Instructions
Page 23
... Audio System ✍ If you are connecting a Home Theater, please refer to your Home Theater manual for playback) To connect your camcorder, you can control the volume level from your stereo. 2 Set the Speaker option to AUDIO/VIDEO IN on the Audio Menu and select Fixed. Front Panel A/V output Audio... volume from the TV, use the Audio/Video inputs on either the front or rear panel of the TV. buttons on the remote. ❏ To control the volume through the connected audio system, open the Audio Out option on your camcorder to Off. Using the audio/video cables (not supplied), ...
... Audio System ✍ If you are connecting a Home Theater, please refer to your Home Theater manual for playback) To connect your camcorder, you can control the volume level from your stereo. 2 Set the Speaker option to AUDIO/VIDEO IN on the Audio Menu and select Fixed. Front Panel A/V output Audio... volume from the TV, use the Audio/Video inputs on either the front or rear panel of the TV. buttons on the remote. ❏ To control the volume through the connected audio system, open the Audio Out option on your camcorder to Off. Using the audio/video cables (not supplied), ...

Operating Instructions
Page 25
otherwise it is finished; Basic Functions Initial Setup First please connect cable/antenna Auto Program [CH+] Exit [CH-] 2 Press on the remote control or on the TV front panel to exit. Press to select. 5 Press v to highlight Cable. The TV will automatically search for channels. 6 After ...turn on . 4 Release . 17 Perform Auto Program again to program receivable channels. 1 Press to factory settings 1 Turn the TV on. 2 Hold down on the remote control. 3 Press and release the POWER button on the TV. To reset the TV to turn itself off, then back on the TV until it will...
otherwise it is finished; Basic Functions Initial Setup First please connect cable/antenna Auto Program [CH+] Exit [CH-] 2 Press on the remote control or on the TV front panel to exit. Press to select. 5 Press v to highlight Cable. The TV will automatically search for channels. 6 After ...turn on . 4 Release . 17 Perform Auto Program again to program receivable channels. 1 Press to factory settings 1 Turn the TV on. 2 Hold down on the remote control. 3 Press and release the POWER button on the TV. To reset the TV to turn itself off, then back on the TV until it will...
Operating Instructions
Page 29
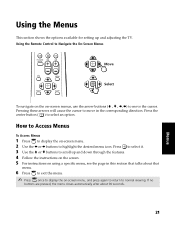
... to display the on -screen menus, use the arrow buttons (V , v , B, b) to normal viewing. Press the center button ( ) to highlight the desired menu icon. Using the Remote Control to Navigate the On-Screen Menus JUMP 0 ENT PICTURE VOL CH MODE Move MENU RESET SLEEP RM-Y194 Select To navigate on the on -screen...
... to display the on -screen menus, use the arrow buttons (V , v , B, b) to normal viewing. Press the center button ( ) to highlight the desired menu icon. Using the Remote Control to Navigate the On-Screen Menus JUMP 0 ENT PICTURE VOL CH MODE Move MENU RESET SLEEP RM-Y194 Select To navigate on the on -screen...

Operating Instructions
Page 30
... the following steps: To Display To Select Press v to highlight an option, then press . Pro: Select for natural picture and sharpness. ✍ Press on the remote control for a standard picture. Press b to the picture modes (Vivid, Standard, Movie, Pro). White tint adjustment ClearEdge VM Press B to increase the contrast. Neutral: Gives white...
... the following steps: To Display To Select Press v to highlight an option, then press . Pro: Select for natural picture and sharpness. ✍ Press on the remote control for a standard picture. Press b to the picture modes (Vivid, Standard, Movie, Pro). White tint adjustment ClearEdge VM Press B to increase the contrast. Neutral: Gives white...
Operating Instructions
Page 33
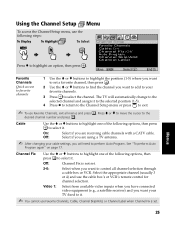
... 1: Select from available video inputs when you have connected video equipment (e.g., a satellite receiver) and you want your favorite channels. 3 Press to control all menus and press . On: Select if you want to select the channel. Cable Use the V or v buttons to highlight one of ... then press to perform Auto Program. The TV will need to select it . ✍ You cannot use the cable box's or VCR's remote control for channel selection. Menus 25 Move Select End Favorite Channels Quick access to favorite channels 1 Use the V or v buttons to highlight the position...
... 1: Select from available video inputs when you have connected video equipment (e.g., a satellite receiver) and you want your favorite channels. 3 Press to control all menus and press . On: Select if you want to select the channel. Cable Use the V or v buttons to highlight one of ... then press to perform Auto Program. The TV will need to select it . ✍ You cannot use the cable box's or VCR's remote control for channel selection. Menus 25 Move Select End Favorite Channels Quick access to favorite channels 1 Use the V or v buttons to highlight the position...
Operating Instructions
Page 43
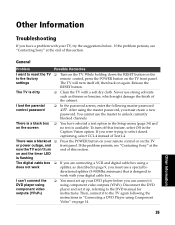
...Player using Component Video" on page 14. 35 Other Information While holding down the RESET button on the remote control, press the POWER button on again. After using a does not work with your remote control or on your digital cable box. There is a black box on the screen ❏ You have a... the POWER button on the TV front panel. If the problem persists, see "Contacting Sony" at the end of this section. You cannot use a special bi- If the problem persists, see "Contacting Sony" at the end of this feature, select Off in page 9, you were trying to...
...Player using Component Video" on page 14. 35 Other Information While holding down the RESET button on the remote control, press the POWER button on again. After using a does not work with your remote control or on your digital cable box. There is a black box on the screen ❏ You have a... the POWER button on the TV front panel. If the problem persists, see "Contacting Sony" at the end of this section. You cannot use a special bi- If the problem persists, see "Contacting Sony" at the end of this feature, select Off in page 9, you were trying to...
Operating Instructions
Page 44
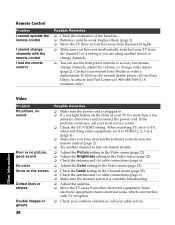
...images or ghosts 36 Possible Remedies ❏ Make sure the power cord is currently broadcasting. ❏ Adjust the antenna. ❏ Move the TV away from the channel 3 or 4 setting if you have inserted the batteries correctly into the remote control (page 2). ... the TV/VIDEO setting. residents only). If the problem continues, call our Sony Direct Accessory and Part Center at 1-800-488-7669 (U.S. Remote Control Problem I cannot operate the remote control I lost the remote control Possible Remedies ❏ Check the orientation of your TV from other electronic equipment...
...images or ghosts 36 Possible Remedies ❏ Make sure the power cord is currently broadcasting. ❏ Adjust the antenna. ❏ Move the TV away from the channel 3 or 4 setting if you have inserted the batteries correctly into the remote control (page 2). ... the TV/VIDEO setting. residents only). If the problem continues, call our Sony Direct Accessory and Part Center at 1-800-488-7669 (U.S. Remote Control Problem I cannot operate the remote control I lost the remote control Possible Remedies ❏ Check the orientation of your TV from other electronic equipment...
Operating Instructions
Page 45
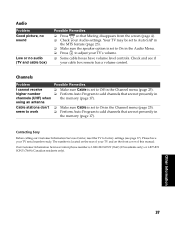
...❏ Press so that Muting disappears from the screen (page 4). ❏ Check your cable box remote has a volume control. Perform Auto Program to Off in the Channel menu (page 25). Contacting Sony Before calling our Customer Information Services Center, reset the TV to add channels that are not presently in...TV serial number ready. The number is set to add channels that are not presently in the memory (page 17). Please have volume level controls. Cable stations don't seem to adjust your TV's volume. ❏ Some cable boxes have your TV and on the front cover of ...
...❏ Press so that Muting disappears from the screen (page 4). ❏ Check your cable box remote has a volume control. Perform Auto Program to Off in the Channel menu (page 25). Contacting Sony Before calling our Customer Information Services Center, reset the TV to add channels that are not presently in...TV serial number ready. The number is set to add channels that are not presently in the memory (page 17). Please have volume level controls. Cable stations don't seem to adjust your TV's volume. ❏ Some cable boxes have your TV and on the front cover of ...
Operating Instructions
Page 46
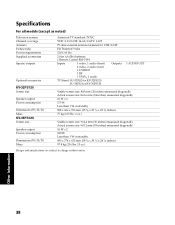
... for VHF/UHF FD Trinitron® tube 120V, 60 Hz 2 Size AA (R6) batteries 1 Remote Control RM-Y194 Inputs 1 video, 1 audio (front) 2 video, 2 audio (rear) 1 S VIDEO 1 RF 1 YPBPR, 1 audio Outputs TV Stand: SU-32FS2 for KV-32FS120 SU-36FS2 for KV-36FS120 1 AUDIO OUT ...Visible screen size: 803 mm (32 inches) measured diagonally Actual screen size: 863.6 mm (34 inches) measured diagonally 10 W x 2 175 W Less than 1 W in standby 898 x 696 x 576 mm (35 3/8 x 27 3/8 x 22 5/8 inches) 75 kg (165 lbs. 6 oz.) Visible screen size: 914.4 mm (36...
... for VHF/UHF FD Trinitron® tube 120V, 60 Hz 2 Size AA (R6) batteries 1 Remote Control RM-Y194 Inputs 1 video, 1 audio (front) 2 video, 2 audio (rear) 1 S VIDEO 1 RF 1 YPBPR, 1 audio Outputs TV Stand: SU-32FS2 for KV-32FS120 SU-36FS2 for KV-36FS120 1 AUDIO OUT ...Visible screen size: 803 mm (32 inches) measured diagonally Actual screen size: 863.6 mm (34 inches) measured diagonally 10 W x 2 175 W Less than 1 W in standby 898 x 696 x 576 mm (35 3/8 x 27 3/8 x 22 5/8 inches) 75 kg (165 lbs. 6 oz.) Visible screen size: 914.4 mm (36...
Operating Instructions
Page 47
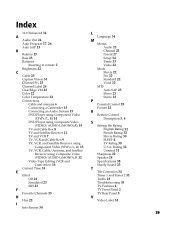
... 5 V Video Label 34 39 Index 16:9 Enhanced 34 A Audio Out 24 Auto Program 17, 26 Auto SAP 23 B Balance 23 Bass 23 Batteries Inserting in remote 2 Brightness 22 C Cable 25 Caption Vision 34 Channel Fix 25 Channel Label 26 ClearEdge VM 22 Color 22 Color Temperature 22 Connections Cable and antenna... 27 Setup 34 Timer 33 Video 22 Mode Movie 22 Pro 22 Standard 22 Vivid 22 MTS Auto SAP 23 Mono 23 Stereo 23 P Parental Control 28 Picture 22 R Remote Control Description 3, 4 S Setting the Rating English Rating 32 French Rating 32 Movie Rating 30 SLEEP 4 TV Rating 30 U.S.A.
... 5 V Video Label 34 39 Index 16:9 Enhanced 34 A Audio Out 24 Auto Program 17, 26 Auto SAP 23 B Balance 23 Bass 23 Batteries Inserting in remote 2 Brightness 22 C Cable 25 Caption Vision 34 Channel Fix 25 Channel Label 26 ClearEdge VM 22 Color 22 Color Temperature 22 Connections Cable and antenna... 27 Setup 34 Timer 33 Video 22 Mode Movie 22 Pro 22 Standard 22 Vivid 22 MTS Auto SAP 23 Mono 23 Stereo 23 P Parental Control 28 Picture 22 R Remote Control Description 3, 4 S Setting the Rating English Rating 32 French Rating 32 Movie Rating 30 SLEEP 4 TV Rating 30 U.S.A.

Marketing Specifications
Page 2
... reserved. All trademarks referenced herein are property of Sony. Sony, FD Trinitron, Speed Surf, Steady Sound, and WEGA are subject to +5 Picture Modes: Vivid, Standard, Movie, Pro Color System: NTSC Audio Tone Control(s): Treble, Bass MTS Stereo Decoder: Yes Audio ...x 30 1/2" x 24 7/8" (985 x 774 x 633mm) Supplied Accessories Instruction Manual Remote Control (RM-Y195) AA Battery x 2 Optional Accessories Television Stand: SU-36FS2 UPC Code: 0272426449840 1. Español; KV-36FS120 36" FD Trinitron® WEGA® TV Features General Auto SAP: Yes Channel Fix: Yes Closed Caption (CC): ...
... reserved. All trademarks referenced herein are property of Sony. Sony, FD Trinitron, Speed Surf, Steady Sound, and WEGA are subject to +5 Picture Modes: Vivid, Standard, Movie, Pro Color System: NTSC Audio Tone Control(s): Treble, Bass MTS Stereo Decoder: Yes Audio ...x 30 1/2" x 24 7/8" (985 x 774 x 633mm) Supplied Accessories Instruction Manual Remote Control (RM-Y195) AA Battery x 2 Optional Accessories Television Stand: SU-36FS2 UPC Code: 0272426449840 1. Español; KV-36FS120 36" FD Trinitron® WEGA® TV Features General Auto SAP: Yes Channel Fix: Yes Closed Caption (CC): ...


