
Child Safety: It Makes A Difference Where Your TV Stands
Page 1
.... 4 Don't allow children to climb on or play with furniture and television sets. 5 Avoid placing any items on top of TVs such as VCRs and remotes that may pique the children's curiosity. 6 Remember that children can become excited while watching a program and can potentially push or pull a TV over and may...
.... 4 Don't allow children to climb on or play with furniture and television sets. 5 Avoid placing any items on top of TVs such as VCRs and remotes that may pique the children's curiosity. 6 Remember that children can become excited while watching a program and can potentially push or pull a TV over and may...

Dimensions Diagrams
Page 1
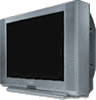
... Features and specifications subject to change without notice. • Non-metric weights and measurements are approximate. SONY WILL NOT BE RESPONSIBLE FOR INACCURACIES IN THE DESIGN OR MANUFACTURE OF ENCLOSURES . KV-32FV300 RM-Y182 REMOTE CONTROL MDDEEOSSDCCERRLII:PPTTIIOONN:: DIMENSIONS 32" Wega® Monitor/Receiver POWER REQUIREMENTS:120VAC (W(WWEHHIGDDH))::T:35 3/8 " x 26 7/8 " x 23 " WEIGHT: 171 lbs 15 oz...
... Features and specifications subject to change without notice. • Non-metric weights and measurements are approximate. SONY WILL NOT BE RESPONSIBLE FOR INACCURACIES IN THE DESIGN OR MANUFACTURE OF ENCLOSURES . KV-32FV300 RM-Y182 REMOTE CONTROL MDDEEOSSDCCERRLII:PPTTIIOONN:: DIMENSIONS 32" Wega® Monitor/Receiver POWER REQUIREMENTS:120VAC (W(WWEHHIGDDH))::T:35 3/8 " x 26 7/8 " x 23 " WEIGHT: 171 lbs 15 oz...

Marketing Specifications
Page 2
...Remote Control (RM-Y181) • AA Battery x 2 Optional Accessories • Television Stand SU-36HV1 KV-36FV300 SU-32HV1 KV-32FV300 SU-27HV1 KV-27FV300 Weights & Measures (Approx) • Dimensions (W x H x D): KV-36FV300 40 1/4 x 30 x 25 1/4 (1020x760x640mm) KV-32FV300 35 3/8 x 26 7/8 x 23 (898x682x584mm) KV-27FV300 30 7/8 x 23 3/4 x 20 1/2 (784x601.5x520mm) • Weight (Approx): KV-36FV300: 224lbs 14oz (102kg) KV-32FV300... frames. Product Information KV-36FV300 KV-32FV300 KV-27FV300 FD Trinitron® WEGA® TV KEY TECHNOLOGY 3D Digital Comb Filter Sony's premier comb filter ...
...Remote Control (RM-Y181) • AA Battery x 2 Optional Accessories • Television Stand SU-36HV1 KV-36FV300 SU-32HV1 KV-32FV300 SU-27HV1 KV-27FV300 Weights & Measures (Approx) • Dimensions (W x H x D): KV-36FV300 40 1/4 x 30 x 25 1/4 (1020x760x640mm) KV-32FV300 35 3/8 x 26 7/8 x 23 (898x682x584mm) KV-27FV300 30 7/8 x 23 3/4 x 20 1/2 (784x601.5x520mm) • Weight (Approx): KV-36FV300: 224lbs 14oz (102kg) KV-32FV300... frames. Product Information KV-36FV300 KV-32FV300 KV-27FV300 FD Trinitron® WEGA® TV KEY TECHNOLOGY 3D Digital Comb Filter Sony's premier comb filter ...
Primary User Manual
Page 6
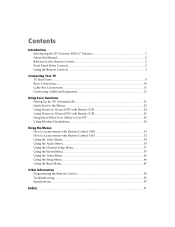
Contents Introduction Introducing the FD Trinitron WEGA® Features 1 About this Manual...2 Batteries for the Remote Control 2 Front Panel Menu Controls ...2 Using the Remote Controls ...3 Connecting Your TV TV Rear Panel ...8 Basic Connections ...10 Cable Box Connections ...11 Connecting Additional Equipment 13 Using Basic...Setting Up the TV Automatically 21 Quick Start to the Menus ...22 Using Picture in Picture (PIP) with Remote Y181 24 Using Picture in Picture (PIP) with Remote Y182 26 Setups that Affect Your Ability to Use PIP 28 Using Wireless Headphones ...29 Using the Menus How...
Contents Introduction Introducing the FD Trinitron WEGA® Features 1 About this Manual...2 Batteries for the Remote Control 2 Front Panel Menu Controls ...2 Using the Remote Controls ...3 Connecting Your TV TV Rear Panel ...8 Basic Connections ...10 Cable Box Connections ...11 Connecting Additional Equipment 13 Using Basic...Setting Up the TV Automatically 21 Quick Start to the Menus ...22 Using Picture in Picture (PIP) with Remote Y181 24 Using Picture in Picture (PIP) with Remote Y182 26 Setups that Affect Your Ability to Use PIP 28 Using Wireless Headphones ...29 Using the Menus How...
Primary User Manual
Page 8
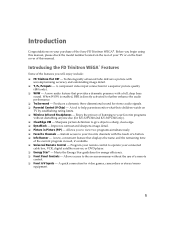
... if available. ❏ Universal Remote Control - Enjoy the privacy of listening to the on your purchase of a remote control. ❏ Front A/V Inputs...Sony FD Trinitron WEGA®. Instant access to further enhance the audio performance. ❏ TruSurround - A new, convenient feature that provides a dramatic presence with uncompromising accuracy and outstanding image detail. ❏ Y, PB, PR Inputs - A quick connection for a superior picture quality (480i only). ❏ WOW - Introduction Congratulations on -screen menus without disturbing anyone else (for KV-32FV300 and KV...
... if available. ❏ Universal Remote Control - Enjoy the privacy of listening to the on your purchase of a remote control. ❏ Front A/V Inputs...Sony FD Trinitron WEGA®. Instant access to further enhance the audio performance. ❏ TruSurround - A new, convenient feature that provides a dramatic presence with uncompromising accuracy and outstanding image detail. ❏ Y, PB, PR Inputs - A quick connection for a superior picture quality (480i only). ❏ WOW - Introduction Congratulations on -screen menus without disturbing anyone else (for KV-32FV300 and KV...
Primary User Manual
Page 9
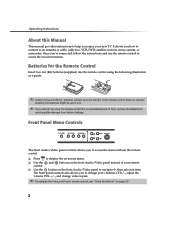
...and buttons on the front Audio/Video panel instead of time, remove the batteries to avoid possible damage from battery leakage. VOLUME + - If the remote control does not operate properly, the batteries might be using the following illustration as a guide. ✍ Under normal conditions, batteries will last up ...to six months. Front Panel Menu Controls TV/VIDEO - It shows you 're connected, follow the instructions and use the remote control to access the on-screen menus. Once you how to connect to an antenna or cable, cable box, VCR, DVD, satellite receiver, ...
...and buttons on the front Audio/Video panel instead of time, remove the batteries to avoid possible damage from battery leakage. VOLUME + - If the remote control does not operate properly, the batteries might be using the following illustration as a guide. ✍ Under normal conditions, batteries will last up ...to six months. Front Panel Menu Controls TV/VIDEO - It shows you 're connected, follow the instructions and use the remote control to access the on-screen menus. Once you how to connect to an antenna or cable, cable box, VCR, DVD, satellite receiver, ...
Primary User Manual
Page 10
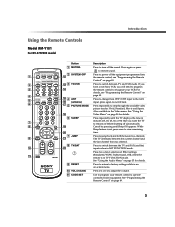
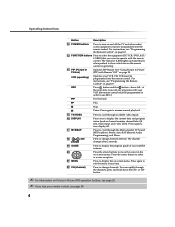
... or 90) that was selected. Press to turn off the equipment programmed into the remote control, see "Programming the Remote Control" on before shutting off automatically. If you have a non-Sony VCR, you want the TV to power off the sound. Also available in SAT ... in the Video menu. Press to return to switch back. See "Using the Audio Menu" on page 34 for details. Introduction Using the Remote Controls Model RM-Y181 For KV-27FV300 model A B C D E F G H / I J K Button 1 MUTING 2 SYSTEM OFF L M 3 TV/VCR N O 4 ANT P (antenna) Q 5 PICTURE MODE R 6 SLEEP S T 7 JUMP U 8 TV/...
... or 90) that was selected. Press to turn off the equipment programmed into the remote control, see "Programming the Remote Control" on before shutting off automatically. If you have a non-Sony VCR, you want the TV to power off the sound. Also available in SAT ... in the Video menu. Press to return to switch back. See "Using the Audio Menu" on page 34 for details. Introduction Using the Remote Controls Model RM-Y181 For KV-27FV300 model A B C D E F G H / I J K Button 1 MUTING 2 SYSTEM OFF L M 3 TV/VCR N O 4 ANT P (antenna) Q 5 PICTURE MODE R 6 SLEEP S T 7 JUMP U 8 TV/...
Primary User Manual
Page 11
...pushed to display the on page 49. VCR (operating) REC Operates your satellite antenna. qf PIP (Picture in Picture (PIP) with Remote Y181" on -screen menus. at any programs with your remote control, see page 54. 4 Press again to use REC.) M Fast-forward. qh DISPLAY qj MTS/SAP qk 0 9 and ENTER... down the CH+ or CHbutton. ✍ For information on and off . Operating Instructions Button Description qs POWER buttons Press to operate with the remote control. qd FUNCTION buttons Press to select the equipment (TV, VCR/DVD, SAT/ CABLE) that you lose your VCR (the...
...pushed to display the on page 49. VCR (operating) REC Operates your satellite antenna. qf PIP (Picture in Picture (PIP) with Remote Y181" on -screen menus. at any programs with your remote control, see page 54. 4 Press again to use REC.) M Fast-forward. qh DISPLAY qj MTS/SAP qk 0 9 and ENTER... down the CH+ or CHbutton. ✍ For information on and off . Operating Instructions Button Description qs POWER buttons Press to operate with the remote control. qd FUNCTION buttons Press to select the equipment (TV, VCR/DVD, SAT/ CABLE) that you lose your VCR (the...
Primary User Manual
Page 12
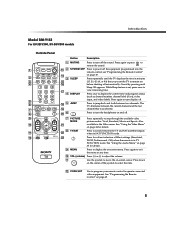
...the menu at any time. See "Using the Video Menu" on the center of Effect settings (Simulated, WOW, TruSurround, Off), when the remote is set, press once to qj view remaining time. 4 DISPLAY Press once to display the current time and program status (such as channel... down on page 34 for details. 9 MENU Press to display the on-screen menu. Press again to restore the sound. q; Introduction Model RM-Y182 For KV-32FV300, KV-36FV300 models Outside Panel 1 2 3 4 5 6 7 8 9 0 qa qs Button Description 1 MUTING Press to turn display off. Also available in SAT FUNCTION ...
...the menu at any time. See "Using the Video Menu" on the center of Effect settings (Simulated, WOW, TruSurround, Off), when the remote is set, press once to qj view remaining time. 4 DISPLAY Press once to display the current time and program status (such as channel... down on page 34 for details. 9 MENU Press to display the on-screen menu. Press again to restore the sound. q; Introduction Model RM-Y182 For KV-32FV300, KV-36FV300 models Outside Panel 1 2 3 4 5 6 7 8 9 0 qa qs Button Description 1 MUTING Press to turn display off. Also available in SAT FUNCTION ...
Primary User Manual
Page 13
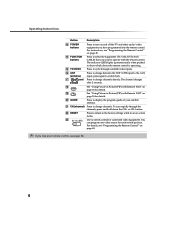
...page 49. wa CH (channel) Press to change channels. To scan rapidly through available video inputs. ql See "Using Picture in Picture (PIP) with Remote Y182" on -screen menu. ws RESET Press to return to cycle through the channels, press and hold down the CH+ or CH- qk See "Using... ANT (antenna) Press to change between the VHF/UHF input to the AUX input, press again to show which device the remote control is operating. For instructions, see "Programming the Remote Control" on page 26 for details. qg TV/VIDEO Press to the factory settings while in Picture (PIP) with...
...page 49. wa CH (channel) Press to change channels. To scan rapidly through available video inputs. ql See "Using Picture in Picture (PIP) with Remote Y182" on -screen menu. ws RESET Press to return to cycle through the channels, press and hold down the CH+ or CH- qk See "Using... ANT (antenna) Press to change between the VHF/UHF input to the AUX input, press again to show which device the remote control is operating. For instructions, see "Programming the Remote Control" on page 26 for details. qg TV/VIDEO Press to the factory settings while in Picture (PIP) with...
Primary User Manual
Page 14
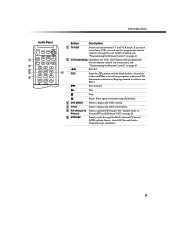
... the DVD's Title menu. 5 PIP (Picture in Picture) 6 MTS/SAP Press to use REC.) M Fast-forward. If you have a non-Sony VCR, you will need to program the remote control to recognize your VCR. m Rewind. 6 REC Press the button and the blank button - For instructions, see "Programming the... your VCR. See "Using Picture in order to operate PIP feature. above, left - For details, see "Programming the Remote Control" on page 26. at the same time to record any programs with Remote Y182" on page 49. The VCR must be programmed in Picture (PIP) with your VCR (the...
... the DVD's Title menu. 5 PIP (Picture in Picture) 6 MTS/SAP Press to use REC.) M Fast-forward. If you have a non-Sony VCR, you will need to program the remote control to recognize your VCR. m Rewind. 6 REC Press the button and the blank button - For instructions, see "Programming the... your VCR. See "Using Picture in order to operate PIP feature. above, left - For details, see "Programming the Remote Control" on page 26. at the same time to record any programs with Remote Y182" on page 49. The VCR must be programmed in Picture (PIP) with your VCR (the...
Primary User Manual
Page 15
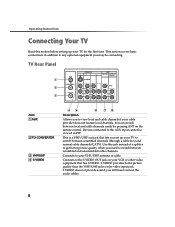
... to the AUX input cannot be viewed in addition to any optional equipment you may be connecting. Connects to the S VIDEO OUT jack on the remote control. you set up your VHF/UHF antenna or cable. You can switch between local and cable channels easily by pressing ANT on your TV...
... to the AUX input cannot be viewed in addition to any optional equipment you may be connecting. Connects to the S VIDEO OUT jack on the remote control. you set up your VHF/UHF antenna or cable. You can switch between local and cable channels easily by pressing ANT on your TV...
Primary User Manual
Page 19
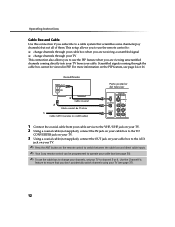
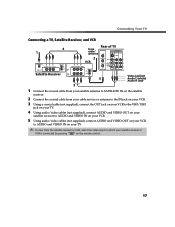
... to change channels through your TV This connection also allows you to use the remote control to channel 3 or 4. For more information on the remote control to switch between the cable box and direct cable inputs. ✍ Your Sony remote control can be viewed in PIP. Decodificador Parte posterior del televisor 3 Cable coaxial 2 Cable...
... to change channels through your TV This connection also allows you to use the remote control to channel 3 or 4. For more information on the remote control to switch between the cable box and direct cable inputs. ✍ Your Sony remote control can be viewed in PIP. Decodificador Parte posterior del televisor 3 Cable coaxial 2 Cable...
Primary User Manual
Page 21
... OUT jack on your cable box to the IN jack on the PIP feature, see page 37). 14 This setup allows you to use the remote control to: ❏ change channels through your cable box or VCR when you are receiving a scrambled signal ❏ change channels through your TV This connection...
... OUT jack on your cable box to the IN jack on the PIP feature, see page 37). 14 This setup allows you to use the remote control to: ❏ change channels through your cable box or VCR when you are receiving a scrambled signal ❏ change channels through your TV This connection...
Primary User Manual
Page 24
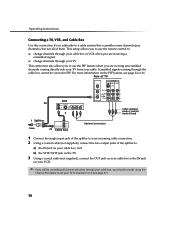
...; To view from the satellite receiver or VCR, select the video input to which your satellite receiver or VCR is connected by pressing on the remote control. 17
...; To view from the satellite receiver or VCR, select the video input to which your satellite receiver or VCR is connected by pressing on the remote control. 17
Primary User Manual
Page 28
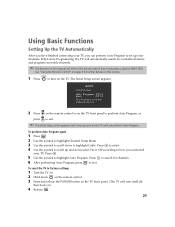
... 4 Use the joystick to scroll up your TV. To reset the TV to factory settings 1 Turn the TV on. 2 Hold down on the remote control. 3 Press and release the POWER button on the TV until you perform Auto Program. Using Basic Functions Setting Up the TV Automatically After you...to set up and down select On or Off according to how you connected your channels. See "Using the Remote Control" on page 3 for channels. 6 After performing Auto Program, press to the remote control that incorporates a joystick (RM-Y182). The Initial Setup screen appears. Press to search for further details...
... 4 Use the joystick to scroll up your TV. To reset the TV to factory settings 1 Turn the TV on. 2 Hold down on the remote control. 3 Press and release the POWER button on the TV until you perform Auto Program. Using Basic Functions Setting Up the TV Automatically After you...to set up and down select On or Off according to how you connected your channels. See "Using the Remote Control" on page 3 for channels. 6 After performing Auto Program, press to the remote control that incorporates a joystick (RM-Y182). The Initial Setup screen appears. Press to search for further details...
Primary User Manual
Page 31
... window for possible solutions. 24 buttons to change the channel in the PIP window picture. Operating Instructions Using Picture in Picture (PIP) with Remote Y181 The Picture-in-Picture (PIP) feature allows you to change the channel in the PIP window picture. 5 Press the PIP (yellow)...the FUNCTION bar to Use PIP" (page 28) or see a different picture in both windows. 4 Use the PIP (yellow) CH+/- Tune your remote control). Make sure the connected equipment is currently receiving sound Main 9 picture 6 Channel number of the main picture 2 Channel number of the window ...
... window for possible solutions. 24 buttons to change the channel in the PIP window picture. Operating Instructions Using Picture in Picture (PIP) with Remote Y181 The Picture-in-Picture (PIP) feature allows you to change the channel in the PIP window picture. 5 Press the PIP (yellow)...the FUNCTION bar to Use PIP" (page 28) or see a different picture in both windows. 4 Use the PIP (yellow) CH+/- Tune your remote control). Make sure the connected equipment is currently receiving sound Main 9 picture 6 Channel number of the main picture 2 Channel number of the window ...
Primary User Manual
Page 32
...channel in the PIP window picture. To change the channel in the main window, use the main CH+/- Press to play as your remote control, see "Using the Remote Controls" on and off. The main window continues to freeze the window picture. button to scroll through TV channels. ❏ Use ...Use the yellow PIP CH+/- Press to any of the four corners of the screen. Press to move the location of the remote control. PIP Functions buttons For KV-27FV300 model Yellow labeled PIP button Description Press to turn the PIP feature on page 3. buttons at the bottom of the window ...
...channel in the PIP window picture. To change the channel in the main window, use the main CH+/- Press to play as your remote control, see "Using the Remote Controls" on and off. The main window continues to freeze the window picture. button to scroll through TV channels. ❏ Use ...Use the yellow PIP CH+/- Press to any of the four corners of the screen. Press to move the location of the remote control. PIP Functions buttons For KV-27FV300 model Yellow labeled PIP button Description Press to turn the PIP feature on page 3. buttons at the bottom of the window ...
Primary User Manual
Page 33
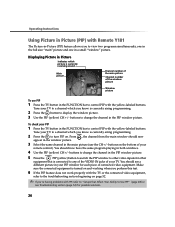
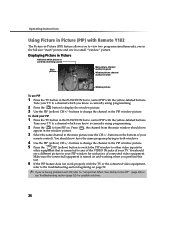
... which picture is currently airing programming. 2 Press the button to display the window picture. 3 Use the PIP (yellow) CH+/- Tune your remote control). You should now appear in the window picture. 3 Select the same channel in Picture Indicates which you know is currently receiving sound Main... a channel which you know is connected to control PIP with the yellow-labeled buttons. Operating Instructions Using Picture in Picture (PIP) with Remote Y182 The Picture-in-Picture (PIP) feature allows you to view two programs simultaneously, one in the full size "main" picture and...
... which picture is currently airing programming. 2 Press the button to display the window picture. 3 Use the PIP (yellow) CH+/- Tune your remote control). You should now appear in the window picture. 3 Select the same channel in Picture Indicates which you know is currently receiving sound Main... a channel which you know is connected to control PIP with the yellow-labeled buttons. Operating Instructions Using Picture in Picture (PIP) with Remote Y182 The Picture-in-Picture (PIP) feature allows you to view two programs simultaneously, one in the full size "main" picture and...
Primary User Manual
Page 34
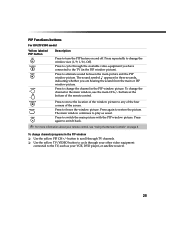
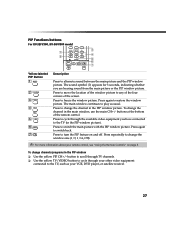
...PIP window ❏ Use the yellow PIP CH+/- Press to cycle through your other video equipment connected to play as your remote control, see "Using the Remote Controls" on and off. Press to change the channel in the PIP window picture. Press to restore the window picture..... Press to move the location of the window picture to alternate sound between the main picture and the PIP window picture. PIP Functions buttons For KV-32FV300, KV-36FV300 model 3 1 4 2 5 6 7 Yellow-labeled PIP Button 1 2 3 4 5 6 7 RM Y182 Description Press to any of the four corners of the screen. ...
...PIP window ❏ Use the yellow PIP CH+/- Press to cycle through your other video equipment connected to play as your remote control, see "Using the Remote Controls" on and off. Press to change the channel in the PIP window picture. Press to restore the window picture..... Press to move the location of the window picture to alternate sound between the main picture and the PIP window picture. PIP Functions buttons For KV-32FV300, KV-36FV300 model 3 1 4 2 5 6 7 Yellow-labeled PIP Button 1 2 3 4 5 6 7 RM Y182 Description Press to any of the four corners of the screen. ...


