Component Setup Guide
Page 1
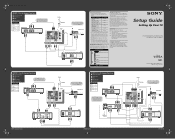
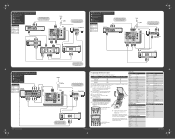
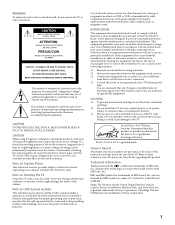
... Good Video Performance Setup Guide Setting Up Your TV For operating instructions, see the manuals that came with your TV and A/V equipment ® ® FD Trinitron, WEGA, XBR, and DVD Dream are not using a cable box, connect your cable or antenna to operate your DVD player or satellite receiver has a DVI ... TV Cable Box IN OUT IN LINE IN LINE OUT OUT R L VIDEO AUDIO VCR © 2003 Sony Corporation Printed in your cable or antenna to connect the components in all the AC power cords and turn on the TV and all components before making connections. • If you 'll need ...
... Good Video Performance Setup Guide Setting Up Your TV For operating instructions, see the manuals that came with your TV and A/V equipment ® ® FD Trinitron, WEGA, XBR, and DVD Dream are not using a cable box, connect your cable or antenna to operate your DVD player or satellite receiver has a DVI ... TV Cable Box IN OUT IN LINE IN LINE OUT OUT R L VIDEO AUDIO VCR © 2003 Sony Corporation Printed in your cable or antenna to connect the components in all the AC power cords and turn on the TV and all components before making connections. • If you 'll need ...
Component Setup Guide
Page 2
... I VCR I Digital Recorder Cables Required Splitter 1 Coaxial 4 Composite 4 Component 1 Audio 2 DVD Player If your equipment. MUTING SLEEP SAT/CABLE POWER SAT/CABLE POWER button (outside cover and set the A/V slide switch to operate Sony brand video equipment. If not, try entering them one by one code number is listed, use that slide switch...
... I VCR I Digital Recorder Cables Required Splitter 1 Coaxial 4 Composite 4 Component 1 Audio 2 DVD Player If your equipment. MUTING SLEEP SAT/CABLE POWER SAT/CABLE POWER button (outside cover and set the A/V slide switch to operate Sony brand video equipment. If not, try entering them one by one code number is listed, use that slide switch...

Dimensions Diagrams
Page 1
... • FAX (201) 930 7891 • b2b.sel.sony.com Features and specifications subject to change without notice. • Non-metric weights and measurements are approximate. KV-30XBR910 RM-Y188 REMOTE CONTROL DESCRIPTION: 30" Trinitron®XBR POWER DIMENSIONS Monitor/Receiver REQUIREMENTS:120V AC (WHD): 35 3/8" x 23 7/8" x 22 1/4" POWER 60Hz WEIGHT: 152 lbs CONSUMPTION: TBD FRONT VIEW...
... • FAX (201) 930 7891 • b2b.sel.sony.com Features and specifications subject to change without notice. • Non-metric weights and measurements are approximate. KV-30XBR910 RM-Y188 REMOTE CONTROL DESCRIPTION: 30" Trinitron®XBR POWER DIMENSIONS Monitor/Receiver REQUIREMENTS:120V AC (WHD): 35 3/8" x 23 7/8" x 22 1/4" POWER 60Hz WEIGHT: 152 lbs CONSUMPTION: TBD FRONT VIEW...
Operating Instructions
Page 2
...place, or in a place subject to excessive dust or mechanical vibration. ❑ The AC power cord is attached to the rear of the TV with a soft, dry cloth. CAUTION RISK ... installed and used in accordance with the instructions, may cause harmful interference with your Sony dealer regarding this equipment. Do not attempt to persons. Doing so could void your... to operate this product. under license from the broadcaster/cable company and/or program owner. Wega, FD Trinitron, Steady Sound, Digital Reality Creation, Caption Vision, CineMotion, Memory Stick, and Twin View ...
...place, or in a place subject to excessive dust or mechanical vibration. ❑ The AC power cord is attached to the rear of the TV with a soft, dry cloth. CAUTION RISK ... installed and used in accordance with the instructions, may cause harmful interference with your Sony dealer regarding this equipment. Do not attempt to persons. Doing so could void your... to operate this product. under license from the broadcaster/cable company and/or program owner. Wega, FD Trinitron, Steady Sound, Digital Reality Creation, Caption Vision, CineMotion, Memory Stick, and Twin View ...

Operating Instructions
Page 3
... feature. Do not defeat the safety purpose of the grounding plug. Always turn the set off when it is equipped with a polarized AC power cord plug (a plug having a third pin for cleaning the exterior of the product should follow the manufacturer's instructions, and should use attachments not ... surfaces may cause hazards. Do not allow children or pets to insert the plug fully into the outlet, contact your dealer or local power company. If you are holding the cable or cord, causing serious injury. Object and Liquid Entry Never push objects of any objects, especially...
... feature. Do not defeat the safety purpose of the grounding plug. Always turn the set off when it is equipped with a polarized AC power cord plug (a plug having a third pin for cleaning the exterior of the product should follow the manufacturer's instructions, and should use attachments not ... surfaces may cause hazards. Do not allow children or pets to insert the plug fully into the outlet, contact your dealer or local power company. If you are holding the cable or cord, causing serious injury. Object and Liquid Entry Never push objects of any objects, especially...

Operating Instructions
Page 4
...a need for the grounding electrode. WHEN INSTALLING AN OUTDOOR ANTENNA SYSTEM, EXTREME CARE SHOULD BE TAKEN TO KEEP FROM CONTACTING SUCH POWER LINES OR CIRCUITS AS CONTACT WITH THEM IS ALMOST INVARIABLY FATAL. Antenna Grounding According to grounding electrodes, and requirements for service. ... operation of other hazards. Service Damage Requiring Service Unplug the set does not operate normally when following conditions: ❑ When the power cord or plug is in a picture tube implosion. Refer all servicing to provide some protection against voltage surges and built-up static...
...a need for the grounding electrode. WHEN INSTALLING AN OUTDOOR ANTENNA SYSTEM, EXTREME CARE SHOULD BE TAKEN TO KEEP FROM CONTACTING SUCH POWER LINES OR CIRCUITS AS CONTACT WITH THEM IS ALMOST INVARIABLY FATAL. Antenna Grounding According to grounding electrodes, and requirements for service. ... operation of other hazards. Service Damage Requiring Service Unplug the set does not operate normally when following conditions: ❑ When the power cord or plug is in a picture tube implosion. Refer all servicing to provide some protection against voltage surges and built-up static...

Operating Instructions
Page 6
Contents Introducing the FD Trinitron Wega Overview ...9 Presenting the FD Trinitron Wega 9 Package Contents 9 Features 9 Setting Up the TV Overview ...11 About the AC Power Cord 11 TV Controls and Connectors 12 Front Panel 12 Rear Panel 14 Basic Connections: Connecting a Cable or Antenna 16 Cable or ... Equipment 23 About Using S VIDEO 23 VCR and Cable 24 VCR and Cable Box 26 Two VCRs for Tape Editing 28 Satellite Receiver 30 Satellite Receiver and VCR 32 DVD Player with Component Video Connectors 34 DVD Player with S VIDEO and Audio Connectors 36 DVI-Equipped Device ...
Contents Introducing the FD Trinitron Wega Overview ...9 Presenting the FD Trinitron Wega 9 Package Contents 9 Features 9 Setting Up the TV Overview ...11 About the AC Power Cord 11 TV Controls and Connectors 12 Front Panel 12 Rear Panel 14 Basic Connections: Connecting a Cable or Antenna 16 Cable or ... Equipment 23 About Using S VIDEO 23 VCR and Cable 24 VCR and Cable Box 26 Two VCRs for Tape Editing 28 Satellite Receiver 30 Satellite Receiver and VCR 32 DVD Player with Component Video Connectors 34 DVD Player with S VIDEO and Audio Connectors 36 DVI-Equipped Device ...

Operating Instructions
Page 12
... DVI-Equipped Device Camcorder Audio Receiver Using the CONTROL S Feature Setting Up the Channel List Page(s) 12-15 16-22 24 26 28 30 32 34 36 37 38 39 40 41 About the AC Power Cord The AC power cord is attached to remove it from its holder. Once removed, the AC... power plug should automatically disengage from the hook. AC power cord You can detach the cord from its stored location. ✍ Do not plug in the AC power cord until you have made all other connections. Use caution when removing the...
... DVI-Equipped Device Camcorder Audio Receiver Using the CONTROL S Feature Setting Up the Channel List Page(s) 12-15 16-22 24 26 28 30 32 34 36 37 38 39 40 41 About the AC Power Cord The AC power cord is attached to remove it from its holder. Once removed, the AC... power plug should automatically disengage from the hook. AC power cord You can detach the cord from its stored location. ✍ Do not plug in the AC power cord until you have made all other connections. Use caution when removing the...
Operating Instructions
Page 14
... shuts off when the picture is turned off the TV. SETUP SETUP SETUP SETUP 13 Press again to adjust the volume. For details, see "Contacting Sony" on -screen cursor. When lit, indicates that has S VIDEO. If the LED blinks continuously, this LED will remain lit even if the TV ... in the TV's menu. 6 7 TV/VIDEO 8 -VOLUME + 9 -CHANNEL+ 0 qa Memory Stick LED qs TIMER LED qd STAND BY LED qf Infrared Receiver (IR) qg POWER Press to the TV's video inputs. For details, see "Using the Menus" on page 77. Provides better picture quality than composite video (2). To scan quickly...
... shuts off when the picture is turned off the TV. SETUP SETUP SETUP SETUP 13 Press again to adjust the volume. For details, see "Contacting Sony" on -screen cursor. When lit, indicates that has S VIDEO. If the LED blinks continuously, this LED will remain lit even if the TV ... in the TV's menu. 6 7 TV/VIDEO 8 -VOLUME + 9 -CHANNEL+ 0 qa Memory Stick LED qs TIMER LED qd STAND BY LED qf Infrared Receiver (IR) qg POWER Press to the TV's video inputs. For details, see "Using the Menus" on page 77. Provides better picture quality than composite video (2). To scan quickly...
Operating Instructions
Page 42
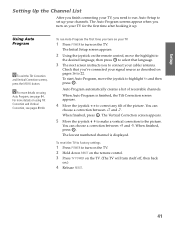
...appears. 2 Using the joystick on the remote control, move the joystick to turn on the TV. 2 Hold down RESET on the remote control. 3 Press TV POWER on the TV. (The TV will turn itself off, then back on.) 4 Release RESET. z For more details on using Auto Program, see pages 89-90... that you've connected your signal source as described on pages 16 to turn on the TV. To reset the TV to factory settings 1 Press POWER to highlight Yes and then press . Auto Program automatically creates a list of the picture. You can choose a correction between +7 and -7. Using Auto Program z To exit...
...appears. 2 Using the joystick on the remote control, move the joystick to turn on the TV. 2 Hold down RESET on the remote control. 3 Press TV POWER on the TV. (The TV will turn itself off, then back on.) 4 Release RESET. z For more details on using Auto Program, see pages 89-90... that you've connected your signal source as described on pages 16 to turn on the TV. To reset the TV to factory settings 1 Press POWER to highlight Yes and then press . Auto Program automatically creates a list of the picture. You can choose a correction between +7 and -7. Using Auto Program z To exit...

Operating Instructions
Page 45
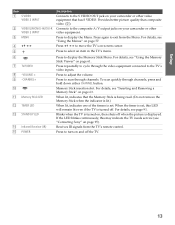
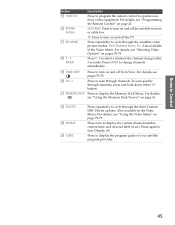
...: Press to display the Scrolling Index. To select an item, press the center of the joystick ( ). Also available in minutes (15, 30, 45, 60, or 90) that was selected. For details, see page 51. Press to have the remote control operate the satellite receiver or..., Normal, Full, Zoom. Press repeatedly to adjust the volume. SETUP SETUP Remote Control Button Descriptions Outside Panel 1 2 3 4 5 MUTING SLEEP SAT/CABLE POWER FUNCTION SAT/CABLE TV TV/VIDEO ANT PIC MODE Button 1 MUTING qh 2 SLEEP qj 3 FUNCTION qk Buttons JUMP ENTER 6 7 WIDE MODE INDEX TWIN VIEW...
...: Press to display the Scrolling Index. To select an item, press the center of the joystick ( ). Also available in minutes (15, 30, 45, 60, or 90) that was selected. For details, see page 51. Press to have the remote control operate the satellite receiver or..., Normal, Full, Zoom. Press repeatedly to adjust the volume. SETUP SETUP Remote Control Button Descriptions Outside Panel 1 2 3 4 5 MUTING SLEEP SAT/CABLE POWER FUNCTION SAT/CABLE TV TV/VIDEO ANT PIC MODE Button 1 MUTING qh 2 SLEEP qj 3 FUNCTION qk Buttons JUMP ENTER 6 7 WIDE MODE INDEX TWIN VIEW...
Operating Instructions
Page 46
... 45 For details, see pages 53-55. the channel changes after 3 seconds. Press to operate nonSony video equipment. SETUP SETUP Button qg CODE SET qh POWER Buttons qj PIC MODE qk 0 - 9 ENTER Description Press to program the remote control to display the program guide of your satellite program provider.
... 45 For details, see pages 53-55. the channel changes after 3 seconds. Press to operate nonSony video equipment. SETUP SETUP Button qg CODE SET qh POWER Buttons qj PIC MODE qk 0 - 9 ENTER Description Press to program the remote control to display the program guide of your satellite program provider.
Operating Instructions
Page 47
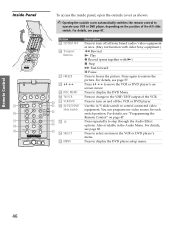
.../2/3/DVD Slide Switch es ed ed ef eg ef SELECT eg MENU Description Press to turn on and off all Sony brand audio/video equipment at once. (May not function with older Sony equipment.) m Rewind N Play z Record (press together with N) x Stop M Fast forward X Pause Press to freeze the picture. Press Vv B b to... MODE INDEX TWIN VIEW VOL MENU CH DRC MODE MEMORY STICK PALETTE RESET FAVORITES GUIDE CODE SET DISPLAY TV RM-Y188 MUTING SLEEP SAT/CABLE POWER wg SYSTEM OFF TV/VCR VCR/DVD wh FREEZE wj SELECT wk wl DISC MENU MENU WIDE MODE INDEX TWIN VIEW To access the inside...
.../2/3/DVD Slide Switch es ed ed ef eg ef SELECT eg MENU Description Press to turn on and off all Sony brand audio/video equipment at once. (May not function with older Sony equipment.) m Rewind N Play z Record (press together with N) x Stop M Fast forward X Pause Press to freeze the picture. Press Vv B b to... MODE INDEX TWIN VIEW VOL MENU CH DRC MODE MEMORY STICK PALETTE RESET FAVORITES GUIDE CODE SET DISPLAY TV RM-Y188 MUTING SLEEP SAT/CABLE POWER wg SYSTEM OFF TV/VCR VCR/DVD wh FREEZE wj SELECT wk wl DISC MENU MENU WIDE MODE INDEX TWIN VIEW To access the inside...
Operating Instructions
Page 48
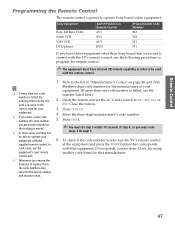
...come to operate your equipment. ❑ If you enter a new code number, the code number you previously entered at the equipment and press the POWER button that corresponds with the supplied remote control. z ❑ If more than one code number is listed, try using another code listed for your...If you may revert to the factory setting and must be able to the correct code for that you must have video equipment other than Sony brand that manufacturer. SETUP SETUP Remote Control Programming the Remote Control The remote control is preset to AV1, AV2, AV3, or DVD. ...
...come to operate your equipment. ❑ If you enter a new code number, the code number you previously entered at the equipment and press the POWER button that corresponds with the supplied remote control. z ❑ If more than one code number is listed, try using another code listed for your...If you may revert to the factory setting and must be able to the correct code for that you must have video equipment other than Sony brand that manufacturer. SETUP SETUP Remote Control Programming the Remote Control The remote control is preset to AV1, AV2, AV3, or DVD. ...
Operating Instructions
Page 51
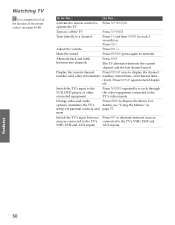
...'s VHF/UHF and VHF/UHF and AUX inputs AUX inputs. Display the current channel Press DISPLAY once to turn Display off the TV Press TV POWER Tune directly to Press TV FUNCTION operate the TV Turn on page 77.
...'s VHF/UHF and VHF/UHF and AUX inputs AUX inputs. Display the current channel Press DISPLAY once to turn Display off the TV Press TV POWER Tune directly to Press TV FUNCTION operate the TV Turn on page 77.

Operating Instructions
Page 59
...Rewind the tape Pause Search the picture forward or backward Change input mode Press Open the outside cover, as shown on /off SAT/CABLE POWER Select a channel 0-9, ENTER Change channels CH +/- Activate the remote control to 48. Press Activate the remote control SAT/CABLE FUNCTION to previous.... Then set the A/V slide switch to the TV's video inputs. CH +/N and z simultaneously N x M m X M or m during playback (release to operate non-Sony equipment Do This ... Switch the TV's input to the VCR, DVD player, or other connected equipment Set up the TV remote control to resume normal...
...Rewind the tape Pause Search the picture forward or backward Change input mode Press Open the outside cover, as shown on /off SAT/CABLE POWER Select a channel 0-9, ENTER Change channels CH +/- Activate the remote control to 48. Press Activate the remote control SAT/CABLE FUNCTION to previous.... Then set the A/V slide switch to the TV's video inputs. CH +/N and z simultaneously N x M m X M or m during playback (release to operate non-Sony equipment Do This ... Switch the TV's input to the VCR, DVD player, or other connected equipment Set up the TV remote control to resume normal...

Operating Instructions
Page 60
... the DVD player Menu (Setup) Display the DVD Menu Move highlight (cursor) Select item Press Open the outside cover, as shown on /off SAT/CABLE POWER Select a channel 0-9, ENTER Change channels CH +/- N x X M to step forward or m to step backward CH+ to resume normal playback) Search a chapter forward or CH +/backward Features...
... the DVD player Menu (Setup) Display the DVD Menu Move highlight (cursor) Select item Press Open the outside cover, as shown on /off SAT/CABLE POWER Select a channel 0-9, ENTER Change channels CH +/- N x X M to step forward or m to step backward CH+ to resume normal playback) Search a chapter forward or CH +/backward Features...

Operating Instructions
Page 97
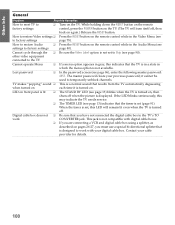
... the video equipment may need to be reset. ❏ There may need to change channels with the remote control Remote control does not operate non-Sony video equipment Possible Remedies ❏ The batteries could be weak. Use the Channel Fix option to "fix" the channel based on the hookup you used... sure you have inadvertently pressed the SAT/CABLE FUNCTION button, which changes the remote control to SAT or CABLE mode. ❏ Make sure the TV's power cord is connected securely to the wall outlet. ❏ Locate the TV at least 3-4 feet away from the channel 3 or 4 setting.
... the video equipment may need to be reset. ❏ There may need to change channels with the remote control Remote control does not operate non-Sony video equipment Possible Remedies ❏ The batteries could be weak. Use the Channel Fix option to "fix" the channel based on the hookup you used... sure you have inadvertently pressed the SAT/CABLE FUNCTION button, which changes the remote control to SAT or CABLE mode. ❏ Make sure the TV's power cord is connected securely to the wall outlet. ❏ Locate the TV at least 3-4 feet away from the channel 3 or 4 setting.

Operating Instructions
Page 100
... Fixed (in the Video Menu (see page 78). Cannot raise the volume on screen ❏ You have selected a text option in . ❏ Press the POWER button on the screen ❏ Try another channel; Dark, poor or no sound 44). ❏ Make sure the Speaker option is set to On in...trying to change the input mode (see page 80). Your TV will show these programs with your DVD (or contact your local Sony Service Center. ❏ Make sure the power cord is set to Stereo, switch to Mono (which may solve the problem. SETUP SETUP SETUP Audio Problem Possible Remedies Good ...
... Fixed (in the Video Menu (see page 78). Cannot raise the volume on screen ❏ You have selected a text option in . ❏ Press the POWER button on the screen ❏ Try another channel; Dark, poor or no sound 44). ❏ Make sure the Speaker option is set to On in...trying to change the input mode (see page 80). Your TV will show these programs with your DVD (or contact your local Sony Service Center. ❏ Make sure the power cord is set to Stereo, switch to Mono (which may solve the problem. SETUP SETUP SETUP Audio Problem Possible Remedies Good ...
Operating Instructions
Page 101
While holding down the RESET button on the remote factory settings control, press the POWER button on the remote control while in the Video Menu (see page 90). When the timer is set, this LED will turn itself off when ...
While holding down the RESET button on the remote factory settings control, press the POWER button on the remote control while in the Video Menu (see page 90). When the timer is set, this LED will turn itself off when ...

