
Operating Instructions
Page 1
4-074-163-11 (1) Color Rear Video Projector Operating Instructions KP-53HS10 KP-61HS10 © 2000 Sony Corporation
4-074-163-11 (1) Color Rear Video Projector Operating Instructions KP-53HS10 KP-61HS10 © 2000 Sony Corporation

Operating Instructions
Page 2
... for help. Note on the screen for long periods of time especially at a high brightness or contrast setting, the image can radiate radio frequency energy and, if not installed and used in accordance with the instructions, may cause harmful interference with an extension cord, receptacle or other than private viewing of programs broadcast on Caption Vision This television receiver provides display of television closed captioning in the literature accompanying the...
... for help. Note on the screen for long periods of time especially at a high brightness or contrast setting, the image can radiate radio frequency energy and, if not installed and used in accordance with the instructions, may cause harmful interference with an extension cord, receptacle or other than private viewing of programs broadcast on Caption Vision This television receiver provides display of television closed captioning in the literature accompanying the...

Operating Instructions
Page 4
... Video Output Connectors 17 Connecting a DVD Player With Component Video Output Connectors 18 Connecting an AV Receiver 19 Connecting an Audio System 20 Connecting an Amplifier That Supports Dolby Pro Logic Decoder 21 Basic Set Up Using the Remote Control 22 Setting Up the Projection TV Automatically 23 Adjusting the Convergence Automatically (FLASH FOCUS 24 Using Your New Projection TV Watching the TV 25 Watching Digital TV 27 Watching Two Programs at One Time - P&P (Twin View 29 Using CHANNEL INDEX 31 Adjusting Your SET UP (menus) Learning Menu...
... Video Output Connectors 17 Connecting a DVD Player With Component Video Output Connectors 18 Connecting an AV Receiver 19 Connecting an Audio System 20 Connecting an Amplifier That Supports Dolby Pro Logic Decoder 21 Basic Set Up Using the Remote Control 22 Setting Up the Projection TV Automatically 23 Adjusting the Convergence Automatically (FLASH FOCUS 24 Using Your New Projection TV Watching the TV 25 Watching Digital TV 27 Watching Two Programs at One Time - P&P (Twin View 29 Using CHANNEL INDEX 31 Adjusting Your SET UP (menus) Learning Menu...

Operating Instructions
Page 5
... VIDEO 5 (DTV) IN jacks) - Thank you to receive the 1080i, 480p and 480i digital TV formats (except for illustration purposes. CHANNEL INDEX, allowing you for input from twelve programs - Model KP-53HS10 is on the VIDEO 5 (DTV) IN jacks). • Four AUDIO/VIDEO/S VIDEO inputs. Picture-in function (Twin View™) - TruSurround, SRS and the symbol are trademarks of your projection TV easily. (not available for purchasing the Sony Color Rear Video Projection TV...
... VIDEO 5 (DTV) IN jacks) - Thank you to receive the 1080i, 480p and 480i digital TV formats (except for illustration purposes. CHANNEL INDEX, allowing you for input from twelve programs - Model KP-53HS10 is on the VIDEO 5 (DTV) IN jacks). • Four AUDIO/VIDEO/S VIDEO inputs. Picture-in function (Twin View™) - TruSurround, SRS and the symbol are trademarks of your projection TV easily. (not available for purchasing the Sony Color Rear Video Projection TV...
Operating Instructions
Page 6
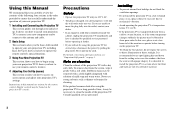
... for several days, disconnect the power by qualified service personnel before turning on the cord. Never use spot lighting directed down from the ceiling or to cover the windows that you fully understand the operation of your new projection TV. 1 Installing and Connecting the Projection TV This section guides you through your initial set up. It is transported directly from the screen, wipe it further. • If...
... for several days, disconnect the power by qualified service personnel before turning on the cord. Never use spot lighting directed down from the ceiling or to cover the windows that you fully understand the operation of your new projection TV. 1 Installing and Connecting the Projection TV This section guides you through your initial set up. It is transported directly from the screen, wipe it further. • If...

Operating Instructions
Page 7
... instructions placed on the set through the cabinet slots as they may touch dangerous voltage points or short out parts that could result in . Use Power Sources This set . (continued) 3 Before You Begin Grounding or Polarization This set with a polarized AC power cord plug (a plug having one way. If the plug should be observed in the installation, use, and servicing of the set...
... instructions placed on the set through the cabinet slots as they may touch dangerous voltage points or short out parts that could result in . Use Power Sources This set . (continued) 3 Before You Begin Grounding or Polarization This set with a polarized AC power cord plug (a plug having one way. If the plug should be observed in the installation, use, and servicing of the set...

Operating Instructions
Page 9
... service personnel under the following the operating instructions. Improper adjustment of the set . - When the set from the wall outlet and disconnect the antenna. Service Damage Requiring Service Unplug the set reaches the end of any service or repairs to the set, ask the service technician to rain or water. - If the set has been exposed to perform routine safety checks (as the original parts. Adjust only those controls...
... service personnel under the following the operating instructions. Improper adjustment of the set . - When the set from the wall outlet and disconnect the antenna. Service Damage Requiring Service Unplug the set reaches the end of any service or repairs to the set, ask the service technician to rain or water. - If the set has been exposed to perform routine safety checks (as the original parts. Adjust only those controls...
Operating Instructions
Page 12
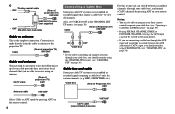
... picture. • If you are able to receive using an antenna. Cable (Rear of projection TV) VHF/UHF Cable and antenna You may be able to program your Sony remote control to operate your cable box. (see "Operating a Cable Box or DBS Receiver" on page 55) • During PIP, P&P, CHANNEL INDEX or FAVORITE CHANNEL viewing, the AUX input can switch between the AUX and normal (CATV) input, you can only be controlling all channels. Also, set up , you should consider using CHANNEL FIX. (see "CHANNEL FIX...
... picture. • If you are able to receive using an antenna. Cable (Rear of projection TV) VHF/UHF Cable and antenna You may be able to program your Sony remote control to operate your cable box. (see "Operating a Cable Box or DBS Receiver" on page 55) • During PIP, P&P, CHANNEL INDEX or FAVORITE CHANNEL viewing, the AUX input can switch between the AUX and normal (CATV) input, you can only be controlling all channels. Also, set up , you should consider using CHANNEL FIX. (see "CHANNEL FIX...

Operating Instructions
Page 20
... playback using the connection instructions on page 9 of this manual. 2 Using an AUDIO/VIDEO cable, connect AUDIO and VIDEO IN on the VCR intended for recording) R AUDIO R AUDIO L VIDEO LINE IN OUT IN 2 VMC-810S/820S (not supplied) VMC-810S/820S (not supplied) (Rear of projection TV) VIDEO IN SELECT OUT Indicates direction of SELECT OUT on the projection TV. Doing so will cause program interference and other viewing problems. • You can select the output signal from...
... playback using the connection instructions on page 9 of this manual. 2 Using an AUDIO/VIDEO cable, connect AUDIO and VIDEO IN on the VCR intended for recording) R AUDIO R AUDIO L VIDEO LINE IN OUT IN 2 VMC-810S/820S (not supplied) VMC-810S/820S (not supplied) (Rear of projection TV) VIDEO IN SELECT OUT Indicates direction of SELECT OUT on the projection TV. Doing so will cause program interference and other viewing problems. • You can select the output signal from...

Operating Instructions
Page 27
... AUTO PROGRAM, all the settings in the VIDEO and AUDIO menus are reset to the factory settings. TV/VIDEO FLASH FOCUS S VIDEO VIDEO L(MONO) AUDIO R SET UP VIDEO 2 INPUT 1 Press POWER to continue. + VOLUME - to turn on page 37) Notes: • Perform this function during the day, with the antenna and/or cable properly connected, to ensure that all available channels will be broadcasting and receivable. • Before you perform AUTO SET UP again, make sure that use a cable box for installations...
... AUTO PROGRAM, all the settings in the VIDEO and AUDIO menus are reset to the factory settings. TV/VIDEO FLASH FOCUS S VIDEO VIDEO L(MONO) AUDIO R SET UP VIDEO 2 INPUT 1 Press POWER to continue. + VOLUME - to turn on page 37) Notes: • Perform this function during the day, with the antenna and/or cable properly connected, to ensure that all available channels will be broadcasting and receivable. • Before you perform AUTO SET UP again, make sure that use a cable box for installations...
Operating Instructions
Page 28
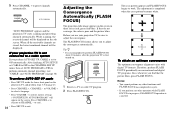
...see "CABLE" and "AUTO PROGRAM" on page 38) To perform AUTO SET UP again • Press SET UP inside the lower front panel on the projection TV, and perform steps 3-5 on the screen. TV/VIDEO FLASH FOCUS 1 Receive a TV or cable TV program. 2 Press FLASH FOCUS. The adjustment is set AUTO PROGRAM to YES to adjust the convergence. Therefore, perform FLASH FOCUS periodically on . + VOLUME - Adjusting the Convergence Automatically (FLASH FOCUS) The projection tube image appears on the sub screen. to ON automatically. AUTO PROGRAM "AUTO PROGRAM" appears and the projection TV starts scanning...
...see "CABLE" and "AUTO PROGRAM" on page 38) To perform AUTO SET UP again • Press SET UP inside the lower front panel on the projection TV, and perform steps 3-5 on the screen. TV/VIDEO FLASH FOCUS 1 Receive a TV or cable TV program. 2 Press FLASH FOCUS. The adjustment is set AUTO PROGRAM to YES to adjust the convergence. Therefore, perform FLASH FOCUS periodically on . + VOLUME - Adjusting the Convergence Automatically (FLASH FOCUS) The projection tube image appears on the sub screen. to ON automatically. AUTO PROGRAM "AUTO PROGRAM" appears and the projection TV starts scanning...

Operating Instructions
Page 29
... AUX input. (for use with the projection TV. Using the white labeled buttons for projection TV operations REFER TO THE ILLUSTRATION OF THE REMOTE CONTROL ON THE INSIDE FRONT COVER OF THIS MANUAL AS YOU REVIEW THE FOLLOWING DESCRIPTIONS TV (FUNCTION) Activates the remote control for detailed connection information, see "FREEZE MODE" on your remote control. Press to scan through the remote control. To restore sound, press again or press VOL +. down ). ANT - (AUX input) Press to adjust the volume...
... AUX input. (for use with the projection TV. Using the white labeled buttons for projection TV operations REFER TO THE ILLUSTRATION OF THE REMOTE CONTROL ON THE INSIDE FRONT COVER OF THIS MANUAL AS YOU REVIEW THE FOLLOWING DESCRIPTIONS TV (FUNCTION) Activates the remote control for detailed connection information, see "FREEZE MODE" on your remote control. Press to scan through the remote control. To restore sound, press again or press VOL +. down ). ANT - (AUX input) Press to adjust the volume...

Operating Instructions
Page 30
... to display the channel number, current time, channel caption (if set), and MTS mode (if SAP is canceled. When you select each mode, you can also adjust the picture quality (such as BRIGHTNESS, COLOR, etc.) to suit your projection TV will skip the video input you selected. (see "VIDEO LABEL" on page 42) MTS Press to scroll through the Multi-channel TV Sound (MTS) options. (see "MTS" on the screen if the...
... to display the channel number, current time, channel caption (if set), and MTS mode (if SAP is canceled. When you select each mode, you can also adjust the picture quality (such as BRIGHTNESS, COLOR, etc.) to suit your projection TV will skip the video input you selected. (see "VIDEO LABEL" on page 42) MTS Press to scroll through the Multi-channel TV Sound (MTS) options. (see "MTS" on the screen if the...

Operating Instructions
Page 45
... [CC] button until Caption Vision is tuned to, regardless of the displayed picture. (see "Connecting an AV Receiver" on the screen. Output signal selection from SELECT OUT You can cause errors in your language of the projection TV. SET UP PARENTAL CONTROL CAPTION VISION CC1 SELECT OUT: MONITOR LANGUAGE: ENGLVISIDHEO1 VIDEO LABEL VIDEO2 DIRECT PLAY VIDEO3 FREEZE MODE:NORVNIADLEO4 DTV INPUT: R.GTTV.VBOOUUTT ASPECT RATIO: 4:3 Move Select Exit MENU Note: •...
... [CC] button until Caption Vision is tuned to, regardless of the displayed picture. (see "Connecting an AV Receiver" on the screen. Output signal selection from SELECT OUT You can cause errors in your language of the projection TV. SET UP PARENTAL CONTROL CAPTION VISION CC1 SELECT OUT: MONITOR LANGUAGE: ENGLVISIDHEO1 VIDEO LABEL VIDEO2 DIRECT PLAY VIDEO3 FREEZE MODE:NORVNIADLEO4 DTV INPUT: R.GTTV.VBOOUUTT ASPECT RATIO: 4:3 Move Select Exit MENU Note: •...

Operating Instructions
Page 47
... receiver Select R.G.B when you connect a DTV receiver to enter password Move Exit MENU 2 Enter a four digit password* using the 0-9 buttons. PARENTAL CONTROL PARENTAL LOCK: OFF RATING: CHILD CHANGE PASSWORD COUNTRY: U.S.A. Input signal selection from the SET UP menu. (see page 49. Frozen picture 6 R e c ip e flour - - - - 2 sugar - - - 1/2 salt - - - - -1/2 butter - - -1 6 Normal motion picture Press FREEZE again or press (OFF) to rate television programs (U.S. Note: • The PARENTAL CONTROL feature is stored and the PARENTAL CONTROL menu...
... receiver Select R.G.B when you connect a DTV receiver to enter password Move Exit MENU 2 Enter a four digit password* using the 0-9 buttons. PARENTAL CONTROL PARENTAL LOCK: OFF RATING: CHILD CHANGE PASSWORD COUNTRY: U.S.A. Input signal selection from the SET UP menu. (see page 49. Frozen picture 6 R e c ip e flour - - - - 2 sugar - - - 1/2 salt - - - - -1/2 butter - - -1 6 Normal motion picture Press FREEZE again or press (OFF) to rate television programs (U.S. Note: • The PARENTAL CONTROL feature is stored and the PARENTAL CONTROL menu...
Operating Instructions
Page 59
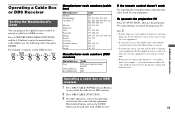
... entered at that come to replace them, for your equipment. Blue-labeled buttons such as the GUIDE button can program the supplied remote control to operate a Sony DBS receiver: FUNCTION CODE SET DBS/CABLE 8 0 ENTER 1 Manufacturer code numbers (cable box) Manufacturer Gemini Hamlin/Regal Jerrold/G. For example, to operate a cable box or DBS receiver. Operating a Cable Box or DBS Receiver Setting the Manufacturer's Code You can be reset. In this case, use the projection TV control buttons to operate your equipment with the supplied remote control. to the correct...
... entered at that come to replace them, for your equipment. Blue-labeled buttons such as the GUIDE button can program the supplied remote control to operate a Sony DBS receiver: FUNCTION CODE SET DBS/CABLE 8 0 ENTER 1 Manufacturer code numbers (cable box) Manufacturer Gemini Hamlin/Regal Jerrold/G. For example, to operate a cable box or DBS receiver. Operating a Cable Box or DBS Receiver Setting the Manufacturer's Code You can be reset. In this case, use the projection TV control buttons to operate your equipment with the supplied remote control. to the correct...

Operating Instructions
Page 60
... picture (screen lit), good sound b Adjust PICTURE in the VIDEO menu. (see "PICTURE" on page 34) b Adjust BRIGHTNESS in Canada contact the Customer Relations Center at: (416) 499-SONY (7669) The picture turns off and the TIMER/ STAND BY indicator on the front panel flashes (self-diagnosis function) b The projection TV is equipped with the buttons on the projection TV to the use of your Sony projection TV, please call one of flashes. b Press TV (FUNCTION) when operating your projection TV...
... picture (screen lit), good sound b Adjust PICTURE in the VIDEO menu. (see "PICTURE" on page 34) b Adjust BRIGHTNESS in Canada contact the Customer Relations Center at: (416) 499-SONY (7669) The picture turns off and the TIMER/ STAND BY indicator on the front panel flashes (self-diagnosis function) b The projection TV is equipped with the buttons on the projection TV to the use of your Sony projection TV, please call one of flashes. b Press TV (FUNCTION) when operating your projection TV...

Operating Instructions
Page 61
... can receive digital broadcasts in the VIDEO menu. (see "AUTO PROGRAM" on page 38) (continued) Additional Information 57 b Press the projection TV's power button off . (see "CHANNEL FIX" on page 38) Double images or ghosts b Use a highly directional outdoor antenna or a cable (when the problem is caused by reflections from noise sources such as cars, neon signs or hair-dryers. CHANNEL INDEX does not display all available channels b Make sure CABLE is ON...
... can receive digital broadcasts in the VIDEO menu. (see "AUTO PROGRAM" on page 38) (continued) Additional Information 57 b Press the projection TV's power button off . (see "CHANNEL FIX" on page 38) Double images or ghosts b Use a highly directional outdoor antenna or a cable (when the problem is caused by reflections from noise sources such as cars, neon signs or hair-dryers. CHANNEL INDEX does not display all available channels b Make sure CABLE is ON...

Operating Instructions
Page 63
...-line system Picture tube 7-inch high-brightness monochrome tubes (6.3 raster size), with optical coupling and liquid cooling system Projection lenses High performance, large diameter hybrid lens F1.1 Television system American TV standard Channel coverage VHF: 2-13/UHF: 14-69/CATV: 1-125 Antenna 75 ohm external terminal for VHF/UHF Screen size (measured diagonally) 53 inches (KP-53HS10) 61 inches (KP-61HS10) Inputs/outputs VIDEO 1/3 IN VIDEO 2 INPUT S VIDEO IN (4-pin mini DIN): Y: 1 Vp-p, 75-ohms unbalanced, sync negative C: 0.286 Vp-p (Burst signal...
...-line system Picture tube 7-inch high-brightness monochrome tubes (6.3 raster size), with optical coupling and liquid cooling system Projection lenses High performance, large diameter hybrid lens F1.1 Television system American TV standard Channel coverage VHF: 2-13/UHF: 14-69/CATV: 1-125 Antenna 75 ohm external terminal for VHF/UHF Screen size (measured diagonally) 53 inches (KP-53HS10) 61 inches (KP-61HS10) Inputs/outputs VIDEO 1/3 IN VIDEO 2 INPUT S VIDEO IN (4-pin mini DIN): Y: 1 Vp-p, 75-ohms unbalanced, sync negative C: 0.286 Vp-p (Burst signal...

Operating Instructions
Page 64
... 9, 10 CONTROL S feature 7 Convergence 24 CURRENT TIME 37 D DAYLIGHT SAVING 37 DBS receiver operation 55 Digital TV program 27 DIRECT PLAY 42 DISPLAY button 26 DRC 1 DTV INPUT 43 DVD connection 17, 18 operation 54 DYNAMIC PICTURE 35 E Editing using SELECT OUT . . . . 16 EFFECT OFF 36 SRS 3D MONO 36 TRUSURROUND 36 F Factory settings 35, 36 FAVORITE CHANNEL selecting 40 setting 39 FLASH FOCUS 24 FREEZE button 25, 29, 30 FREEZE MODE NORMAL 42...
... 9, 10 CONTROL S feature 7 Convergence 24 CURRENT TIME 37 D DAYLIGHT SAVING 37 DBS receiver operation 55 Digital TV program 27 DIRECT PLAY 42 DISPLAY button 26 DRC 1 DTV INPUT 43 DVD connection 17, 18 operation 54 DYNAMIC PICTURE 35 E Editing using SELECT OUT . . . . 16 EFFECT OFF 36 SRS 3D MONO 36 TRUSURROUND 36 F Factory settings 35, 36 FAVORITE CHANNEL selecting 40 setting 39 FLASH FOCUS 24 FREEZE button 25, 29, 30 FREEZE MODE NORMAL 42...


