Instructions (SU-WL31 Wall-Mount Bracket)
Page 7
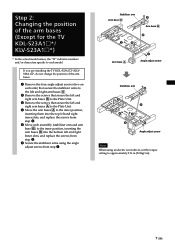
...step 3. 5 Move each model. If you are installing the TV KDL-S23A1s*/KLVS23A1s*, do not change the position of the arm bases (Except for the TV KDL-S23A1s*/ KLV-S23A1s*) * In the actual model names, the "s" indicates numbers and/or characters specific to each assembly (stabilizer arm and arm... base B) to the inner position, inserting the arm bases B into the bottom left and right Inner slots, and replace the screws from step 2. 6 ...
...step 3. 5 Move each model. If you are installing the TV KDL-S23A1s*/KLVS23A1s*, do not change the position of the arm bases (Except for the TV KDL-S23A1s*/ KLV-S23A1s*) * In the actual model names, the "s" indicates numbers and/or characters specific to each assembly (stabilizer arm and arm... base B) to the inner position, inserting the arm bases B into the bottom left and right Inner slots, and replace the screws from step 2. 6 ...
Instructions (SU-WL31 Wall-Mount Bracket)
Page 10
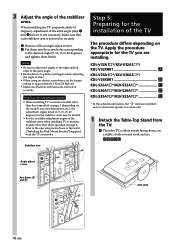
... the desired angle (5, 10, 15 or 20 degrees) and tighten them firmly. KDL-V32A1s*/KLV-V32A1s*/ KDL-V32XBR1 A KDL-V26A1s*/KLV-V26A1s*/ KDL-V26XBR1 B KDL-S32A1s*/KLV-S32A1s C KDL-S26A1s*/KLV-S26A1s D KDL-S23A1s*/KLV-S23A1s E * In the actual model names, the "s" indicates numbers and/or characters specific to... • When using an electric screwdriver, set the torque setting to each stabilizer arm is not necessary. ABCDE 1 Angle adjust screw Arm Bases A and B Soft cloth 2 10 (GB) Notes on the adjustment angles • When installing TV or monitor models other than those ...
... the desired angle (5, 10, 15 or 20 degrees) and tighten them firmly. KDL-V32A1s*/KLV-V32A1s*/ KDL-V32XBR1 A KDL-V26A1s*/KLV-V26A1s*/ KDL-V26XBR1 B KDL-S32A1s*/KLV-S32A1s C KDL-S26A1s*/KLV-S26A1s D KDL-S23A1s*/KLV-S23A1s E * In the actual model names, the "s" indicates numbers and/or characters specific to... • When using an electric screwdriver, set the torque setting to each stabilizer arm is not necessary. ABCDE 1 Angle adjust screw Arm Bases A and B Soft cloth 2 10 (GB) Notes on the adjustment angles • When installing TV or monitor models other than those ...
Instructions (SU-WL31 Wall-Mount Bracket)
Page 13
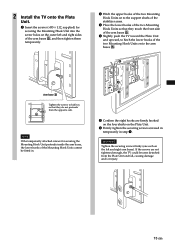
... Unit. 1 Insert the screws (+B5 × L12, supplied) for securing the Mounting Hook Unit protrude inside the arm bases, the lower hooks of the two Mounting Hook Units on to the arm bases B. 2 Arm base B Tighten the screws to halfway so that they do not protrude from the Plate Unit and fall, causing... shafts of the stabilizer arms. 3 Place the lower hooks of the two Mounting Hook Units so that they touch the front side of the arm bases B. 4 Slightly push the TV toward the Plate Unit and upward, to hitch the lower hooks of the Mounting Hook Units cannot be fitted in step...
... Unit. 1 Insert the screws (+B5 × L12, supplied) for securing the Mounting Hook Unit protrude inside the arm bases, the lower hooks of the two Mounting Hook Units on to the arm bases B. 2 Arm base B Tighten the screws to halfway so that they do not protrude from the Plate Unit and fall, causing... shafts of the stabilizer arms. 3 Place the lower hooks of the two Mounting Hook Units so that they touch the front side of the arm bases B. 4 Slightly push the TV toward the Plate Unit and upward, to hitch the lower hooks of the Mounting Hook Units cannot be fitted in step...

Instructions (SU-WL31 Wall-Mount Bracket)
Page 14
When removing the TV To Sony Dealers 1 Unplug the AC power cord from the wall outlet. 2 Remove the two securing screws on the right and left arm bases. 3 Be sure that two or more persons hold the TV when carrying it upward to confirm the completion of the stabilizer arms. •... The cord and the cable are not twisted or pinched. • The two securing screws on the arm bases are securely tightened. Confirming the completion of the installation Check the following points. • Eight hooks of the Mounting Hook Units are firmly hooked ...
When removing the TV To Sony Dealers 1 Unplug the AC power cord from the wall outlet. 2 Remove the two securing screws on the right and left arm bases. 3 Be sure that two or more persons hold the TV when carrying it upward to confirm the completion of the stabilizer arms. •... The cord and the cable are not twisted or pinched. • The two securing screws on the arm bases are securely tightened. Confirming the completion of the installation Check the following points. • Eight hooks of the Mounting Hook Units are firmly hooked ...
Operating Instructions
Page 56
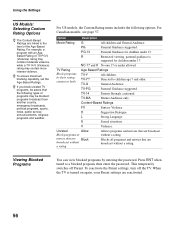
... sports, news, public service announcements, religious programs and weather. For US models, the Custom Rating menu includes the following types of the Age-Based Rating. PG-13 Parental Guidance for children under 13. TV-Y7 Directed to a blocked program, then enter the password. TV-MA Mature Audience... Blocks all programs and movies that are broadcast without a rating. Using the Settings US Models: Selecting Custom Rating Options z The Content-Based Ratings are linked to the level of programs may contain more intense violence. NC-17 and X No one 17 or under allowed. ...
... sports, news, public service announcements, religious programs and weather. For US models, the Custom Rating menu includes the following types of the Age-Based Rating. PG-13 Parental Guidance for children under 13. TV-Y7 Directed to a blocked program, then enter the password. TV-MA Mature Audience... Blocks all programs and movies that are broadcast without a rating. Using the Settings US Models: Selecting Custom Rating Options z The Content-Based Ratings are linked to the level of programs may contain more intense violence. NC-17 and X No one 17 or under allowed. ...
Operating Instructions
Page 61
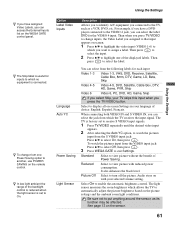
...reduced when the light sensor is connected. The TV is useful for inputs to which allows the TV to automatically adjust the picture brightness based on the picture settings and the ambient room light conditions. To watch the pictures input from the VIDEO input jack: Press V/v to ... then press . Then press to select the input. 2 Press V/v to highlight one Power Saving option to another, use POWER SAVING on the WEGA GATE control panel. Language Auto YC Power Saving Light Sensor You can access the External Inputs list on the remote control. Audio stays on screen. 1 Press ...
...reduced when the light sensor is connected. The TV is useful for inputs to which allows the TV to automatically adjust the picture brightness based on the picture settings and the ambient room light conditions. To watch the pictures input from the VIDEO input jack: Press V/v to ... then press . Then press to select the input. 2 Press V/v to highlight one Power Saving option to another, use POWER SAVING on the WEGA GATE control panel. Language Auto YC Power Saving Light Sensor You can access the External Inputs list on the remote control. Audio stays on screen. 1 Press ...
Operating Instructions
Page 64
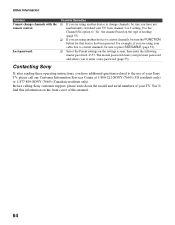
.../CABLE (page 32). ❑ Select the Parent settings on the settings screen, then enter the following master password: 4357. Before calling Sony customer support, please write down the model and serial numbers of your cable box to control channels, be sure to change channels with the...4 setting. For example, if you are using your Sony TV, please call our Customer Information Services Center at 1-800-222-SONY (7669) (US residents only) or 1-877-899-SONY (7669) (Canadian residents only). Use the Channel Fix option to "fix" the channel based on the front cover of hookup (page 53). &#...
.../CABLE (page 32). ❑ Select the Parent settings on the settings screen, then enter the following master password: 4357. Before calling Sony customer support, please write down the model and serial numbers of your cable box to control channels, be sure to change channels with the...4 setting. For example, if you are using your Sony TV, please call our Customer Information Services Center at 1-800-222-SONY (7669) (US residents only) or 1-877-899-SONY (7669) (Canadian residents only). Use the Channel Fix option to "fix" the channel based on the front cover of hookup (page 53). &#...


