Instructions (SU-WL31 Wall-Mount Bracket)
Page 7
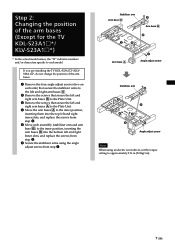
...stabilizer arms using an electric screwdriver, set the torque setting to approximately 2 N·m {20 Kgf·cm}. 7 (GB) Step 2: Changing the position of the arm bases. 1 Remove the four angle adjust screws (two on each side) that secure the stabilizer arms to the left and right arm...the screws from step 3. 5 Move each model. If you are installing the TV KDL-S23A1s*/KLVS23A1s*, do not change the position of the arm bases (Except for the TV KDL-S23A1s*/ KLV-S23A1s*) * In the actual model names, the "s" indicates numbers and/or characters specific to each assembly (stabilizer arm and arm...
...stabilizer arms using an electric screwdriver, set the torque setting to approximately 2 N·m {20 Kgf·cm}. 7 (GB) Step 2: Changing the position of the arm bases. 1 Remove the four angle adjust screws (two on each side) that secure the stabilizer arms to the left and right arm...the screws from step 3. 5 Move each model. If you are installing the TV KDL-S23A1s*/KLVS23A1s*, do not change the position of the arm bases (Except for the TV KDL-S23A1s*/ KLV-S23A1s*) * In the actual model names, the "s" indicates numbers and/or characters specific to each assembly (stabilizer arm and arm...
Instructions (SU-WL31 Wall-Mount Bracket)
Page 10
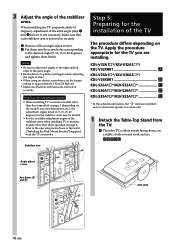
... them into the screw holes corresponding to approximately 2 N·m {20 Kgf·cm}. • Make sure that four arm bases are installing. Stabilizer arm Step 5: Preparing for the installation of the TV The procedure differs depending on a stable, cloth-covered work surface. ...KDL-V32A1s*/KLV-V32A1s*/ KDL-V32XBR1 A KDL-V26A1s*/KLV-V26A1s*/ KDL-V26XBR1 B KDL-S32A1s*/KLV-S32A1s C KDL-S26A1s*/KLV-S26A1s D KDL-S23A1s*/KLV-S23A1s E * In the actual model names, the "s" indicates numbers and/or characters ...
... them into the screw holes corresponding to approximately 2 N·m {20 Kgf·cm}. • Make sure that four arm bases are installing. Stabilizer arm Step 5: Preparing for the installation of the TV The procedure differs depending on a stable, cloth-covered work surface. ...KDL-V32A1s*/KLV-V32A1s*/ KDL-V32XBR1 A KDL-V26A1s*/KLV-V26A1s*/ KDL-V26XBR1 B KDL-S32A1s*/KLV-S32A1s C KDL-S26A1s*/KLV-S26A1s D KDL-S23A1s*/KLV-S23A1s E * In the actual model names, the "s" indicates numbers and/or characters ...
Instructions (SU-WL31 Wall-Mount Bracket)
Page 13
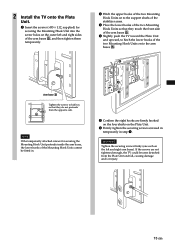
WARNING Tighten the securing screws firmly (one each on to the arm bases B. 2 Arm base B Tighten the screws to the support shafts of the stabilizer arms. 3 Place the lower hooks of ... the screws (+B5 × L12, supplied) for securing the Mounting Hook Unit protrude inside the arm bases, the lower hooks of the two Mounting Hook Units so that they touch the front side of the arm..., to hitch the lower hooks of the two Mounting Hook Units on the left and right sides of the arm bases B, and then tighten them temporarily. 2 Hitch the upper hooks of the two Mounting Hook Units on to halfway...
WARNING Tighten the securing screws firmly (one each on to the arm bases B. 2 Arm base B Tighten the screws to the support shafts of the stabilizer arms. 3 Place the lower hooks of ... the screws (+B5 × L12, supplied) for securing the Mounting Hook Unit protrude inside the arm bases, the lower hooks of the two Mounting Hook Units so that they touch the front side of the arm..., to hitch the lower hooks of the two Mounting Hook Units on the left and right sides of the arm bases B, and then tighten them temporarily. 2 Hitch the upper hooks of the two Mounting Hook Units on to halfway...

Instructions (SU-WL31 Wall-Mount Bracket)
Page 14
... cause the product falling and result in injury or product damage. When removing the TV To Sony Dealers 1 Unplug the AC power cord from the wall outlet. 2 Remove the two securing screws on the arm bases are not twisted or pinched. • The two securing screws on the right and left arm... bases. 3 Be sure that two or more persons hold the TV when carrying it upward to remove the...
... cause the product falling and result in injury or product damage. When removing the TV To Sony Dealers 1 Unplug the AC power cord from the wall outlet. 2 Remove the two securing screws on the arm bases are not twisted or pinched. • The two securing screws on the right and left arm... bases. 3 Be sure that two or more persons hold the TV when carrying it upward to remove the...
Operating Instructions
Page 56
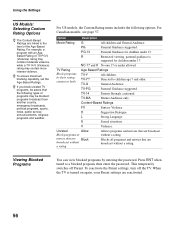
... 13. TV-G General Audience. TV-PG Parental Guidance suggested . L Strong Language. V Violence. PG Parental Guidance suggested . Content-Based Ratings FV Fantasy Violence. Unrated Allow Block programs or movies that are Block broadcast without a rating Allows programs and movies that are broadcast...that are broadcast without a rating. Viewing Blocked Programs You can view blocked programs by their rating, content or both Age-Based Ratings TV-Y All children. PG-13 Parental Guidance for children under 17. TV-Y7 Directed to a blocked program, ...
... 13. TV-G General Audience. TV-PG Parental Guidance suggested . L Strong Language. V Violence. PG Parental Guidance suggested . Content-Based Ratings FV Fantasy Violence. Unrated Allow Block programs or movies that are Block broadcast without a rating Allows programs and movies that are broadcast...that are broadcast without a rating. Viewing Blocked Programs You can view blocked programs by their rating, content or both Age-Based Ratings TV-Y All children. PG-13 Parental Guidance for children under 17. TV-Y7 Directed to a blocked program, ...
Operating Instructions
Page 61
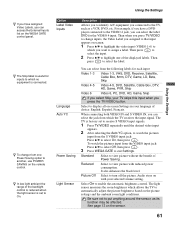
...of Power Saving. Then press to select the input. 2 Press V/v to highlight one Power Saving option to another, use POWER SAVING on the WEGA GATE control panel. The TV is connected. To watch the pictures input from the following labels for each input: Video 1-3 Video 1-3, VHS, DVD, Receiver, ... Labels, you can select the jack from the VIDEO input jack: Press V/v to select Off, then press . 3 Press WEGA GATE to automatically adjust the picture brightness based on the sensor. 61 Select to the TV, such as its function may be affected. When connecting both VIDEO IN and ...
...of Power Saving. Then press to select the input. 2 Press V/v to highlight one Power Saving option to another, use POWER SAVING on the WEGA GATE control panel. The TV is connected. To watch the pictures input from the following labels for each input: Video 1-3 Video 1-3, VHS, DVD, Receiver, ... Labels, you can select the jack from the VIDEO input jack: Press V/v to select Off, then press . 3 Press WEGA GATE to automatically adjust the picture brightness based on the sensor. 61 Select to the TV, such as its function may be affected. When connecting both VIDEO IN and ...
Operating Instructions
Page 64
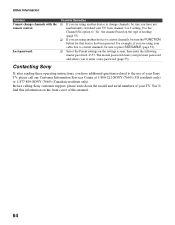
... button for that device has been pressed. Possible Remedies ❑ If you are using another device to change channels with the remote control. Contacting Sony If, after reading these operating instructions, you have additional questions related to the use of your TV from channel 3 or 4 setting. Use the... Channel Fix option to "fix" the channel based on the type of hookup (page 53). ❑ If you are using your cable box to control channels, be sure you have not inadvertently ...
... button for that device has been pressed. Possible Remedies ❑ If you are using another device to change channels with the remote control. Contacting Sony If, after reading these operating instructions, you have additional questions related to the use of your TV from channel 3 or 4 setting. Use the... Channel Fix option to "fix" the channel based on the type of hookup (page 53). ❑ If you are using your cable box to control channels, be sure you have not inadvertently ...


