
Child Safety: It Makes A Difference Where Your TV Stands
Page 1
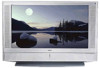
...committed to advocate children's safety and educate customers and their families about television safety. Child Safety: It Makes A Difference Where Your TV Stands The Issue If you are improperly secured or inappropriately situated on dressers, bookcases, shelves, desks, audio speakers, chests or ...furniture and television sets. 5 Avoid placing any items on the proper TV stands. The Consumer Electronics Association formed the Home Entertainment Support Safety Committee comprised of TVs such as VCRs and remotes that children can become excited while watching a program and can potentially ...
...committed to advocate children's safety and educate customers and their families about television safety. Child Safety: It Makes A Difference Where Your TV Stands The Issue If you are improperly secured or inappropriately situated on dressers, bookcases, shelves, desks, audio speakers, chests or ...furniture and television sets. 5 Avoid placing any items on the proper TV stands. The Consumer Electronics Association formed the Home Entertainment Support Safety Committee comprised of TVs such as VCRs and remotes that children can become excited while watching a program and can potentially ...
Operating Instructions (Large File - 11.3 MB)
Page 8
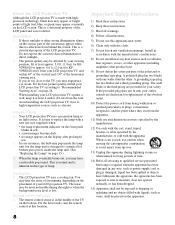
... to high temperature sources such as its light source. Projection lamp ❑ Your LCD projection TV uses a projection lamp as a heater. A grounding type plug has two blades and a third grounding prong. Remote control detection ❑ The remote control sensor is in the middle of the LCD projection TV. About the LCD Projection TV Although the LCD projection TV is made with one (not supplied) when: •...
... to high temperature sources such as its light source. Projection lamp ❑ Your LCD projection TV uses a projection lamp as a heater. A grounding type plug has two blades and a third grounding prong. Remote control detection ❑ The remote control sensor is in the middle of the LCD projection TV. About the LCD Projection TV Although the LCD projection TV is made with one (not supplied) when: •...
Operating Instructions (Large File - 11.3 MB)
Page 9
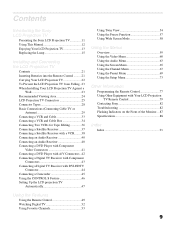
... Using the Channel Menu 67 Using the Parent Menu 69 Using the Setup Menu 73 Other Information Programming the Remote Control 77 Using Other Equipment with Your LCD Projection TV Remote Control 79 Contacting Sony 82 Troubleshooting 82 Flashing Indicators on the Front of the Monitor....87 Specifications 88 Index Index 91 Using the Features Using the...
... Using the Channel Menu 67 Using the Parent Menu 69 Using the Setup Menu 73 Other Information Programming the Remote Control 77 Using Other Equipment with Your LCD Projection TV Remote Control 79 Contacting Sony 82 Troubleshooting 82 Flashing Indicators on the Front of the Monitor....87 Specifications 88 Index Index 91 Using the Features Using the...
Operating Instructions (Large File - 11.3 MB)
Page 12
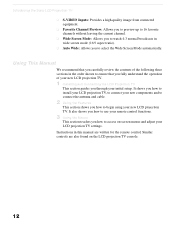
... order shown to ensure that you fully understand the operation of your new LCD projection TV. 1 Installing and Connecting the LCD Projection TV This section guides you to select the Wide Screen Mode automatically. Similar controls are written for the remote control. Introducing the Sony LCD Projection TV ❑ S-VIDEO Inputs: Provides a high-quality image from connected equipment. ❑ Favorite Channel...
... order shown to ensure that you fully understand the operation of your new LCD projection TV. 1 Installing and Connecting the LCD Projection TV This section guides you to select the Wide Screen Mode automatically. Similar controls are written for the remote control. Introducing the Sony LCD Projection TV ❑ S-VIDEO Inputs: Provides a high-quality image from connected equipment. ❑ Favorite Channel...
Operating Instructions (Large File - 11.3 MB)
Page 14
... diluted with a sharp or abrasive object (see "Cleaning the Screen Surface" below). Introducing the Sony LCD Projection TV Notes on the LCD Projection TV To enjoy clear pictures ❑ Be sure not to allow sunlight or light from a lamp ...LCD projection TV. Before carrying the LCD projection TV ❑ Disconnect all connections. On moisture condensation ❑ If your LCD projection TV is moved directly from a cold to blow for more than seven days. Using these types of products may blur or show poor color. When turning off the main power on the main unit or the remote...
... diluted with a sharp or abrasive object (see "Cleaning the Screen Surface" below). Introducing the Sony LCD Projection TV Notes on the LCD Projection TV To enjoy clear pictures ❑ Be sure not to allow sunlight or light from a lamp ...LCD projection TV. Before carrying the LCD projection TV ❑ Disconnect all connections. On moisture condensation ❑ If your LCD projection TV is moved directly from a cold to blow for more than seven days. Using these types of products may blur or show poor color. When turning off the main power on the main unit or the remote...
Operating Instructions (Large File - 11.3 MB)
Page 21
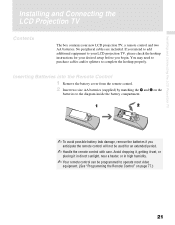
You may need to purchase cables and/or splitters to your new LCD projection TV, a remote control and two AA batteries. Inserting Batteries into the Remote Control 1 Remove the battery cover from the remote control. 2 Insert two size AA batteries (supplied) by matching the e and E...anticipate the remote control will not be used for your desired setup before you intend to add additional equipment to complete the hookup properly. Installing and Connecting the LCD Projection TV Installing and Connecting the LCD Projection TV Contents The box contains your LCD projection TV, please check...
You may need to purchase cables and/or splitters to your new LCD projection TV, a remote control and two AA batteries. Inserting Batteries into the Remote Control 1 Remove the battery cover from the remote control. 2 Insert two size AA batteries (supplied) by matching the e and E...anticipate the remote control will not be used for your desired setup before you intend to add additional equipment to complete the hookup properly. Installing and Connecting the LCD Projection TV Installing and Connecting the LCD Projection TV Contents The box contains your LCD projection TV, please check...
Operating Instructions (Large File - 11.3 MB)
Page 25
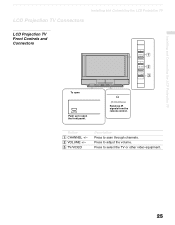
Installing and Connecting the LCD Projection TV Installing and Connecting the LCD Projection TV LCD Projection TV Connectors LCD Projection TV Front Controls and Connectors 1 CHANNEL 2 VOLUME TV/VIDEO 3 To open OPEN OPEN Push up to select the TV or other video equipment. 25 Press to open the front panel. (IR) Infrared Receiver Receives IR signals from the remote control. Press to scan through channels. Button 1 CHANNEL +/- 2 VOLUME +/- 3 TV/VIDEO Description Press to adjust the volume.
Installing and Connecting the LCD Projection TV Installing and Connecting the LCD Projection TV LCD Projection TV Connectors LCD Projection TV Front Controls and Connectors 1 CHANNEL 2 VOLUME TV/VIDEO 3 To open OPEN OPEN Push up to select the TV or other video equipment. 25 Press to open the front panel. (IR) Infrared Receiver Receives IR signals from the remote control. Press to scan through channels. Button 1 CHANNEL +/- 2 VOLUME +/- 3 TV/VIDEO Description Press to adjust the volume.
Operating Instructions (Large File - 11.3 MB)
Page 27
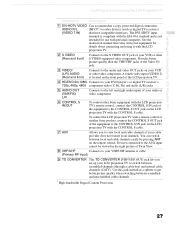
... 9 TO CONVERTER This TO CONVERTER (VHF/UHF OUT) jack lets you to view local and cable channels if your VCR or other Sony equipment with the LCD projection TV's remote control, connect the CONTROL S IN jack of your audio or video component. 6 CONTROL S IN/OUT To control other S VIDEO-... LCD projection TV. 4 HD/DVD IN (1080i, Connects to your DVD player's or digital TV receiver's 720p, 480p, 480i) component video (Y, PB, PR) and audio (L/R) jacks. 5 AUDIO OUT (VAR/FIX) L/R Connects to the left and right audio inputs of the equipment to the CONTROL S OUT jack on the remote control...
... 9 TO CONVERTER This TO CONVERTER (VHF/UHF OUT) jack lets you to view local and cable channels if your VCR or other Sony equipment with the LCD projection TV's remote control, connect the CONTROL S IN jack of your audio or video component. 6 CONTROL S IN/OUT To control other S VIDEO-... LCD projection TV. 4 HD/DVD IN (1080i, Connects to your DVD player's or digital TV receiver's 720p, 480p, 480i) component video (Y, PB, PR) and audio (L/R) jacks. 5 AUDIO OUT (VAR/FIX) L/R Connects to the left and right audio inputs of the equipment to the CONTROL S OUT jack on the remote control...
Operating Instructions (Large File - 11.3 MB)
Page 30
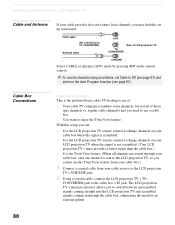
... not feature local channels, you may find this setup you can: ❑ Use the LCD projection TV remote control to change channels on your cable box when the signal is scrambled. ❑ Use the LCD projection TV remote control to change channels on the remote control. ✍ To receive channels using an antenna, set up convenient. Cable Box Connections...
... not feature local channels, you may find this setup you can: ❑ Use the LCD projection TV remote control to change channels on your cable box when the signal is scrambled. ❑ Use the LCD projection TV remote control to change channels on the remote control. ✍ To receive channels using an antenna, set up convenient. Cable Box Connections...

Operating Instructions (Large File - 11.3 MB)
Page 31
Cable box IN OUT Rear of LCD projection TV AUX 75-ohm coaxial cable (not supplied) TO CONVERTER Signal CATV cable (unscrambled channels) VHF/UHF ✍ Pressing ANT on the remote control switches between the channels coming in through the cable box (scrambled) and those coming directly to the LCD projection TV's AUX jack. Installing and Connecting the LCD Projection TV Installing and Connecting the LCD Projection TV 3 Using a coaxial cable, connect the cable box's OUT jack to the LCD projection TV (unscrambled). 31
Cable box IN OUT Rear of LCD projection TV AUX 75-ohm coaxial cable (not supplied) TO CONVERTER Signal CATV cable (unscrambled channels) VHF/UHF ✍ Pressing ANT on the remote control switches between the channels coming in through the cable box (scrambled) and those coming directly to the LCD projection TV's AUX jack. Installing and Connecting the LCD Projection TV Installing and Connecting the LCD Projection TV 3 Using a coaxial cable, connect the cable box's OUT jack to the LCD projection TV (unscrambled). 31
Operating Instructions (Large File - 11.3 MB)
Page 32
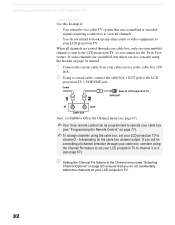
... using the cable box, set your LCD projection TV to channel 3 or 4 (see page 67). ✍ Your Sony remote control can be controlling all channel selection through your cable box, consider using the hookup on page 30 instead. 1 Connect the coaxial cable from your LCD projection TV to channel 2 - 6 depending on your LCD projection TV. 32 When all channels. ❑ You...
... using the cable box, set your LCD projection TV to channel 3 or 4 (see page 67). ✍ Your Sony remote control can be controlling all channel selection through your cable box, consider using the hookup on page 30 instead. 1 Connect the coaxial cable from your LCD projection TV to channel 2 - 6 depending on your LCD projection TV. 32 When all channels. ❑ You...
Operating Instructions (Large File - 11.3 MB)
Page 34
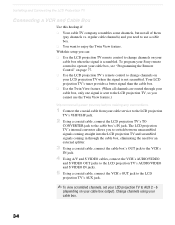
To program your Sony remote control to operate your cable box, see "Programming the Remote Control" on page 77. ❑ Use the LCD projection TV's remote control to change channels on your LCD projection TV when the signal is not scrambled. Installing and Connecting the LCD Projection TV Connecting a VCR and Cable Box Use this setup you can: ❑ Use the LCD projection TV remote control to change...
To program your Sony remote control to operate your cable box, see "Programming the Remote Control" on page 77. ❑ Use the LCD projection TV's remote control to change channels on your LCD projection TV when the signal is not scrambled. Installing and Connecting the LCD Projection TV Connecting a VCR and Cable Box Use this setup you can: ❑ Use the LCD projection TV remote control to change...
Operating Instructions (Large File - 11.3 MB)
Page 35
...your VCR is not equipped with S VIDEO, use a VIDEO cable (yellow) instead of LCD projection TV Coaxial cable ✍ If your cable box channel output. ✍ Pressing ANT on the remote control switches between the channels coming in through the cable box (scrambled) and those coming ...directly to change channels on the VCR. Installing and Connecting the LCD Projection TV VCR AUDIO-R (red) AUDIO-L (white) VIDEO (yellow)...
...your VCR is not equipped with S VIDEO, use a VIDEO cable (yellow) instead of LCD projection TV Coaxial cable ✍ If your cable box channel output. ✍ Pressing ANT on the remote control switches between the channels coming in through the cable box (scrambled) and those coming ...directly to change channels on the VCR. Installing and Connecting the LCD Projection TV VCR AUDIO-R (red) AUDIO-L (white) VIDEO (yellow)...
Operating Instructions (Large File - 11.3 MB)
Page 36
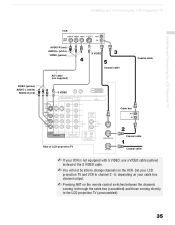
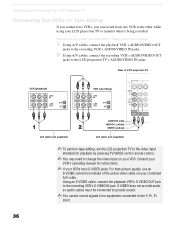
... OUT jack to the LCD projection TV's AUDIO/VIDEO IN jacks. Rear of the yellow video cable on your LCD projection TV to the other while using your VCR. Installing and Connecting the LCD Projection TV Connecting Two VCRs for playback by pressing TV/VIDEO on the remote control. ✍ You...LCD projection TV to the video input intended for Tape Editing If you connect two VCRs, you can record from equipment connected to the Y, PB, PR input. 36 S VIDEO does not provide audio, so audio cables must be connected to provide sound. ✍ You cannot record signals from one VCR to monitor...
... OUT jack to the LCD projection TV's AUDIO/VIDEO IN jacks. Rear of the yellow video cable on your LCD projection TV to the other while using your VCR. Installing and Connecting the LCD Projection TV Connecting Two VCRs for playback by pressing TV/VIDEO on the remote control. ✍ You...LCD projection TV to the video input intended for Tape Editing If you connect two VCRs, you can record from equipment connected to the Y, PB, PR input. 36 S VIDEO does not provide audio, so audio cables must be connected to provide sound. ✍ You cannot record signals from one VCR to monitor...
Operating Instructions (Large File - 11.3 MB)
Page 42
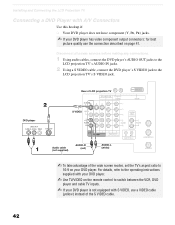
.... 1 Using audio cables, connect the DVD player's AUDIO OUT jacks to the LCD projection TV's AUDIO IN jacks. 2 Using a S VIDEO cable, connect the DVD player's S VIDEO jack to 16:9 on the remote control to switch between the VCR, DVD player and cable TV inputs. ✍ If your DVD player has video component output connectors: for...
.... 1 Using audio cables, connect the DVD player's AUDIO OUT jacks to the LCD projection TV's AUDIO IN jacks. 2 Using a S VIDEO cable, connect the DVD player's S VIDEO jack to 16:9 on the remote control to switch between the VCR, DVD player and cable TV inputs. ✍ If your DVD player has video component output connectors: for...

Operating Instructions (Large File - 11.3 MB)
Page 46
Rear of sight. Installing and Connecting the LCD Projection TV Using the CONTROL S Feature CONTROL S allows you to point it at your LCD projection TV system and other equipment, which might be hidden or out of direct line of LCD projection TV 46 In addition to allowing you to control multiple devices with one remote control, the CONTROL S feature allows you to control your LCD projection TV, instead of having to always point your remote control at the other Sony equipment with one remote control.
Rear of sight. Installing and Connecting the LCD Projection TV Using the CONTROL S Feature CONTROL S allows you to point it at your LCD projection TV system and other equipment, which might be hidden or out of direct line of LCD projection TV 46 In addition to allowing you to control multiple devices with one remote control, the CONTROL S feature allows you to control your LCD projection TV, instead of having to always point your remote control at the other Sony equipment with one remote control.
Operating Instructions (Large File - 11.3 MB)
Page 47
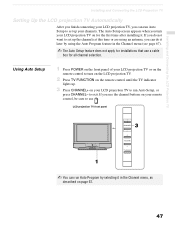
...later by using an antenna, you turn on the LCD projection TV. 2 Press TV FUNCTION on the remote control until the TV indicator lights up. 3 Press CHANNEL+ on for all channel selection. LCD projection TV front panel CHANNEL VOLUME TV/VIDEO ✍ You can do not want to..., as described on your remote control, be sure to run Auto Setup to exit. If you do it . Installing and Connecting the LCD Projection TV Installing and Connecting the LCD Projection TV Setting Up the LCD projection TV Automatically After you finish connecting your LCD projection TV, you use the channel ...
...later by using an antenna, you turn on the LCD projection TV. 2 Press TV FUNCTION on the remote control until the TV indicator lights up. 3 Press CHANNEL+ on for all channel selection. LCD projection TV front panel CHANNEL VOLUME TV/VIDEO ✍ You can do not want to..., as described on your remote control, be sure to run Auto Setup to exit. If you do it . Installing and Connecting the LCD Projection TV Installing and Connecting the LCD Projection TV Setting Up the LCD projection TV Automatically After you finish connecting your LCD projection TV, you use the channel ...
Operating Instructions (Large File - 11.3 MB)
Page 49
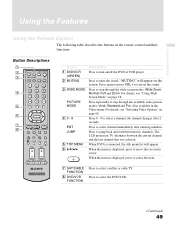
... FAVORITES MENU G H DVD/VCR SAT/ CABLE FUNCTION TV F1 F2 FREEZE TV/SAT ANT VOL GUIDE CH RESET SLEEP MTS/SAP TV Button 1 DVD/VCR (GREEN) 2 MUTING 3 WIDE MODE PICTURE MODE 4 0-9 ENT JUMP 5 TOP MENU 6 V/v/B/b Description Press to turn on the remote control and their functions. Press 0 - 9 to...the Features Using the Remote Control The following table describes the buttons on /off the DVD or VCR player. Press to select the DVD/VCR. (Continued) 49 Press to mute the sound. For details, see "Selecting Video Options" on page 58. The LCD projection TV alternates between two channels...
... FAVORITES MENU G H DVD/VCR SAT/ CABLE FUNCTION TV F1 F2 FREEZE TV/SAT ANT VOL GUIDE CH RESET SLEEP MTS/SAP TV Button 1 DVD/VCR (GREEN) 2 MUTING 3 WIDE MODE PICTURE MODE 4 0-9 ENT JUMP 5 TOP MENU 6 V/v/B/b Description Press to turn on the remote control and their functions. Press 0 - 9 to...the Features Using the Remote Control The following table describes the buttons on /off the DVD or VCR player. Press to select the DVD/VCR. (Continued) 49 Press to mute the sound. For details, see "Selecting Video Options" on page 58. The LCD projection TV alternates between two channels...
Operating Instructions (Large File - 11.3 MB)
Page 50
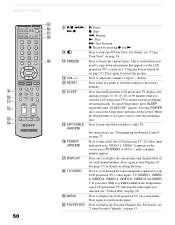
... timer and turns off automatically. T FAVORITES Press to restore the picture. qs VOL +/- M RESET Press when in the Setup menu, your LCD projection TV's video inputs: TV, VIDEO 1, VIDEO 2, VIDEO 3, VIDEO 4, VIDEO 5, VIDEO 6 and VIDEO 7. If a video input indication (e.g., VIDEO 1, VIDEO 2)...appears. Press again to display the LCD projection TV on page 77. N SLEEP Press repeatedly until the LCD projection TV displays the amount of time (15, 30, 45, 60, or 90 minutes) that appears on the LCD projection TV's screen (see "Programming the Remote Control" on -screen menu. Press...
... timer and turns off automatically. T FAVORITES Press to restore the picture. qs VOL +/- M RESET Press when in the Setup menu, your LCD projection TV's video inputs: TV, VIDEO 1, VIDEO 2, VIDEO 3, VIDEO 4, VIDEO 5, VIDEO 6 and VIDEO 7. If a video input indication (e.g., VIDEO 1, VIDEO 2)...appears. Press again to display the LCD projection TV on page 77. N SLEEP Press repeatedly until the LCD projection TV displays the amount of time (15, 30, 45, 60, or 90 minutes) that appears on the LCD projection TV's screen (see "Programming the Remote Control" on -screen menu. Press...

Operating Instructions (Large File - 11.3 MB)
Page 51
... Press F1 or F2 to scan one-by-one through channels. z To scan rapidly through the Multi-channel TV Sound (MTS) options: Stereo, Auto SAP and Mono (see "Using Other Equipment with Your LCD Projection TV Remote Control" on page 63). 51 down CH + or CH - (+ up momentarily when pressed to scroll through the channels...
... Press F1 or F2 to scan one-by-one through channels. z To scan rapidly through the Multi-channel TV Sound (MTS) options: Stereo, Auto SAP and Mono (see "Using Other Equipment with Your LCD Projection TV Remote Control" on page 63). 51 down CH + or CH - (+ up momentarily when pressed to scroll through the channels...


