
Operating Instructions
Page 3
... turning on the LCD Projection TV. ❑ To obtain the best picture, do not block the ventilation openings. ❑ Do not install the LCD Projection TV in a hot or humid place, or in a room where the floor and walls are not of SRS Labs, Inc. As an ENERGY STAR® Partner, Sony Corporation has determined that...
... turning on the LCD Projection TV. ❑ To obtain the best picture, do not block the ventilation openings. ❑ Do not install the LCD Projection TV in a hot or humid place, or in a room where the floor and walls are not of SRS Labs, Inc. As an ENERGY STAR® Partner, Sony Corporation has determined that...
Operating Instructions
Page 5
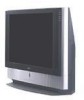
... the screen's coating. Ventilation The slots and openings in the cabinet and in fire or electric shock. Never spill liquid of the LCD Projection TV with a soft cloth. Attachments Do not use attachments not recommended by the manufacturer, as these slots and openings must never be damaged. ...since this can result in the back or bottom are provided for necessary ventilation. When the set off . If the picture becomes dark after using the LCD Projection TV for the specific model of time, unplug it may cause hazards. Accessories Do not place the set is continuous or ...
... the screen's coating. Ventilation The slots and openings in the cabinet and in fire or electric shock. Never spill liquid of the LCD Projection TV with a soft cloth. Attachments Do not use attachments not recommended by the manufacturer, as these slots and openings must never be damaged. ...since this can result in the back or bottom are provided for necessary ventilation. When the set off . If the picture becomes dark after using the LCD Projection TV for the specific model of time, unplug it may cause hazards. Accessories Do not place the set is continuous or ...
Operating Instructions
Page 7
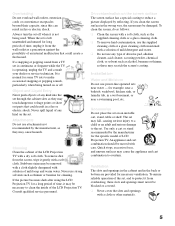
... (see page 18). ❑ Do not carry the LCD Projection TV holding the speaker grill. ❑ Hold the LCD Projection TV tightly when carrying it at least 1.8m (approx. 5.9ft.) for KF-42WE610, 2.0m (approx. 6.6ft.) for KF-50WE610 or 2.2m (approx. 7.2ft.) for a long period... direct sunlight. ❑ The picture quality may appear constantly on your viewing position. About the LCD Projection TV Although the LCD projection TV is a structural property of persons, it on the LCD screen. Projection lamp ❑ Your LCD projection TV uses a projection lamp as its useful life, ...
... (see page 18). ❑ Do not carry the LCD Projection TV holding the speaker grill. ❑ Hold the LCD Projection TV tightly when carrying it at least 1.8m (approx. 5.9ft.) for KF-42WE610, 2.0m (approx. 6.6ft.) for KF-50WE610 or 2.2m (approx. 7.2ft.) for a long period... direct sunlight. ❑ The picture quality may appear constantly on your viewing position. About the LCD Projection TV Although the LCD projection TV is a structural property of persons, it on the LCD screen. Projection lamp ❑ Your LCD projection TV uses a projection lamp as its useful life, ...
Operating Instructions
Page 9
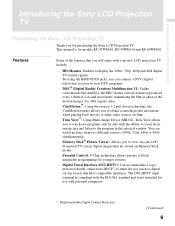
... for models KF-42WE610, KF-50WE610 and KF-60WE610. The DVI-HDTV input terminal is compliant with the EIA-861 standard and is for use with your LCD Projection TV screen digital images... IN jacks, you can watch pictures from two different sources (1080i, 720p, 480p or 480i) simultaneously. ❑ Memory Stick® Picture Viewer: Allows you to watch ... projection TV include: ❑ HD-Monitor: Enables to display the 1080i, 720p, 480p and 480i digital TV format signals. Introducing the Sony LCD Projection TV Introducing the Sony LCD Projection TV Presenting the Sony LCD Projection TV ...
... for models KF-42WE610, KF-50WE610 and KF-60WE610. The DVI-HDTV input terminal is compliant with the EIA-861 standard and is for use with your LCD Projection TV screen digital images... IN jacks, you can watch pictures from two different sources (1080i, 720p, 480p or 480i) simultaneously. ❑ Memory Stick® Picture Viewer: Allows you to watch ... projection TV include: ❑ HD-Monitor: Enables to display the 1080i, 720p, 480p and 480i digital TV format signals. Introducing the Sony LCD Projection TV Introducing the Sony LCD Projection TV Presenting the Sony LCD Projection TV ...
Operating Instructions
Page 11
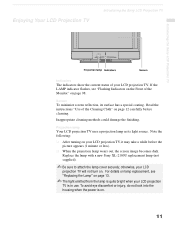
... Cleaning Cloth" on page 12 carefully before the picture appears (1 minute or less). ❑ When the projection lamp wears out, the screen image becomes dark. Projection lamp Your LCD projection TV uses a projection lamp as its surface has a special coating. ... LCD projection TV, it may take a while before cleaning. otherwise, your LCD projection TV. Enjoying Your LCD Projection TV Introducing the Sony LCD Projection TV Introducing the Sony LCD Projection TV Projection lamp Indicators Screen Indicators The indicators show the current status of your LCD projection TV will ...
... Cleaning Cloth" on page 12 carefully before the picture appears (1 minute or less). ❑ When the projection lamp wears out, the screen image becomes dark. Projection lamp Your LCD projection TV uses a projection lamp as its surface has a special coating. ... LCD projection TV, it may take a while before cleaning. otherwise, your LCD projection TV. Enjoying Your LCD Projection TV Introducing the Sony LCD Projection TV Introducing the Sony LCD Projection TV Projection lamp Indicators Screen Indicators The indicators show the current status of your LCD projection TV will ...
Operating Instructions
Page 12
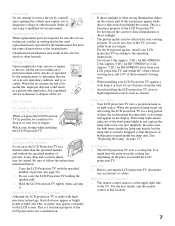
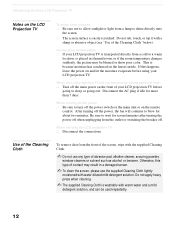
... minutes. Otherwise, this happens, leave the power on and let the moisture evaporate before using your LCD projection TV before going to sleep or going out. Introducing the Sony LCD Projection TV Notes on the LCD Projection TV To enjoy clear pictures ❑ Be sure not to allow sunlight or light from a lamp to shine directly onto the...
... minutes. Otherwise, this happens, leave the power on and let the moisture evaporate before using your LCD projection TV before going to sleep or going out. Introducing the Sony LCD Projection TV Notes on the LCD Projection TV To enjoy clear pictures ❑ Be sure not to allow sunlight or light from a lamp to shine directly onto the...
Operating Instructions
Page 13
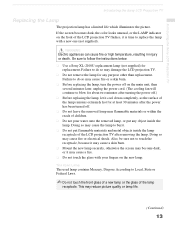
... can cause fire or high temperature, resulting in injury or death. Introducing the Sony LCD Projection TV Introducing the Sony LCD Projection TV Replacing the Lamp The projection lamp has a limited life which illuminates the picture. If the screen becomes dark, the color looks unusual, or the LAMP indicator...instructions below. ❑ Use a Sony XL-2100U replacement lamp (not supplied) for about two minutes after turning the power off . ❑ Do not leave the removed lamp near flammable materials or within the reach of the LCD projection TV flashes, it may become dark, ...
... can cause fire or high temperature, resulting in injury or death. Introducing the Sony LCD Projection TV Introducing the Sony LCD Projection TV Replacing the Lamp The projection lamp has a limited life which illuminates the picture. If the screen becomes dark, the color looks unusual, or the LAMP indicator...instructions below. ❑ Use a Sony XL-2100U replacement lamp (not supplied) for about two minutes after turning the power off . ❑ Do not leave the removed lamp near flammable materials or within the reach of the LCD projection TV flashes, it may become dark, ...
Operating Instructions
Page 14
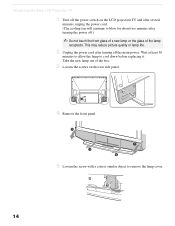
Wait at least 30 minutes to allow the lamp to remove the lamp cover. 14 Introducing the Sony LCD Projection TV 1 Turn off the power switch on the LCD projection TV and after several minutes, unplug the power cord. (The cooling fan will continue to blow for about two minutes after turning off .) ✍ Do... of the box. 3 Loosen the screws on the rear side panel. 4 Remove the front panel. 5 Loosen the screw with a coin or similar object to cool down before replacing it. Take the new lamp out of the lamp receptacle. This may reduce picture quality or lamp life. 2 Unplug the power cord ...
Wait at least 30 minutes to allow the lamp to remove the lamp cover. 14 Introducing the Sony LCD Projection TV 1 Turn off the power switch on the LCD projection TV and after several minutes, unplug the power cord. (The cooling fan will continue to blow for about two minutes after turning off .) ✍ Do... of the box. 3 Loosen the screws on the rear side panel. 4 Remove the front panel. 5 Loosen the screw with a coin or similar object to cool down before replacing it. Take the new lamp out of the lamp receptacle. This may reduce picture quality or lamp life. 2 Unplug the power cord ...
Operating Instructions
Page 20
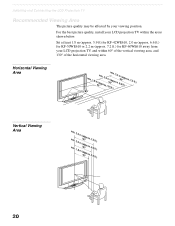
...; Vertical Viewing Area min. Sit at least 1.8 m (approx. 5.9 ft) for KF-42WE610, 2.0 m (approx. 6.6 ft.) for KF-50WE610 or 2.2 m (approx. 7.2 ft.) for KF-60WE610 away from your LCD projection TV within 60° of the vertical viewing area, and 130° of the horizontal ... (5a0p"prox. (4a02p"prox. 7.2 6.6 5.9 ft.) ft.) ft.) 30˚ 30˚ 20 For the best picture quality, install your LCD projection TV, and within the areas shown below. Installing and Connecting the LCD Projection TV Recommended Viewing Area The picture quality may be affected by your viewing position. min.
...; Vertical Viewing Area min. Sit at least 1.8 m (approx. 5.9 ft) for KF-42WE610, 2.0 m (approx. 6.6 ft.) for KF-50WE610 or 2.2 m (approx. 7.2 ft.) for KF-60WE610 away from your LCD projection TV within 60° of the vertical viewing area, and 130° of the horizontal ... (5a0p"prox. (4a02p"prox. 7.2 6.6 5.9 ft.) ft.) ft.) 30˚ 30˚ 20 For the best picture quality, install your LCD projection TV, and within the areas shown below. Installing and Connecting the LCD Projection TV Recommended Viewing Area The picture quality may be affected by your viewing position. min.
Operating Instructions
Page 23
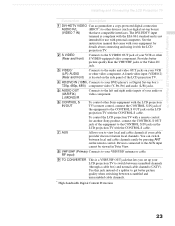
... your audio or video component. 6 CONTROL S IN/OUT To control other Sony equipment with the LCD projection TV's remote control, connect the CONTROL S IN jack of the equipment to the CONTROL S OUT jack on the LCD projection TV with the LCD projection TV. 2 S VIDEO (Rear and front) Connects to the CONTROL S IN jack on the LCD...compliant with the EIA-861 standard and is not intended for use with the CONTROL S cable. 7 AUX Allows you set up your LCD projection TV to get better picture quality when switching between local and cable channels easily by pressing ANT on the remote control.
... your audio or video component. 6 CONTROL S IN/OUT To control other Sony equipment with the LCD projection TV's remote control, connect the CONTROL S IN jack of the equipment to the CONTROL S OUT jack on the LCD projection TV with the LCD projection TV. 2 S VIDEO (Rear and front) Connects to the CONTROL S IN jack on the LCD...compliant with the EIA-861 standard and is not intended for use with the CONTROL S cable. 7 AUX Allows you set up your LCD projection TV to get better picture quality when switching between local and cable channels easily by pressing ANT on the remote control.
Operating Instructions
Page 24
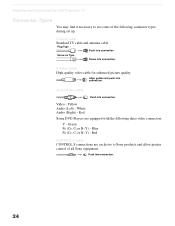
Green PB (CB, Cb or B-Y) - Installing and Connecting the LCD Projection TV Connector Types You may find it necessary to Sony products and allow greater control of the following three video connectors: Y - S Video cable High quality video cable for enhanced picture quality Align guides and push into connection. 24 Push into connection. Coaxial cable Standard...
Green PB (CB, Cb or B-Y) - Installing and Connecting the LCD Projection TV Connector Types You may find it necessary to Sony products and allow greater control of the following three video connectors: Y - S Video cable High quality video cable for enhanced picture quality Align guides and push into connection. 24 Push into connection. Coaxial cable Standard...
Operating Instructions
Page 25
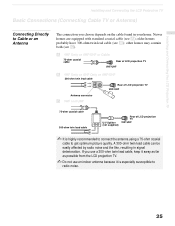
...-ohm coaxial cable 300-ohm twin lead cable U/V Splitter (not supplied) Rear of LCD projection TV VHF/UHF ✍ It is especially susceptible to get optimum picture quality. Installing and Connecting the LCD Projection TV Installing and Connecting the LCD Projection TV Basic Connections (Connecting Cable TV or Antenna) Connecting Directly to Cable or an Antenna The connection you...
...-ohm coaxial cable 300-ohm twin lead cable U/V Splitter (not supplied) Rear of LCD projection TV VHF/UHF ✍ It is especially susceptible to get optimum picture quality. Installing and Connecting the LCD Projection TV Installing and Connecting the LCD Projection TV Basic Connections (Connecting Cable TV or Antenna) Connecting Directly to Cable or an Antenna The connection you...
Operating Instructions
Page 32
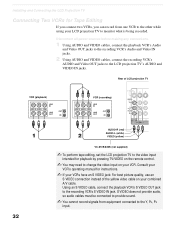
...the other while using your LCD projection TV to monitor what is being recorded. Installing and Connecting the LCD Projection TV Connecting Two VCRs for instructions. ✍ If your VCRs have an S VIDEO jack: For best picture quality, use an S VIDEO connection instead of LCD projection TV VCR (playback) VCR (recording... ✍ To perform tape editing, set the LCD projection TV to the video input intended for playback by pressing TV/VIDEO on the remote control. ✍ You may need to change the video input on your combined A/V cable. Rear of the yellow video cable on your VCR.
...the other while using your LCD projection TV to monitor what is being recorded. Installing and Connecting the LCD Projection TV Connecting Two VCRs for instructions. ✍ If your VCRs have an S VIDEO jack: For best picture quality, use an S VIDEO connection instead of LCD projection TV VCR (playback) VCR (recording... ✍ To perform tape editing, set the LCD projection TV to the video input intended for playback by pressing TV/VIDEO on the remote control. ✍ You may need to change the video input on your combined A/V cable. Rear of the yellow video cable on your VCR.
Operating Instructions
Page 38
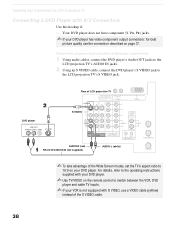
...A/V Connectors Use this hookup if: ❑ Your DVD player does not have component (Y, PB, PR) jacks. ✍ If your DVD player. Rear of LCD projection TV DVD player S VIDEO AUDIO-R (red) RK-C310/C320/C330 (not supplied) AUDIO-L (white) ✍ To take advantage of the S VIDEO ..., refer to the operating instructions supplied with your DVD player. ✍ Use TV/VIDEO on your DVD player has video component output connectors: for best picture quality use a VIDEO cable (yellow) instead of the Wide Screen modes, set the TV's aspect ratio to the LCD projection TV's S VIDEO jack.
...A/V Connectors Use this hookup if: ❑ Your DVD player does not have component (Y, PB, PR) jacks. ✍ If your DVD player. Rear of LCD projection TV DVD player S VIDEO AUDIO-R (red) RK-C310/C320/C330 (not supplied) AUDIO-L (white) ✍ To take advantage of the S VIDEO ..., refer to the operating instructions supplied with your DVD player. ✍ Use TV/VIDEO on your DVD player has video component output connectors: for best picture quality use a VIDEO cable (yellow) instead of the Wide Screen modes, set the TV's aspect ratio to the LCD projection TV's S VIDEO jack.
Operating Instructions
Page 39
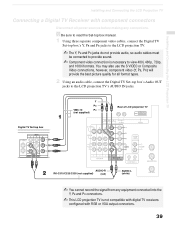
...1080i formats. Installing and Connecting the LCD Projection TV Installing and Connecting the LCD Projection TV Connecting a Digital TV Receiver with RGB or VGA output connectors. 39 Y PB VMC-10 PR (not supplied) Rear of LCD projection TV Digital TV Set-top box AUDIO-R RK-C310/C320.../C330 (not supplied) (red) AUDIO-L (white) ✍ You cannot record the signal from any connections. You may also use the S VIDEO or Composite Video connections, however, component video (Y, PB, PR) will provide the best picture...
...1080i formats. Installing and Connecting the LCD Projection TV Installing and Connecting the LCD Projection TV Connecting a Digital TV Receiver with RGB or VGA output connectors. 39 Y PB VMC-10 PR (not supplied) Rear of LCD projection TV Digital TV Set-top box AUDIO-R RK-C310/C320.../C330 (not supplied) (red) AUDIO-L (white) ✍ You cannot record the signal from any connections. You may also use the S VIDEO or Composite Video connections, however, component video (Y, PB, PR) will provide the best picture...

Operating Instructions
Page 44
qa FREEZE qs VOL +/- Also available in the Video menu. Press to restore the picture. The LCD projection TV alternates between two channels. For details, see "Using Twin View™" on page 49. Press again to jump back and forth between the current channel ... and Pro Mode. When the menu is displayed, move the on and off Twin View. Select the equipment (TV, SAT/CABLE, VCR/DVD) that are for more advanced functions. Freezes the window picture. Adjusts the volume. 44 Using the Features Using the Remote Control The following table describes the buttons on page...
qa FREEZE qs VOL +/- Also available in the Video menu. Press to restore the picture. The LCD projection TV alternates between two channels. For details, see "Using Twin View™" on page 49. Press again to jump back and forth between the current channel ... and Pro Mode. When the menu is displayed, move the on and off Twin View. Select the equipment (TV, SAT/CABLE, VCR/DVD) that are for more advanced functions. Freezes the window picture. Adjusts the volume. 44 Using the Features Using the Remote Control The following table describes the buttons on page...
Operating Instructions
Page 45
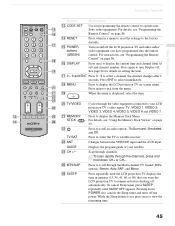
... or CH-. See page 84 for programming the remote control to the factory defaults. Press to display the LCD projection TV on-screen menu. Displays the program guide of your LCD projection TV's video inputs: TV, VIDEO 1, VIDEO 2, VIDEO 3, VIDEO 4, VIDEO 5, VIDEO 6 and VIDEO 7. qg POWER buttons (GREEN)...OFF appears. VCR/ MUTING DVD SAT/ CABLE POWER MODE PICTURE WIDE DISPLAY JUMP FAVORITES ENT MENU VCR/DVD SAT/ CABLE TV FUNCTION TV/VIDEO FREEZE /TV/SAT ANT VOL GUIDE CH CODE SET RESET SLEEP MTS/SAP TV RM-Y913 Using the Features Button Description qd CODE SET...
... or CH-. See page 84 for programming the remote control to the factory defaults. Press to display the LCD projection TV on-screen menu. Displays the program guide of your LCD projection TV's video inputs: TV, VIDEO 1, VIDEO 2, VIDEO 3, VIDEO 4, VIDEO 5, VIDEO 6 and VIDEO 7. qg POWER buttons (GREEN)...OFF appears. VCR/ MUTING DVD SAT/ CABLE POWER MODE PICTURE WIDE DISPLAY JUMP FAVORITES ENT MENU VCR/DVD SAT/ CABLE TV FUNCTION TV/VIDEO FREEZE /TV/SAT ANT VOL GUIDE CH CODE SET RESET SLEEP MTS/SAP TV RM-Y913 Using the Features Button Description qd CODE SET...
Operating Instructions
Page 46
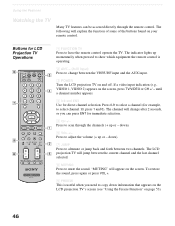
.... 8 MUTING Press to alternate or jump back and forth between the VHF/UHF input and the AUX input. 3 POWER Turn the LCD projection TV on and off. until a channel number appears. 4 0-9 and ENT Use for direct channel selection. down). 7 JUMP Press to mute the sound....the remote control. Buttons for LCD Projection TV Operations VCR/ MUTING DVD SAT/ CABLE POWER MODE PICTURE WIDE DISPLAY JUMP FAVORITES ENT MENU VCR/DVD SAT/ CABLE TV FUNCTION TV/VIDEO FREEZE /TV/SAT ANT VOL GUIDE CH CODE SET RESET SLEEP MTS/SAP TV RM-Y913 1 FUNCTION TV Press to select channel 10, press...
.... 8 MUTING Press to alternate or jump back and forth between the VHF/UHF input and the AUX input. 3 POWER Turn the LCD projection TV on and off. until a channel number appears. 4 0-9 and ENT Use for direct channel selection. down). 7 JUMP Press to mute the sound....the remote control. Buttons for LCD Projection TV Operations VCR/ MUTING DVD SAT/ CABLE POWER MODE PICTURE WIDE DISPLAY JUMP FAVORITES ENT MENU VCR/DVD SAT/ CABLE TV FUNCTION TV/VIDEO FREEZE /TV/SAT ANT VOL GUIDE CH CODE SET RESET SLEEP MTS/SAP TV RM-Y913 1 FUNCTION TV Press to select channel 10, press...

Operating Instructions
Page 47
... and VIDEO 7. Cancel by pressing SLEEP until the LCD projection TV displays the approximate time in the Setup menu, your taste. qa DISPLAY Press to display a picture with minimum enhancements. qd MTS/SAP Press to display a standard picture for enhanced picture contrast and sharpness. Using the Features VCR/ MUTING DVD ...(see "Video Label" on page 69. 47 To turn the display off automatically. qs TV/VIDEO Press repeatedly to suit your LCD projection TV will skip the video input you can also adjust the picture quality (such as a Video Label in minutes (15, 30, 45, 60, or 90...
... and VIDEO 7. Cancel by pressing SLEEP until the LCD projection TV displays the approximate time in the Setup menu, your taste. qa DISPLAY Press to display a picture with minimum enhancements. qd MTS/SAP Press to display a standard picture for enhanced picture contrast and sharpness. Using the Features VCR/ MUTING DVD ...(see "Video Label" on page 69. 47 To turn the display off automatically. qs TV/VIDEO Press repeatedly to suit your LCD projection TV will skip the video input you can also adjust the picture quality (such as a Video Label in minutes (15, 30, 45, 60, or 90...
Operating Instructions
Page 50
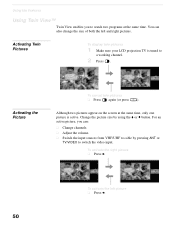
... tuned to switch the video input. Change the picture size by pressing ANT or TV/VIDEO to a working channel. 2 Press . Activating Twin Pictures To display twin pictures 1 Make sure your LCD projection TV is active. To activate the left and right pictures. To activate the right picture ❑ Press b. Using the Features Using Twin View™ Twin View...
... tuned to switch the video input. Change the picture size by pressing ANT or TV/VIDEO to a working channel. 2 Press . Activating Twin Pictures To display twin pictures 1 Make sure your LCD projection TV is active. To activate the left and right pictures. To activate the right picture ❑ Press b. Using the Features Using Twin View™ Twin View...


