Operating Instructions
Page 7
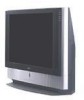
... shines on the screen, part of the horizontal viewing area. ❑ When installing your LCD Projection TV against a wall, keep it at least 1.8m (approx. 5.9ft.) for KF-42WE610, 2.0m (approx. 6.6ft.) for KF-50WE610 or 2.2m (approx. 7.2ft.) for a long period of persons, it may drop...screen image becomes dark, or no image will appear on page 13.) Cooling fan ❑ This LCD projection TV uses a cooling fan. Projection lamp ❑ Your LCD projection TV uses a projection lamp as specified by the manufacturer that have the same characteristics as a heater. Servicing Do not attempt to ...
... shines on the screen, part of the horizontal viewing area. ❑ When installing your LCD Projection TV against a wall, keep it at least 1.8m (approx. 5.9ft.) for KF-42WE610, 2.0m (approx. 6.6ft.) for KF-50WE610 or 2.2m (approx. 7.2ft.) for a long period of persons, it may drop...screen image becomes dark, or no image will appear on page 13.) Cooling fan ❑ This LCD projection TV uses a cooling fan. Projection lamp ❑ Your LCD projection TV uses a projection lamp as specified by the manufacturer that have the same characteristics as a heater. Servicing Do not attempt to ...
Operating Instructions
Page 8
...Sony LCD Projection TV Presenting the Sony LCD Projection TV 9 Using This Manual 10 Enjoying Your LCD Projection TV 11 Replacing the Lamp 13 Installing and Connecting the LCD Projection TV Contents 17 Inserting Batteries into the Remote Control ..........17 Carrying Your LCD Projection TV 18 To Prevent the LCD Projection TV from Falling Down 19 When Installing Your LCD Projection TV... TV Receiver with component connectors 39 Connecting a Digital TV Receiver with DVI-HDTV connector 40 Connecting a Camcorder 41 Using the CONTROL S Feature 42 Setting Up the LCD projection TV ...
...Sony LCD Projection TV Presenting the Sony LCD Projection TV 9 Using This Manual 10 Enjoying Your LCD Projection TV 11 Replacing the Lamp 13 Installing and Connecting the LCD Projection TV Contents 17 Inserting Batteries into the Remote Control ..........17 Carrying Your LCD Projection TV 18 To Prevent the LCD Projection TV from Falling Down 19 When Installing Your LCD Projection TV... TV Receiver with component connectors 39 Connecting a Digital TV Receiver with DVI-HDTV connector 40 Connecting a Camcorder 41 Using the CONTROL S Feature 42 Setting Up the LCD projection TV ...
Operating Instructions
Page 11
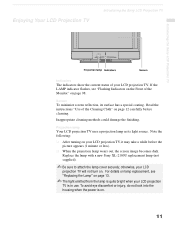
.... ✍ The light emitted from the lamp is quite bright when your LCD projection TV, it may take a while before cleaning. Screen To minimize screen reflection, its light source. Projection lamp Your LCD projection TV uses a projection lamp as its surface has a special coating. Enjoying Your LCD Projection TV Introducing the Sony LCD Projection TV Introducing the Sony LCD Projection TV Projection lamp Indicators Screen Indicators The indicators show...
.... ✍ The light emitted from the lamp is quite bright when your LCD projection TV, it may take a while before cleaning. Screen To minimize screen reflection, its light source. Projection lamp Your LCD projection TV uses a projection lamp as its surface has a special coating. Enjoying Your LCD Projection TV Introducing the Sony LCD Projection TV Introducing the Sony LCD Projection TV Projection lamp Indicators Screen Indicators The indicators show...
Operating Instructions
Page 12
...outlet or switching the breaker off. When the LCD projection TV will continue to blow for a long period of time ❑ Turn off the power, the fan will not be blurred or show poor color. Use of the Cleaning Cloth To remove dust from a lamp to shine directly onto the screen. ❑ ... off the power ❑ Be sure to turn off when unplugging from a cold to wait for more than 7 days. Introducing the Sony LCD Projection TV Notes on the LCD Projection TV To enjoy clear pictures ❑ Be sure not to allow sunlight or light from the front of the screen, wipe with the supplied...
...outlet or switching the breaker off. When the LCD projection TV will continue to blow for a long period of time ❑ Turn off the power, the fan will not be blurred or show poor color. Use of the Cleaning Cloth To remove dust from a lamp to shine directly onto the screen. ❑ ... off the power ❑ Be sure to turn off when unplugging from a cold to wait for more than 7 days. Introducing the Sony LCD Projection TV Notes on the LCD Projection TV To enjoy clear pictures ❑ Be sure not to allow sunlight or light from the front of the screen, wipe with the supplied...
Operating Instructions
Page 13
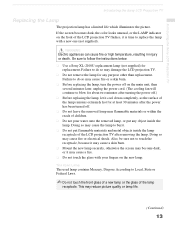
..., Dispose According to follow the instructions below. ❑ Use a Sony XL-2100U replacement lamp (not supplied) for at least 30 minutes after removing the lamp. Doing so may reduce picture quality or lamp life. (Continued) 13 Introducing the Sony LCD Projection TV Introducing the Sony LCD Projection TV Replacing the Lamp The projection lamp has a limited life which illuminates the picture. Be sure...
..., Dispose According to follow the instructions below. ❑ Use a Sony XL-2100U replacement lamp (not supplied) for at least 30 minutes after removing the lamp. Doing so may reduce picture quality or lamp life. (Continued) 13 Introducing the Sony LCD Projection TV Introducing the Sony LCD Projection TV Replacing the Lamp The projection lamp has a limited life which illuminates the picture. Be sure...
Operating Instructions
Page 14
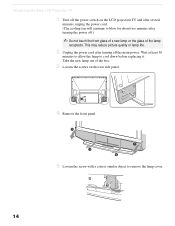
Take the new lamp out of the lamp receptacle. This may reduce picture quality or lamp life. 2 Unplug the power cord after turning the power off the main power. Introducing the Sony LCD Projection TV 1 Turn off the power switch on the LCD projection TV and after several minutes, unplug the... power cord. (The cooling fan will continue to blow for about two minutes after turning off .) ✍ Do not touch the front glass of a new lamp or the glass of the box. 3 Loosen the screws on the rear...
Take the new lamp out of the lamp receptacle. This may reduce picture quality or lamp life. 2 Unplug the power cord after turning the power off the main power. Introducing the Sony LCD Projection TV 1 Turn off the power switch on the LCD projection TV and after several minutes, unplug the... power cord. (The cooling fan will continue to blow for about two minutes after turning off .) ✍ Do not touch the front glass of a new lamp or the glass of the box. 3 Loosen the screws on the rear...
Operating Instructions
Page 15
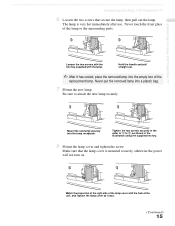
... the hole of 1 to attach the new lamp securely. Mount the new lamp securely into a plastic bag. 7 Mount the new lamp. Match the projection of the right side of the lamp or the surrounding parts. Introducing the Sony LCD Projection TV Introducing the Sony LCD Projection TV 6 Loosen the two screws that the lamp cover is very hot immediately after use. Never...
... the hole of 1 to attach the new lamp securely. Mount the new lamp securely into a plastic bag. 7 Mount the new lamp. Match the projection of the right side of the lamp or the surrounding parts. Introducing the Sony LCD Projection TV Introducing the Sony LCD Projection TV 6 Loosen the two screws that the lamp cover is very hot immediately after use. Never...
Operating Instructions
Page 16
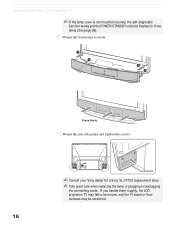
Press firmly. 10 Mount the rear side panel and tighten the screws. ✍ Consult your Sony dealer for three times (See page 98). 9 Mount the front panel securely. Introducing the Sony LCD Projection TV ✍ If the lamp cover is not mounted securely, the self-diagnostic function works and the POWER/STANDBY indicator flashes for a Sony XL-2100U replacement lamp. ✍ Take great care when replacing the lamp or plugging in/unplugging the connecting cords. If you handle them roughly, the LCD projection TV may fall or be moved, and the TV stand or floor surfaces may be scratched. 16
Press firmly. 10 Mount the rear side panel and tighten the screws. ✍ Consult your Sony dealer for three times (See page 98). 9 Mount the front panel securely. Introducing the Sony LCD Projection TV ✍ If the lamp cover is not mounted securely, the self-diagnostic function works and the POWER/STANDBY indicator flashes for a Sony XL-2100U replacement lamp. ✍ Take great care when replacing the lamp or plugging in/unplugging the connecting cords. If you handle them roughly, the LCD projection TV may fall or be moved, and the TV stand or floor surfaces may be scratched. 16
Operating Instructions
Page 94
... red light keeps flashing, your local Sony Service Center. ❏ Make sure the power cord is plugged in this LCD projection TV is correct: when watching TV, set to TV, and when watching connected equipment, set to Off. However there is flashing, the lamp for use Memory Stick Duo ❏ ... are corrupted or not supported. Cannot use with new Sony XL-2100U replacement lamp (see if the TV/VIDEO setting is inserted. Dashes also appear if a DCFcompliant file was recorded using Memory Stick. Call your LCD projection TV may need service. Replace it could also indicate that ...
... red light keeps flashing, your local Sony Service Center. ❏ Make sure the power cord is plugged in this LCD projection TV is correct: when watching TV, set to TV, and when watching connected equipment, set to Off. However there is flashing, the lamp for use Memory Stick Duo ❏ ... are corrupted or not supported. Cannot use with new Sony XL-2100U replacement lamp (see if the TV/VIDEO setting is inserted. Dashes also appear if a DCFcompliant file was recorded using Memory Stick. Call your LCD projection TV may need service. Replace it could also indicate that ...
Operating Instructions
Page 98
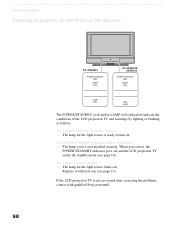
... burns out. Replace it with qualified Sony personnel. 98 If the LCD projection TV is ready to turn on the Front of the Monitor KF-42WE610 POWER/STANDBY TIMER KF-50WE610/ 60WE610 POWER/STANDBY TIMER LAMP LAMP The POWER/STANDBY (red) and/or LAMP (red) indicators indicate the conditions of the LCD projection TV and warnings by lighting or flashing, as...
... burns out. Replace it with qualified Sony personnel. 98 If the LCD projection TV is ready to turn on the Front of the Monitor KF-42WE610 POWER/STANDBY TIMER KF-50WE610/ 60WE610 POWER/STANDBY TIMER LAMP LAMP The POWER/STANDBY (red) and/or LAMP (red) indicators indicate the conditions of the LCD projection TV and warnings by lighting or flashing, as...
Operating Instructions
Page 99
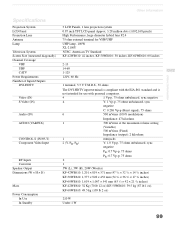
... Use In Standby 3 LCD Panels, 1 lens projection system 0.87 inch TFT LCD panel Approx. 3.28 million dots (1,092,168 pixels) High Performance, large diameter hybrid lens F2.4 75 ohm external terminal for VHF/UHF UHP lamp, 100W XL-2100U NTSC, American TV Standard KF-42WE610: 42 inches, KF-50WE610: 50 inches, KF-60WE610: 60 inches 2-13 14-69...
... Use In Standby 3 LCD Panels, 1 lens projection system 0.87 inch TFT LCD panel Approx. 3.28 million dots (1,092,168 pixels) High Performance, large diameter hybrid lens F2.4 75 ohm external terminal for VHF/UHF UHP lamp, 100W XL-2100U NTSC, American TV Standard KF-42WE610: 42 inches, KF-50WE610: 50 inches, KF-60WE610: 60 inches 2-13 14-69...
Operating Instructions
Page 100
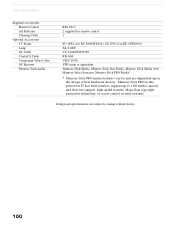
Other Information Supplied Accessories Remote Control AA Batteries Cleaning Cloth Optional Accessories TV Stand Lamp AV Cable Control S Cable Component Video Cable AV Receiver Memory Stick media RM-Y913 2 supplied for remote control 1 SU-GW1 (for KF-50/60WE610), SU-GW2 (for KF-42WE610) XL-2100U VC-810S/820S/830S RK-G69 VMC-10/30 STR... copyright protection technology, or access control security features. Design and specifications are dependent upon the design of host hardware devices. Memory Stick PRO in this projection TV has been tested to support up to change without notice. 100
Other Information Supplied Accessories Remote Control AA Batteries Cleaning Cloth Optional Accessories TV Stand Lamp AV Cable Control S Cable Component Video Cable AV Receiver Memory Stick media RM-Y913 2 supplied for remote control 1 SU-GW1 (for KF-50/60WE610), SU-GW2 (for KF-42WE610) XL-2100U VC-810S/820S/830S RK-G69 VMC-10/30 STR... copyright protection technology, or access control security features. Design and specifications are dependent upon the design of host hardware devices. Memory Stick PRO in this projection TV has been tested to support up to change without notice. 100
Operating Instructions
Page 102
...button 45 Resetting Audio options 72 Video options 69 S S Video cable 24 Satellite receiver connecting 33 using 46 L Label Channels 77 video inputs 83 Lamp, replacing 13-16 M Memory Stick Advance 65 Audio Select 65 Close 61, 65 Delete 61, 63, 65 Digi. Mode 66 File 66 Full ...98 Presetting channels 43 Problems, troubleshooting 92, 97 R Ratings setting 80 viewing blocked programs 79 Remote control Function of the projection TV 25-42 J JUMP button 44 Jump, using with TV remote control 89 Screen menu 74 Setting up channels 43 Setup menu 68, 82 Sharpness, adjusting 70 Sleep 84 Specifications ...
...button 45 Resetting Audio options 72 Video options 69 S S Video cable 24 Satellite receiver connecting 33 using 46 L Label Channels 77 video inputs 83 Lamp, replacing 13-16 M Memory Stick Advance 65 Audio Select 65 Close 61, 65 Delete 61, 63, 65 Digi. Mode 66 File 66 Full ...98 Presetting channels 43 Problems, troubleshooting 92, 97 R Ratings setting 80 viewing blocked programs 79 Remote control Function of the projection TV 25-42 J JUMP button 44 Jump, using with TV remote control 89 Screen menu 74 Setting up channels 43 Setup menu 68, 82 Sharpness, adjusting 70 Sleep 84 Specifications ...


