
Child Safety: It Makes A Difference Where Your TV Stands
Page 1
...may pique the children's curiosity. 6 Remember that children can become excited while watching a program and can potentially push or pull a TV over. 7 Share our safety message on top of the home with your home. The home theater entertainment experience is large enough to ... components). 2 Use appropriate angle braces, straps and anchors to secure your furniture to the wall (but never screw anything directly into the TV). 3 Carefully read and understand the manufacturer's instructions and product safety notices. 4 Don't allow children to advocate children's safety and educate customers...
...may pique the children's curiosity. 6 Remember that children can become excited while watching a program and can potentially push or pull a TV over. 7 Share our safety message on top of the home with your home. The home theater entertainment experience is large enough to ... components). 2 Use appropriate angle braces, straps and anchors to secure your furniture to the wall (but never screw anything directly into the TV). 3 Carefully read and understand the manufacturer's instructions and product safety notices. 4 Don't allow children to advocate children's safety and educate customers...
Dimensions Diagram
Page 1
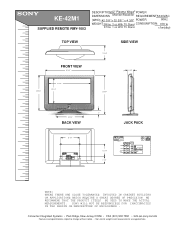
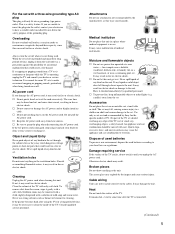
KE-42M1 SUPPLIED REMOTE RMY-1003 MDDDEIEOMSSDECCENRRLSII:PPIOTTNIIOOSNN::4M2"oPniltaosrm/RaecWeeivgear® POWER REQUIREMENTS:120VAC (W(WWEHHIGDDH))::T4:2 3/8 "x 32 5/8 " x 4 3/8" WEIGHT: 99 lbs 3 oz With TV Stand POWER CONSUMPTION: 60Hz 370 w 87 lbs 1 oz W/O TV Stand
KE-42M1 SUPPLIED REMOTE RMY-1003 MDDDEIEOMSSDECCENRRLSII:PPIOTTNIIOOSNN::4M2"oPniltaosrm/RaecWeeivgear® POWER REQUIREMENTS:120VAC (W(WWEHHIGDDH))::T4:2 3/8 "x 32 5/8 " x 4 3/8" WEIGHT: 99 lbs 3 oz With TV Stand POWER CONSUMPTION: 60Hz 370 w 87 lbs 1 oz W/O TV Stand

Operating Instructions (primary manual)
Page 1
2-021-773-11 (1) Flat Panel Color TV Operating Instructions KE-42M1 © 2004 Sony Corporation
2-021-773-11 (1) Flat Panel Color TV Operating Instructions KE-42M1 © 2004 Sony Corporation
Operating Instructions (primary manual)
Page 2
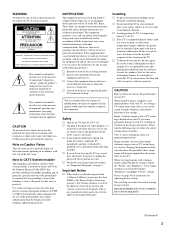
Owner's Record The model and serial numbers are located at : 1-877-899-SONY (7669) 2 Model No. Customers in the continental United States contact the Direct Response Center at: 1-800-222-SONY (7669) Customers in the spaces provided below. Serial No. Refer to them whenever you have ...additional questions related to the use of your Sony TV, please call upon your Sony dealer regarding this product. Record these numbers in Canada contact the Customer Relations Center at the rear of the following instructions...
Owner's Record The model and serial numbers are located at : 1-877-899-SONY (7669) 2 Model No. Customers in the continental United States contact the Direct Response Center at: 1-800-222-SONY (7669) Customers in the spaces provided below. Serial No. Refer to them whenever you have ...additional questions related to the use of your Sony TV, please call upon your Sony dealer regarding this product. Record these numbers in Canada contact the Customer Relations Center at the rear of the following instructions...
Operating Instructions (primary manual)
Page 3
...Vision This television receiver provides display of television closed captioning in accordance with the instructions, may be blurred or show poor color due to reduce the risk of the following steps to cover the windows that interference will become imprinted on adjusting picture ...moisture evaporate before operating it further. s Connect the equipment into the outlet, contact your TV When using the TV for the use of the panels. s Consult the dealer or an experienced radio/ TV technician for a Class B digital device pursuant to excessive dust or mechanical vibration. s The...
...Vision This television receiver provides display of television closed captioning in accordance with the instructions, may be blurred or show poor color due to reduce the risk of the following steps to cover the windows that interference will become imprinted on adjusting picture ...moisture evaporate before operating it further. s Connect the equipment into the outlet, contact your TV When using the TV for the use of the panels. s Consult the dealer or an experienced radio/ TV technician for a Class B digital device pursuant to excessive dust or mechanical vibration. s The...
Operating Instructions (primary manual)
Page 4
...BBE" and BBE symbol are trademarks or registered trademarks of BBE Sound, Inc. Do not defeat the safety purpose of Sony Corporation. 4 Important Safeguards Before using your electrician to safety during the installation. Be sure to the operating instructions. Cleaning... HDMI logo and High-Definition Multimedia Interface are trademarks of HDMI Licensing LLC. This is a U.S. SONY APPLIANCE MODEL NO. KE-42M1 SONY WALL-MOUNT BRACKET MODEL NO. This TV incorporates High-Definition Multimedia Interface (HDMI™) technology. Wega, Steady Sound, Digital Reality Creation, Caption...
...BBE" and BBE symbol are trademarks or registered trademarks of BBE Sound, Inc. Do not defeat the safety purpose of Sony Corporation. 4 Important Safeguards Before using your electrician to safety during the installation. Be sure to the operating instructions. Cleaning... HDMI logo and High-Definition Multimedia Interface are trademarks of HDMI Licensing LLC. This is a U.S. SONY APPLIANCE MODEL NO. KE-42M1 SONY WALL-MOUNT BRACKET MODEL NO. This TV incorporates High-Definition Multimedia Interface (HDMI™) technology. Wega, Steady Sound, Digital Reality Creation, Caption...
Operating Instructions (primary manual)
Page 5
... in fire or electric shock. The core lines may be removed with a cloth slightly dampened with a solution of TV. To remove dust from the screen, wipe it checked immediately by Sony for cleaning. Never use . candles) away from the wall outlet as a precaution against the possibility of any liquid... or solid object does fall , causing serious injury to a child or an adult and serious damage to your dealer or Sony service center to overturn. Quick stops, excessive force, and uneven surfaces may cause the appliance and cart combination to exchange it and ask ...
... in fire or electric shock. The core lines may be removed with a cloth slightly dampened with a solution of TV. To remove dust from the screen, wipe it checked immediately by Sony for cleaning. Never use . candles) away from the wall outlet as a precaution against the possibility of any liquid... or solid object does fall , causing serious injury to a child or an adult and serious damage to your dealer or Sony service center to overturn. Quick stops, excessive force, and uneven surfaces may cause the appliance and cart combination to exchange it and ask ...
Operating Instructions (primary manual)
Page 6
... as far as follows: Air circulation is not secured properly, it may drop and a serious injury may cause facial injury. If you carry the TV in cabinet, unless proper ventilation is provided. Oils Do not install this much space. 10 cm (4 inches) When installing the unit using a stand...10 cm (4 inches) Allow this unit near or over or upside down. 6 s Never cover the slots and openings with the specified number of the TV has a special coating, be blocked causing overheating and cause fire or damage the unit. s Never place the set to follow the operating instructions supplied with...
... as far as follows: Air circulation is not secured properly, it may drop and a serious injury may cause facial injury. If you carry the TV in cabinet, unless proper ventilation is provided. Oils Do not install this much space. 10 cm (4 inches) When installing the unit using a stand...10 cm (4 inches) Allow this unit near or over or upside down. 6 s Never cover the slots and openings with the specified number of the TV has a special coating, be blocked causing overheating and cause fire or damage the unit. s Never place the set to follow the operating instructions supplied with...

Operating Instructions (primary manual)
Page 9
...14 Using your Remote Controls with Other Equipment 16 Overview of the TV Controls and Connectors 18 Front Panel Controls and Connectors 18 Rear Panel Connectors 19 Preventing the TV from Falling Down 20 Connecting and Setting the TV Basic Connections (Connecting Cable or an Antenna 21 Connector types 21 Connecting...Setting the Channels 35 Using the Menu 37 Selecting the On-screen Menu Language 38 Watching the TV Watching the TV 40 Watching with closed caption 41 Selecting the Picture Mode 42 Selecting the Effect Mode 43 Using the Wide Screen Mode 44 Changing the Wide Screen Mode ...
...14 Using your Remote Controls with Other Equipment 16 Overview of the TV Controls and Connectors 18 Front Panel Controls and Connectors 18 Rear Panel Connectors 19 Preventing the TV from Falling Down 20 Connecting and Setting the TV Basic Connections (Connecting Cable or an Antenna 21 Connector types 21 Connecting...Setting the Channels 35 Using the Menu 37 Selecting the On-screen Menu Language 38 Watching the TV Watching the TV 40 Watching with closed caption 41 Selecting the Picture Mode 42 Selecting the Effect Mode 43 Using the Wide Screen Mode 44 Changing the Wide Screen Mode ...
Operating Instructions (primary manual)
Page 10
...Selecting stereo or bilingual programs using the menu 63 Selecting How to Control the Volume of the TV's Speakers 63 Selecting the TV Speakers or an External Amplifier to Listen to the TV 64 Using the Parental Control Feature ....... 65 Activating the Parental Control feature 66 Selecting a ... Ratings Mean 70 Ratings in the U.S.A 70 Ratings in Canada 72 Using the Screen Saver Function .......... 74 Turning Off the TV Automatically .......... 75 Additional Information Troubleshooting 77 Self-diagnosis function 77 Trouble symptoms and remedies ..... 77 Specifications 79 Index 80 10
...Selecting stereo or bilingual programs using the menu 63 Selecting How to Control the Volume of the TV's Speakers 63 Selecting the TV Speakers or an External Amplifier to Listen to the TV 64 Using the Parental Control Feature ....... 65 Activating the Parental Control feature 66 Selecting a ... Ratings Mean 70 Ratings in the U.S.A 70 Ratings in Canada 72 Using the Screen Saver Function .......... 74 Turning Off the TV Automatically .......... 75 Additional Information Troubleshooting 77 Self-diagnosis function 77 Trouble symptoms and remedies ..... 77 Specifications 79 Index 80 10
Operating Instructions (primary manual)
Page 11
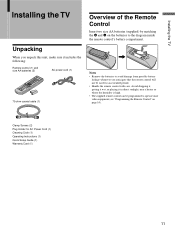
... batteries (supplied) by matching the e and E on the batteries to operate most video equipment (see "Programming the Remote Control" on page 14). Installing the TV Installing the TV Unpacking When you anticipate that the remote control will not be programmed to the diagram inside the remote control's battery compartment. Clamp Screws (2) Plug...
... batteries (supplied) by matching the e and E on the batteries to operate most video equipment (see "Programming the Remote Control" on page 14). Installing the TV Installing the TV Unpacking When you anticipate that the remote control will not be programmed to the diagram inside the remote control's battery compartment. Clamp Screws (2) Plug...

Operating Instructions (primary manual)
Page 12
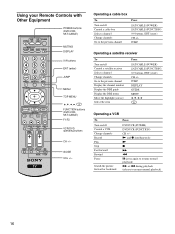
...qd wf Tip The MTS/SAP button, the number 5 button and the CH + button have the remote control operate the equipment you want. The TV alternates between two channels. For details, see "Programming the Remote Control" on page 14. 9 DVD/VCR When FUNCTION is switched on DVD/VCR TOP... programmed into the remote control. Button Description 1 DVD/VCR, SAT/ Press to mute the sound. Use the tactile dot as a reference when operating the TV. For details, see "Using your DVD/VCR. 7 FAVORITES Press to display the top menu of your Remote Control with Other Equipment " on and off...
...qd wf Tip The MTS/SAP button, the number 5 button and the CH + button have the remote control operate the equipment you want. The TV alternates between two channels. For details, see "Programming the Remote Control" on page 14. 9 DVD/VCR When FUNCTION is switched on DVD/VCR TOP... programmed into the remote control. Button Description 1 DVD/VCR, SAT/ Press to mute the sound. Use the tactile dot as a reference when operating the TV. For details, see "Using your DVD/VCR. 7 FAVORITES Press to display the top menu of your Remote Control with Other Equipment " on and off...

Operating Instructions (primary manual)
Page 13
...video label is programmed on page 43. the channel changes after 2 seconds. For details, see "Selecting Stereo or Bilingual Programs" on the TV's remote control. Press ENTER to select the sound effect modes: TruSurround, Off. Button Description wd Press to change channels immediately. VIDEO 5:...VIDEO IN 2 and the VIDEO IN 3. wf MTS/SAP Press repeatedly to cycle through the video equipment connected to switch between the TV and the satellite receiver. Press to reset the settings to display the current channel number, and channel label. For more details, see...
...video label is programmed on page 43. the channel changes after 2 seconds. For details, see "Selecting Stereo or Bilingual Programs" on the TV's remote control. Press ENTER to select the sound effect modes: TruSurround, Off. Button Description wd Press to change channels immediately. VIDEO 5:...VIDEO IN 2 and the VIDEO IN 3. wf MTS/SAP Press repeatedly to cycle through the video equipment connected to switch between the TV and the satellite receiver. Press to reset the settings to display the current channel number, and channel label. For more details, see...

Operating Instructions (primary manual)
Page 14
...PIC OFF MTS/SAP GUIDE TV/SAT 1 The remote control is preset to program the remote control. Note The equipment must have video equipment other codes listed for that you want to the correct code for the manufacturer's code of your equipment. If more than Sony brand that manufacturer. If... DVD/VCR SAT/Cable Programmable Code Number 701 (Sony Dream System) 801 (Satellite Cable Box) If you have infrared (IR) remote capability in order to be able to operate your equipment with the TV's remote control, use the equipment's own remote control unit. 14 Use the code number to ...
...PIC OFF MTS/SAP GUIDE TV/SAT 1 The remote control is preset to program the remote control. Note The equipment must have video equipment other codes listed for that you want to the correct code for the manufacturer's code of your equipment. If more than Sony brand that manufacturer. If... DVD/VCR SAT/Cable Programmable Code Number 701 (Sony Dream System) 801 (Satellite Cable Box) If you have infrared (IR) remote capability in order to be able to operate your equipment with the TV's remote control, use the equipment's own remote control unit. 14 Use the code number to ...

Operating Instructions (primary manual)
Page 15
... 806, 807 * If an Aiwa VCR does not work even though you enter the code for Aiwa, enter the code for Sony instead. 15 Installing the TV Manufacturer's codes DVD Manufacturer Sony General Electric Hitachi JVC Magnavox Mitsubishi Panasonic Philips Pioneer RCA, Proscan Samsung Toshiba Zenith Code 751 755 758 756 757 761...
... 806, 807 * If an Aiwa VCR does not work even though you enter the code for Aiwa, enter the code for Sony instead. 15 Installing the TV Manufacturer's codes DVD Manufacturer Sony General Electric Hitachi JVC Magnavox Mitsubishi Panasonic Philips Pioneer RCA, Proscan Samsung Toshiba Zenith Code 751 755 758 756 757 761...
Operating Instructions (primary manual)
Page 16
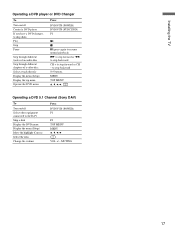
... VCR CABLE MODE PICTURE WIDE SLEEP DISPLAY POWER buttons (DVD/VCR, SAT/CABLE) MUTING DISPLAY 0-9 buttons ENT (enter) FREEZE FAVORITES MENU TOP MENU F1 F2 TV VIDEO 1/2/3 VIDEO 4 VIDEO 5 JUMP MENU TOP MENU V, v, B, b, FUNCTION buttons (DVD/VCR, SAT/CABLE) F1/F2 VCR/DVD operating buttons RESET PIC OFF MTS/SAP GUIDE...
... VCR CABLE MODE PICTURE WIDE SLEEP DISPLAY POWER buttons (DVD/VCR, SAT/CABLE) MUTING DISPLAY 0-9 buttons ENT (enter) FREEZE FAVORITES MENU TOP MENU F1 F2 TV VIDEO 1/2/3 VIDEO 4 VIDEO 5 JUMP MENU TOP MENU V, v, B, b, FUNCTION buttons (DVD/VCR, SAT/CABLE) F1/F2 VCR/DVD operating buttons RESET PIC OFF MTS/SAP GUIDE...
Operating Instructions (primary manual)
Page 17
Installing the TV Operating a DVD player or DVD Changer To Turn on /off Control a DVD player If you have a DVD changer, to skip disks Play Stop Pause Step ... Change the volume Press DVD/VCR (POWER) F1 F2 TOP MENU MENU V, v, B, b VOL +/-, MUTING 17 to step backward 0-9 buttons MENU TOP MENU V, v, B, b, Operating a DVD 5.1 Channel (Sony DAV) To Turn on /off Select other equipment connected to step forward or CH -
Installing the TV Operating a DVD player or DVD Changer To Turn on /off Control a DVD player If you have a DVD changer, to skip disks Play Stop Pause Step ... Change the volume Press DVD/VCR (POWER) F1 F2 TOP MENU MENU V, v, B, b VOL +/-, MUTING 17 to step backward 0-9 buttons MENU TOP MENU V, v, B, b, Operating a DVD 5.1 Channel (Sony DAV) To Turn on /off Select other equipment connected to step forward or CH -

Operating Instructions (primary manual)
Page 18
... When the timer is activated. For details, see page 75. 3 (Picture off the TV. If the LED blinks continuously, this LED will open the drop-down panel of your TV, push up green when the TV is turned on. For details, see page 77). 5 i Headphones jack Connects to your... camcorder or other video equipment that the Picture Off feature is set . Overview of the TV Controls and Connectors Front Panel Controls and Connectors To open the drop-down panel To open . 1 2 3 4 S VIDEO (MONO) VIDEO L AUDIO R VIDEO IN 2 INPUT VOLUME CHANNEL 56 7 89 0 Item/Jack ...
... When the timer is activated. For details, see page 75. 3 (Picture off the TV. If the LED blinks continuously, this LED will open the drop-down panel of your TV, push up green when the TV is turned on. For details, see page 77). 5 i Headphones jack Connects to your... camcorder or other video equipment that the Picture Off feature is set . Overview of the TV Controls and Connectors Front Panel Controls and Connectors To open the drop-down panel To open . 1 2 3 4 S VIDEO (MONO) VIDEO L AUDIO R VIDEO IN 2 INPUT VOLUME CHANNEL 56 7 89 0 Item/Jack ...

Operating Instructions (primary manual)
Page 19
... (2) connections. 6 HD/DVD IN 4 Y, PB, PR/ Connect to the composite A/V output jacks on the front panel of Dolby Laboratories. 19 You can use the IN 180W (6Ω) MAX TV speakers as a set -top box's component video (Y, PB, PR) and audio (L/R) L-AUDIO-R jacks. These video ... your stereo system. 8 5 CENTER SPEAKER Connect the center output terminals of your DVD player's or digital set -top box, DVD player, and A/V receiver. Installing the TV Rear Panel Connectors 1 R L AUDIO IN 5 IN 2 3 VHF/UHF AC IN VIDEO IN 1 3 S VIDEO VIDEO L(MONO) AUDIO R HD/DVD IN 4 Y PB ...
... (2) connections. 6 HD/DVD IN 4 Y, PB, PR/ Connect to the composite A/V output jacks on the front panel of Dolby Laboratories. 19 You can use the IN 180W (6Ω) MAX TV speakers as a set -top box's component video (Y, PB, PR) and audio (L/R) L-AUDIO-R jacks. These video ... your stereo system. 8 5 CENTER SPEAKER Connect the center output terminals of your DVD player's or digital set -top box, DVD player, and A/V receiver. Installing the TV Rear Panel Connectors 1 R L AUDIO IN 5 IN 2 3 VHF/UHF AC IN VIDEO IN 1 3 S VIDEO VIDEO L(MONO) AUDIO R HD/DVD IN 4 Y PB ...

Operating Instructions (primary manual)
Page 20
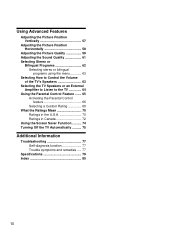
Preventing the TV from Falling Down After connections with antennas and other clamp screw. 3 Attach a sturdy cord or chain securely to each clamp screw, and attach the cord or chain to the screw hole. Attached screw Rear of the TV Clamp screw (supplied) 2 Repeat step 1 to attach the other equipment are completed, be sure to attach the supplied clamp screws to the rear of the TV, and pass a sturdy cord or chain and attach it to a wall or pillar. 1 Remove one of the two screws at the rear of the TV, then attach the supplied clamp screw to a wall or pillar. 20
Preventing the TV from Falling Down After connections with antennas and other clamp screw. 3 Attach a sturdy cord or chain securely to each clamp screw, and attach the cord or chain to the screw hole. Attached screw Rear of the TV Clamp screw (supplied) 2 Repeat step 1 to attach the other equipment are completed, be sure to attach the supplied clamp screws to the rear of the TV, and pass a sturdy cord or chain and attach it to a wall or pillar. 1 Remove one of the two screws at the rear of the TV, then attach the supplied clamp screw to a wall or pillar. 20


