Operating Instructions
Page 6
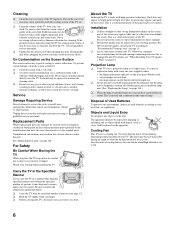
... and without the specified number of time, it may be blocked causing overheating and cause fire or damage the unit. Projection Lamp ❑ Your TV uses a projection lamp as these may be necessary to dripping or splashing and no image appears on the apparatus. Never use a cloth moistened... serious injury may scratch the screen's coating. Disposal of Used Batteries To preserve our environment, dispose of the TV. Cleaning ❑ Clean the rear cover area of the TV. Stubborn stains may be caused. Also the noise of cooling fan may be careful not to service the set...
... and without the specified number of time, it may be blocked causing overheating and cause fire or damage the unit. Projection Lamp ❑ Your TV uses a projection lamp as these may be necessary to dripping or splashing and no image appears on the apparatus. Never use a cloth moistened... serious injury may scratch the screen's coating. Disposal of Used Batteries To preserve our environment, dispose of the TV. Cleaning ❑ Clean the rear cover area of the TV. Stubborn stains may be caused. Also the noise of cooling fan may be careful not to service the set...
Operating Instructions
Page 7
...Projection Lamp 12 Installing the TV 13 Carrying Your TV 13 Take Precaution during Installation 13 Preventing the TV from Toppling Over .......... 14 When Installing Your TV against a Wall......... 14 Recommended Viewing Area 15 TV Controls and Connectors 16 Front Panel 16 Front Connectors 17 Rear Panel 18 Connecting the TV...Using Favorite Channels 58 Using the Channel Menu 58 Using the Favorite Channels Guide 59 Using the PC Input 60 Displaying the PC Screen 60 Using the Memory Stick Viewer About Memory Stick 61 Features 61 Memory Stick Compatibility 61 File Compatibility 62 ...
...Projection Lamp 12 Installing the TV 13 Carrying Your TV 13 Take Precaution during Installation 13 Preventing the TV from Toppling Over .......... 14 When Installing Your TV against a Wall......... 14 Recommended Viewing Area 15 TV Controls and Connectors 16 Front Panel 16 Front Connectors 17 Rear Panel 18 Connecting the TV...Using Favorite Channels 58 Using the Channel Menu 58 Using the Favorite Channels Guide 59 Using the PC Input 60 Displaying the PC Screen 60 Using the Memory Stick Viewer About Memory Stick 61 Features 61 Memory Stick Compatibility 61 File Compatibility 62 ...

Operating Instructions
Page 8
... Vision 98 Selecting PC Setup Options 99 Accessing the Applications Settings 101 Selecting Applications Options 101 Other Information Overview 103 Contacting Sony 103 Replacing the Lamp 104 How to Replace the Lamp 105 Troubleshooting 108 Twin View 108 Remote Control 108 CableCARD Device 109 Memory Stick 109 Video 111 Audio 111 Channels 112...
... Vision 98 Selecting PC Setup Options 99 Accessing the Applications Settings 101 Selecting Applications Options 101 Other Information Overview 103 Contacting Sony 103 Replacing the Lamp 104 How to Replace the Lamp 105 Troubleshooting 108 Twin View 108 Remote Control 108 CableCARD Device 109 Memory Stick 109 Video 111 Audio 111 Channels 112...
Operating Instructions
Page 12
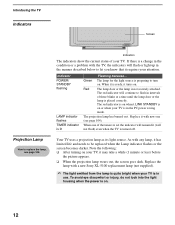
...will not flash) even when the TV is placed correctly. When one (see page 104. Replace the lamp with a new Sony XL-5100 replacement lamp (not supplied). ✍ The light emitted from the lamp is quite bright when your TV is in intervals of your TV is in the manner described below ...a change in the condition or a problem with the TV, the indicators will flash or light up in use. Introducing the TV Indicators Projection Lamp How to replace the lamp, see page 104). Green The lamp for the light source is on . Replace it with any lamp, it turns on . 12 Note the following: ...
...will not flash) even when the TV is placed correctly. When one (see page 104. Replace the lamp with a new Sony XL-5100 replacement lamp (not supplied). ✍ The light emitted from the lamp is quite bright when your TV is in intervals of your TV is in the manner described below ...a change in the condition or a problem with the TV, the indicators will flash or light up in use. Introducing the TV Indicators Projection Lamp How to replace the lamp, see page 104). Green The lamp for the light source is on . Replace it with any lamp, it turns on . 12 Note the following: ...
Operating Instructions
Page 14
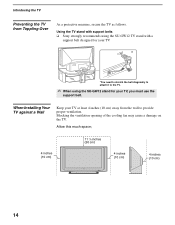
...) 4 inches (10 cm) STD/DUO POWER/STANDBY LAMP TIMER POWER 14 When Installing Your TV against a Wall Keep your TV, you must use the support belt. Using the TV stand with support belts ❑ Sony strongly recommends using the SU-GW12 TV stand with a support belt designed for your TV. * *You need to stretch the belt diagonally...
...) 4 inches (10 cm) STD/DUO POWER/STANDBY LAMP TIMER POWER 14 When Installing Your TV against a Wall Keep your TV, you must use the support belt. Using the TV stand with support belts ❑ Sony strongly recommends using the SU-GW12 TV stand with a support belt designed for your TV. * *You need to stretch the belt diagonally...
Operating Instructions
Page 16
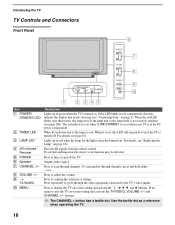
Lights up in red continuously, this LED will remain lit even if the TV is not securely attached (see "Contacting Sony" on . Do not put anything near the sensor, as a reference when operating the TV. 16 Press to turn on -screen setting and activate the , B, b, v, and V buttons. Press to ... timers is set , this may be affected. When lit, indicates one of the lamp unit or the lamp itself is turned off the TV. For details, see "Replacing the Lamp" on -screen setting and activate the TV/VIDEO, VOLUME +/- For details, see page 101. To scan quickly through channels, ...
Lights up in red continuously, this LED will remain lit even if the TV is not securely attached (see "Contacting Sony" on . Do not put anything near the sensor, as a reference when operating the TV. 16 Press to turn on -screen setting and activate the , B, b, v, and V buttons. Press to ... timers is set , this may be affected. When lit, indicates one of the lamp unit or the lamp itself is turned off the TV. For details, see "Replacing the Lamp" on -screen setting and activate the TV/VIDEO, VOLUME +/- For details, see page 101. To scan quickly through channels, ...

Operating Instructions
Page 17
... Duo" on page 63. 3 i.LINK Connects to view on your VCR or other S VIDEOequipped video component. Provides a secure digital connection between your TV and i.LINK-compatible portable device, such as a digital video camcorder. 4 S VIDEO Connects to the S VIDEO OUT jack of your... are under the front panel cover 4 5 Push up to the audio and video OUT jacks on the panel. Front Connectors Introducing the TV Introducing the TV STD/DUO POWER/STANDBY LAMP TIMER POWER STD/DUO i.LINK S400 VIDEO 2 INPUT (DV/HDV/MICROMV/TS) S VIDEO VIDEO L(MONO) - AUDIO - Provides better picture ...
... Duo" on page 63. 3 i.LINK Connects to view on your VCR or other S VIDEOequipped video component. Provides a secure digital connection between your TV and i.LINK-compatible portable device, such as a digital video camcorder. 4 S VIDEO Connects to the S VIDEO OUT jack of your... are under the front panel cover 4 5 Push up to the audio and video OUT jacks on the panel. Front Connectors Introducing the TV Introducing the TV STD/DUO POWER/STANDBY LAMP TIMER POWER STD/DUO i.LINK S400 VIDEO 2 INPUT (DV/HDV/MICROMV/TS) S VIDEO VIDEO L(MONO) - AUDIO - Provides better picture ...
Operating Instructions
Page 103
....sonystyle.ca/tv/ Before calling Sony customer support, please write down the model and serial numbers of this manual. You'll find this information on the front cover of your Sony television, please call our Customer Information Services Center. Other Information Overview This chapter includes the following topics: Topic Contacting Sony Replacing the Lamp Troubleshooting...
....sonystyle.ca/tv/ Before calling Sony customer support, please write down the model and serial numbers of this manual. You'll find this information on the front cover of your Sony television, please call our Customer Information Services Center. Other Information Overview This chapter includes the following topics: Topic Contacting Sony Replacing the Lamp Troubleshooting...
Operating Instructions
Page 104
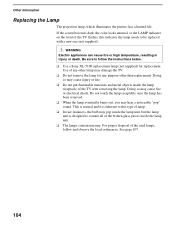
...other than replacement. See page 107. 104 Use of the used lamps, follow the instructions below. ❑ Use a Sony XL-5100 replacement lamp (not supplied) for any other lamp may damage the TV. ❑ Do not remove the lamp for replacement. This is normal and it is inherent to this ... is designed to follow and observe the local ordinances. Doing so may hear a noticeable "pop" sound. Other Information Replacing the Lamp The projection lamp, which illuminates the picture, has a limited life. WARNING Electric appliances can cause fire or high temperature, resulting in injury or...
...other than replacement. See page 107. 104 Use of the used lamps, follow the instructions below. ❑ Use a Sony XL-5100 replacement lamp (not supplied) for any other lamp may damage the TV. ❑ Do not remove the lamp for replacement. This is normal and it is inherent to this ... is designed to follow and observe the local ordinances. Doing so may hear a noticeable "pop" sound. Other Information Replacing the Lamp The projection lamp, which illuminates the picture, has a limited life. WARNING Electric appliances can cause fire or high temperature, resulting in injury or...
Operating Instructions
Page 105
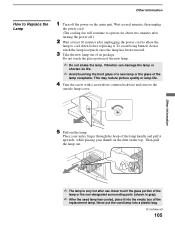
...two minutes after use. To avoid being burned, do not touch the lamp receptacle once the lamp has been removed. 3 Take the new lamp out of the new lamp. ✍ Do not shake the lamp. This may reduce picture quality or lamp life. 4 Turn the screw with a screwdriver counterclockwise and remove the... fan will continue to cool down before replacing it upwards, while placing your index finger through the hoop of the lamp handle and pull it . Vibration can damage the lamp or shorten its package. Place your thumb on the dent on the main unit. Other Information ✍ The...
...two minutes after use. To avoid being burned, do not touch the lamp receptacle once the lamp has been removed. 3 Take the new lamp out of the new lamp. ✍ Do not shake the lamp. This may reduce picture quality or lamp life. 4 Turn the screw with a screwdriver counterclockwise and remove the... fan will continue to cool down before replacing it upwards, while placing your index finger through the hoop of the lamp handle and pull it . Vibration can damage the lamp or shorten its package. Place your thumb on the dent on the main unit. Other Information ✍ The...
Operating Instructions
Page 106
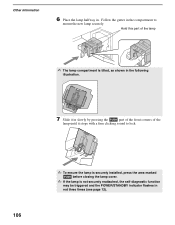
... to lock. Hold this part of the lamp until it stops with a firm clicking sound to mount the new lamp securely. PUSH PUSH ✍ To ensure the lamp is securely installed, press the area marked PUSH before closing the lamp cover. ✍ If the lamp is tilted, as shown in the following... illustration. 106 7 Slide it in slowly by pressing the PUSH part of the front corners of the lamp ✍ The lamp compartment is not securely reattached, the self-diagnostic ...
... to lock. Hold this part of the lamp until it stops with a firm clicking sound to mount the new lamp securely. PUSH PUSH ✍ To ensure the lamp is securely installed, press the area marked PUSH before closing the lamp cover. ✍ If the lamp is tilted, as shown in the following... illustration. 106 7 Slide it in slowly by pressing the PUSH part of the front corners of the lamp ✍ The lamp compartment is not securely reattached, the self-diagnostic ...
Operating Instructions
Page 107
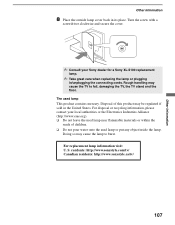
...TV, the TV stand and the floor. Turn the screw with a screwdriver clockwise and secure the cover. ✍ Consult your local authorities or the Electronics Industries Alliance (http://www.eiae.org). ❑ Do not leave the used lamp This product contains mercury. For disposal or recycling information, please contact your Sony dealer for a Sony... XL-5100 replacement lamp. ✍ Take great care when replacing the lamp or plugging in its place....
...TV, the TV stand and the floor. Turn the screw with a screwdriver clockwise and secure the cover. ✍ Consult your local authorities or the Electronics Industries Alliance (http://www.eiae.org). ❑ Do not leave the used lamp This product contains mercury. For disposal or recycling information, please contact your Sony dealer for a Sony... XL-5100 replacement lamp. ✍ Take great care when replacing the lamp or plugging in its place....
Operating Instructions
Page 108
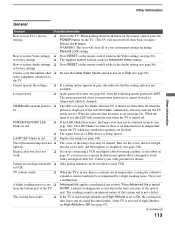
...108 Check that the Label Video Inputs option is not set to Skip. (See the Setup setting on the rear of the batteries. ❏ Press FUNCTION repeatedly until the TV indicator lights up. ❏ If you are using another device to change channels, be sure you have ... CABLE mode. ❏ Make sure this unit's power cord is connected securely to press FUNCTION repeatedly until the TV's projection lamp cools down (approximately 5 minutes). message appears, turn off the TV and wait until the SAT/CABLE indicator lights up . If the remote control still does not work . ❏...
...108 Check that the Label Video Inputs option is not set to Skip. (See the Setup setting on the rear of the batteries. ❏ Press FUNCTION repeatedly until the TV indicator lights up. ❏ If you are using another device to change channels, be sure you have ... CABLE mode. ❏ Make sure this unit's power cord is connected securely to press FUNCTION repeatedly until the TV's projection lamp cools down (approximately 5 minutes). message appears, turn off the TV and wait until the SAT/CABLE indicator lights up . If the remote control still does not work . ❏...
Operating Instructions
Page 113
...in the Video setting (see page 81). While holding down the V button on the remote control, press the POWER button on the TV. (The TV will clear all of the lamp cover may be accompanied by a slight creaking noise. How to factory settings. ❏ Turn on again.) Release the V button. ..., insert it completely (see page 106). WARNING: The reset will turn itself off . LAMP LED blinks in red. ❏ If the LED blinks three times, the lamp cover may indicate the TV needs service. The replacement lamp does not ❏ The screw of your digital cable box. into the screw hole,...
...in the Video setting (see page 81). While holding down the V button on the remote control, press the POWER button on the TV. (The TV will clear all of the lamp cover may be accompanied by a slight creaking noise. How to factory settings. ❏ Turn on again.) Release the V button. ..., insert it completely (see page 106). WARNING: The reset will turn itself off . LAMP LED blinks in red. ❏ If the LED blinks three times, the lamp cover may indicate the TV needs service. The replacement lamp does not ❏ The screw of your digital cable box. into the screw hole,...
Operating Instructions
Page 114
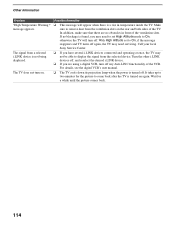
... your local Sony Service Center. ❏ If you have several i.LINK devices connected and operating at once, the TV may need servicing. Possible Remedies ❏ This message will turn on again. Turn the other i.LINK devices off . For details, see the digital VCR's user manual. ❏ The TV cools down its projection lamp when the... is turned off , and reselect the desired i.LINK device. ❏ If you may not be able to remove dust from the ventilation slots on the rear and both sides of the ventilation slots.
... your local Sony Service Center. ❏ If you have several i.LINK devices connected and operating at once, the TV may need servicing. Possible Remedies ❏ This message will turn on again. Turn the other i.LINK devices off . For details, see the digital VCR's user manual. ❏ The TV cools down its projection lamp when the... is turned off , and reselect the desired i.LINK device. ❏ If you may not be able to remove dust from the ventilation slots on the rear and both sides of the ventilation slots.
Operating Instructions
Page 115
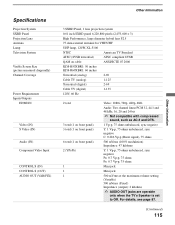
..., 1 lens projection system 0.61 inch SXRD panel 6,220,800 pixels (2,073,600 × 3) High Performance, large diameter hybrid lens F2.5 75 ohm external terminal for VHF/UHF UHP lamp, 120W, XL-5100 NTSC American TV Standard ATSC (8VSB terrestrial) ATSC compliant 8VSB QAM on cable ANSI/SCTE 07 2000 KDS-R50XBR1: 50 inches KDS-R60XBR1: 60 inches...
..., 1 lens projection system 0.61 inch SXRD panel 6,220,800 pixels (2,073,600 × 3) High Performance, large diameter hybrid lens F2.5 75 ohm external terminal for VHF/UHF UHP lamp, 120W, XL-5100 NTSC American TV Standard ATSC (8VSB terrestrial) ATSC compliant 8VSB QAM on cable ANSI/SCTE 07 2000 KDS-R50XBR1: 50 inches KDS-R60XBR1: 60 inches...
Operating Instructions
Page 116
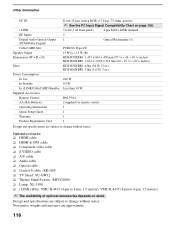
... cable ❑ Audio cable ❑ Optical cable ❑ Control S cable : RK-G69 ❑ TV Stand : SU-GW12 ❑ Theatre Stand System : RHT-G2000 ❑ Lamp : XL-5100 ❑ i.LINK cables: VMC-IL4415 (4-pin to 4-pin, 3.5 meters) ✍ The... availability of optional accessories depends on front panel) 4-pin S400 i.LINK terminal 2 1 Optical Rectangular (1) PCMCIA Type I/II 15 W (L), 15 W (R) KDS-R50XBR1 1,453 × 863 × 478 mm (57 1/4 × 34 × 18 7/8 inches) KDS-R60XBR1...
... cable ❑ Audio cable ❑ Optical cable ❑ Control S cable : RK-G69 ❑ TV Stand : SU-GW12 ❑ Theatre Stand System : RHT-G2000 ❑ Lamp : XL-5100 ❑ i.LINK cables: VMC-IL4415 (4-pin to 4-pin, 3.5 meters) ✍ The... availability of optional accessories depends on front panel) 4-pin S400 i.LINK terminal 2 1 Optical Rectangular (1) PCMCIA Type I/II 15 W (L), 15 W (R) KDS-R50XBR1 1,453 × 863 × 478 mm (57 1/4 × 34 × 18 7/8 inches) KDS-R60XBR1...
Operating Instructions
Page 118
... VOL +/- Infrared Receiver (IR) 16 Inputs, labeling 96 Iris 81, 85 J, K JUMP 54 JUMP button 47, 54 L Label Channels 91 Label Video Inputs 96 LAMP LED 16 Lamp, replacing 104-107 Language 97 M Memory Stick button 47 features 61 Index 64 indicator 17 playing movies 66 precautions 70 removing 63 Slide Show... button 16, 47 Menu Color 97 Movie Rating 94 MTS 87 Music 68 MUTING button 46 N Noise Reduction 82 O Off, turning off the TV 16 On, turning on the TV 16 Overscan 89 P, Q Parental Lock settings 80, 92 Password, changing 93 PC IN jack 18 PC Input 85, 87, 99 Personal Computer...
... VOL +/- Infrared Receiver (IR) 16 Inputs, labeling 96 Iris 81, 85 J, K JUMP 54 JUMP button 47, 54 L Label Channels 91 Label Video Inputs 96 LAMP LED 16 Lamp, replacing 104-107 Language 97 M Memory Stick button 47 features 61 Index 64 indicator 17 playing movies 66 precautions 70 removing 63 Slide Show... button 16, 47 Menu Color 97 Movie Rating 94 MTS 87 Music 68 MUTING button 46 N Noise Reduction 82 O Off, turning off the TV 16 On, turning on the TV 16 Overscan 89 P, Q Parental Lock settings 80, 92 Password, changing 93 PC IN jack 18 PC Input 85, 87, 99 Personal Computer...


