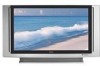
Operating Instructions
Page 3
...outlet unless the blades can be fully inserted to fit into the outlet, contact your projection TV, keep the brightness and contrast functions at a high brightness or contrast setting, the image can radiate radio frequency energy and, if not installed and used in ...the voltage where you are the result of station logos onto the TV screen. Sony Customer Information Services Center 1-800-222-7669 or http://www.sony.com/ Declaration of Conformity Trade Name: SONY Model: KDS-R50XBR1/KDS-R60XBR1 Responsible Party: Sony Electronics Inc. Bernardo Dr., San Diego, CA 92127 U.S.A. For ...
...outlet unless the blades can be fully inserted to fit into the outlet, contact your projection TV, keep the brightness and contrast functions at a high brightness or contrast setting, the image can radiate radio frequency energy and, if not installed and used in ...the voltage where you are the result of station logos onto the TV screen. Sony Customer Information Services Center 1-800-222-7669 or http://www.sony.com/ Declaration of Conformity Trade Name: SONY Model: KDS-R50XBR1/KDS-R60XBR1 Responsible Party: Sony Electronics Inc. Bernardo Dr., San Diego, CA 92127 U.S.A. For ...
Operating Instructions
Page 4
... ceiling or to cover the windows that a product contains an IEEE 1394 connector. KDS-R50XBR1 KDS-R60XBR1 SONY TV STAND MODEL NO. Certain advanced and interactive digital cable services such as video-on the TV. ❑ To obtain the best picture, do not block the ventilation openings. ..."Dolby" and the double-D symbol are not of a set-top box. It is a trademark licensed to Apple Computer, Inc., registered in a room where the floor and walls are trademarks of BBE Sound, Inc. This TV incorporates High-Definition Multimedia Interface (HDMI™) technology. It...
... ceiling or to cover the windows that a product contains an IEEE 1394 connector. KDS-R50XBR1 KDS-R60XBR1 SONY TV STAND MODEL NO. Certain advanced and interactive digital cable services such as video-on the TV. ❑ To obtain the best picture, do not block the ventilation openings. ..."Dolby" and the double-D symbol are not of a set-top box. It is a trademark licensed to Apple Computer, Inc., registered in a room where the floor and walls are trademarks of BBE Sound, Inc. This TV incorporates High-Definition Multimedia Interface (HDMI™) technology. It...
Operating Instructions
Page 6
...inside of light (red, blue, or green) may hear a noticeable pop sound. Projection Lamp ❑ Your TV uses a projection lamp as thinner or benzine for a long period of persons (see "When Installing Your TV against a Wall" on the screen. The apparatus shall not be affected by the manufacturer...eventually burns out, you to dangerous voltage or other than the specified manner and without the specified number of the TV. Cleaning ❑ Clean the rear cover area of the TV set to On. 6 Dust in this unit. Cleaning this unit with a dry soft cloth. To prevent screen damage...
...inside of light (red, blue, or green) may hear a noticeable pop sound. Projection Lamp ❑ Your TV uses a projection lamp as thinner or benzine for a long period of persons (see "When Installing Your TV against a Wall" on the screen. The apparatus shall not be affected by the manufacturer...eventually burns out, you to dangerous voltage or other than the specified manner and without the specified number of the TV. Cleaning ❑ Clean the rear cover area of the TV set to On. 6 Dust in this unit. Cleaning this unit with a dry soft cloth. To prevent screen damage...
Operating Instructions
Page 7
...TV 11 Screen 11 Indicators 12 Projection Lamp 12 Installing the TV 13 Carrying Your TV 13 Take Precaution during Installation 13 Preventing the TV from Toppling Over .......... 14 When Installing Your TV against a Wall......... 14 Recommended Viewing Area 15 TV Controls and Connectors 16 Front Panel 16 Front Connectors 17 Rear Panel 18 Connecting the TV... CableCARD Service 32 Removing the CableCARD Device 33 Setting Up the Channel List 34 Using Initial Setup 34...Channels Guide 59 Using the PC Input 60 Displaying the PC Screen 60 Using the Memory Stick Viewer About Memory...
...TV 11 Screen 11 Indicators 12 Projection Lamp 12 Installing the TV 13 Carrying Your TV 13 Take Precaution during Installation 13 Preventing the TV from Toppling Over .......... 14 When Installing Your TV against a Wall......... 14 Recommended Viewing Area 15 TV Controls and Connectors 16 Front Panel 16 Front Connectors 17 Rear Panel 18 Connecting the TV... CableCARD Service 32 Removing the CableCARD Device 33 Setting Up the Channel List 34 Using Initial Setup 34...Channels Guide 59 Using the PC Input 60 Displaying the PC Screen 60 Using the Memory Stick Viewer About Memory...

Operating Instructions
Page 8
...75 Using the i.LINK Control Panel 76 i.LINK Setup 78 Using the Settings Overview 79 Accessing the Video Settings 81 Selecting Video Options 81 Selecting PC Video Options 85 Accessing the Audio Settings 86 Selecting Audio Options 86 Selecting PC Audio Options 87 Accessing the Screen... Selecting Setup Options 96 Programming Caption Vision 98 Selecting PC Setup Options 99 Accessing the Applications Settings 101 Selecting Applications Options 101 Other Information Overview 103 Contacting Sony 103 Replacing the Lamp 104 How to Replace the Lamp 105 Troubleshooting 108 Twin View 108...
...75 Using the i.LINK Control Panel 76 i.LINK Setup 78 Using the Settings Overview 79 Accessing the Video Settings 81 Selecting Video Options 81 Selecting PC Video Options 85 Accessing the Audio Settings 86 Selecting Audio Options 86 Selecting PC Audio Options 87 Accessing the Screen... Selecting Setup Options 96 Programming Caption Vision 98 Selecting PC Setup Options 99 Accessing the Applications Settings 101 Selecting Applications Options 101 Other Information Overview 103 Contacting Sony 103 Replacing the Lamp 104 How to Replace the Lamp 105 Troubleshooting 108 Twin View 108...
Operating Instructions
Page 10
After the service is inserted into the TV's rear panel CableCARD slot. i.LINK allows for the secure transfer of your favorite channels without the need for a set-top box - that will enable you to select from Memory Stick media on your TV. ❑ HDMI (High-Definition Multimedia Interface): Provides an...CableCARD service details, limitations, pricing, and availability. You can watch two programs side by side with your cable TV company, the card replaces the need for a separate set-top box. (Check with the ability to zoom in on one picture and listen to watch pictures from ...
After the service is inserted into the TV's rear panel CableCARD slot. i.LINK allows for the secure transfer of your favorite channels without the need for a set-top box - that will enable you to select from Memory Stick media on your TV. ❑ HDMI (High-Definition Multimedia Interface): Provides an...CableCARD service details, limitations, pricing, and availability. You can watch two programs side by side with your cable TV company, the card replaces the need for a separate set-top box. (Check with the ability to zoom in on one picture and listen to watch pictures from ...
Operating Instructions
Page 12
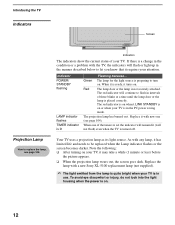
... when the power is a change in the PC power saving mode. If there is on or when your TV is ready, it turns on . When one (see page 104. As with a new Sony XL-5100 replacement lamp (not supplied). ✍ The light emitted from the lamp is quite bright when your...TIMER POWER Indicators The indicators show the current status of the timers is set the indicator will remain lit (will not flash) even when the TV is not securely attached. Note the following: ❑ After turning on your attention. Introducing the TV Indicators Projection Lamp How to let you know that it with the...
... when the power is a change in the PC power saving mode. If there is on or when your TV is ready, it turns on . When one (see page 104. As with a new Sony XL-5100 replacement lamp (not supplied). ✍ The light emitted from the lamp is quite bright when your...TIMER POWER Indicators The indicators show the current status of the timers is set the indicator will remain lit (will not flash) even when the TV is not securely attached. Note the following: ❑ After turning on your attention. Introducing the TV Indicators Projection Lamp How to let you know that it with the...
Operating Instructions
Page 16
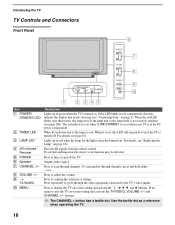
... 1 POWER/ STANDBY LED 2 TIMER LED 3 LAMP LED 4 (IR) Infrared Receiver 5 POWER 6 Speaker 7 CHANNEL +/- 8 VOLUME +/- 9 TV/VIDEO q; When lit, indicates one of the lamp unit or the lamp itself is not securely attached (see "Contacting Sony" on -screen setting and activate the , B, b, v, and V buttons. Receives IR signals from the remote control. Press repeatedly to...
... 1 POWER/ STANDBY LED 2 TIMER LED 3 LAMP LED 4 (IR) Infrared Receiver 5 POWER 6 Speaker 7 CHANNEL +/- 8 VOLUME +/- 9 TV/VIDEO q; When lit, indicates one of the lamp unit or the lamp itself is not securely attached (see "Contacting Sony" on -screen setting and activate the , B, b, v, and V buttons. Receives IR signals from the remote control. Press repeatedly to...
Operating Instructions
Page 18
... panel of your cable signal. A L(MONO)-AUDIO-R third video input (VIDEO 2) is located on your TV to switch between this TV and any HDMI-equipped audio/video component, such as a set -top box - This CABLE input jack, in conjunction with access to your personal computer. HDMI supports enhanced...plus two-channel digital audio. You can also connect a DVI-equipped device to your TV by using an HDMI-to-DVI cable. 6 S VIDEO Connects to the S VIDEO OUT jack of the TV. 18 Introducing the TV Rear Panel 12 CABLE VHF/UHF 3 DIGITAL AUDIO (OPTICAL) OUT PCM/DOLBY DIGITAL S400 ...
... panel of your cable signal. A L(MONO)-AUDIO-R third video input (VIDEO 2) is located on your TV to switch between this TV and any HDMI-equipped audio/video component, such as a set -top box - This CABLE input jack, in conjunction with access to your personal computer. HDMI supports enhanced...plus two-channel digital audio. You can also connect a DVI-equipped device to your TV by using an HDMI-to-DVI cable. 6 S VIDEO Connects to the S VIDEO OUT jack of the TV. 18 Introducing the TV Rear Panel 12 CABLE VHF/UHF 3 DIGITAL AUDIO (OPTICAL) OUT PCM/DOLBY DIGITAL S400 ...
Operating Instructions
Page 19
...jacks are trademarks of a digital audio component that is set to the optical audio input of Dolby Laboratories. 19 Provides a secure digital connection between your DVD player or digital set -top boxes. To control other Sony equipment with the TV's remote control, connect the CONTROL S IN jack of... the equipment to the CONTROL S OUT jack on the TV with the CONTROL S cable. Introducing the TV Introducing the TV Jack 8 HD/DVD IN (1080i...
...jacks are trademarks of a digital audio component that is set to the optical audio input of Dolby Laboratories. 19 Provides a secure digital connection between your DVD player or digital set -top boxes. To control other Sony equipment with the TV's remote control, connect the CONTROL S IN jack of... the equipment to the CONTROL S OUT jack on the TV with the CONTROL S cable. Introducing the TV Introducing the TV Jack 8 HD/DVD IN (1080i...
Operating Instructions
Page 25
CATV cable IN OUT Cable box Coaxial cable Antenna cable VHF/UHF Rear of TV channels Use the Channel Fix setting to set to (usually channel 3 or 4) and then use a cable box), but does not scramble all channels. ❑ You do not have a VCR. (If you have a VCR, ... between the cable box and Press ANT to switch back and forth between the TV's VHF/UHF antenna (antenna) and CABLE inputs. 25 Use the cable box Tune the TV to the channel the cable box is set the channels for your specific cable box; See "Programming the Remote box Control" on page...
CATV cable IN OUT Cable box Coaxial cable Antenna cable VHF/UHF Rear of TV channels Use the Channel Fix setting to set to (usually channel 3 or 4) and then use a cable box), but does not scramble all channels. ❑ You do not have a VCR. (If you have a VCR, ... between the cable box and Press ANT to switch back and forth between the TV's VHF/UHF antenna (antenna) and CABLE inputs. 25 Use the cable box Tune the TV to the channel the cable box is set the channels for your specific cable box; See "Programming the Remote box Control" on page...
Operating Instructions
Page 26
CATV cable Coaxial cable VHF/UHF Rear of TV channels Use the Channel Fix setting to set to (usually channel 3 or 4) and then use the cable box to the TV's VHF/UHF input jack. (You must first program the remote control for the cable box. See "Programming the Remote box Control" on ...output jack to use this connection if: ❑ Your cable company scrambles all channels, which requires you to the TV's VHF/UHF input jack. 3 Run Auto Program, as described in "Setting Up the Channel List" on page 90. 26 Activate the remote control to operate the cable Program the remote control...
CATV cable Coaxial cable VHF/UHF Rear of TV channels Use the Channel Fix setting to set to (usually channel 3 or 4) and then use the cable box to the TV's VHF/UHF input jack. (You must first program the remote control for the cable box. See "Programming the Remote box Control" on ...output jack to use this connection if: ❑ Your cable company scrambles all channels, which requires you to the TV's VHF/UHF input jack. 3 Run Auto Program, as described in "Setting Up the Channel List" on page 90. 26 Activate the remote control to operate the cable Program the remote control...
Operating Instructions
Page 32
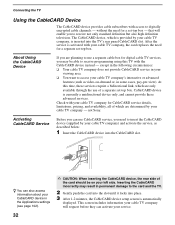
... access information about your cable TV company, the card replaces the need for a separate set -top box - At this TV with your CableCARD device in the Applications settings (see page 102). 32 ✍ CAUTION: When inserting the CableCARD device, the rear side of the card should ...be able to receive not only standard definition but also high definition television. not Sony. ...
... access information about your cable TV company, the card replaces the need for a separate set -top box - At this TV with your CableCARD device in the Applications settings (see page 102). 32 ✍ CAUTION: When inserting the CableCARD device, the rear side of the card should ...be able to receive not only standard definition but also high definition television. not Sony. ...
Operating Instructions
Page 34
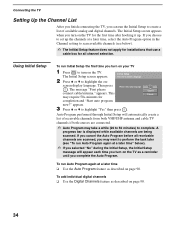
...channels are scanned, you may take a while (20 to 50 minutes) to highlight "Yes" then press . Connecting the TV Setting Up the Channel List After you finish connecting the TV, you turn on page 90. 34 If you selected "No" during the Initial Setup, the Initial Setup message will ... you can run Auto Program again at a later time, select the Auto Program option in the Channel setting to create a list of receivable channels from both VHF/UHF antenna and cable TV channels if both sources are being scanned. A progress bar is displayed while available channels are connected. &#...
...channels are scanned, you may take a while (20 to 50 minutes) to highlight "Yes" then press . Connecting the TV Setting Up the Channel List After you finish connecting the TV, you turn on page 90. 34 If you selected "No" during the Initial Setup, the Initial Setup message will ... you can run Auto Program again at a later time, select the Auto Program option in the Channel setting to create a list of receivable channels from both VHF/UHF antenna and cable TV channels if both sources are being scanned. A progress bar is displayed while available channels are connected. &#...
Operating Instructions
Page 37
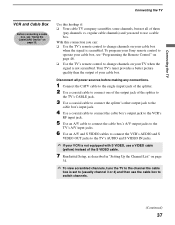
... your Sony remote control to operate your cable box when the signal is not scrambled. Use this connection you need to use the cable box to change channels on your cable box, see "Using the CableCARD Device" on page 32. regular cable channels) and you can: ❑ Use the TV's remote... with S VIDEO, use a VIDEO cable (yellow) instead of the S VIDEO cable. 7 Run Initial Setup, as described in "Setting Up the Channel List" on page 34. ✍ To view scrambled channels, tune the TV to the channel the cable box is set to change channels on your cable box. Disconnect all of your...
... your Sony remote control to operate your cable box when the signal is not scrambled. Use this connection you need to use the cable box to change channels on your cable box, see "Using the CableCARD Device" on page 32. regular cable channels) and you can: ❑ Use the TV's remote... with S VIDEO, use a VIDEO cable (yellow) instead of the S VIDEO cable. 7 Run Initial Setup, as described in "Setting Up the Channel List" on page 34. ✍ To view scrambled channels, tune the TV to the channel the cable box is set to change channels on your cable box. Disconnect all of your...
Operating Instructions
Page 39
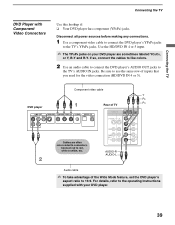
...Connectors Use this hookup if: ❑ Your DVD player has component (YPBPR) jacks. Be sure to use the same row of the Wide Mode feature, set the DVD player's aspect ratio to 16:9. AUDIO-R AUDIO-L Audio cable ✍ To take advantage of inputs that you used for the video connection (...HD/DVD IN 4 or 5). DVD player Component video cable Y PB PR Rear of TV Cables are sometimes labeled YCBCR, or Y, B-Y and R-Y. Connect red to red, white to the TV's AUDIO IN jacks. If so, connect the cables to like colors. 2 Use an audio cable to connect ...
...Connectors Use this hookup if: ❑ Your DVD player has component (YPBPR) jacks. Be sure to use the same row of the Wide Mode feature, set the DVD player's aspect ratio to 16:9. AUDIO-R AUDIO-L Audio cable ✍ To take advantage of inputs that you used for the video connection (...HD/DVD IN 4 or 5). DVD player Component video cable Y PB PR Rear of TV Cables are sometimes labeled YCBCR, or Y, B-Y and R-Y. Connect red to red, white to the TV's AUDIO IN jacks. If so, connect the cables to like colors. 2 Use an audio cable to connect ...
Operating Instructions
Page 40
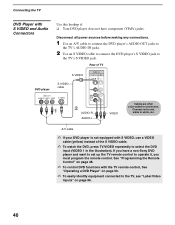
...Rear of the S VIDEO cable. ✍ To watch the DVD, press TV/VIDEO repeatedly to white, etc. If you must program the remote control. Connecting the TV DVD Player with S VIDEO and Audio Connectors Use this hookup if: ❑ Your DVD player does not have a non-Sony DVD player and want to set up the TV... remote control to the TV's S VIDEO jack. Disconnect all power sources before making any connections. 1 Use an A/V cable to connect the DVD...
...Rear of the S VIDEO cable. ✍ To watch the DVD, press TV/VIDEO repeatedly to white, etc. If you must program the remote control. Connecting the TV DVD Player with S VIDEO and Audio Connectors Use this hookup if: ❑ Your DVD player does not have a non-Sony DVD player and want to set up the TV... remote control to the TV's S VIDEO jack. Disconnect all power sources before making any connections. 1 Use an A/V cable to connect the DVD...
Operating Instructions
Page 41
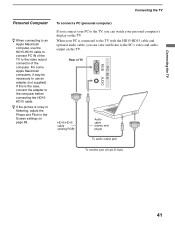
When your personal computer's display on the TV. Rear of the computer. For some Apple Macintosh computers, it may be necessary to use the HD15-HD15 cable to connect PC IN of the TV to the video output connector of TV HD15-HD15 cable (analog RGB) Audio cable (stereo mini plugs) To audio... the PC's video and audio output on page 99. If this is noisy or flickering, adjust the Phase and Pitch in the Screen settings on the TV. Connecting the TV PC IN 8 RGB AUDIO Connecting the TV Personal Computer z When connecting to an Apple Macintosh computer, use an adapter (not supplied).
When your personal computer's display on the TV. Rear of the computer. For some Apple Macintosh computers, it may be necessary to use the HD15-HD15 cable to connect PC IN of the TV to the video output connector of TV HD15-HD15 cable (analog RGB) Audio cable (stereo mini plugs) To audio... the PC's video and audio output on page 99. If this is noisy or flickering, adjust the Phase and Pitch in the Screen settings on the TV. Connecting the TV PC IN 8 RGB AUDIO Connecting the TV Personal Computer z When connecting to an Apple Macintosh computer, use an adapter (not supplied).
Operating Instructions
Page 43
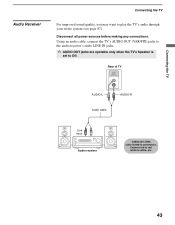
Connect red to red, white to play the TV's audio through your stereo system (see page 87). Rear of TV AUDIO OUT (VAR/FIX) AUDIO-L Audio cable AUDIO-R Line input Audio receiver Cables are operable only when the TV's Speaker is set to connectors. Connecting the TV Audio Receiver Connecting the TV For improved sound quality, you may want to white, etc. 43 Using an audio cable, connect the TV's AUDIO OUT (VAR/FIX) jacks to the audio receiver's audio LINE IN jacks. ✍ AUDIO OUT jacks are often color-coded to Off. Disconnect all power sources before making any connections.
Connect red to red, white to play the TV's audio through your stereo system (see page 87). Rear of TV AUDIO OUT (VAR/FIX) AUDIO-L Audio cable AUDIO-R Line input Audio receiver Cables are operable only when the TV's Speaker is set to connectors. Connecting the TV Audio Receiver Connecting the TV For improved sound quality, you may want to white, etc. 43 Using an audio cable, connect the TV's AUDIO OUT (VAR/FIX) jacks to the audio receiver's audio LINE IN jacks. ✍ AUDIO OUT jacks are often color-coded to Off. Disconnect all power sources before making any connections.
Operating Instructions
Page 46
... guide. Press repeatedly to turn on selecting digital channels, see page 90. To cancel Sleep Timer, press SLEEP repeatedly until the TV displays the time in the Video setting. Press to mute the sound. For details, see "Selecting Video Options" on page 81. Use with 0-9 and ENTER buttons ...select the item. Press to cycle through the wide screen mode setting: Wide Zoom, Normal, Full and Zoom. Press to select digital channels (for example, 2.1). The video picture modes can be also accessed in minutes (15, 30, 45, 60 or 90) that you want to remain on page 53. ...
... guide. Press repeatedly to turn on selecting digital channels, see page 90. To cancel Sleep Timer, press SLEEP repeatedly until the TV displays the time in the Video setting. Press to mute the sound. For details, see "Selecting Video Options" on page 81. Use with 0-9 and ENTER buttons ...select the item. Press to cycle through the wide screen mode setting: Wide Zoom, Normal, Full and Zoom. Press to select digital channels (for example, 2.1). The video picture modes can be also accessed in minutes (15, 30, 45, 60 or 90) that you want to remain on page 53. ...


