User Manual
Page 3
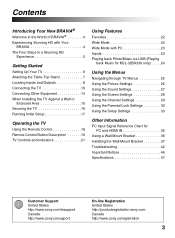
...Table-Top Stand 7 Locating Inputs and Outputs 8 Connecting the TV 10 Connecting Other Equipment 14 When Installing the TV Against a Wall or Enclosed Area 15 Securing the TV 16 Running Initial Setup 17 Operating the TV Using the Remote Control 18 Remote Control ...Reference Chart for PC and HDMI IN 35 Using a Wall-Mount Bracket 36 Installing the Wall-Mount Bracket 37 Troubleshooting 42 Important Notices 46 Specifications 47 Customer Support United States http://www.sony.com/tvsupport Canada http://www.sony.ca/support On-line Registration United States http://productregistration...
...Table-Top Stand 7 Locating Inputs and Outputs 8 Connecting the TV 10 Connecting Other Equipment 14 When Installing the TV Against a Wall or Enclosed Area 15 Securing the TV 16 Running Initial Setup 17 Operating the TV Using the Remote Control 18 Remote Control ...Reference Chart for PC and HDMI IN 35 Using a Wall-Mount Bracket 36 Installing the Wall-Mount Bracket 37 Troubleshooting 42 Important Notices 46 Specifications 47 Customer Support United States http://www.sony.com/tvsupport Canada http://www.sony.ca/support On-line Registration United States http://productregistration...

User Manual
Page 6
...Up Your TV Some TV models are not mounting the TV to a wall, you can mount your TV: • Disconnect all cables when carrying the TV. • Carry the TV with the TV. Be sure to consider the following while setting up your TV to a wall right away. Should this occur, allow moisture... • For best picture quality, do not expose the screen to direct illumination or sunlight. • Avoid installing the TV in a room with reflective wall and floor materials. • Avoid moving the TV from a cold area to evaporate completely before powering the TV on. 6 larger size TVs require two or...
...Up Your TV Some TV models are not mounting the TV to a wall, you can mount your TV: • Disconnect all cables when carrying the TV. • Carry the TV with the TV. Be sure to consider the following while setting up your TV to a wall right away. Should this occur, allow moisture... • For best picture quality, do not expose the screen to direct illumination or sunlight. • Avoid installing the TV in a room with reflective wall and floor materials. • Avoid moving the TV from a cold area to evaporate completely before powering the TV on. 6 larger size TVs require two or...
User Manual
Page 7
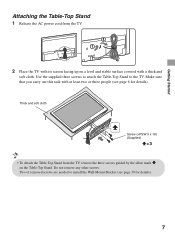
Use the supplied three screws to attach the Table-Top Stand to install the Wall-Mount Bracket (see page 6 for details). 7 Two of removed screws are needed to the TV. Getting Started Attaching the Table-Top Stand 1 Release the AC power ...
Use the supplied three screws to attach the Table-Top Stand to install the Wall-Mount Bracket (see page 6 for details). 7 Two of removed screws are needed to the TV. Getting Started Attaching the Table-Top Stand 1 Release the AC power ...

User Manual
Page 16
... the stand. For each angle brace use the appropriate hardware to: • attach one side of the TV. Anchor bolts (not supplied) 16 Wall-mount holes Rope or chain (not supplied) Wall-anchor (not supplied) Recommended Measures to Secure the TV Consider the following measures when securing your TV to the...; Route all AC power cords and connecting cables so that can adequately support the weight of the angle brace to the wall stud. • attach the other side to the TV stand. Securing the TV Sony strongly recommends taking measures to prevent the TV from Toppling ❑ Secure the TV to...
... the stand. For each angle brace use the appropriate hardware to: • attach one side of the TV. Anchor bolts (not supplied) 16 Wall-mount holes Rope or chain (not supplied) Wall-anchor (not supplied) Recommended Measures to Secure the TV Consider the following measures when securing your TV to the...; Route all AC power cords and connecting cables so that can adequately support the weight of the angle brace to the wall stud. • attach the other side to the TV stand. Securing the TV Sony strongly recommends taking measures to prevent the TV from Toppling ❑ Secure the TV to...

User Manual
Page 36
...Keep the screws away from the attaching surface of the box as indicated by a Sony dealer or licensed contractor. • Follow the instruction guide provided with the Wall-Mount Bracket for additional safety information. 36 Use of screws other than those supplied may ... screws supplied with the Wall-Mount Bracket when attaching the mounting hooks to the TV set • Be sure to the instructions provided with the Wall-Mount Bracket) Mounting Hook Hook attachment on the Wall-mount bracket model. For product protection and safety reasons, Sony strongly recommends that you ...
...Keep the screws away from the attaching surface of the box as indicated by a Sony dealer or licensed contractor. • Follow the instruction guide provided with the Wall-Mount Bracket for additional safety information. 36 Use of screws other than those supplied may ... screws supplied with the Wall-Mount Bracket when attaching the mounting hooks to the TV set • Be sure to the instructions provided with the Wall-Mount Bracket) Mounting Hook Hook attachment on the Wall-mount bracket model. For product protection and safety reasons, Sony strongly recommends that you ...
User Manual
Page 37
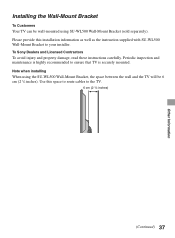
... installation information as well as the instruction supplied with SU-WL500 Wall-Mount Bracket to your installer. Please provide this space to route cables to ensure that TV is securely mounted. Note when installing When using SU-WL500 Wall-Mount Bracket (sold separately). To Sony Dealers and Licensed Contractors To avoid injury and property damage, read...
... installation information as well as the instruction supplied with SU-WL500 Wall-Mount Bracket to your installer. Please provide this space to route cables to ensure that TV is securely mounted. Note when installing When using SU-WL500 Wall-Mount Bracket (sold separately). To Sony Dealers and Licensed Contractors To avoid injury and property damage, read...

User Manual
Page 38
... TV. Refer to the TV installation dimensions table. Step 2: Deciding on should be capable of supporting a weight of the TV. CAUTION The wall that of at least four times that the TV will be installed on the installation location Decide where you want to install your TV's operating... weight. Step 3: Installing the Base Bracket on the installation. For SU-WL500 Step 1: Checking the parts required for the installation Open the Wall-Mount Bracket package and check the contents for SU-WL500. Dimension Table Screen center point Unit: mm (inches) TV Screen Length for each...
... TV. Refer to the TV installation dimensions table. Step 2: Deciding on should be capable of supporting a weight of the TV. CAUTION The wall that of at least four times that the TV will be installed on the installation location Decide where you want to install your TV's operating... weight. Step 3: Installing the Base Bracket on the installation. For SU-WL500 Step 1: Checking the parts required for the installation Open the Wall-Mount Bracket package and check the contents for SU-WL500. Dimension Table Screen center point Unit: mm (inches) TV Screen Length for each...

User Manual
Page 39
... Screws (+PSW 5 × 16) are common for installing the TV. 1 Secure the Mounting Hook to store it in safe place, keeping it away from children. Step 4: Preparing the TV for wall mount installation Follow the steps below to prepare for attaching the Table-Top Stand. Determine the screw ...locations and secure the Mounting Hooks to the rear of the TV. Attachment Parts (supplied) Screw (+PSW 5 ...
... Screws (+PSW 5 × 16) are common for installing the TV. 1 Secure the Mounting Hook to store it in safe place, keeping it away from children. Step 4: Preparing the TV for wall mount installation Follow the steps below to prepare for attaching the Table-Top Stand. Determine the screw ...locations and secure the Mounting Hooks to the rear of the TV. Attachment Parts (supplied) Screw (+PSW 5 ...

User Manual
Page 40
Mounting Hook Screw (+PSW 6 × 16) 3 Be sure to the rear of the TV using the four screws supplied with equal torque strength. Wall TV 40 Screw and Hook Locations Diagram/Table TV Model KDL-32BX330/32BX331 Screw location d, g Hook location c Screw location Hook location When installing the Mounting Hooks on the TV. When installing the TV onto Base Bracket. 2 Secure the Mounting Hooks to tighten the screws with the Wall-Mount Bracket.
Mounting Hook Screw (+PSW 6 × 16) 3 Be sure to the rear of the TV using the four screws supplied with equal torque strength. Wall TV 40 Screw and Hook Locations Diagram/Table TV Model KDL-32BX330/32BX331 Screw location d, g Hook location c Screw location Hook location When installing the Mounting Hooks on the TV. When installing the TV onto Base Bracket. 2 Secure the Mounting Hooks to tighten the screws with the Wall-Mount Bracket.

User Manual
Page 41
Other Information 2 Adjust the angle of the front panel too tight. • Remove the screws or install the Mounting Hook on a stable and level surface. 41 Step 5: Installing the TV on the Table-Top Stand, reverse the above steps. • When moving the TV, do not squeeze the bottom of the Mounting Hook. Refer to the Instructions for SU-WL500. ~ • When you put the TV back on the wall Refer to the Instructions for SU-WL500.
Other Information 2 Adjust the angle of the front panel too tight. • Remove the screws or install the Mounting Hook on a stable and level surface. 41 Step 5: Installing the TV on the Table-Top Stand, reverse the above steps. • When moving the TV, do not squeeze the bottom of the Mounting Hook. Refer to the Instructions for SU-WL500. ~ • When you put the TV back on the wall Refer to the Instructions for SU-WL500.

User Manual
Page 46
... frequency energy and, if not installed and used with the limits for help. If this equipment in accordance with other Wall-Mount Brackets may cause harmful interference to the following measures: ❑ Reorient or relocate the receiving antenna. ❑ Increase ... designed to provide reasonable protection against harmful interference in this equipment. Availability of the FCC rules. Compatible Wall-Mount Bracket Information Use SU-WL500 Sony Wall-Mount Bracket with the limits for TV installations. To Customers Sufficient expertise is no guarantee that may not cause...
... frequency energy and, if not installed and used with the limits for help. If this equipment in accordance with other Wall-Mount Brackets may cause harmful interference to the following measures: ❑ Reorient or relocate the receiving antenna. ❑ Increase ... designed to provide reasonable protection against harmful interference in this equipment. Availability of the FCC rules. Compatible Wall-Mount Bracket Information Use SU-WL500 Sony Wall-Mount Bracket with the limits for TV installations. To Customers Sufficient expertise is no guarantee that may not cause...

User Manual
Page 47
...215; 207 30 1/2 × 20 3/4 × 8 1/4 without stand (mm) (inches) 772 × 484 × 82 30 1/2 × 19 1/8 × 3 1/4 wall-mount hole pattern (mm) 200 × 300 wall-mount screw size (mm) M6 (length: refer to change without notice. 47 PC/HDMI IN 1 AUDIO INPUT Stereo mini jack, 500 mVrms, (Typical... Card (1)/Safety and Regulatory Booklet (1)/Software License (1)/Stand installation guide (1)/Table-Top Stand (1)/Screw (3)/Attachment Parts (2) Optional accessories Connecting cables / Wall-Mount Bracket: SU-WL500 • Optional accessories availability depends on page 35.
...215; 207 30 1/2 × 20 3/4 × 8 1/4 without stand (mm) (inches) 772 × 484 × 82 30 1/2 × 19 1/8 × 3 1/4 wall-mount hole pattern (mm) 200 × 300 wall-mount screw size (mm) M6 (length: refer to change without notice. 47 PC/HDMI IN 1 AUDIO INPUT Stereo mini jack, 500 mVrms, (Typical... Card (1)/Safety and Regulatory Booklet (1)/Software License (1)/Stand installation guide (1)/Table-Top Stand (1)/Screw (3)/Attachment Parts (2) Optional accessories Connecting cables / Wall-Mount Bracket: SU-WL500 • Optional accessories availability depends on page 35.


