Operating Instructions
Page 3
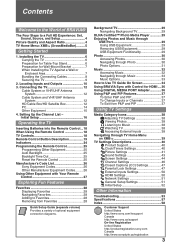
... TV Settings Descriptions 40 Product Support 40 Clock/Timers Settings 40 Picture Settings 41 Sound Settings 43 Screen Settings 44 Channel Settings 46 CC Closed Captions (CC) Settings 47 Parental Lock Settings 47 External Inputs Settings 50 HDMI Settings 50 Network Settings 51 General Setup Settings 51 Initial Setup 52 Other Information Troubleshooting 53 Specifications 57 Index 58 Customer Support United States http://www.sony...
... TV Settings Descriptions 40 Product Support 40 Clock/Timers Settings 40 Picture Settings 41 Sound Settings 43 Screen Settings 44 Channel Settings 46 CC Closed Captions (CC) Settings 47 Parental Lock Settings 47 External Inputs Settings 50 HDMI Settings 50 Network Settings 51 General Setup Settings 51 Initial Setup 52 Other Information Troubleshooting 53 Specifications 57 Index 58 Customer Support United States http://www.sony...

Operating Instructions
Page 4
To experience the stunning detail of your BRAVIA TV set, a complete HD system requires an HD sound system, a source of HD programming and proper setup connections. http://www.sony.com/HDTV Canada http://www.sonystyle.ca/hd The Four Steps to HD programming. When a 4:3 image is only as... a Full HD Experience: Set, Sound, Source, and Setup Along with your new BRAVIA TV, you will notice a big difference. Your BRAVIA TV can receive and display HD programming from 1080 HD signals. The 16:9 fills your cable or satellite provider for purchasing this Sony BRAVIA® high-definition ...
To experience the stunning detail of your BRAVIA TV set, a complete HD system requires an HD sound system, a source of HD programming and proper setup connections. http://www.sony.com/HDTV Canada http://www.sonystyle.ca/hd The Four Steps to HD programming. When a 4:3 image is only as... a Full HD Experience: Set, Sound, Source, and Setup Along with your new BRAVIA TV, you will notice a big difference. Your BRAVIA TV can receive and display HD programming from 1080 HD signals. The 16:9 fills your cable or satellite provider for purchasing this Sony BRAVIA® high-definition ...
Operating Instructions
Page 5
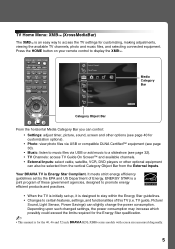
... the limits required for the 40, 46 and 52 inch BRAVIA KDL-XBR6 series models with screen size measured diagonally. 5 It meets strict energy efficiency guidelines set up, it is designed to stay within the Energy Star guidelines. • Changes to certain features, settings, and functionalities of this TV (i.e. TV guide, Picture/ Sound, Light Sensor, Power...
... the limits required for the 40, 46 and 52 inch BRAVIA KDL-XBR6 series models with screen size measured diagonally. 5 It meets strict energy efficiency guidelines set up, it is designed to stay within the Energy Star guidelines. • Changes to certain features, settings, and functionalities of this TV (i.e. TV guide, Picture/ Sound, Light Sensor, Power...
Operating Instructions
Page 7
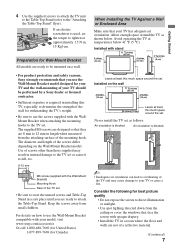
... (10 cm) 4 inches (10 cm) Leave at least this much space around the TV as follows: Air circulation is required in internal damage to the TV set AC IN the torque to be performed by a Sony dealer or licensed contractor. • Sufficient expertise is blocked. Installed on how to use ...the screws supplied with opaque drapery. • Install the TV in a room where the floor and walls...
... (10 cm) 4 inches (10 cm) Leave at least this much space around the TV as follows: Air circulation is required in internal damage to the TV set AC IN the torque to be performed by a Sony dealer or licensed contractor. • Sufficient expertise is blocked. Installed on how to use ...the screws supplied with opaque drapery. • Install the TV in a room where the floor and walls...
Operating Instructions
Page 9
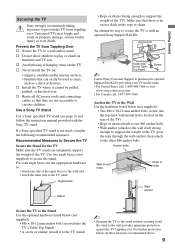
... visit: www.sony.com/accessories • For Canada call: 1-877-899-7669 Anchor the TV to the Wall Use the hardware listed below (not supplied): • M6 × 10-12 mm anchor bolt (screwed into the top-most wall-mount holes located on furniture and TV sets. For further ...protection, follow the instruction manual provided with an optional Sony Support Belt Kit. For each angle brace use the appropriate hardware to: • attach one M6 anchor bolt)...
... visit: www.sony.com/accessories • For Canada call: 1-877-899-7669 Anchor the TV to the Wall Use the hardware listed below (not supplied): • M6 × 10-12 mm anchor bolt (screwed into the top-most wall-mount holes located on furniture and TV sets. For further ...protection, follow the instruction manual provided with an optional Sony Support Belt Kit. For each angle brace use the appropriate hardware to: • attach one M6 anchor bolt)...
Operating Instructions
Page 11
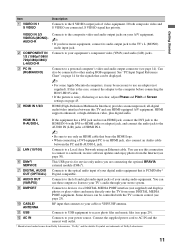
Getting Started Item 1 VIDEO IN 1 S VIDEO Description Connects to the S VIDEO output jack of Screen settings on page 45. Connects to access photo files and music files (see page 25). 0 CABLE/ ANTENNA RF input that is noisy, flickering or not clear, ... cable between this connection to connect to a network, receive software updates and enjoy photos from some Apple Macintosh computers, it may be connected to the TV's L (MONO) audio input jack. qs AC IN Connects to AC IN and the nearest wall outlet. * Manufactured under license from Dolby Laboratories. Connect the supplied...
Getting Started Item 1 VIDEO IN 1 S VIDEO Description Connects to the S VIDEO output jack of Screen settings on page 45. Connects to access photo files and music files (see page 25). 0 CABLE/ ANTENNA RF input that is noisy, flickering or not clear, ... cable between this connection to connect to a network, receive software updates and enjoy photos from some Apple Macintosh computers, it may be connected to the TV's L (MONO) audio input jack. qs AC IN Connects to AC IN and the nearest wall outlet. * Manufactured under license from Dolby Laboratories. Connect the supplied...

Operating Instructions
Page 12
...-ohm coaxial cable to receive optimum picture quality. Shown with HDMI Connection Rear of input signal you choose (see page 46). Connecting the TV Cable System or VHF/UHF Antenna System You can be easily affected by subscribing to switch between the cable and over...definition satellite service. Cable Antenna A-B RF switch A Rear of TV B CABLE/ANTENNA ~ • Be sure to set the Signal Type setting to your TV via the HDMI or component video (with standard-definition analog programming. ~ • This TV is strongly recommended that you connect this equipment to Cable or...
...-ohm coaxial cable to receive optimum picture quality. Shown with HDMI Connection Rear of input signal you choose (see page 46). Connecting the TV Cable System or VHF/UHF Antenna System You can be easily affected by subscribing to switch between the cable and over...definition satellite service. Cable Antenna A-B RF switch A Rear of TV B CABLE/ANTENNA ~ • Be sure to set the Signal Type setting to your TV via the HDMI or component video (with standard-definition analog programming. ~ • This TV is strongly recommended that you connect this equipment to Cable or...

Operating Instructions
Page 14
...the PC IN jack to the PC using an HD15HD15 cable with a 60 Hz vertical frequency. This affects Picture settings, Wide Mode settings, and PIP function. Supported resolutions Signal VGA Horizontal × (Pixel) 640 × 640 × 720... 768 768 768 768 768 768 768 1,024 1,080 Horizontal frequency (kHz) 31.5 37.5 31.5 37.9 46.9 48.4 56.5 60.0 47.4 47.8 60.3 47.7 64.0 67.5 Vertical frequency (Hz) 60 75 70...according to Full Pixel. 14 This TV can also be treated as shown below . PC Input Signal Reference Chart After connecting the PC to the TV, set Picture Mode to Custom, Wide Mode...
...the PC IN jack to the PC using an HD15HD15 cable with a 60 Hz vertical frequency. This affects Picture settings, Wide Mode settings, and PIP function. Supported resolutions Signal VGA Horizontal × (Pixel) 640 × 640 × 720... 768 768 768 768 768 768 768 1,024 1,080 Horizontal frequency (kHz) 31.5 37.5 31.5 37.9 46.9 48.4 56.5 60.0 47.4 47.8 60.3 47.7 64.0 67.5 Vertical frequency (Hz) 60 75 70...according to Full Pixel. 14 This TV can also be treated as shown below . PC Input Signal Reference Chart After connecting the PC to the TV, set Picture Mode to Custom, Wide Mode...

Operating Instructions
Page 16
...details. • If the language that you have selected in the Language setting is available from the broadcaster. Next, you turn on screen display as well as an Alternate Audio language, your TV will scan for the TV to fully receive the program listing information. • Once the program ...for the first time. See page 34 on screen instructions using an external input; Highlight a choice and press to begin the TV Guide setup. b button: Allows you to set up to the previous screen. B button: Allows you to move to the next screen. 3 Follow the help text provided on...
...details. • If the language that you have selected in the Language setting is available from the broadcaster. Next, you turn on screen display as well as an Alternate Audio language, your TV will scan for the TV to fully receive the program listing information. • Once the program ...for the first time. See page 34 on screen instructions using an external input; Highlight a choice and press to begin the TV Guide setup. b button: Allows you to set up to the previous screen. B button: Allows you to move to the next screen. 3 Follow the help text provided on...

Operating Instructions
Page 17
HDMI Settings General Setup Settings Initial Setup TV s To Add Digital Channels Use the Add Digital Channels feature as described on page 46. (Useful for antenna installations.) ~ • If you accidentally turn off the TV during the Initial Setup process, the Initial Setup will restart from the XMB™ or perform the .... Getting Started s To Run Initial Setup Again or Auto Program at a Later Time Select the Initial Setup feature from the beginning when the TV is turned back on page 52. Select Yes to cancel or No to resume Auto Program. 17 Press RETURN first, then press either B/b ...
HDMI Settings General Setup Settings Initial Setup TV s To Add Digital Channels Use the Add Digital Channels feature as described on page 46. (Useful for antenna installations.) ~ • If you accidentally turn off the TV during the Initial Setup process, the Initial Setup will restart from the XMB™ or perform the .... Getting Started s To Run Initial Setup Again or Auto Program at a Later Time Select the Initial Setup feature from the beginning when the TV is turned back on page 52. Select Yes to cancel or No to resume Auto Program. 17 Press RETURN first, then press either B/b ...

Operating Instructions
Page 19
...x STOP: Press to exit. See Info Banner on and off the Theater Mode. Remote Control Button Description Operating the TV 1 2 3 4 DISPLAY LIGHT POWER TV POWER DVD AMP STB TV FUNCTION PREV REPLAY ADVANCE NEXT PLAY SYNC MENU PAUSE STOP 5 6 THEATER SOUND PICTURE WIDE CC FREEZE VOL MUTING CH ...; The 5, PLAY and CH+ buttons have a tactile dot. The banner will be programmed to your dealer or www.sony.com/bravia for a set for details). The buttons listed below can be set period of the remote control. M (fast forward): Press to the DVD, AMP, or STB FUNCTION buttons of time...
...x STOP: Press to exit. See Info Banner on and off the Theater Mode. Remote Control Button Description Operating the TV 1 2 3 4 DISPLAY LIGHT POWER TV POWER DVD AMP STB TV FUNCTION PREV REPLAY ADVANCE NEXT PLAY SYNC MENU PAUSE STOP 5 6 THEATER SOUND PICTURE WIDE CC FREEZE VOL MUTING CH ...; The 5, PLAY and CH+ buttons have a tactile dot. The banner will be programmed to your dealer or www.sony.com/bravia for a set for details). The buttons listed below can be set period of the remote control. M (fast forward): Press to the DVD, AMP, or STB FUNCTION buttons of time...

Operating Instructions
Page 20
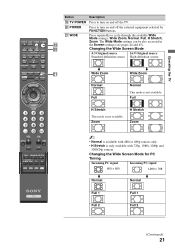
Press again to access the TV Home Menu items such as the TV Settings, Photo, Music, TV channels and External Inputs list (see pages 5 and 38). Press to display the TV Home Menu/XMB™ to exit the Guide. Press 0-9 to enter 2.1, press 2 , , 1 and ENT. Use with Sony Blu-ray player (BD) see "... to go back to the previous screen or exit from the Favorites menu. Product Support Clock/Timers Settings Sound Screen Channel TV qa 0-9 ENT qs qd MUTING qf VOL +/- Press to open the TV Guide On Screen system. Press ENT to stop recording. x REC STOP: Press to change channels ...
Press again to access the TV Home Menu items such as the TV Settings, Photo, Music, TV channels and External Inputs list (see pages 5 and 38). Press to display the TV Home Menu/XMB™ to exit the Guide. Press 0-9 to enter 2.1, press 2 , , 1 and ENT. Use with Sony Blu-ray player (BD) see "... to go back to the previous screen or exit from the Favorites menu. Product Support Clock/Timers Settings Sound Screen Channel TV qa 0-9 ENT qs qd MUTING qf VOL +/- Press to open the TV Guide On Screen system. Press ENT to stop recording. x REC STOP: Press to change channels ...
Operating Instructions
Page 21
...is only available with 720p, 1080i, 1080p and 1080/24p sources. The Wide Mode settings can be also accessed in the Screen settings (see pages 44 and 45). DISPLAY LIGHT POWER TV POWER DVD AMP STB TV FUNCTION PREV REPLAY ADVANCE NEXT PLAY ql w; Changing the Wide Screen Mode for PC ...PC signal 800 × 600 1,280 × 768 m Normal m Normal Full 1 Full 1 Full 2 Full 2 (Continued) 21 Operating the TV Button Description ql TV POWER Press to cycle through the available Wide Mode settings: Wide Zoom, Normal, Full, H Stretch, Zoom. POWER wa WIDE Press to turn on and off the...
...is only available with 720p, 1080i, 1080p and 1080/24p sources. The Wide Mode settings can be also accessed in the Screen settings (see pages 44 and 45). DISPLAY LIGHT POWER TV POWER DVD AMP STB TV FUNCTION PREV REPLAY ADVANCE NEXT PLAY ql w; Changing the Wide Screen Mode for PC ...PC signal 800 × 600 1,280 × 768 m Normal m Normal Full 1 Full 1 Full 2 Full 2 (Continued) 21 Operating the TV Button Description ql TV POWER Press to cycle through the available Wide Mode settings: Wide Zoom, Normal, Full, H Stretch, Zoom. POWER wa WIDE Press to turn on and off the...
Operating Instructions
Page 22
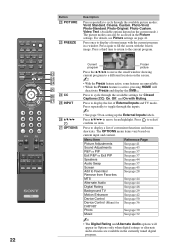
... current program. Press V/v/B/b to display a list of External Inputs and TV mode. Press to move the small window showing current program to a different location on setting up the External Inputs labels. For details, see Picture settings on current input and content. Press to select/ confirm an item. ..., Text. (Available options depend on the current mode.) The picture modes can also be accessed in the Picture settings. DISPLAY LIGHT POWER TV POWER DVD AMP STB TV FUNCTION PREV REPLAY ADVANCE NEXT PLAY SYNC MENU PAUSE STOP THEATER SOUND PICTURE WIDE CC FREEZE VOL MUTING CH JUMP ...
... current program. Press V/v/B/b to display a list of External Inputs and TV mode. Press to move the small window showing current program to a different location on setting up the External Inputs labels. For details, see Picture settings on current input and content. Press to select/ confirm an item. ..., Text. (Available options depend on the current mode.) The picture modes can also be accessed in the Picture settings. DISPLAY LIGHT POWER TV POWER DVD AMP STB TV FUNCTION PREV REPLAY ADVANCE NEXT PLAY SYNC MENU PAUSE STOP THEATER SOUND PICTURE WIDE CC FREEZE VOL MUTING CH JUMP ...
Operating Instructions
Page 24
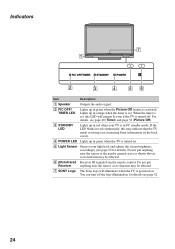
...green when the Picture Off feature is in PC standby mode. When the timer is set . Do not put Receiver anything near the sensor, as its function may indicate that the TV needs servicing (see contacting Sony information on . 5 Light Sensor Senses room light level and adjusts the screen brightness ...52 for details). Lights up in orange when the timer is turned on the back cover). 4 POWER LED Lights up in green when the TV is set , this may be affected. 6 (IR) Infrared Receives IR signals from the remote control. Do not put anything near the sensor or the...
...green when the Picture Off feature is in PC standby mode. When the timer is set . Do not put Receiver anything near the sensor, as its function may indicate that the TV needs servicing (see contacting Sony information on . 5 Light Sensor Senses room light level and adjusts the screen brightness ...52 for details). Lights up in orange when the timer is turned on the back cover). 4 POWER LED Lights up in green when the TV is set , this may be affected. 6 (IR) Infrared Receives IR signals from the remote control. Do not put anything near the sensor or the...

Operating Instructions
Page 25
...blinks twice; Programming the Remote Control The remote control can be programmed to operate other equipment regardless of the labeling. Function Button Sony Equipment Code Number DVD DVD Player 31033 AMP Receiver 52172 STB Digital Satellite 01639 Programming Other Equipment ~ • Any of the ...buttons blink red. Confirm the Programming If you can be programmed to the factory default settings, press SOUND, TV POWER, and then . DVD 5 seconds (default) STB 15 seconds AMP 10 seconds TV 20 seconds Reset the Remote Control To reset the remote control to operate a Bluray ...
...blinks twice; Programming the Remote Control The remote control can be programmed to operate other equipment regardless of the labeling. Function Button Sony Equipment Code Number DVD DVD Player 31033 AMP Receiver 52172 STB Digital Satellite 01639 Programming Other Equipment ~ • Any of the ...buttons blink red. Confirm the Programming If you can be programmed to the factory default settings, press SOUND, TV POWER, and then . DVD 5 seconds (default) STB 15 seconds AMP 10 seconds TV 20 seconds Reset the Remote Control To reset the remote control to operate a Bluray ...

Operating Instructions
Page 28
... a carousel-like fashion. 2 When the recently viewed channels and inputs are highlighted, press V/v to Favorites 1 From the XMBTM, select a Photo, Music, TV, or External Inputs icon. Removing from Favorites 1 Press FAVORITES, then select an item to be removed, and press OPTIONS. 2 Press V/v to highlight Remove...for easy access. Recently viewed items are also cleared when the TV is powered off. Locate the item you wish to add and press OPTIONS. 2 Press V/v to highlight Add to factory default settings (see pages 16 and 46). • Initial Setup will clear your recently viewed channels and ...
... a carousel-like fashion. 2 When the recently viewed channels and inputs are highlighted, press V/v to Favorites 1 From the XMBTM, select a Photo, Music, TV, or External Inputs icon. Removing from Favorites 1 Press FAVORITES, then select an item to be removed, and press OPTIONS. 2 Press V/v to highlight Remove...for easy access. Recently viewed items are also cleared when the TV is powered off. Locate the item you wish to add and press OPTIONS. 2 Press V/v to highlight Add to factory default settings (see pages 16 and 46). • Initial Setup will clear your recently viewed channels and ...

Operating Instructions
Page 31
... shuffle the photo order during the slideshow. Information Select to view the photo file highlighted. Shuffle Select On to modify file settings for selection (see page 32). Repeat Select On to USB connected equipment. ~ • Not available with thumbnails. Rotate and...from Favorites Select to protect a photo from a USB connected equipment. Slideshow Effect Select from Fast, Medium, or Slow to set the photo display duration. Start Slideshow Select to delete a photo. Slideshow Speed Select from Simple, Butterfly, Maze, Sepia, Monochrome, Slide,...
... shuffle the photo order during the slideshow. Information Select to view the photo file highlighted. Shuffle Select On to modify file settings for selection (see page 32). Repeat Select On to USB connected equipment. ~ • Not available with thumbnails. Rotate and...from Favorites Select to protect a photo from a USB connected equipment. Slideshow Effect Select from Fast, Medium, or Slow to set the photo display duration. Start Slideshow Select to delete a photo. Slideshow Speed Select from Simple, Butterfly, Maze, Sepia, Monochrome, Slide,...

Operating Instructions
Page 32
... category. 3 Press V/v to Favorites, and Remove from a Sony connected USB equipment (not supplied) or add music to photos (see page 41 Picture Adjustments). A sample USB icon is selected below. Speakers Select to set sound to TV Speakers or Audio System. ~ • For Display Size, ...Playback Method, Photo Settings, Start Slideshow, Rotate and Save, Delete, Information, Add to highlight and select the music...
... category. 3 Press V/v to Favorites, and Remove from a Sony connected USB equipment (not supplied) or add music to photos (see page 41 Picture Adjustments). A sample USB icon is selected below. Speakers Select to set sound to TV Speakers or Audio System. ~ • For Display Size, ...Playback Method, Photo Settings, Start Slideshow, Rotate and Save, Delete, Information, Add to highlight and select the music...

Operating Instructions
Page 33
... View will be stored in which files will display the following Music Options menu. Sets the play tracks. Repeat Select On to continuously play order and visual effect settings while playing music files. File Order Sets the order in the TV. 33 After adding a music file, see Slideshow Music under the Photo Options on...
... View will be stored in which files will display the following Music Options menu. Sets the play tracks. Repeat Select On to continuously play order and visual effect settings while playing music files. File Order Sets the order in the TV. 33 After adding a music file, see Slideshow Music under the Photo Options on...


