Operating Instructions
Page 3
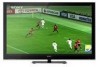
Contents Introducing Your BRAVIA® TV Experiencing Stunning HD with Your BRAVIA TV 4 The Four Steps to a Full HD Experience . . . .4 TV Feature Highlights 5 Getting Started Setting Up Your Monitor 6 Connecting the AC Power Cord 7 Using a Wall-Mount Bracket 8 Locating Inputs and Outputs 10... of natural resources. 3 Read this Sony BRAVIA® high-definition television. Access it at www.sony.com/referencebook. Provides unit setup information, illustrates sample optional equipment connection diagrams, and highlights TV features. Operating Instructions Reference Book Provides ...
Contents Introducing Your BRAVIA® TV Experiencing Stunning HD with Your BRAVIA TV 4 The Four Steps to a Full HD Experience . . . .4 TV Feature Highlights 5 Getting Started Setting Up Your Monitor 6 Connecting the AC Power Cord 7 Using a Wall-Mount Bracket 8 Locating Inputs and Outputs 10... of natural resources. 3 Read this Sony BRAVIA® high-definition television. Access it at www.sony.com/referencebook. Provides unit setup information, illustrates sample optional equipment connection diagrams, and highlights TV features. Operating Instructions Reference Book Provides ...
Operating Instructions
Page 6
...your monitor has adequate ventilation, see page 18. 6 This may cause moisture condensation. The designated Sony wall-mount bracket model and TV stand model name(s) are not mounting the monitor to a wall, you can mount your monitor: • Disconnect all cables when carrying the monitor. • Carry the monitor ... connection is completed, be sure to secure the monitor to a stable surface or mount it to consider the following while setting up your monitor to a wall right away. Be sure to a wall. If you are available under the "Other Information" section of people; Should this...
...your monitor has adequate ventilation, see page 18. 6 This may cause moisture condensation. The designated Sony wall-mount bracket model and TV stand model name(s) are not mounting the monitor to a wall, you can mount your monitor: • Disconnect all cables when carrying the monitor. • Carry the monitor ... connection is completed, be sure to secure the monitor to a stable surface or mount it to consider the following while setting up your monitor to a wall right away. Be sure to a wall. If you are available under the "Other Information" section of people; Should this...
Operating Instructions
Page 8
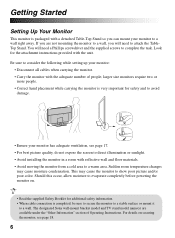
... by a Sony dealer or licensed contractor. • Follow the instruction guide provided with the bracket may also need to refer to read page 19. 8 Prepare the monitor for your unit model. Keep the screws away from the attaching surface of screws other than those supplied with the Wall-Mount Bracket for the Wall-Mount Bracket...
... by a Sony dealer or licensed contractor. • Follow the instruction guide provided with the bracket may also need to refer to read page 19. 8 Prepare the monitor for your unit model. Keep the screws away from the attaching surface of screws other than those supplied with the Wall-Mount Bracket for the Wall-Mount Bracket...
Operating Instructions
Page 19
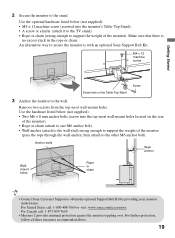
...the monitor's Table-Top Stand). • A screw or similar (attach it to the TV stand). • Rope or chain (strong enough to the wall. For United States call: 1-800-488-7669 or visit: www.sony.com/accessories For Canada call: 1-877-899-7669 • Measure 2 provides minimal protection against...is with an optional Sony Support Belt Kit. For further protection, follow all three measures recommended above. 19 Getting Started 2 Secure the monitor to obtain the optional Support Belt Kit by providing your monitor model name. Remove two screws from the top-most wall-mount holes located on the...
...the monitor's Table-Top Stand). • A screw or similar (attach it to the TV stand). • Rope or chain (strong enough to the wall. For United States call: 1-800-488-7669 or visit: www.sony.com/accessories For Canada call: 1-877-899-7669 • Measure 2 provides minimal protection against...is with an optional Sony Support Belt Kit. For further protection, follow all three measures recommended above. 19 Getting Started 2 Secure the monitor to obtain the optional Support Belt Kit by providing your monitor model name. Remove two screws from the top-most wall-mount holes located on the...
Operating Instructions
Page 49
...receiver is subject to radio or television reception, which should be co-located or operating in a particular installation. KDL-46XBR10 KDL-52XBR10 Sony Wall-Mount Bracket Model No. Telephone Number: 858-942-2230 This device complies with minimum distance 20 cm between the ... Rules and RSSGen of Conformity Trade Name: SONY Model: KDL-46XBR10/KDL-52XBR10/MBT-WZ5 Responsible Party: Sony Electronics Inc. This transmitter must accept any interference received, including interference that any other Wall-Mount Brackets or TV-Stand may cause undesired operation. Equipment (or...
...receiver is subject to radio or television reception, which should be co-located or operating in a particular installation. KDL-46XBR10 KDL-52XBR10 Sony Wall-Mount Bracket Model No. Telephone Number: 858-942-2230 This device complies with minimum distance 20 cm between the ... Rules and RSSGen of Conformity Trade Name: SONY Model: KDL-46XBR10/KDL-52XBR10/MBT-WZ5 Responsible Party: Sony Electronics Inc. This transmitter must accept any interference received, including interference that any other Wall-Mount Brackets or TV-Stand may cause undesired operation. Equipment (or...
Operating Instructions
Page 51
...KDL-46XBR10 KDL-52XBR10 System Panel system LCD (Liquid Crystal Display) Panel Speaker output Power and others 10 W + 10 W Power requirement 120 V AC, 60 Hz Power consumption in use 198 W 218 W in DAM* 16 W (You may hear a clicking noise during the download but this is normal.) in standby 0.3 W Screen size (inches measured diagonally) 46... Cover (1) / Spacers (black) for Wall-Mount (4) / Spacers (silver) and Screws (M6 × 20) for Floor Stand (4) Optional accessories Connecting cables / Support Belt Kit / Wall-Mount Bracket / TV-Stand: see page 49 * Download Acquisition...
...KDL-46XBR10 KDL-52XBR10 System Panel system LCD (Liquid Crystal Display) Panel Speaker output Power and others 10 W + 10 W Power requirement 120 V AC, 60 Hz Power consumption in use 198 W 218 W in DAM* 16 W (You may hear a clicking noise during the download but this is normal.) in standby 0.3 W Screen size (inches measured diagonally) 46... Cover (1) / Spacers (black) for Wall-Mount (4) / Spacers (silver) and Screws (M6 × 20) for Floor Stand (4) Optional accessories Connecting cables / Support Belt Kit / Wall-Mount Bracket / TV-Stand: see page 49 * Download Acquisition...

