Operating Instructions
Page 3
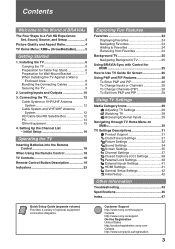
... Settings 42 Initial Setup 42 Other Information Troubleshooting 43 Specifications 46 Index 47 Quick Setup Guide (separate volume) Provides a variety of optional equipment connection diagrams. Customer Support http://www.sony.com/tvsupport Canada http://www.sony.ca/support On-line Registration United States http://productregistration.sony.com Canada http://www.sonystyle.ca/registration 3 Installing the TV...
... Settings 42 Initial Setup 42 Other Information Troubleshooting 43 Specifications 46 Index 47 Quick Setup Guide (separate volume) Provides a variety of optional equipment connection diagrams. Customer Support http://www.sony.com/tvsupport Canada http://www.sony.ca/support On-line Registration United States http://productregistration.sony.com Canada http://www.sonystyle.ca/registration 3 Installing the TV...

Operating Instructions
Page 4
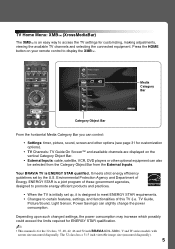
http://www.sony.com/HDTV Canada http://www.sonystyle.ca/hd The Four Steps to a Full HD Experience: Set, Sound, Source, and Setup Along with your BRAVIA TV set, a complete HD system requires an HD sound system, a source of 16:9. The Quick Setup Guide, enclosed separately, illustrates how ...to connect other HD compatible external equipment Contact your BRAVIA TV is displayed on the ...
http://www.sony.com/HDTV Canada http://www.sonystyle.ca/hd The Four Steps to a Full HD Experience: Set, Sound, Source, and Setup Along with your BRAVIA TV set, a complete HD system requires an HD sound system, a source of 16:9. The Quick Setup Guide, enclosed separately, illustrates how ...to connect other HD compatible external equipment Contact your BRAVIA TV is displayed on the ...
Operating Instructions
Page 5
... the 32 class, 37, 40, 42, 46 and 52 inch BRAVIA KDL-XBR6, V and W series models with screen size measured diagonally. TV Guide, Picture/Sound, Light Sensor, Power Savings) can also be selected from the Category Object Bar from the External Inputs. Product Support Clock/Timers Settings Sound Screen Channel Category Object Bar Media...
... the 32 class, 37, 40, 42, 46 and 52 inch BRAVIA KDL-XBR6, V and W series models with screen size measured diagonally. TV Guide, Picture/Sound, Light Sensor, Power Savings) can also be selected from the Category Object Bar from the External Inputs. Product Support Clock/Timers Settings Sound Screen Channel Category Object Bar Media...
Operating Instructions
Page 7
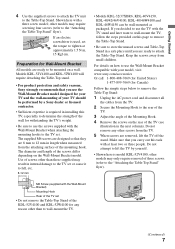
... 8-12 mm • Models KDL-32/37XBR6, KDL-40V4150, KDL-40/42/46V4100, KDL-40/46W4100 and KDL-46W4150 can be performed by yourself. • Shown here is used, set . For details on how to use the screws supplied with the TV stand and later want to wall-mount the TV, follow the steps provided on ...of the screws differ depending on a wall. M6 Screw (supplied with your model, visit www.sony.com/accessories Or call 1-800-488-7669 (for United States) 1-877-899-7669 (for your TV should be wall-mounted as packaged. Do not remove any reason other than those supplied may result...
... 8-12 mm • Models KDL-32/37XBR6, KDL-40V4150, KDL-40/42/46V4100, KDL-40/46W4100 and KDL-46W4150 can be performed by yourself. • Shown here is used, set . For details on how to use the screws supplied with the TV stand and later want to wall-mount the TV, follow the steps provided on ...of the screws differ depending on a wall. M6 Screw (supplied with your model, visit www.sony.com/accessories Or call 1-800-488-7669 (for United States) 1-877-899-7669 (for your TV should be wall-mounted as packaged. Do not remove any reason other than those supplied may result...
Operating Instructions
Page 8
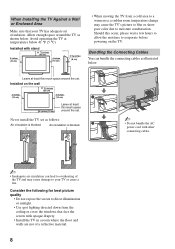
... room temperature change may cause damage to overheating of a reflective material. 8 Leave at least this much space around the set. Allow enough space around the set as follows: Air circulation is blocked. When Installing the TV Against a Wall or Enclosed Area Make sure that face the screen with opaque drapery. • Install the...
... room temperature change may cause damage to overheating of a reflective material. 8 Leave at least this much space around the set. Allow enough space around the set as follows: Air circulation is blocked. When Installing the TV Against a Wall or Enclosed Area Make sure that face the screen with opaque drapery. • Install the...
Operating Instructions
Page 9
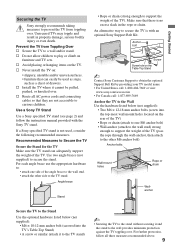
... Toppling Over s Secure the TV to play or climb on furniture and TV sets. s Do not allow children to a wall and/or stand. Recommended Measures to Secure the TV Secure the Stand for the TV Make sure the TV stand can easily be pulled, pushed, or knocked over . Use a Sony TV Stand Use a Sony specified TV stand (see page 2) and...
... Toppling Over s Secure the TV to play or climb on furniture and TV sets. s Do not allow children to a wall and/or stand. Recommended Measures to Secure the TV Secure the Stand for the TV Make sure the TV stand can easily be pulled, pushed, or knocked over . Use a Sony TV Stand Use a Sony specified TV stand (see page 2) and...
Operating Instructions
Page 11
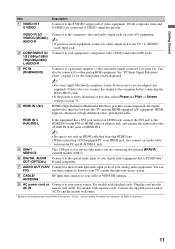
... be connected to other analog RGB equipment. Connects to your power source. Can also be necessary to use an adapter (not supplied). If this TV and any HDMI-equipped A/V equipment. For models with separate cords: Connect the supplied power cord to AC IN and the nearest wall outlet. *... the optional BRAVIA external module (DMex). 6 DIGITAL AUDIO Connects to the optical audio input of Screen settings on page 14 for service only unless you have mono equipment, connect its audio output jack to the TV's L (MONO) audio input jack. HDMI IN 4 R-AUDIO-L If the equipment has a DVI jack ...
... be connected to other analog RGB equipment. Connects to your power source. Can also be necessary to use an adapter (not supplied). If this TV and any HDMI-equipped A/V equipment. For models with separate cords: Connect the supplied power cord to AC IN and the nearest wall outlet. *... the optional BRAVIA external module (DMex). 6 DIGITAL AUDIO Connects to the optical audio input of Screen settings on page 14 for service only unless you have mono equipment, connect its audio output jack to the TV's L (MONO) audio input jack. HDMI IN 4 R-AUDIO-L If the equipment has a DVI jack ...
Operating Instructions
Page 12
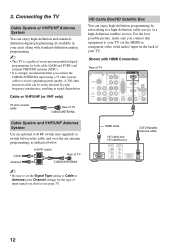
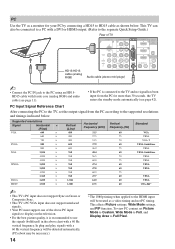
...input on the back of input signal you choose (see page 37). Cable Antenna A-B RF switch A Rear of TV B CABLE/ANTENNA ~ • Be sure to set the Signal Type setting to receive optimum picture quality. HDMI cable HD cable box/ HD satellite box CATV/Satellite antenna cable 12 Connecting the... TV Cable System or VHF/UHF Antenna System You can be easily affected by subscribing to your TV via the HDMI or...
...input on the back of input signal you choose (see page 37). Cable Antenna A-B RF switch A Rear of TV B CABLE/ANTENNA ~ • Be sure to set the Signal Type setting to receive optimum picture quality. HDMI cable HD cable box/ HD satellite box CATV/Satellite antenna cable 12 Connecting the... TV Cable System or VHF/UHF Antenna System You can be easily affected by subscribing to your TV via the HDMI or...
Operating Instructions
Page 14
...recommended to Full Pixel. PC Input Signal Reference Chart After connecting the PC to the TV, set Picture Mode to Custom, Wide Mode to Full, and Display Area to use the ... * The 1080p timing when applied to the supported resolutions and timings indicated below . This affects Picture settings, Wide Mode settings, and PIP function. Supported resolutions Signal VGA Horizontal × (Pixel) 640 × 640 ×... 768 768 768 768 768 768 1,024 1,080 Horizontal frequency (kHz) 31.5 37.5 31.5 37.9 46.9 48.4 56.5 60.0 47.4 47.8 60.3 47.7 64.0 67.5 Vertical frequency (Hz) 60 ...
...recommended to Full Pixel. PC Input Signal Reference Chart After connecting the PC to the TV, set Picture Mode to Custom, Wide Mode to Full, and Display Area to use the ... * The 1080p timing when applied to the supported resolutions and timings indicated below . This affects Picture settings, Wide Mode settings, and PIP function. Supported resolutions Signal VGA Horizontal × (Pixel) 640 × 640 ×... 768 768 768 768 768 768 1,024 1,080 Horizontal frequency (kHz) 31.5 37.5 31.5 37.9 46.9 48.4 56.5 60.0 47.4 47.8 60.3 47.7 64.0 67.5 Vertical frequency (Hz) 60 ...
Operating Instructions
Page 16
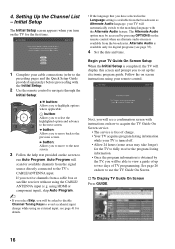
...be able to two days of 6 Initial Setup is complete. see page 35). 4 Set the date and time. Initial Setup Step 6 of TV programming. B button: Allows you have selected in the Language setting is available only for available channels from a cable box or satellite receiver without using an...take longer) for the first time. Select to the next screen. Language settings will apply to the TV's CABLE/ANTENNA input. If you to set up to view a guide of up the electronic program guide. This TV features an electronic program guide. b button: Allows you to select the ...
...be able to two days of 6 Initial Setup is complete. see page 35). 4 Set the date and time. Initial Setup Step 6 of TV programming. B button: Allows you have selected in the Language setting is available only for available channels from a cable box or satellite receiver without using an...take longer) for the first time. Select to the next screen. Language settings will apply to the TV's CABLE/ANTENNA input. If you to set up to view a guide of up the electronic program guide. This TV features an electronic program guide. b button: Allows you to select the ...
Operating Instructions
Page 17
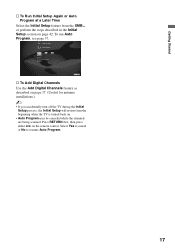
... Program may be canceled while the channels are being scanned. Select Yes to cancel or No to resume Auto Program. 17 HDMI Settings General Setup Settings Initial Setup TV s To Add Digital Channels Use the Add Digital Channels feature as described on page 37. (Useful for antenna installations.) ~ &#...8226; If you accidentally turn off the TV during the Initial Setup process, the Initial Setup will restart from the XMB™ or ...
... Program may be canceled while the channels are being scanned. Select Yes to cancel or No to resume Auto Program. 17 HDMI Settings General Setup Settings Initial Setup TV s To Add Digital Channels Use the Add Digital Channels feature as described on page 37. (Useful for antenna installations.) ~ &#...8226; If you accidentally turn off the TV during the Initial Setup process, the Initial Setup will restart from the XMB™ or ...
Operating Instructions
Page 19
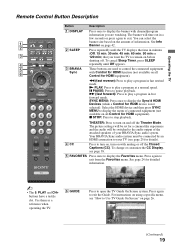
... 60 min, 90 min or 3 120 min) that you are used to exit the Guide. THEATER: Press to display the Favorites menu. The picture settings will time out in fast forward mode. Press again to display the Sync'd HDMI Devices (while a Control for HDMI equipment). SYNC MENU: Press once ... Press to Use TV Guide On Screen" on using a specific menu, see page 25 for detailed information. ~ • The 5, PLAY and CH+ buttons have a tactile dot. Your BRAVIA Sync audio system must be set for HDMI equipment). X PAUSE: Press to turn on, turn on all Control for HDMI device is ...
... 60 min, 90 min or 3 120 min) that you are used to exit the Guide. THEATER: Press to display the Favorites menu. The picture settings will time out in fast forward mode. Press again to display the Sync'd HDMI Devices (while a Control for HDMI equipment). SYNC MENU: Press once ... Press to Use TV Guide On Screen" on using a specific menu, see page 25 for detailed information. ~ • The 5, PLAY and CH+ buttons have a tactile dot. Your BRAVIA Sync audio system must be set for HDMI equipment). X PAUSE: Press to turn on, turn on all Control for HDMI device is ...

Operating Instructions
Page 20
See your dealer or www.sony.com/bravia for more information. Press ENT to access features in all regions. Press again or press VOL + to the previous screen or exit from the screen when displaying menu items and settings. Button 7 RETURN 8 HOME qf Description Press to go back to 0 restore the ...qd MUTING Press to select/ confirm an item. 20 Press to mute the sound. Press to access the TV Home Menu items such as the TV Settings, TV channels and External Inputs list (see pages 5 and 29). Press to display the TV Home Menu/XMB™ to display the list of External Inputs and...
See your dealer or www.sony.com/bravia for more information. Press ENT to access features in all regions. Press again or press VOL + to the previous screen or exit from the screen when displaying menu items and settings. Button 7 RETURN 8 HOME qf Description Press to go back to 0 restore the ...qd MUTING Press to select/ confirm an item. 20 Press to mute the sound. Press to access the TV Home Menu items such as the TV Settings, TV channels and External Inputs list (see pages 5 and 29). Press to display the TV Home Menu/XMB™ to display the list of External Inputs and...

Operating Instructions
Page 21
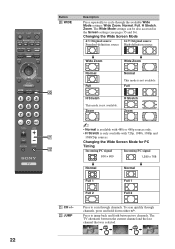
... Audio options will appear in Options only when digital ratings or alternate audio streams are available in the Picture settings. Press repeatedly to display a list of convenient functions and menu shortcuts. Operating the TV Button Description qk OPTIONS Press to cycle through the available picture modes: Vivid, Standard, Cinema, Custom, PhotoVivid, Photo...
... Audio options will appear in Options only when digital ratings or alternate audio streams are available in the Picture settings. Press repeatedly to display a list of convenient functions and menu shortcuts. Operating the TV Button Description qk OPTIONS Press to cycle through the available picture modes: Vivid, Standard, Cinema, Custom, PhotoVivid, Photo...
Operating Instructions
Page 22
...Incoming PC signal 800 × 600 1,280 × 768 m Normal m Normal Full 1 Full 1 Full 2 Full 2 wz CH +/- Full Full w; The TV alternates between two channels. ws JUMP Press to cycle through channels, press and hold down either +/-. To scan quickly through the available Wide Mode... settings: Wide Zoom, Normal, Full, H Stretch, Zoom. Button w; Press to jump back and forth between the current channel and the last ...
...Incoming PC signal 800 × 600 1,280 × 768 m Normal m Normal Full 1 Full 1 Full 2 Full 2 wz CH +/- Full Full w; The TV alternates between two channels. ws JUMP Press to cycle through channels, press and hold down either +/-. To scan quickly through the available Wide Mode... settings: Wide Zoom, Normal, Full, H Stretch, Zoom. Button w; Press to jump back and forth between the current channel and the last ...
Operating Instructions
Page 23
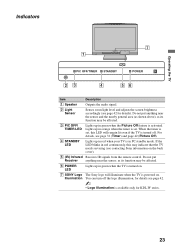
... when the TV is turned on. 7 SONY Logo Illumination The Sony logo will remain lit even if the TV is turned off the logo illumination, for details see contacting Sony information on ...the TV needs servicing (see page 42. ~ • Logo Illumination is available only for details). When the timer is set . Lights up in orange when the timer is set , ...this may be affected. 3 PIC OFF/ TIMER LED Lights up in green when the Picture Off feature is activated. Operating the TV... when your TV is in PC standby mode. For details, see page 42 for...
... when the TV is turned on. 7 SONY Logo Illumination The Sony logo will remain lit even if the TV is turned off the logo illumination, for details see contacting Sony information on ...the TV needs servicing (see page 42. ~ • Logo Illumination is available only for details). When the timer is set . Lights up in orange when the timer is set , ...this may be affected. 3 PIC OFF/ TIMER LED Lights up in green when the Picture Off feature is activated. Operating the TV... when your TV is in PC standby mode. For details, see page 42 for...
Operating Instructions
Page 24
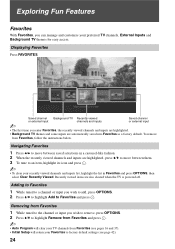
... from Favorites and press . ~ • Auto Program will return your Favorites to factory default settings (see pages 16 and 37). • Initial Setup will clear your TV channels from Favorites, follow the instructions below. Navigating Favorites 1 Press B/b to move between saved ...selections in Favorites and press OPTIONS, then select Clear Recently Viewed. Displaying Favorites Press FAVORITES. Saved channel Background TV Recently viewed or external input channels and inputs Saved channel or external input ~ • The first time you wish to add...
... from Favorites and press . ~ • Auto Program will return your Favorites to factory default settings (see pages 16 and 37). • Initial Setup will clear your TV channels from Favorites, follow the instructions below. Navigating Favorites 1 Press B/b to move between saved ...selections in Favorites and press OPTIONS, then select Clear Recently Viewed. Displaying Favorites Press FAVORITES. Saved channel Background TV Recently viewed or external input channels and inputs Saved channel or external input ~ • The first time you wish to add...
Operating Instructions
Page 25
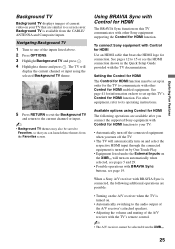
... BRAVIA Sync buttons, see the HDMI connection shown in order for the TV to a screen saver. For other Control for HDMI enabled equipment. To connect Sony equipment with the TV documentation. Background TV is turned on by One-Touch-Play. • Equipment listed under ... Sony equipment supporting the Control for HDMI function. Exploring Fun Features Background TV Background TV displays images of current video on this TV's Control for HDMI function. Navigating Background TV 1 Tune to its operating instructions. The TV will automatically turn on how to set up this TV communicates...
... BRAVIA Sync buttons, see the HDMI connection shown in order for the TV to a screen saver. For other Control for HDMI enabled equipment. To connect Sony equipment with the TV documentation. Background TV is turned on by One-Touch-Play. • Equipment listed under ... Sony equipment supporting the Control for HDMI function. Exploring Fun Features Background TV Background TV displays images of current video on this TV's Control for HDMI function. Navigating Background TV 1 Tune to its operating instructions. The TV will automatically turn on how to set up this TV communicates...
Operating Instructions
Page 27
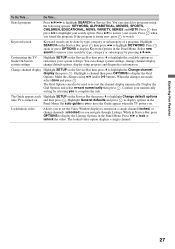
...Highlight General defaults and press to lock or unlock the video. Do This... Press when you navigate through Listings. Customizing the TV Guide On Screen system settings Highlight SETUP on and then press . Change channel display Highlight SETUP on . When the changes are made, select done and...options, display setup progress and diagnostics information. Lock/unlock video Allows you to set the Video Window display to remain on the Service Bar then press v to highlight Change default options time TV is airing now, press to highlight KEYWORD. Press V/v to display the Listings ...
...Highlight General defaults and press to lock or unlock the video. Do This... Press when you navigate through Listings. Customizing the TV Guide On Screen system settings Highlight SETUP on and then press . Change channel display Highlight SETUP on . When the changes are made, select done and...options, display setup progress and diagnostics information. Lock/unlock video Allows you to set the Video Window display to remain on the Service Bar then press v to highlight Change default options time TV is airing now, press to highlight KEYWORD. Press V/v to display the Listings ...
Operating Instructions
Page 29
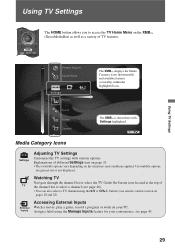
... Watch a movie, play a game, record a program or work on pages 20 and 22). TV Media Category Icons Settings Adjusting TV Settings Customize the TV settings with Settings highlighted. Unavailable options are grayed out or not displayed. buttons (see remote control section on your convenience..., see page 26). • You can also select a TV channel using the 0-9 or CH+/- Using TV Settings Product Support Clock/Timers Settings The XMB™ displays the Media Category icons (horizontally) and available features (vertically) within...
... Watch a movie, play a game, record a program or work on pages 20 and 22). TV Media Category Icons Settings Adjusting TV Settings Customize the TV settings with Settings highlighted. Unavailable options are grayed out or not displayed. buttons (see remote control section on your convenience..., see page 26). • You can also select a TV channel using the 0-9 or CH+/- Using TV Settings Product Support Clock/Timers Settings The XMB™ displays the Media Category icons (horizontally) and available features (vertically) within...


