Operating Instructions
Page 3
... 18 Operating the TV Using the Remote Control 19 Remote Control Button Description 20 TV Controls and Indicators 24 Using Features BRAVIA® SyncTM with Control for HDMI . . .25 Using PIP Feature 26 Favorites 27 Wide Mode 27 Wide Mode with PC 28 Inputs 28 Playing back Photo/Music/Video via USB... a Wall-Mount Bracket 47 Installing the Wall-Mount Bracket 47 Troubleshooting 52 Important Notices 56 Specifications 57 Index 59 Customer Support United States http://www.sony.com/tvsupport Canada http://www.sony.ca/support On-line Registration United States http://productregistration...
... 18 Operating the TV Using the Remote Control 19 Remote Control Button Description 20 TV Controls and Indicators 24 Using Features BRAVIA® SyncTM with Control for HDMI . . .25 Using PIP Feature 26 Favorites 27 Wide Mode 27 Wide Mode with PC 28 Inputs 28 Playing back Photo/Music/Video via USB... a Wall-Mount Bracket 47 Installing the Wall-Mount Bracket 47 Troubleshooting 52 Important Notices 56 Specifications 57 Index 59 Customer Support United States http://www.sony.com/tvsupport Canada http://www.sony.ca/support On-line Registration United States http://productregistration...
Operating Instructions
Page 5
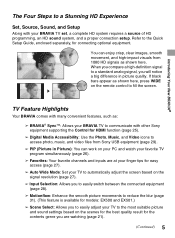
...shown here, press WIDE on the scenes for the best quality result for the contents genre you to easily adjust your BRAVIA TV to communicate with other Sony equipment supporting the Control for HDMI function (page 25). ➢ Digital Media Accessibility: Use the Photo, Music, ...big difference in Picture): You can enjoy crisp, clear images, smooth movement, and high-impact visuals from Sony USB equipment (page 29). ➢ PIP (Picture in picture quality. Introducing Your New BRAVIA® The Four Steps to a Stunning HD Experience Set, Source, Sound, and Setup Along with your...
...shown here, press WIDE on the scenes for the best quality result for the contents genre you to easily adjust your BRAVIA TV to communicate with other Sony equipment supporting the Control for HDMI function (page 25). ➢ Digital Media Accessibility: Use the Photo, Music, ...big difference in Picture): You can enjoy crisp, clear images, smooth movement, and high-impact visuals from Sony USB equipment (page 29). ➢ PIP (Picture in picture quality. Introducing Your New BRAVIA® The Four Steps to a Stunning HD Experience Set, Source, Sound, and Setup Along with your...
Operating Instructions
Page 26
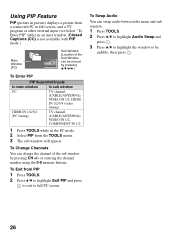
...TV program or other external input (see below "To Enter PIP" table) in an inset window. (Closed Captions (CC) is not available with PIP mode.) Main Window (PC) Sub Window (Location of the sub window by pressing V/v/B/b.) To Enter PIP PIP Supported Inputs In main window In sub window PC TV ...ANTENNA), VIDEO IN 1/2, COMPONENT IN 1/2 1 Press TOOLS while in the PC mode. 2 Select PIP from the TOOLS menu. 3 The sub window will appear. To Exit from PIP 1 Press TOOLS. 2 Press V/v to highlight Exit PIP and press to exit to be moved by pressing CH +/- or entering the channel number using...
...TV program or other external input (see below "To Enter PIP" table) in an inset window. (Closed Captions (CC) is not available with PIP mode.) Main Window (PC) Sub Window (Location of the sub window by pressing V/v/B/b.) To Enter PIP PIP Supported Inputs In main window In sub window PC TV ...ANTENNA), VIDEO IN 1/2, COMPONENT IN 1/2 1 Press TOOLS while in the PC mode. 2 Select PIP from the TOOLS menu. 3 The sub window will appear. To Exit from PIP 1 Press TOOLS. 2 Press V/v to highlight Exit PIP and press to exit to be moved by pressing CH +/- or entering the channel number using...
Operating Instructions
Page 36
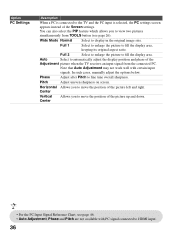
.... • For the PC Input Signal Reference Chart, see page 26). Wide Mode Normal Select to fill the display area. You can also select the PIP feature which allows you to automatically adjust the display position and phase of the Screen settings. Auto Select to move the position of the picture...
.... • For the PC Input Signal Reference Chart, see page 26). Wide Mode Normal Select to fill the display area. You can also select the PIP feature which allows you to automatically adjust the display position and phase of the Screen settings. Auto Select to move the position of the picture...
Operating Instructions
Page 59
... 37 AUDIO OUT jack, described 9 Auto Adjustment 36 Auto Program 18, 37 Auto Shut Off 45 Auto Wide 35 B Backlight 31 Balance 33 Bass 33 BRAVIA Sync buttons 20 Brightness 31 C CABLE/ANTENNA input, described 8 CC button 20 CH +/- Rating 38 E English Rating 40 ENT button 22 Enter Password 38 Equalizer... P PC IN 9 PC Settings 36 Phase 36 Photo 29 Picture 31 Picture Adjustments Lock 43 Picture Frame 29 Picture Mode 31 Picture Off ( ) LED 24 PIP 26 Pitch 36 POWER ("/1) button 22, 23 POWER (") LED 24 POWER button 24 Power Saving 45 Product Support 43 R Rating 38 Reset 31, 33, 55...
... 37 AUDIO OUT jack, described 9 Auto Adjustment 36 Auto Program 18, 37 Auto Shut Off 45 Auto Wide 35 B Backlight 31 Balance 33 Bass 33 BRAVIA Sync buttons 20 Brightness 31 C CABLE/ANTENNA input, described 8 CC button 20 CH +/- Rating 38 E English Rating 40 ENT button 22 Enter Password 38 Equalizer... P PC IN 9 PC Settings 36 Phase 36 Photo 29 Picture 31 Picture Adjustments Lock 43 Picture Frame 29 Picture Mode 31 Picture Off ( ) LED 24 PIP 26 Pitch 36 POWER ("/1) button 22, 23 POWER (") LED 24 POWER button 24 Power Saving 45 Product Support 43 R Rating 38 Reset 31, 33, 55...


