
Operating Instructions
Page 3
... manual are default settings optimized for the ENERGY STAR qualification in this TV (i.e. are located at the bottom of AC adapter. ~ • Instructions about "Installing Wall-Mount Bracket" are included within this TV's instructions manual. • The illustrations of the remote control used in the "Home" mode. Changes to promote energy efficient...
... manual are default settings optimized for the ENERGY STAR qualification in this TV (i.e. are located at the bottom of AC adapter. ~ • Instructions about "Installing Wall-Mount Bracket" are included within this TV's instructions manual. • The illustrations of the remote control used in the "Home" mode. Changes to promote energy efficient...

Operating Instructions
Page 7
... TV 12 3: Securing the TV 18 4: Bundling the cables 20 5: Connecting the TV to the Internet 20 6: Running initial setup 21 Using a Wall-Mount Bracket 22 Installing the TV against a wall or enclosed area 30 Using Your BRAVIA TV Watching TV B ea Selecting various functions and settings (Home Menu 33 Watching Internet Video...
... TV 12 3: Securing the TV 18 4: Bundling the cables 20 5: Connecting the TV to the Internet 20 6: Running initial setup 21 Using a Wall-Mount Bracket 22 Installing the TV against a wall or enclosed area 30 Using Your BRAVIA TV Watching TV B ea Selecting various functions and settings (Home Menu 33 Watching Internet Video...

Operating Instructions
Page 8
... Stand (1)*2 Fixing screws for Table-Top Stand (M5 × 16) (2) Assembling screws for Table-Top Stand (M5 x 16) (2) Operating Instructions (this manual), other documents and Wall-Mount Bracket accessories *1 Please refer to the model name printed on the remote control. *2 Assembling the Table-Top Stand is required.
... Stand (1)*2 Fixing screws for Table-Top Stand (M5 × 16) (2) Assembling screws for Table-Top Stand (M5 x 16) (2) Operating Instructions (this manual), other documents and Wall-Mount Bracket accessories *1 Please refer to the model name printed on the remote control. *2 Assembling the Table-Top Stand is required.
Operating Instructions
Page 9
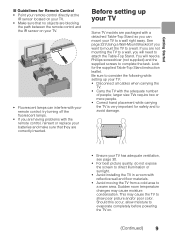
... for safety and to avoid damage. • Ensure your TV to a wall right away. Sudden room temperature changes may cause the TV to evaporate completely before powering the TV on your TV. • Fluorescent lamps can mount your TV has adequate ventilation, see page 30. • For best picture quality...8226; Avoid moving the TV from a cold area to attach the Table-Top Stand. Before setting up your TV Some TV models are not mounting the TV to a wall, you want to mount the TV to complete the task. See page 22 (Using a Wall-Mount Bracket) if you will need to a warm area.
... for safety and to avoid damage. • Ensure your TV to a wall right away. Sudden room temperature changes may cause the TV to evaporate completely before powering the TV on your TV. • Fluorescent lamps can mount your TV has adequate ventilation, see page 30. • For best picture quality...8226; Avoid moving the TV from a cold area to attach the Table-Top Stand. Before setting up your TV Some TV models are not mounting the TV to a wall, you want to mount the TV to complete the task. See page 22 (Using a Wall-Mount Bracket) if you will need to a warm area.

Operating Instructions
Page 19
...of the M4 machine screw differs depending on the TV model. (They are fastened in the screw holes for wall mounting.) Be sure to remove the upper two screws prior to anchoring the TV to a wall. • Securing the TV to the stand without securing the TV and the stand to the... the TV toppling over. For further protection, be sure to obtain the optional Support Belt Kit by using bolts, wall anchor and chain (or rope). Please see below illustration. 6-8 mm Screw M4 Rope or chain TV's Table-Top Stand ~ Contact Sony Customer Support to follow the three measures recommended. 19
...of the M4 machine screw differs depending on the TV model. (They are fastened in the screw holes for wall mounting.) Be sure to remove the upper two screws prior to anchoring the TV to a wall. • Securing the TV to the stand without securing the TV and the stand to the... the TV toppling over. For further protection, be sure to obtain the optional Support Belt Kit by using bolts, wall anchor and chain (or rope). Please see below illustration. 6-8 mm Screw M4 Rope or chain TV's Table-Top Stand ~ Contact Sony Customer Support to follow the three measures recommended. 19

Operating Instructions
Page 22
..., select Custom t Wireless Setup t Scan. For product protection and safety reasons, Sony strongly recommends that you do not wish to use the screws supplied with the Wall-Mount Bracket when attaching the mounting hooks to the TV set Network Setup later, press HOME, then select Settings t... automatically. Then, select the network name (SSID) you select Continue or Start (depending on the Wall-Mount Bracket model. The diameter and length of the box as indicated by a Sony dealer or licensed contractor. • Follow the instructions provided in internal damage to Off. Your TV...
..., select Custom t Wireless Setup t Scan. For product protection and safety reasons, Sony strongly recommends that you do not wish to use the screws supplied with the Wall-Mount Bracket when attaching the mounting hooks to the TV set Network Setup later, press HOME, then select Settings t... automatically. Then, select the network name (SSID) you select Continue or Start (depending on the Wall-Mount Bracket model. The diameter and length of the box as indicated by a Sony dealer or licensed contractor. • Follow the instructions provided in internal damage to Off. Your TV...

Operating Instructions
Page 23
... Template that indicates the screen center of your TV is installed on the wall, the VIDEO IN 1 / terminal on WALL-MOUNT BRACKET before carrying out Wall-Mount Bracket installation. Sony is not liable for any damages or injury caused by mishandling or improper installation. Sony is not liable for any damages or injury caused by mishandling or...
... Template that indicates the screen center of your TV is installed on the wall, the VIDEO IN 1 / terminal on WALL-MOUNT BRACKET before carrying out Wall-Mount Bracket installation. Sony is not liable for any damages or injury caused by mishandling or improper installation. Sony is not liable for any damages or injury caused by mishandling or...

Operating Instructions
Page 24
Tape the Paper Template to the wall. 4 Peel the Paper Template from the wall. - 30 - 20 1 - 10 3 0 2 4 50 100 150 5 6 200 250 300 350 Wall Paper Template 3 Make six holes according to the numbering (1, 2, 3, 4, 5 and 6) on the Paper Template using an electric drill. - 30 - 20... 10 3 0 4 2 50 100 150 5 6 200 250 300 350 5 Install screws (8 mm in diameter, not supplied) to the Wall-Mount Base and AC Adapter Holder on the installation location of your TV. 2 Decide on the wall. 5 6 5, 6 - 30 - 20 1 - 10 3 0 2 4 50 100 150 200 250 300 350 1, 2, 3, ...
Tape the Paper Template to the wall. 4 Peel the Paper Template from the wall. - 30 - 20 1 - 10 3 0 2 4 50 100 150 5 6 200 250 300 350 Wall Paper Template 3 Make six holes according to the numbering (1, 2, 3, 4, 5 and 6) on the Paper Template using an electric drill. - 30 - 20... 10 3 0 4 2 50 100 150 5 6 200 250 300 350 5 Install screws (8 mm in diameter, not supplied) to the Wall-Mount Base and AC Adapter Holder on the installation location of your TV. 2 Decide on the wall. 5 6 5, 6 - 30 - 20 1 - 10 3 0 2 4 50 100 150 200 250 300 350 1, 2, 3, ...

Operating Instructions
Page 26
Screw (+PSW 4 x 10) Bracket Cap Plate Wall-Mount Base AC Adapter Holder 3 Insert the AC adapter into the Wall-Mount Base. Wall Wall-Mount Base AC Adapter Holder 2 Attach the Bracket Cap Plate using the supplied screw. AC adapter ~ • Make sure to connect and bundle the cables before installing the TV on the wall. Installing the TV on the wall 1 Install the TV on the wall. 26 Arrow direction shows front of the TV. Then, confirm the Stand Protector is facing outwards. Make sure that the label is firmly latched into the AC Adapter Holder.
Screw (+PSW 4 x 10) Bracket Cap Plate Wall-Mount Base AC Adapter Holder 3 Insert the AC adapter into the Wall-Mount Base. Wall Wall-Mount Base AC Adapter Holder 2 Attach the Bracket Cap Plate using the supplied screw. AC adapter ~ • Make sure to connect and bundle the cables before installing the TV on the wall. Installing the TV on the wall 1 Install the TV on the wall. 26 Arrow direction shows front of the TV. Then, confirm the Stand Protector is facing outwards. Make sure that the label is firmly latched into the AC Adapter Holder.

Operating Instructions
Page 28
See page 41-42 (Specifications) for the Paper Template supplied with the Wall-Mount Bracket is in the table may differ slightly depending on the installation. Display dimensions Screen center dimension Unit: inches (mm)* Length for mounting 42W650A 32W650A 37 5/8 (954) 28 5/8 (725) 22 3/8 (568) 17 1/4...The measurement unit for its weight. 28 WARNING The wall that the TV will be installed should be capable of supporting a weight of at least four times that of the TV. TV installation dimensions table a e c b d Screen center point Model Name KDL- Figures in millimeters.
See page 41-42 (Specifications) for the Paper Template supplied with the Wall-Mount Bracket is in the table may differ slightly depending on the installation. Display dimensions Screen center dimension Unit: inches (mm)* Length for mounting 42W650A 32W650A 37 5/8 (954) 28 5/8 (725) 22 3/8 (568) 17 1/4...The measurement unit for its weight. 28 WARNING The wall that the TV will be installed should be capable of supporting a weight of at least four times that of the TV. TV installation dimensions table a e c b d Screen center point Model Name KDL- Figures in millimeters.

Operating Instructions
Page 29
Pass the information below to install the Wall-Mount Base and AC Adapter Holder on the wall. Use 6 screws (8 mm in diameter, not supplied) to licensed contractors if necessary. Be sure to use the supplied Paper Template that shows the actual position of Wall-Mount Base and AC Adapter Holder for hole position on the wall. Wall-Mount Base 30 mm 76 mm 28 mm AC Adapter Holder 295 mm 158 mm 29 Getting Started Dimensions for easy installation.
Pass the information below to install the Wall-Mount Base and AC Adapter Holder on the wall. Use 6 screws (8 mm in diameter, not supplied) to licensed contractors if necessary. Be sure to use the supplied Paper Template that shows the actual position of Wall-Mount Base and AC Adapter Holder for hole position on the wall. Wall-Mount Base 30 mm 76 mm 28 mm AC Adapter Holder 295 mm 158 mm 29 Getting Started Dimensions for easy installation.

Operating Instructions
Page 42
Model name KDL- 42W650A 32W650A Power and others Power requirement 19.5 V DC with AC adapter ...215; 23 1/2 × 7 7/8 without stand (mm) 954 × 568 × 69 (inches) 37 5/8 × 22 3/8 × 2 3/4 wall-mount hole 283 725 × 465 × 197 28 5/8 × 18 3/8 × 7 7/8 725 × 438 × 69 28 5/8 × 17 1/4 × 2... 3/4 pattern (mm) wall-mount screw M6 (length: see diagram on page 22.) size (mm) Mass* with stand (kg)/(lb.) 11 / 24.3 7.8 / 17.2 without stand 9.9 / ...
Model name KDL- 42W650A 32W650A Power and others Power requirement 19.5 V DC with AC adapter ...215; 23 1/2 × 7 7/8 without stand (mm) 954 × 568 × 69 (inches) 37 5/8 × 22 3/8 × 2 3/4 wall-mount hole 283 725 × 465 × 197 28 5/8 × 18 3/8 × 7 7/8 725 × 438 × 69 28 5/8 × 17 1/4 × 2... 3/4 pattern (mm) wall-mount screw M6 (length: see diagram on page 22.) size (mm) Mass* with stand (kg)/(lb.) 11 / 24.3 7.8 / 17.2 without stand 9.9 / ...

Operating Instructions
Page 44
...injury through fire, electric shock, the product toppling over or under an air-conditioner. • Be sure to install the Wall-Mount Bracket securely to the wall following the instructions in the AC adapter, disconnect it from the AC power outlet immediately. • The set is not ...with liquids, such as vases, on the apparatus. To Sony Dealers and Contractors: The following precautions for Sony dealers and contractors only. Do not install this equipment in this product. • Do not install the Wall-Mount Bracket on wall surfaces where the corners or the sides of the WallMount...
...injury through fire, electric shock, the product toppling over or under an air-conditioner. • Be sure to install the Wall-Mount Bracket securely to the wall following the instructions in the AC adapter, disconnect it from the AC power outlet immediately. • The set is not ...with liquids, such as vases, on the apparatus. To Sony Dealers and Contractors: The following precautions for Sony dealers and contractors only. Do not install this equipment in this product. • Do not install the Wall-Mount Bracket on wall surfaces where the corners or the sides of the WallMount...

Operating Instructions
Page 45
Precautions WALL-MOUNT BRACKET • If you use the TV installed on the Wall-Mount Bracket for a long time, the wall behind or above the TV may become discoloured or the wallpaper may come unstuck, depending on the material of the wall. • If the Wall-Mount Bracket is removed after installing it on the wall, the screw holes are left. • Do not use the Wall-Mount Bracket in a place where it is subjected to mechanical vibrations. 45 Additional Information
Precautions WALL-MOUNT BRACKET • If you use the TV installed on the Wall-Mount Bracket for a long time, the wall behind or above the TV may become discoloured or the wallpaper may come unstuck, depending on the material of the wall. • If the Wall-Mount Bracket is removed after installing it on the wall, the screw holes are left. • Do not use the Wall-Mount Bracket in a place where it is subjected to mechanical vibrations. 45 Additional Information

