
Operating Instructions
Page 2
... digital cable television programming in accordance with the following Sony TVs only with the instructions, may be using the TV for several days, disconnect the power by turning the equipment ...please wait a few hours to let the moisture evaporate before operating it . "BRAVIA" and , S-Force, BRAVIA Theatre Sync, and DMex are trademarks or registered marks of a reflective material.... temperatures below . Refer to the presence of Conformity Trade Name: SONY Model: KDL-40VL130/KDL-46VL130 Responsible Party: Sony Electronics Inc. WARNING To reduce the risk of the TV. This...
... digital cable television programming in accordance with the following Sony TVs only with the instructions, may be using the TV for several days, disconnect the power by turning the equipment ...please wait a few hours to let the moisture evaporate before operating it . "BRAVIA" and , S-Force, BRAVIA Theatre Sync, and DMex are trademarks or registered marks of a reflective material.... temperatures below . Refer to the presence of Conformity Trade Name: SONY Model: KDL-40VL130/KDL-46VL130 Responsible Party: Sony Electronics Inc. WARNING To reduce the risk of the TV. This...
Operating Instructions
Page 5
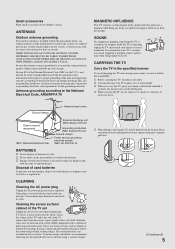
..., dispose of mild soap and warm water. If the plug is grounded so as to make occasional snapping or popping sounds, particularly when being turned on or off. Be sure the antenna system is covered with a solution of used batteries according to follow these guidelines: s Before carrying the... cleaning. SOUND If a snapping or popping sound from the screen, wipe it regularly. It is installed, follow the instruction provided on the LCD panel. Stubborn stains may be located in the specified manner To avoid dropping the TV and causing serious injury, be sure to your hand ...
..., dispose of mild soap and warm water. If the plug is grounded so as to make occasional snapping or popping sounds, particularly when being turned on or off. Be sure the antenna system is covered with a solution of used batteries according to follow these guidelines: s Before carrying the... cleaning. SOUND If a snapping or popping sound from the screen, wipe it regularly. It is installed, follow the instruction provided on the LCD panel. Stubborn stains may be located in the specified manner To avoid dropping the TV and causing serious injury, be sure to your hand ...
Operating Instructions
Page 6
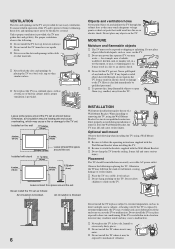
... to malfunction. for example, near a bathtub, washbowl, kitchen sink, or laundry tub, in the TV are provided for necessary ventilation. s Do not install the TV turned over or upside down or sideways. s Do not use of any objects on the TV. Optional wall mount Observe the following when installing the TV...
... to malfunction. for example, near a bathtub, washbowl, kitchen sink, or laundry tub, in the TV are provided for necessary ventilation. s Do not install the TV turned over or upside down or sideways. s Do not use of any objects on the TV. Optional wall mount Observe the following when installing the TV...
Operating Instructions
Page 7
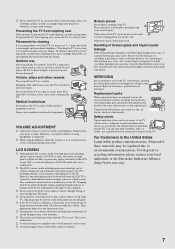
...leakage may occur, or scattered broken glass may result. VOLUME ADJUSTMENT s Adjust the volume so as hearing damage may result. LCD SCREEN s Although the LCD screen is made with water and consult your neighbors. However, uneven brightness may be damaged. Changing the Picture mode, Backlight ...setting, enabling the Light Sensor, or turning on top of performance and picture quality, this TV in a vehicle. Otherwise electric shock may damage the LCD panel. Also, do not let glass fragments or leaked crystalline liquid get warm when...
...leakage may occur, or scattered broken glass may result. VOLUME ADJUSTMENT s Adjust the volume so as hearing damage may result. LCD SCREEN s Although the LCD screen is made with water and consult your neighbors. However, uneven brightness may be damaged. Changing the Picture mode, Backlight ...setting, enabling the Light Sensor, or turning on top of performance and picture quality, this TV in a vehicle. Otherwise electric shock may damage the LCD panel. Also, do not let glass fragments or leaked crystalline liquid get warm when...

Operating Instructions
Page 18
...cannot be selected from either sides depending on the A/V receiver when the TV is equipped with BRAVIA Theatre Sync. The HDMI Control function enables BRAVIA Theatre Sync to turn off the TV. • When the connected equipment is supported. Bundling the Connecting Cables You...following additional operations are available: • Turn off the equipment automatically when you turn the HDMI Control On. For other Sony HDMI Control equipment must be setup. Using HDMI Control for connection. When a Sony A/V receiver with BRAVIA Theatre Sync is connected, the following operations...
...cannot be selected from either sides depending on the A/V receiver when the TV is equipped with BRAVIA Theatre Sync. The HDMI Control function enables BRAVIA Theatre Sync to turn off the TV. • When the connected equipment is supported. Bundling the Connecting Cables You...following additional operations are available: • Turn off the equipment automatically when you turn the HDMI Control On. For other Sony HDMI Control equipment must be setup. Using HDMI Control for connection. When a Sony A/V receiver with BRAVIA Theatre Sync is connected, the following operations...

Operating Instructions
Page 19
... with the connected signal source or select Skip to resume Auto Program. Initial Setup Step 1 of available analog and digital channels if you turn off the TV during the Initial Setup process, the Initial Setup will apply to on screen display as well as described on the remote ...control, highlight "Yes" to cancel or "No" to skip the Auto Program if you accidentally turn on -screen settings. Use the remote control to navigate through the Initial Setup: V/v button: Allows you to move back to the next screen. button...
... with the connected signal source or select Skip to resume Auto Program. Initial Setup Step 1 of available analog and digital channels if you turn off the TV during the Initial Setup process, the Initial Setup will apply to on screen display as well as described on the remote ...control, highlight "Yes" to cancel or "No" to skip the Auto Program if you accidentally turn on -screen settings. Use the remote control to navigate through the Initial Setup: V/v button: Allows you to move back to the next screen. button...
Operating Instructions
Page 20
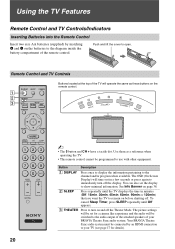
...programmed to the channel and/or program when available. See Info Banner on page 38. 2 SLEEP Press repeatedly until Off appears. 3 THEATER Press to turn off the display. Use them as these buttons on and off . The OSD (On Screen Display) will operate the same as a reference when ...Remote Control and TV Controls/Indicators Inserting Batteries into the Remote Control Insert two size AA batteries (supplied) by an HDMI connection to your BRAVIA Theatre Sync audio system. The picture settings will be set the display to show minimal information. Push and lift the cover to the ...
...programmed to the channel and/or program when available. See Info Banner on page 38. 2 SLEEP Press repeatedly until Off appears. 3 THEATER Press to turn off the display. Use them as these buttons on and off . The OSD (On Screen Display) will operate the same as a reference when ...Remote Control and TV Controls/Indicators Inserting Batteries into the Remote Control Insert two size AA batteries (supplied) by an HDMI connection to your BRAVIA Theatre Sync audio system. The picture settings will be set the display to show minimal information. Push and lift the cover to the ...

Operating Instructions
Page 22
... adjust the volume. Changing the Wide Screen Mode (For PC timing, see page 31). qs MUTING qd POWER qf WIDE qd qf Description Press to turn on and off the TV. Button qa VOL +/- Press again or press VOL + to step through the Wide Mode settings: Wide Zoom, Normal, Full, Zoom...
... adjust the volume. Changing the Wide Screen Mode (For PC timing, see page 31). qs MUTING qd POWER qf WIDE qd qf Description Press to turn on and off the TV. Button qa VOL +/- Press again or press VOL + to step through the Wide Mode settings: Wide Zoom, Normal, Full, Zoom...

Operating Instructions
Page 23
...; Inputs can also be changed by pressing V/v and while the list of digital rating will appear if Digital Rating is displayed. ql CC Press to turn on setting up the External Inputs labels, qh including the Skip feature. w; Press to scan through channels, press and hold down either +/-. 23 qg •...
...; Inputs can also be changed by pressing V/v and while the list of digital rating will appear if Digital Rating is displayed. ql CC Press to turn on setting up the External Inputs labels, qh including the Skip feature. w; Press to scan through channels, press and hold down either +/-. 23 qg •...
Operating Instructions
Page 24
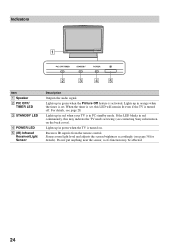
... the Picture Off feature is in green when the TV is set , this may be affected. 24 Lights up in orange when the timer is turned on the back cover). Lights up in red continuously, this LED will remain lit even if the TV is set . Receives IR signals from the... Description Outputs the audio signal. For details, see page 38 for details). When the timer is turned off. Do not put anything near the sensor, as its function may indicate the TV needs servicing (see contacting Sony information on . Lights up in PC standby mode. If the LED blinks in red when...
... the Picture Off feature is in green when the TV is set , this may be affected. 24 Lights up in orange when the timer is turned on the back cover). Lights up in red continuously, this LED will remain lit even if the TV is set . Receives IR signals from the... Description Outputs the audio signal. For details, see page 38 for details). When the timer is turned off. Do not put anything near the sensor, as its function may indicate the TV needs servicing (see contacting Sony information on . Lights up in PC standby mode. If the LED blinks in red when...
Operating Instructions
Page 28
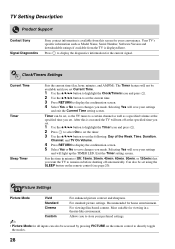
... current signal. Your TV's specific information such as a specified volume at the specified time you to save changes you made . Selecting Yes will turn off automatically. Custom Allows you set. 1 Use the V/v/B/b button to highlight the Timer icon and press . 2 Press to select On to set...to set . Most suitable for your settings and exit the Current Time setting screen. TV Setting Description Product Support Contact Sony Signal Diagnostics Sony contact information is displayed here. Timer can also be set, so the TV tunes to display the diagnostics information for home ...
... current signal. Your TV's specific information such as a specified volume at the specified time you to save changes you made . Selecting Yes will turn off automatically. Custom Allows you set. 1 Use the V/v/B/b button to highlight the Timer icon and press . 2 Press to select On to set...to set . Most suitable for your settings and exit the Current Time setting screen. TV Setting Description Product Support Contact Sony Signal Diagnostics Sony contact information is displayed here. Timer can also be set, so the TV tunes to display the diagnostics information for home ...

Operating Instructions
Page 29
... Reality axis, the picture becomes more detailed. As you move the z to adjust the position of connected equipment, and the VHF/UHF/CABLE input. Off Turns off DRC Mode. ~ • DRC Mode is available only with 4 x density, for high quality sources (i.e., DVD player, satellite receiver). The DRC Palette appears. Increases or...
... Reality axis, the picture becomes more detailed. As you move the z to adjust the position of connected equipment, and the VHF/UHF/CABLE input. Off Turns off DRC Mode. ~ • DRC Mode is available only with 4 x density, for high quality sources (i.e., DVD player, satellite receiver). The DRC Palette appears. Increases or...
Operating Instructions
Page 30
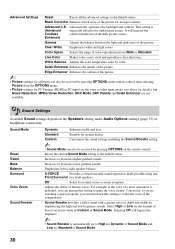
...Increases or decreases higher-pitched sounds. Increases or decreases lower-pitched sounds. Conversely, if you are watching a sports program, you can turn down this setting to soften the voice of Sound Mode. 30 Sound Settings Available Sound settings depend on the remote control, then selecting ...voice of a news announcer is automatically set to High for Dynamic of Sound Mode and Low for the amount of boost you can turn up this setting to make the voice clearer. Custom Customizes the sound settings including the Sound Booster setting. ~ • Sound Mode ...
...Increases or decreases higher-pitched sounds. Increases or decreases lower-pitched sounds. Conversely, if you are watching a sports program, you can turn down this setting to soften the voice of Sound Mode. 30 Sound Settings Available Sound settings depend on the remote control, then selecting ...voice of a news announcer is automatically set to High for Dynamic of Sound Mode and Low for the amount of boost you can turn up this setting to make the voice clearer. Custom Customizes the sound settings including the Sound Booster setting. ~ • Sound Mode ...
Operating Instructions
Page 31
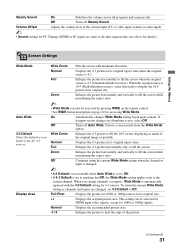
... or input is changed , set to anything but Off, the Wide Mode setting applies only to display the 16:9 picture in its original size. Off Turns off Steady Sound. Volume Offset Adjusts the volume level of the current input (TV or video input) relative to Off. • If 4:3 Default is 4:3 (Standard... Enlarges the picture horizontally and vertically to fill the screen while maintaining the aspect ratio. When the original source is 4:3. When you , select Off. Off Turns off Auto Wide.
... or input is changed , set to anything but Off, the Wide Mode setting applies only to display the 16:9 picture in its original size. Off Turns off Steady Sound. Volume Offset Adjusts the volume level of the current input (TV or video input) relative to Off. • If 4:3 Default is 4:3 (Standard... Enlarges the picture horizontally and vertically to fill the screen while maintaining the aspect ratio. When the original source is 4:3. When you , select Off. Off Turns off Auto Wide.
Operating Instructions
Page 34
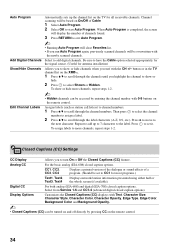
...2 Press V/v to scroll through the label characters (A-Z, 0-9, etc.). To assign labels to more channels, repeat steps 1-2. ~ • Hidden channels can be turned on and off directly by entering the channel number with the CH +/- Channel scanning will clear Favorites list. • If you highlight the channel to... on the remote control. 34 Press to set to CC1 for antenna installation) Allows you to show or hide channels when you to turn On or Off the Closed Captions (CC) feature. Display Options Customizes the Closed Captions (CC) displays with the newly scanned channels. ...
...2 Press V/v to scroll through the label characters (A-Z, 0-9, etc.). To assign labels to more channels, repeat steps 1-2. ~ • Hidden channels can be turned on and off directly by entering the channel number with the CH +/- Channel scanning will clear Favorites list. • If you highlight the channel to... on the remote control. 34 Press to set to CC1 for antenna installation) Allows you to show or hide channels when you to turn On or Off the Closed Captions (CC) feature. Display Options Customizes the Closed Captions (CC) displays with the newly scanned channels. ...
Operating Instructions
Page 35
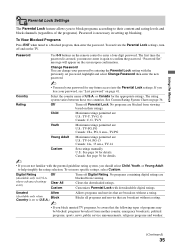
... from viewing based on the remote control to a blocked program, then enter the password. where advanced ratings exist) Off Clear All Custom Turns off Parental Lock. Change Password You can change your password for details. ~ • If you are broadcast without a rating. To ...reactivate the Parental Lock settings, turn off and on page 41. U.S.: See page 36 for the appropriate ratings. To set password, highlight and select Change Password then enter the ...
... from viewing based on the remote control to a blocked program, then enter the password. where advanced ratings exist) Off Clear All Custom Turns off Parental Lock. Change Password You can change your password for details. ~ • If you are broadcast without a rating. To ...reactivate the Parental Lock settings, turn off and on page 41. U.S.: See page 36 for the appropriate ratings. To set password, highlight and select Change Password then enter the ...
Operating Instructions
Page 37
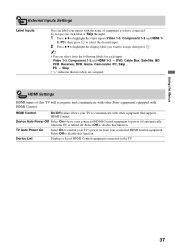
... (Video 1-3, Component 1-2 and HDMI 1- 2, PC), then press to select the desired input. 2 Press V/v to communicate with other Sony equipment equipped with HDMI Control. Select Off to power off automatically when the TV is turned off. TV Auto Power On Select On to control your connected HDMI Control equipment to disable this function.
... (Video 1-3, Component 1-2 and HDMI 1- 2, PC), then press to select the desired input. 2 Press V/v to communicate with other Sony equipment equipped with HDMI Control. Select Off to power off automatically when the TV is turned off. TV Auto Power On Select On to control your connected HDMI Control equipment to disable this function.

Operating Instructions
Page 38
... completely disable the banner display. Info Banner also appears on -screen settings. On Automatically enters to standby mode when there is not VESA-compliant. Off Turns off PC Power Management. ~ • To bring the TV out of standby mode and recover TV features, press POWER on the screen. Settings such as...
... completely disable the banner display. Info Banner also appears on -screen settings. On Automatically enters to standby mode when there is not VESA-compliant. Off Turns off PC Power Management. ~ • To bring the TV out of standby mode and recover TV features, press POWER on the screen. Settings such as...
Operating Instructions
Page 39
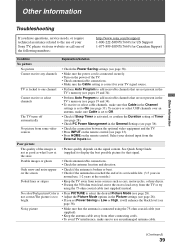
...to On (see page 33). The TV turns off automatically • Check if Sleep Timer is activated, or confirm the Duration setting of the following numbers: http://www.sony.com/tvsupport 1-800-222-SONY(7669) for US Support 1-877-899-SONY(7669) for Canadian Support Condition Explanation/Solution No...has reached the end of the TV. • Check antenna/cable connections. • Make sure the Cable setting is connected securely. • Turn on the signal content. not correct/The picture is • Press PICTURE to use , 1-2 years at the store • Picture quality depends...
...to On (see page 33). The TV turns off automatically • Check if Sleep Timer is activated, or confirm the Duration setting of the following numbers: http://www.sony.com/tvsupport 1-800-222-SONY(7669) for US Support 1-877-899-SONY(7669) for Canadian Support Condition Explanation/Solution No...has reached the end of the TV. • Check antenna/cable connections. • Make sure the Cable setting is connected securely. • Turn on the signal content. not correct/The picture is • Press PICTURE to use , 1-2 years at the store • Picture quality depends...

Operating Instructions
Page 40
...the picture may cause your TV's screen to display less loss of detail, especially during the commercials, this is activated (see page 32). 40 To turn off . For more visible and are flashing lines around the edges of the screen • Change the Display Area setting to ON (see...antenna cable. Condition Explanation/Solution The picture does not fill the entire screen or there are dependent on the clarity and resolution of the television. Certain programs on the remote control, set to other connecting cords. • To avoid TV interference, make sure to the method ...
...the picture may cause your TV's screen to display less loss of detail, especially during the commercials, this is activated (see page 32). 40 To turn off . For more visible and are flashing lines around the edges of the screen • Change the Display Area setting to ON (see...antenna cable. Condition Explanation/Solution The picture does not fill the entire screen or there are dependent on the clarity and resolution of the television. Certain programs on the remote control, set to other connecting cords. • To avoid TV interference, make sure to the method ...


