
Child Safety: It Makes A Difference Where Your TV Stands
Page 1
...remotes that may pique the children's curiosity. 6 Remember that children can become excited while watching a program and can potentially push or pull a TV over and may cause unnecessary injury. The industry is a Sector of the Electronic Industries Alliance Thank you have a television in fact, have ...more than one television. As a result, TV sets may fall over . 7 Share our safety message on this hidden hazard of the home with furniture and television sets. 5 Avoid placing any...
...remotes that may pique the children's curiosity. 6 Remember that children can become excited while watching a program and can potentially push or pull a TV over and may cause unnecessary injury. The industry is a Sector of the Electronic Industries Alliance Thank you have a television in fact, have ...more than one television. As a result, TV sets may fall over . 7 Share our safety message on this hidden hazard of the home with furniture and television sets. 5 Avoid placing any...
Operating Instructions
Page 1
4-000-704-11(2) LCD Digital Color TV Operating Instructions KDL-40SL140 KDL-46SL140 © 2008 Sony Corporation
4-000-704-11(2) LCD Digital Color TV Operating Instructions KDL-40SL140 KDL-46SL140 © 2008 Sony Corporation
Operating Instructions
Page 2
...TV-stand. Sony TV Model No. Be sure to subcontract the installation to Sony dealer or licensed contractors and pay adequate attention to direct illumination or direct sunlight. "Dolby" and the double-D symbol are trademarks of Conformity Trade Name: SONY Model: KDL-40SL140/KDL-46SL140 Responsible Party: Sony...to use this product contains mercury. Installing s The TV should be using the TV for disconnection. s To obtain the best picture, do not expose the screen to safety during the installation. "BRAVIA" and , BRAVIA Theatre Sync and are trademarks or registered marks of...
...TV-stand. Sony TV Model No. Be sure to subcontract the installation to Sony dealer or licensed contractors and pay adequate attention to direct illumination or direct sunlight. "Dolby" and the double-D symbol are trademarks of Conformity Trade Name: SONY Model: KDL-40SL140/KDL-46SL140 Responsible Party: Sony...to use this product contains mercury. Installing s The TV should be using the TV for disconnection. s To obtain the best picture, do not expose the screen to safety during the installation. "BRAVIA" and , BRAVIA Theatre Sync and are trademarks or registered marks of...
Operating Instructions
Page 3
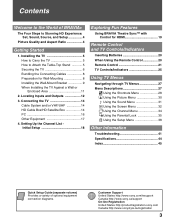
... 12 3. Setting Up the Channel List Initial Setup 18 Exploring Fun Features Using BRAVIA Theatre Sync™ with Control for Wall-Mounting 8 Installing the Wall-Mount Bracket 9 When Installing the TV Against a Wall or Enclosed Area 11 2. Contents Welcome to the World of ... States http://www.sony.com/tvsupport Canada http://www.sony.ca/support On-line Registration United States http://productregistration.sony.com Canada http://www.sonystyle.ca/registration 3 Installing the TV 5 How to Carry the TV 5 How to Attach the Table-Top Stand 5 Securing the TV 6 Bundling the Connecting...
... 12 3. Setting Up the Channel List Initial Setup 18 Exploring Fun Features Using BRAVIA Theatre Sync™ with Control for Wall-Mounting 8 Installing the Wall-Mount Bracket 9 When Installing the TV Against a Wall or Enclosed Area 11 2. Contents Welcome to the World of ... States http://www.sony.com/tvsupport Canada http://www.sony.ca/support On-line Registration United States http://productregistration.sony.com Canada http://www.sonystyle.ca/registration 3 Installing the TV 5 How to Carry the TV 5 How to Attach the Table-Top Stand 5 Securing the TV 6 Bundling the Connecting...

Operating Instructions
Page 4
...8226; HD satellite subscription • Blu-ray Disc™ player or other optional equipment. To experience the stunning detail of your BRAVIA TV is displayed on an HDTV, you will notice a big difference. The Quick Setup Guide, enclosed separately, illustrates how to connect other... external equipment Contact your cable or satellite provider for purchasing this Sony BRAVIA® high-definition television. When you compare a high-definition signal to a standard analog signal, you will see page 14). The...
...8226; HD satellite subscription • Blu-ray Disc™ player or other optional equipment. To experience the stunning detail of your BRAVIA TV is displayed on an HDTV, you will notice a big difference. The Quick Setup Guide, enclosed separately, illustrates how to connect other... external equipment Contact your cable or satellite provider for purchasing this Sony BRAVIA® high-definition television. When you compare a high-definition signal to a standard analog signal, you will see page 14). The...

Operating Instructions
Page 5
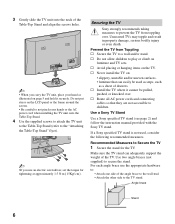
...the connection and setup. 1 Take out the Table-Top Stand from the cushion and the four screws from children. Installing the TV How to Carry the TV Be sure to follow these guidelines to Attach the Table-Top Stand The Table-Top Stand for this product is packaged separately. ...~ • You will find the Table-Top Stand next to shocks or vibration, or excessive force. Do not put stress on the LCD panel. • When carrying the TV, do not subject it securely. Getting Started Getting Started 1. How to protect your properties and avoid causing serious injury. • Before ...
...the connection and setup. 1 Take out the Table-Top Stand from the cushion and the four screws from children. Installing the TV How to Carry the TV Be sure to follow these guidelines to Attach the Table-Top Stand The Table-Top Stand for this product is packaged separately. ...~ • You will find the Table-Top Stand next to shocks or vibration, or excessive force. Do not put stress on the LCD panel. • When carrying the TV, do not subject it securely. Getting Started Getting Started 1. How to protect your properties and avoid causing serious injury. • Before ...
Operating Instructions
Page 6
... can adequately support the weight of the angle brace to the wall stud. • Attach the other side to play or climb on the TV. If a Sony specified TV stand is not used as steps, such as a chest of the Table-Top Stand and align the screws holes. ~ • When you carry the... TV unit, place your hand as illustrated on the LCD panel or the frame around the screen. • Be careful to not pinch your hands or the...
... can adequately support the weight of the angle brace to the wall stud. • Attach the other side to play or climb on the TV. If a Sony specified TV stand is not used as steps, such as a chest of the Table-Top Stand and align the screws holes. ~ • When you carry the... TV unit, place your hand as illustrated on the LCD panel or the frame around the screen. • Be careful to not pinch your hands or the...
Operating Instructions
Page 7
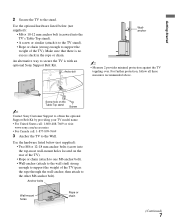
...top-most wall-mount holes located on the Table-Top stand Screw ~ Contact Sony Customer Support to obtain the optional Support Belt Kit by providing your TV model name. • For United States call: 1-800-488-7669 or visit: www.sony.com/accessories • For Canada call: 1-877-899-7669 3 Anchor ...the TV to support the weight of the TV). Getting Started 2 Secure the TV to secure the TV is no excess slack in the rope or chain. Screw hole on the rear...
...top-most wall-mount holes located on the Table-Top stand Screw ~ Contact Sony Customer Support to obtain the optional Support Belt Kit by providing your TV model name. • For United States call: 1-800-488-7669 or visit: www.sony.com/accessories • For Canada call: 1-877-899-7669 3 Anchor ...the TV to support the weight of the TV). Getting Started 2 Secure the TV to secure the TV is no excess slack in the rope or chain. Screw hole on the rear...
Operating Instructions
Page 8
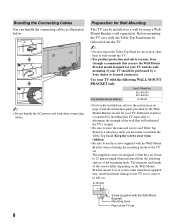
...sure to 12 mm in length when measured from the attaching surface of the mounting hook. Before mounting the TV on a wall, the Table-Top Stand must be performed by a Sony dealer or licensed contractor. SU-WL500 • For bracket installation, refer to fall, etc. 8-12 ... the TV set or cause it to the instructions on the Wall-Mount Bracket model. Preparation for installing this TV, especially to determine the strength of the screws differ depending on page 9 and the instruction guide provided by using a WallMount Bracket (sold separately). KDL-40SL140 KDL-46SL140 Sony Wall-...
...sure to 12 mm in length when measured from the attaching surface of the mounting hook. Before mounting the TV on a wall, the Table-Top Stand must be performed by a Sony dealer or licensed contractor. SU-WL500 • For bracket installation, refer to fall, etc. 8-12 ... the TV set or cause it to the instructions on the Wall-Mount Bracket model. Preparation for installing this TV, especially to determine the strength of the screws differ depending on page 9 and the instruction guide provided by using a WallMount Bracket (sold separately). KDL-40SL140 KDL-46SL140 Sony Wall-...
Operating Instructions
Page 9
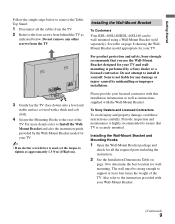
...KDL-40SL140/KDL-46SL140 can be strong enough to support at approximately 1.5 N·m {15Kgf·cm}. Do not attempt to ensure that you use the Wall-Mount Bracket designed for your licensed contractor with this installation information as well as indicated below. Sony is not liable for any other screws from behind the TV... to the rear of the TV. See table on page 10 to determine the best location for your TV. For product protection and safety, Sony strongly recommends that TV is performed by a Sony dealer or a licensed contractor. To Sony Dealers and Licensed Contractors To ...
...KDL-40SL140/KDL-46SL140 can be strong enough to support at approximately 1.5 N·m {15Kgf·cm}. Do not attempt to ensure that you use the Wall-Mount Bracket designed for your licensed contractor with this installation information as well as indicated below. Sony is not liable for any other screws from behind the TV... to the rear of the TV. See table on page 10 to determine the best location for your TV. For product protection and safety, Sony strongly recommends that TV is performed by a Sony dealer or a licensed contractor. To Sony Dealers and Licensed Contractors To ...
Operating Instructions
Page 10
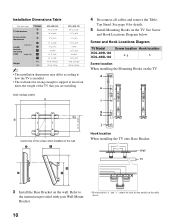
... Diagram below. Screw and Hook Locations Diagram TV Model Screw location Hook location KDL-40SL140 KDL-46SL140 d, g b Screw location When installing the Mounting Hooks on the wall. Wall TV 3 Install the Base Bracket on the TV. See page 8 for the models in ...the table above. 10 Installation Dimensions Table Unit: inches (mm) TV dimensions TV Model A B Screen center dimensions C D Angle (0°) Length E for each F mounting angle Angle (20°) G H TV Weight x4 KDL-40SL140 44 1/8 (1,119) 24 1/4 (615) 4 7/8 (122) 17 1/4 (438) 6 3/4 (171) 14...
... Diagram below. Screw and Hook Locations Diagram TV Model Screw location Hook location KDL-40SL140 KDL-46SL140 d, g b Screw location When installing the Mounting Hooks on the wall. Wall TV 3 Install the Base Bracket on the TV. See page 8 for the models in ...the table above. 10 Installation Dimensions Table Unit: inches (mm) TV dimensions TV Model A B Screen center dimensions C D Angle (0°) Length E for each F mounting angle Angle (20°) G H TV Weight x4 KDL-40SL140 44 1/8 (1,119) 24 1/4 (615) 4 7/8 (122) 17 1/4 (438) 6 3/4 (171) 14...

Operating Instructions
Page 11
... (6 cm) Leave at least this much space around the TV as follows: Air circulation is blocked. Getting Started When Installing the TV Against a Wall or Enclosed Area Make sure that your TV or cause fire. 11 Air circulation is blocked. Never install the TV set . Allow enough space around the set as shown below...
... (6 cm) Leave at least this much space around the TV as follows: Air circulation is blocked. Getting Started When Installing the TV Against a Wall or Enclosed Area Make sure that your TV or cause fire. 11 Air circulation is blocked. Never install the TV set . Allow enough space around the set as shown below...

Operating Instructions
Page 12
2. Locating Inputs and Outputs Rear of TV VIDEO IN 1 3 1 S VIDEO VIDEO L (MONO) AUDIO R COMPONENT IN PC IN 1 2 Y RGB P B IN DIGITAL 1 AUDIO OUT (OPTICAL) 3 P R L AUDIO R AUDIO (1080i/720p/480p/480i) 4 AUDIO OUT R AUDIO L L AUDIO R (VAR/FIX) 23 4 SERVICE ONLY 5 6 CABLE / ANTENNA 7 Side panel IN 4 2 VIDEO IN 2 VIDEO L (MONO) AUDIO R 1 12
2. Locating Inputs and Outputs Rear of TV VIDEO IN 1 3 1 S VIDEO VIDEO L (MONO) AUDIO R COMPONENT IN PC IN 1 2 Y RGB P B IN DIGITAL 1 AUDIO OUT (OPTICAL) 3 P R L AUDIO R AUDIO (1080i/720p/480p/480i) 4 AUDIO OUT R AUDIO L L AUDIO R (VAR/FIX) 23 4 SERVICE ONLY 5 6 CABLE / ANTENNA 7 Side panel IN 4 2 VIDEO IN 2 VIDEO L (MONO) AUDIO R 1 12
Operating Instructions
Page 13
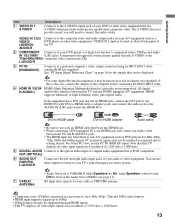
... to the AUDIO IN (L/R) jacks below the HDMI IN 4. See "PC Input Signal Reference Chart" on the left and right audio input jacks of the TV. 2 COMPONENT Connects to your DVD player's or digital set-top box's component video (YPBPR) and audio IN 1/2 (1080i/ (L/R) jacks. HDMI supports enhanced,... video equipment that bears the HDMI logo. • When connecting a DVI-equipped PC to an HDMI jack, also connect an Audio cable between this TV displays all video input signals in the Audio Out is FIXED (see page 31). Getting Started Item 1 VIDEO IN 1 S VIDEO Description Connects to ...
... to the AUDIO IN (L/R) jacks below the HDMI IN 4. See "PC Input Signal Reference Chart" on the left and right audio input jacks of the TV. 2 COMPONENT Connects to your DVD player's or digital set-top box's component video (YPBPR) and audio IN 1/2 (1080i/ (L/R) jacks. HDMI supports enhanced,... video equipment that bears the HDMI logo. • When connecting a DVI-equipped PC to an HDMI jack, also connect an Audio cable between this TV displays all video input signals in the Audio Out is FIXED (see page 31). Getting Started Item 1 VIDEO IN 1 S VIDEO Description Connects to ...
Operating Instructions
Page 14
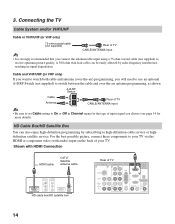
A 300-ohm twin lead cable can also enjoy high-definition programming by radio frequency interference, resulting in Channel menu for the type of TV VIDEO IN 1 3 S VIDEO VIDEO L (MONO) AUDIO R COMPONENT IN PC IN 1 2 Y RGB PB IN DIGITAL 1 AUDIO OUT (OPTICAL) 3 PR L AUDIO R AUDIO (1080i.../720p/480p/480i) 4 AUDIO OUT R AUDIO L L AUDIO R (VAR/FIX) 14 Shown with audio) input on the back of your TV via the HDMI or component video (with HDMI Connection HDMI cable CATV/ Satellite antenna cable HD cable box/HD satellite box Rear of input signal...
A 300-ohm twin lead cable can also enjoy high-definition programming by radio frequency interference, resulting in Channel menu for the type of TV VIDEO IN 1 3 S VIDEO VIDEO L (MONO) AUDIO R COMPONENT IN PC IN 1 2 Y RGB PB IN DIGITAL 1 AUDIO OUT (OPTICAL) 3 PR L AUDIO R AUDIO (1080i.../720p/480p/480i) 4 AUDIO OUT R AUDIO L L AUDIO R (VAR/FIX) 14 Shown with audio) input on the back of your TV via the HDMI or component video (with HDMI Connection HDMI cable CATV/ Satellite antenna cable HD cable box/HD satellite box Rear of input signal...

Operating Instructions
Page 15
Getting Started Shown with DVI Connection CATV/ Satellite antenna cable Rear of TV VIDEO IN 1 3 S VIDEO VIDEO L (MONO) AUDIO R COMPONENT IN PC IN 1 2 Y RGB PB IN DIGITAL 1 AUDIO OUT (OPTICAL) 3 DVI-to-HDMI cable HD cable box/HD ...) jack and connect the audio jack to any HDMI IN (with Component Connection CATV/ Satellite antenna cable HD cable box/HD satellite box Rear of TV VIDEO IN 1 3 S VIDEO VIDEO L (MONO) AUDIO R COMPONENT IN PC IN 1 2 Y RGB PB IN DIGITAL 1 AUDIO OUT (OPTICAL) 3 PR L AUDIO R AUDIO (1080i/720p/480p/480i) 4 AUDIO...
Getting Started Shown with DVI Connection CATV/ Satellite antenna cable Rear of TV VIDEO IN 1 3 S VIDEO VIDEO L (MONO) AUDIO R COMPONENT IN PC IN 1 2 Y RGB PB IN DIGITAL 1 AUDIO OUT (OPTICAL) 3 DVI-to-HDMI cable HD cable box/HD ...) jack and connect the audio jack to any HDMI IN (with Component Connection CATV/ Satellite antenna cable HD cable box/HD satellite box Rear of TV VIDEO IN 1 3 S VIDEO VIDEO L (MONO) AUDIO R COMPONENT IN PC IN 1 2 Y RGB PB IN DIGITAL 1 AUDIO OUT (OPTICAL) 3 PR L AUDIO R AUDIO (1080i/720p/480p/480i) 4 AUDIO...
Operating Instructions
Page 16
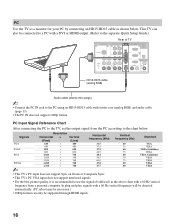
...connecting the PC to the PC using an HD15-HD15 cable with a 60 Hz vertical frequency from the PC according to the chart below . This TV can only be connected to a PC with a 60 Hz vertical frequency will be detected automatically. (PC reboot may be necessary.) • 1080p ... be supported through HDMI inputs. 16 In plug and play, signals with a DVI or HDMI output. (Refer to the separate Quick Setup Guide.) Rear of TV VIDEO IN 1 3 S VIDEO VIDEO L (MONO) AUDIO R COMPONENT IN PC IN 1 2 Y RGB PB IN DIGITAL 1 AUDIO OUT (OPTICAL) 3 PR L AUDIO R AUDIO (1080i/720p/480p/480i...
...connecting the PC to the PC using an HD15-HD15 cable with a 60 Hz vertical frequency from the PC according to the chart below . This TV can only be connected to a PC with a 60 Hz vertical frequency will be detected automatically. (PC reboot may be necessary.) • 1080p ... be supported through HDMI inputs. 16 In plug and play, signals with a DVI or HDMI output. (Refer to the separate Quick Setup Guide.) Rear of TV VIDEO IN 1 3 S VIDEO VIDEO L (MONO) AUDIO R COMPONENT IN PC IN 1 2 Y RGB PB IN DIGITAL 1 AUDIO OUT (OPTICAL) 3 PR L AUDIO R AUDIO (1080i/720p/480p/480i...

Operating Instructions
Page 17
... Started Other Equipment Personal computer Blu-ray Digital Disc Player/ DVD satellite Digital Audio "PS3" player receiver cable box system Side Panel IN 2 Rear of TV VIDEO IN 1 3 S VIDEO VIDEO L (MONO) AUDIO R COMPONENT IN PC IN 1 2 Y RGB PB IN DIGITAL 1 AUDIO OUT (OPTICAL) 3 PR L AUDIO R AUDIO (1080i/720p/480p/480i) 4 AUDIO... Digital recorder Analog audio Digital audio equipment equipment (A/V Receiver/ Home Theater) ~ • Refer to the Quick Setup Guide (supplied) when connecting other equipment to your TV.
... Started Other Equipment Personal computer Blu-ray Digital Disc Player/ DVD satellite Digital Audio "PS3" player receiver cable box system Side Panel IN 2 Rear of TV VIDEO IN 1 3 S VIDEO VIDEO L (MONO) AUDIO R COMPONENT IN PC IN 1 2 Y RGB PB IN DIGITAL 1 AUDIO OUT (OPTICAL) 3 PR L AUDIO R AUDIO (1080i/720p/480p/480i) 4 AUDIO... Digital recorder Analog audio Digital audio equipment equipment (A/V Receiver/ Home Theater) ~ • Refer to the Quick Setup Guide (supplied) when connecting other equipment to your TV.
Operating Instructions
Page 18
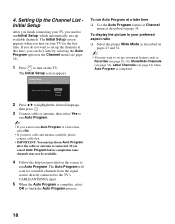
... menu as Favorites (see page 28, 34), Show/Hide Channels (see page 34), Label Channels (see page 34). 1 POWER Press to turn on your TV for available channels from the signal source directly connected to run Auto Program. If you can do not want to run Auto Program at a later... Program at a later time ❑ Use the Auto Program feature at this time, you do it later by selecting the Auto Program option in your TV, you have cable and antenna available, please connect cable first. • IMPORTANT: You must perform Auto Program after the cable or antenna is complete, ...
... menu as Favorites (see page 28, 34), Show/Hide Channels (see page 34), Label Channels (see page 34). 1 POWER Press to turn on your TV for available channels from the signal source directly connected to run Auto Program. If you can do not want to run Auto Program at a later... Program at a later time ❑ Use the Auto Program feature at this time, you do it later by selecting the Auto Program option in your TV, you have cable and antenna available, please connect cable first. • IMPORTANT: You must perform Auto Program after the cable or antenna is complete, ...
Operating Instructions
Page 19
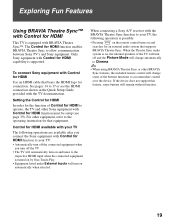
... will change some buttons will turn on automatically when selected. To connect Sony equipment with the BRAVIA Theatre Sync function to allow communication between Sony TV's and Sony equipment. Control for connection. Only Sony equipment with Control for HDMI capability is equipped with your TV The following operation is turned on and searches for an external audio...
... will change some buttons will turn on automatically when selected. To connect Sony equipment with the BRAVIA Theatre Sync function to allow communication between Sony TV's and Sony equipment. Control for connection. Only Sony equipment with Control for HDMI capability is equipped with your TV The following operation is turned on and searches for an external audio...


