Safety and Regulatory Booklet
Page 1
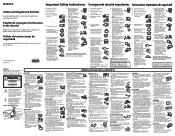
.... Clean the AC power plug Unplug the AC power plug and clean it may cause arcing and result in any way, such as audio and video) connected. ☐ Use only an original Sony AC power cord with a soft cloth. ☐ Stubborn stains may be observed when the LCD TV is in a cold place, the picture may be sure to unplug the power cord to operate. Consulte el...
.... Clean the AC power plug Unplug the AC power plug and clean it may cause arcing and result in any way, such as audio and video) connected. ☐ Use only an original Sony AC power cord with a soft cloth. ☐ Stubborn stains may be observed when the LCD TV is in a cold place, the picture may be sure to unplug the power cord to operate. Consulte el...
Operating Instructions
Page 3
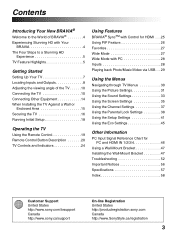
.../Music/Video via USB. . . 29 Using the Menus Navigating through TV Menus 30 Using the Picture Settings 31 Using the Sound Settings 33 Using the Screen Settings 35 Using the Channel Settings 37 Using the Parental Lock Settings 38 Using the Setup Settings 41 Using the Eco Settings 45 Other Information PC Input Signal Reference Chart for PC and HDMI IN 1/2/3/4 46 Using a Wall-Mount Bracket 47 Installing the Wall-Mount Bracket 47 Troubleshooting 52 Important Notices 56 Specifications 57 Index 58 Customer Support United States http://www.sony...
.../Music/Video via USB. . . 29 Using the Menus Navigating through TV Menus 30 Using the Picture Settings 31 Using the Sound Settings 33 Using the Screen Settings 35 Using the Channel Settings 37 Using the Parental Lock Settings 38 Using the Setup Settings 41 Using the Eco Settings 45 Other Information PC Input Signal Reference Chart for PC and HDMI IN 1/2/3/4 46 Using a Wall-Mount Bracket 47 Installing the Wall-Mount Bracket 47 Troubleshooting 52 Important Notices 56 Specifications 57 Index 58 Customer Support United States http://www.sony...
Operating Instructions
Page 4
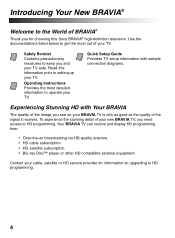
... information to operate your cable, satellite or HD service provider for choosing this information prior to setting up your TV. Read this Sony BRAVIA® high-definition television. Operating Instructions Provides the most out of your TV. Introducing Your New BRAVIA® Welcome to the World of BRAVIA® Thank you see on upgrading to HD programming. Quick Setup Guide Provides TV setup information with sample connection diagrams. Experiencing...
... information to operate your cable, satellite or HD service provider for choosing this information prior to setting up your TV. Read this Sony BRAVIA® high-definition television. Operating Instructions Provides the most out of your TV. Introducing Your New BRAVIA® Welcome to the World of BRAVIA® Thank you see on upgrading to HD programming. Quick Setup Guide Provides TV setup information with sample connection diagrams. Experiencing...
Operating Instructions
Page 5
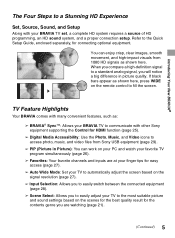
... Experience Set, Source, Sound, and Setup Along with other Sony equipment supporting the Control for HDMI function (page 25). ➢ Digital Media Accessibility: Use the Photo, Music, and Video icons to access photo, music, and video files from 1080 HD signals as shown here, press WIDE on the remote control to the Quick Setup Guide, enclosed separately, for connecting optional equipment. You can work on your PC and watch your favorite TV program simultaneously...
... Experience Set, Source, Sound, and Setup Along with other Sony equipment supporting the Control for HDMI function (page 25). ➢ Digital Media Accessibility: Use the Photo, Music, and Video icons to access photo, music, and video files from 1080 HD signals as shown here, press WIDE on the remote control to the Quick Setup Guide, enclosed separately, for connecting optional equipment. You can work on your PC and watch your favorite TV program simultaneously...
Operating Instructions
Page 8
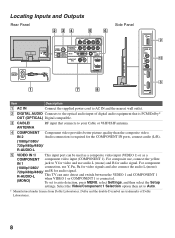
... PC/HDMI 1 AUDIO IN 1 4 IN Side Panel 1 7 8 9 VIDEO IN 2 VIDEO L (MONO) AUDIO R 2 3 IN 0 8 Item Description 1 AC IN Connect the supplied power cord to AC IN and the nearest wall outlet. 2 DIGITAL AUDIO Connects to the optical audio input of Dolby Laboratories. 8 IN 2 Audio connection is required for the COMPONENT IN ports, connect audio (L/R). (1080p/1080i/ 720p/480p/480i)/ R-AUDIO-L 5 VIDEO IN 1/ This input port can auto detect and switch between the VIDEO 1 and COMPONENT 1 when VIDEO 1 or COMPONENT 1 is PCM/Dolby* OUT (OPTICAL) Digital compatible. 3 CABLE/ ANTENNA...
... PC/HDMI 1 AUDIO IN 1 4 IN Side Panel 1 7 8 9 VIDEO IN 2 VIDEO L (MONO) AUDIO R 2 3 IN 0 8 Item Description 1 AC IN Connect the supplied power cord to AC IN and the nearest wall outlet. 2 DIGITAL AUDIO Connects to the optical audio input of Dolby Laboratories. 8 IN 2 Audio connection is required for the COMPONENT IN ports, connect audio (L/R). (1080p/1080i/ 720p/480p/480i)/ R-AUDIO-L 5 VIDEO IN 1/ This input port can auto detect and switch between the VIDEO 1 and COMPONENT 1 when VIDEO 1 or COMPONENT 1 is PCM/Dolby* OUT (OPTICAL) Digital compatible. 3 CABLE/ ANTENNA...
Operating Instructions
Page 9
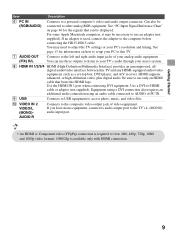
... audio/video equipment, such as a set-top box, DVD player, and A/V receiver. See page 13 for the signals that can use these outputs to listen to use an adapter (not supplied). Use the HDMI IN 1 port when connecting DVI equipment. Use a DVI-to the composite video output jack of PC IN. 9 USB Connects to USB equipment to access photo, music, and video files. 0 VIDEO IN 2 VIDEO/L (MONO)AUDIO-R Connects to -HDMI cable or adapter (not supplied). Equipment using a DVI connection also requires an additional audio connection using an audio cable connected...
... audio/video equipment, such as a set-top box, DVD player, and A/V receiver. See page 13 for the signals that can use these outputs to listen to use an adapter (not supplied). Use the HDMI IN 1 port when connecting DVI equipment. Use a DVI-to the composite video output jack of PC IN. 9 USB Connects to USB equipment to access photo, music, and video files. 0 VIDEO IN 2 VIDEO/L (MONO)AUDIO-R Connects to -HDMI cable or adapter (not supplied). Equipment using a DVI connection also requires an additional audio connection using an audio cable connected...
Operating Instructions
Page 24
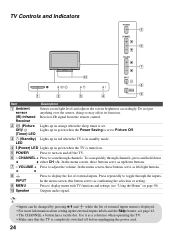
... Picture Off. (Timer) LED 3 1 (Standby) Lights up in orange when the sleep timer is completely switched off the TV. 6 - Use it as left/right buttons. 8 INPUT 9 MENU 0 Speaker Press to display the list of external inputs menu is in standby mode. Receives IR signal from the remote control. 2 (Picture Lights up in red when the TV is displayed. • For more information about setting up /down either CH -/+. CHANNEL + Press to turn on and off before unplugging the power cord. 24 LED 4 " (Power) LED Lights up in green...
... Picture Off. (Timer) LED 3 1 (Standby) Lights up in orange when the sleep timer is completely switched off the TV. 6 - Use it as left/right buttons. 8 INPUT 9 MENU 0 Speaker Press to display the list of external inputs menu is in standby mode. Receives IR signal from the remote control. 2 (Picture Lights up in red when the TV is displayed. • For more information about setting up /down either CH -/+. CHANNEL + Press to turn on and off before unplugging the power cord. 24 LED 4 " (Power) LED Lights up in green...
Operating Instructions
Page 25
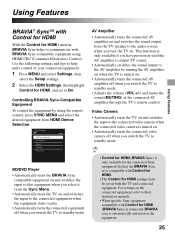
... standby mode. • Adjusts the volume (VOL +/-) and mutes the sound (MUTING) of your connected equipment. 1 Press MENU and select Settings, then select the Setup settings. 2 Select the HDMI Settings, then highlight Control for HDMI function, BRAVIA Sync helps to standby mode. Video Camera • Automatically turns the TV on and switches the input to On. For settings on the connected equipment, refer to their instruction manuals. • When specific Sony equipment compatible with Control for HDMI settings must be set to the connected video...
... standby mode. • Adjusts the volume (VOL +/-) and mutes the sound (MUTING) of your connected equipment. 1 Press MENU and select Settings, then select the Setup settings. 2 Select the HDMI Settings, then highlight Control for HDMI function, BRAVIA Sync helps to standby mode. Video Camera • Automatically turns the TV on and switches the input to On. For settings on the connected equipment, refer to their instruction manuals. • When specific Sony equipment compatible with Control for HDMI settings must be set to the connected video...

Operating Instructions
Page 26
.... Using PIP Feature PIP (picture in picture) displays a picture from a connected PC in full screen, and a TV program or other external input (see below "To Enter PIP" table) in the PC mode. 2 Select PIP from PIP 1 Press TOOLS. 2 Press V/v to highlight Exit PIP and press to exit to be moved by pressing V/v/B/b.) To Enter PIP PIP Supported Inputs In main window In sub window PC TV channel (CABLE/ANTENNA), VIDEO IN 1/2, HDMI IN 1/2/3/4 (video timing) HDMI IN 1/2/3/4 (PC timing) TV channel (CABLE/ANTENNA), VIDEO IN 1/2, COMPONENT...
.... Using PIP Feature PIP (picture in picture) displays a picture from a connected PC in full screen, and a TV program or other external input (see below "To Enter PIP" table) in the PC mode. 2 Select PIP from PIP 1 Press TOOLS. 2 Press V/v to highlight Exit PIP and press to exit to be moved by pressing V/v/B/b.) To Enter PIP PIP Supported Inputs In main window In sub window PC TV channel (CABLE/ANTENNA), VIDEO IN 1/2, HDMI IN 1/2/3/4 (video timing) HDMI IN 1/2/3/4 (PC timing) TV channel (CABLE/ANTENNA), VIDEO IN 1/2, COMPONENT...
Operating Instructions
Page 27
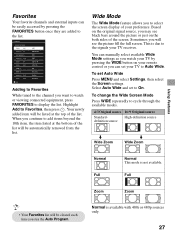
... to display the list. Based on the original signal source, you want to watch your TV by pressing the FAVORITES button once they are added to the channel you may see the picture fill the full screen. Favorites Your favorite channels and external inputs can be automatically removed from the list. Favorites Add to Favorites Cable 4.61 Antenna 12 Component 3 Antenna 24.6 Cable 34 Cable 36.1 HDMI 1 HDMI 3 Antenna 52.5 Cable 88.6 Set ABC BBCNEWS DVD...
... to display the list. Based on the original signal source, you want to watch your TV by pressing the FAVORITES button once they are added to the channel you may see the picture fill the full screen. Favorites Your favorite channels and external inputs can be automatically removed from the list. Favorites Add to Favorites Cable 4.61 Antenna 12 Component 3 Antenna 24.6 Cable 34 Cable 36.1 HDMI 1 HDMI 3 Antenna 52.5 Cable 88.6 Set ABC BBCNEWS DVD...
Operating Instructions
Page 29
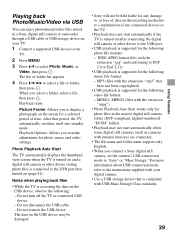
... the USB cable. - For more information about USB connection mode, refer to the instructions supplied with your TV. 1 Connect a supported USB device to the TV. 2 Press MENU. 3 Press V/v to select Photo, Music, or Video, then press . When you to "Auto" or "Mass Storage." Playback starts. Playback Options: Allows you connect a Sony digital still camera, set the camera's USB connection mode to display a photograph on the USB device, observe the following photo file formats...
... the USB cable. - For more information about USB connection mode, refer to the instructions supplied with your TV. 1 Connect a supported USB device to the TV. 2 Press MENU. 3 Press V/v to select Photo, Music, or Video, then press . When you to "Auto" or "Mass Storage." Playback starts. Playback Options: Allows you connect a Sony digital still camera, set the camera's USB connection mode to display a photograph on the USB device, observe the following photo file formats...

Operating Instructions
Page 30
... the remote control to display the menu options. 2, 3 2 Press V/v/B/b to navigate on the screen. Settings The Settings icon contains all of the images you see and the labels assigned to them. Sound: customize your sound settings to suit your photo, music, and video files from Sony USB connected equipment. Screen: adjust the size and shape of the necessary configurations to customize your viewing preference. Parental Lock: set the password and limit access to programming based...
... the remote control to display the menu options. 2, 3 2 Press V/v/B/b to navigate on the screen. Settings The Settings icon contains all of the images you see and the labels assigned to them. Sound: customize your sound settings to suit your photo, music, and video files from Sony USB connected equipment. Screen: adjust the size and shape of the necessary configurations to customize your viewing preference. Parental Lock: set the password and limit access to programming based...
Operating Instructions
Page 43
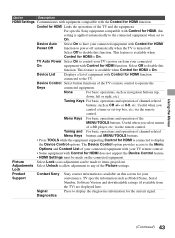
... Device Control option provides access to the Menu, Options and Content List of equipment with the Control for HDMI function. For specific Sony equipment compatible with Control for HDMI Power Off function to power off automatically when the TV is turned off. Device Auto Select On to have your Support convenience. None For basic operations, such as Model Name, Serial Number, Software Version and downloadable ratings (if available from your TV remote control. •...
... Device Control option provides access to the Menu, Options and Content List of equipment with the Control for HDMI function. For specific Sony equipment compatible with Control for HDMI Power Off function to power off automatically when the TV is turned off. Device Auto Select On to have your Support convenience. None For basic operations, such as Model Name, Serial Number, Software Version and downloadable ratings (if available from your TV remote control. •...
Operating Instructions
Page 47
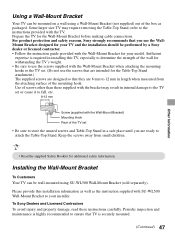
... the bracket may require removing the Table-Top Stand; Some larger size TV may result in internal damage to the TV set • Be sure to store the unused screws and Table-Top Stand in length when measured from small children. • Read the supplied Safety Booklet for the Wall-Mount Bracket before making cable connections. Use of the box as the instruction supplied with the Wall-Mount Bracket for your installer. To Sony...
... the bracket may require removing the Table-Top Stand; Some larger size TV may result in internal damage to the TV set • Be sure to store the unused screws and Table-Top Stand in length when measured from small children. • Read the supplied Safety Booklet for the Wall-Mount Bracket before making cable connections. Use of the box as the instruction supplied with the Wall-Mount Bracket for your installer. To Sony...
Operating Instructions
Page 52
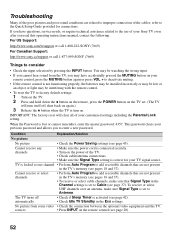
... the remote control. • To reset the TV to the use of your remote control; You may have questions, service needs, or require technical assistance related to factory default settings: 1 Turn on the TV. 2 Press and hold down the V button on the remote, press the POWER button on the TV set. (The TV will clear all of your TV signal source. When the Password is locked to one channel • Perform Auto Program to Cable...
... the remote control. • To reset the TV to the use of your remote control; You may have questions, service needs, or require technical assistance related to factory default settings: 1 Turn on the TV. 2 Press and hold down the V button on the remote, press the POWER button on the TV set. (The TV will clear all of your TV signal source. When the Password is locked to one channel • Perform Auto Program to Cable...
Operating Instructions
Page 53
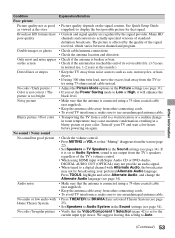
... the Video/Component 1 Selection (page 42) is set to Audio System, sound is connected using a 75-ohm coaxial cable (not supplied). • Keep the antenna cable away from other connecting cords. • To avoid TV interference, make sure to use an undamaged antenna cable. • Press THEATER for that the antenna is not output from the TV's speakers regardless of the TV's volume control. • When using HDMI input with Super Audio CD or DVD-Audio, DIGITAL AUDIO OUT (OPTICAL...
... the Video/Component 1 Selection (page 42) is set to Audio System, sound is connected using a 75-ohm coaxial cable (not supplied). • Keep the antenna cable away from other connecting cords. • To avoid TV interference, make sure to use an undamaged antenna cable. • Press THEATER for that the antenna is not output from the TV's speakers regardless of the TV's volume control. • When using HDMI input with Super Audio CD or DVD-Audio, DIGITAL AUDIO OUT (OPTICAL...
Operating Instructions
Page 54
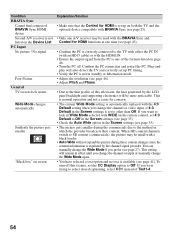
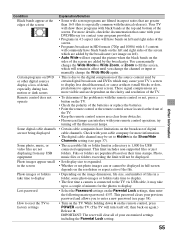
...). Condition BRAVIA Sync Cannot find connected BRAVIA Sync HDMI device Second A/V receiver is not listed on the Device List PC Input No picture / No signal Poor Picture General TV screen feels warm Wide Mode changes automatically Suddenly the picture gets smaller "Black box" on screen Explanation/Solution • Make sure that the Control for HDMI is set up PC timing. • Verify the PC is not in standby or hibernation mode. • Adjust the resolution (see...
...). Condition BRAVIA Sync Cannot find connected BRAVIA Sync HDMI device Second A/V receiver is not listed on the Device List PC Input No picture / No signal Poor Picture General TV screen feels warm Wide Mode changes automatically Suddenly the picture gets smaller "Black box" on screen Explanation/Solution • Make sure that the Control for HDMI is set up PC timing. • Verify the PC is not in standby or hibernation mode. • Adjust the resolution (see...
Operating Instructions
Page 55
... all of your cable company for USB connected equipment. This limit includes non-supported files or just folders. IMPORTANT: The reset will not be displayed. • Set display size to the digital compression of the source content used by certain digital broadcasts and DVDs which are populated based on your remote control operation; This password clears your previous password and allows you change the channel or input or manually change the Wide Mode to Wide Zoom...
... all of your cable company for USB connected equipment. This limit includes non-supported files or just folders. IMPORTANT: The reset will not be displayed. • Set display size to the digital compression of the source content used by certain digital broadcasts and DVDs which are populated based on your remote control operation; This password clears your previous password and allows you change the channel or input or manually change the Wide Mode to Wide Zoom...
Operating Instructions
Page 57
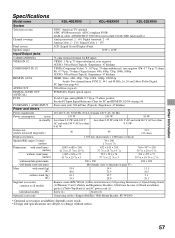
... 40.6 32.9 24.5 16.1 12.7 9.1 35.5 28.0 20.1 Remote control RM-YD034 (1)/Size AAA batteries (2)/Operating Instructions (1)/Quick Setup Guide (1)/Warranty Card (1)/Safety and Regulatory Booklet (1)/Software License (1)/Stand installation guide (1)/Table-Top Stand (1 set)/AC power cord (1) Screw (4) Screw (8) Connecting cables / Support Belt Kit / Wall-Mount Bracket: SU-WL500 • Optional accessories availability depends on its stock. • Design and specifications are subject to change without stand (kg) (lb.) Supplied accessories common to all models individual models...
... 40.6 32.9 24.5 16.1 12.7 9.1 35.5 28.0 20.1 Remote control RM-YD034 (1)/Size AAA batteries (2)/Operating Instructions (1)/Quick Setup Guide (1)/Warranty Card (1)/Safety and Regulatory Booklet (1)/Software License (1)/Stand installation guide (1)/Table-Top Stand (1 set)/AC power cord (1) Screw (4) Screw (8) Connecting cables / Support Belt Kit / Wall-Mount Bracket: SU-WL500 • Optional accessories availability depends on its stock. • Design and specifications are subject to change without stand (kg) (lb.) Supplied accessories common to all models individual models...
Operating Instructions
Page 58
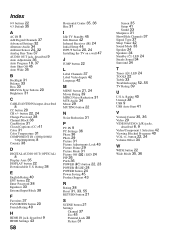
... 45 Parental Lock 38 Picture 31 Screen 35 Setup 41 Sound 33 Sharpness 31 Show/Hide Channels 37 Signal Type 37 Sleep Timer 42 Sound Mode 33 Speaker 24 Speakers 34 Standby (1) LED 24 Steady Sound 34 Surround 34 T Timer ( ) LED 24 TOOLS 22 Treble 33 Troubleshooting 52-55 TV Rating 39 U U.S.A. button 22, 24 Volume Offset 34 W WIDE button 22 Wide Mode 35, 36 Index 0-9 buttons 22 4:3 Default 35 A AC IN 8 Add Digital Channels 37 Advanced Settings 32 Alternate Audio...
... 45 Parental Lock 38 Picture 31 Screen 35 Setup 41 Sound 33 Sharpness 31 Show/Hide Channels 37 Signal Type 37 Sleep Timer 42 Sound Mode 33 Speaker 24 Speakers 34 Standby (1) LED 24 Steady Sound 34 Surround 34 T Timer ( ) LED 24 TOOLS 22 Treble 33 Troubleshooting 52-55 TV Rating 39 U U.S.A. button 22, 24 Volume Offset 34 W WIDE button 22 Wide Mode 35, 36 Index 0-9 buttons 22 4:3 Default 35 A AC IN 8 Add Digital Channels 37 Advanced Settings 32 Alternate Audio...


