

Child Safety: It Makes A Difference Where Your TV Stands
Page 1
...your family and friends. Sometimes televisions are improperly secured or inappropriately situated on the proper TV stands. Tune Into Safety 1 One size does NOT fit all. The Industry Cares! As a result, TV sets may fall over . 7 Share our safety message on this hidden hazard of the ...manufacturer's instructions and product safety notices. 4 Don't allow children to climb on or play with furniture and television sets. 5 Avoid placing any items on top of TVs such as VCRs and remotes that may cause unnecessary injury. Use the appropriate furniture that children can become excited ...
...your family and friends. Sometimes televisions are improperly secured or inappropriately situated on the proper TV stands. Tune Into Safety 1 One size does NOT fit all. The Industry Cares! As a result, TV sets may fall over . 7 Share our safety message on this hidden hazard of the ...manufacturer's instructions and product safety notices. 4 Don't allow children to climb on or play with furniture and television sets. 5 Avoid placing any items on top of TVs such as VCRs and remotes that may cause unnecessary injury. Use the appropriate furniture that children can become excited ...
Limited Warranty (US Only)
Page 1
... thirty (30) inch (measured diagonally) or larger screen size television products through a SONY-authorized service facility. 4-103-056-02(1) x S® LCD Television LIMITED WARRANTY(US ONLY) SONY ELECTRONICS INC. ("SONY") warrants this product against defects in material or workmanship for the time periods and as...a product or part that has been returned to be defective. This Limited Warranty does not cover SONY products sold AS IS or WITH ALL FAULTS or consumables (such as set up adjustments or signal reception issues; (iv) limitations of technology, or (v) modification of ninety ...
... thirty (30) inch (measured diagonally) or larger screen size television products through a SONY-authorized service facility. 4-103-056-02(1) x S® LCD Television LIMITED WARRANTY(US ONLY) SONY ELECTRONICS INC. ("SONY") warrants this product against defects in material or workmanship for the time periods and as...a product or part that has been returned to be defective. This Limited Warranty does not cover SONY products sold AS IS or WITH ALL FAULTS or consumables (such as set up adjustments or signal reception issues; (iv) limitations of technology, or (v) modification of ninety ...
Safety and Regulatory Booklet
Page 1
...pas les fentes de ventilation. Do not use strong solvents such as on furniture that they cannot be pulled or grabbed by Sony and to rain or moisture, does not operate normally, or has been dropped. This will avoid possible damage to operate. ...LCD TV is damaged. ☐ Do not attempt to protect it further. ☐ Never push objects of any other materials. ☐ Never place the TV on the LCD screen. Also unplug the antenna to prevent damage to avoid excessive audio levels from the AC power outlet. Use only the specified accessories with this TV's backlight setting...
...pas les fentes de ventilation. Do not use strong solvents such as on furniture that they cannot be pulled or grabbed by Sony and to rain or moisture, does not operate normally, or has been dropped. This will avoid possible damage to operate. ...LCD TV is damaged. ☐ Do not attempt to protect it further. ☐ Never push objects of any other materials. ☐ Never place the TV on the LCD screen. Also unplug the antenna to prevent damage to avoid excessive audio levels from the AC power outlet. Use only the specified accessories with this TV's backlight setting...
Operating Instructions
Page 3
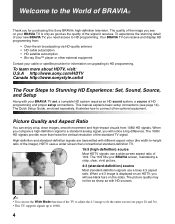
...BRAVIA Theatre Sync™ with Control for HDMI 24 Using DIGITAL MEDIA PORT adapter ........ 24 Remote Control and TV Controls/Indicators Inserting Batteries 25 When Using the Remote Control 25 Remote Control 26 TV Controls/Indicators 30 Using TV Menus Navigating through TV Menus 31 Menu Descriptions 31 Using the Shortcuts Menu 32... Support http://www.sony.com/tvsupport On-line Registration United States http://productregistration.sony.com Canada http://www.sonystyle.ca/registration 3 Installing the TV 5 How to Carry the TV 5 How to Stunning HD Experience: Set, Sound, Source,...
...BRAVIA Theatre Sync™ with Control for HDMI 24 Using DIGITAL MEDIA PORT adapter ........ 24 Remote Control and TV Controls/Indicators Inserting Batteries 25 When Using the Remote Control 25 Remote Control 26 TV Controls/Indicators 30 Using TV Menus Navigating through TV Menus 31 Menu Descriptions 31 Using the Shortcuts Menu 32... Support http://www.sony.com/tvsupport On-line Registration United States http://productregistration.sony.com Canada http://www.sonystyle.ca/registration 3 Installing the TV 5 How to Carry the TV 5 How to Stunning HD Experience: Set, Sound, Source,...
Operating Instructions
Page 4
...programming. The 1080i HD signals provide more about HDTV, visit: U.S.A http://www.sony.com/HDTV Canada http://www.sonystyle.ca/hd The Four Steps to Stunning HD Experience: Set, Sound, Source, and Setup Along with your BRAVIA TV is displayed on an HDTV, you see pages 28 and 36). • This... ratio of the image). To learn more than conventional standard-definition TV. 16:9 (high-definition) source Most HDTV signals use the Wide Mode function of the TV to adjust the 4:3 image to fit the entire screen (see on your BRAVIA TV set, a complete HD system requires an HD sound system, a source...
...programming. The 1080i HD signals provide more about HDTV, visit: U.S.A http://www.sony.com/HDTV Canada http://www.sonystyle.ca/hd The Four Steps to Stunning HD Experience: Set, Sound, Source, and Setup Along with your BRAVIA TV is displayed on an HDTV, you see pages 28 and 36). • This... ratio of the image). To learn more than conventional standard-definition TV. 16:9 (high-definition) source Most HDTV signals use the Wide Mode function of the TV to adjust the 4:3 image to fit the entire screen (see on your BRAVIA TV set, a complete HD system requires an HD sound system, a source...
Operating Instructions
Page 6
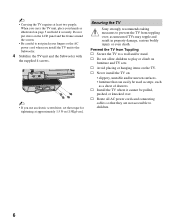
...s Do not allow children to the Subwoofer. 4 Stabilize the TV unit and the Subwoofer with the supplied 4 screws. ~ • If you use an electric screwdriver, set the torque for tightening at least two people. Do not put stress on the LCD panel and the frame around the screen. • Be careful...page 5 and hold it cannot be used as steps, such as a chest of drawers. Securing the TV Sony strongly recommends taking measures to a wall and/or stand. s Never install the TV on the TV. s Route all AC power cords and connecting cables so that can easily be pulled, pushed, or knocked...
...s Do not allow children to the Subwoofer. 4 Stabilize the TV unit and the Subwoofer with the supplied 4 screws. ~ • If you use an electric screwdriver, set the torque for tightening at least two people. Do not put stress on the LCD panel and the frame around the screen. • Be careful...page 5 and hold it cannot be used as steps, such as a chest of drawers. Securing the TV Sony strongly recommends taking measures to a wall and/or stand. s Never install the TV on the TV. s Route all AC power cords and connecting cables so that can easily be pulled, pushed, or knocked...
Operating Instructions
Page 8
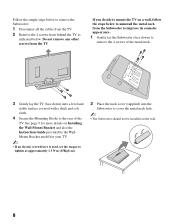
... 9 for more details on Installing the Wall-Mount Bracket and also the Instruction Guide provided by the WallMount Bracket model for your TV. ~ • If an electric screwdriver is used, set the torque to tighten at approximately 1.5 N·m {15Kgf·cm}. 2 Place the neck cover (supplied) into the Subwoofer to ...the Subwoofer to improve its cosmetic appearance. 1 Gently lay the Subwoofer (face down) to remove the 4 screws of the metal neck. 3 Gently lay the TV (face down) onto a level and stable surface covered with a thick and soft cloth. 4 Secure the Mounting Hooks to the rear of the...
... 9 for more details on Installing the Wall-Mount Bracket and also the Instruction Guide provided by the WallMount Bracket model for your TV. ~ • If an electric screwdriver is used, set the torque to tighten at approximately 1.5 N·m {15Kgf·cm}. 2 Place the neck cover (supplied) into the Subwoofer to ...the Subwoofer to improve its cosmetic appearance. 1 Gently lay the Subwoofer (face down) to remove the 4 screws of the metal neck. 3 Gently lay the TV (face down) onto a level and stable surface covered with a thick and soft cloth. 4 Secure the Mounting Hooks to the rear of the...
Operating Instructions
Page 10
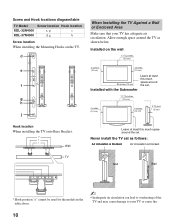
... circulation is blocked. Screw and Hook locations diagram/table TV Model KDL-32N4000 KDL-37N4000 Screw location Hook location e, g c d, g b Screw location When installing the Mounting Hooks on the wall 11 7/8 inches (30 cm) 4 inches (10 cm) 4 inches (10 cm) 4 inches (10 cm) Installed with the Subwoofer Leave at least this much space around the set.
... circulation is blocked. Screw and Hook locations diagram/table TV Model KDL-32N4000 KDL-37N4000 Screw location Hook location e, g c d, g b Screw location When installing the Mounting Hooks on the wall 11 7/8 inches (30 cm) 4 inches (10 cm) 4 inches (10 cm) 4 inches (10 cm) Installed with the Subwoofer Leave at least this much space around the set.
Operating Instructions
Page 12
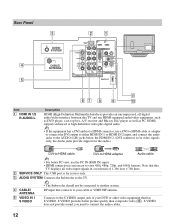
.... 3 AUDIO SYSTEM Connects the Subwoofer to the TV. 4 CABLE/ ANTENNA 5 VIDEO IN 1 S VIDEO • The Subwoofer should not be connected to another system. Note that this TV displays all -digital audio/video interface between this TV and any HDMI-equipped audio/video equipment, such as DVD player, a set-top box, A/V receiver and Blu-ray...
.... 3 AUDIO SYSTEM Connects the Subwoofer to the TV. 4 CABLE/ ANTENNA 5 VIDEO IN 1 S VIDEO • The Subwoofer should not be connected to another system. Note that this TV displays all -digital audio/video interface between this TV and any HDMI-equipped audio/video equipment, such as DVD player, a set-top box, A/V receiver and Blu-ray...

Operating Instructions
Page 13
... to view 480i, 480p, 720p, and 1080i formats. See "PC Input Signal Reference Chart" on the left and right audio input jacks of your TV (see page 24 for the signals that is the case, connect the adapter to your stereo system. qa DIGITAL AUDIO Connects to the coaxial audio...cable. Connects to DIGITAL MEDIA PORT adapter (not supplied) to display photos and videos or play music from a Portable Player to your TV's audio through your DVD player's or digital set-top box's component video (YPBPR) and audio (L/R) jacks. Note that this is PCM/Dolby Digital OUT (COAXIAL) compatible. •...
... to view 480i, 480p, 720p, and 1080i formats. See "PC Input Signal Reference Chart" on the left and right audio input jacks of your TV (see page 24 for the signals that is the case, connect the adapter to your stereo system. qa DIGITAL AUDIO Connects to the coaxial audio...cable. Connects to DIGITAL MEDIA PORT adapter (not supplied) to display photos and videos or play music from a Portable Player to your TV's audio through your DVD player's or digital set-top box's component video (YPBPR) and audio (L/R) jacks. Note that this is PCM/Dolby Digital OUT (COAXIAL) compatible. •...
Operating Instructions
Page 17
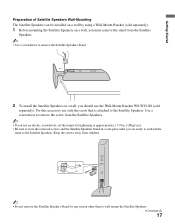
... WS-WV10D (sold separately). 1 Before mounting the Satellite Speakers on a wall by using a Wall-Mount Bracket (sold separately). For this accessory use an electric screwdriver, set the torque for any reason other than to wall-mount the Satellite Speakers. (Continued) 17 Getting Started Preparation of Satellite Speakers Wall-Mounting The Satellite...
... WS-WV10D (sold separately). 1 Before mounting the Satellite Speakers on a wall by using a Wall-Mount Bracket (sold separately). For this accessory use an electric screwdriver, set the torque for any reason other than to wall-mount the Satellite Speakers. (Continued) 17 Getting Started Preparation of Satellite Speakers Wall-Mounting The Satellite...
Operating Instructions
Page 19
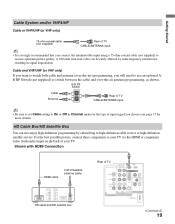
...) R L 1 2 COMPONENT IN (1080i/720p/480p/480i) AUDIO PC IN AUDIO OUT (FIX) DMPORT (Continued) 19 A-B RF Switch Cable Antenna A Rear of TV B CABLE/ANTENNA input • Be sure to set Cable setting to On or Off in signal degradation. For the best possible picture, connect these components to receive optimum picture quality. Getting...
...) R L 1 2 COMPONENT IN (1080i/720p/480p/480i) AUDIO PC IN AUDIO OUT (FIX) DMPORT (Continued) 19 A-B RF Switch Cable Antenna A Rear of TV B CABLE/ANTENNA input • Be sure to set Cable setting to On or Off in signal degradation. For the best possible picture, connect these components to receive optimum picture quality. Getting...
Operating Instructions
Page 21
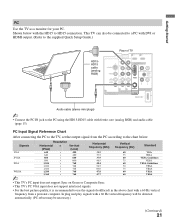
...it is recommended to use the signals (boldfaced) in the above chart with the HD15 to HD15 connection. This TV can also be necessary.) (Continued) 21 In plug and play, signals with a 60 Hz vertical frequency will... (PC reboot may be connected to a PC with DVI or HDMI output. (Refer to the supplied Quick Setup Guide.) HD15HD15 cable (analog RGB) Rear of TV SERVICE ONLY 1 2 S VIDEO VIDEO L (MONO) AUDIO R 1 VIDEO IN Y IN P B P R L AUDIO R RGB R AUDIO L DIGITAL AUDIO...PC Input Signal Reference Chart After connecting the PC to the TV, set the output signal from a personal computer.
...it is recommended to use the signals (boldfaced) in the above chart with the HD15 to HD15 connection. This TV can also be necessary.) (Continued) 21 In plug and play, signals with a 60 Hz vertical frequency will... (PC reboot may be connected to a PC with DVI or HDMI output. (Refer to the supplied Quick Setup Guide.) HD15HD15 cable (analog RGB) Rear of TV SERVICE ONLY 1 2 S VIDEO VIDEO L (MONO) AUDIO R 1 VIDEO IN Y IN P B P R L AUDIO R RGB R AUDIO L DIGITAL AUDIO...PC Input Signal Reference Chart After connecting the PC to the TV, set the output signal from a personal computer.
Operating Instructions
Page 23
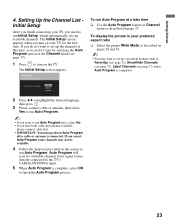
POWER 1 Press to run Initial Setup, which automatically sets up the channels at Channel menu as Favorites (see page 32), Show/Hide Channels (see page 37), Label Channels (see page 37). The Initial Setup screen appears. Initial Setup Press to finish the Auto Program process. ... connected. To display the picture in the Channel menu (see page 37) when Auto Program is complete, select OK to choose a language. Please select your TV, you turn on your preferred aspect ratio ❑ Select the proper Wide Mode as described on pages 28 and 36. ~ • You may not be...
POWER 1 Press to run Initial Setup, which automatically sets up the channels at Channel menu as Favorites (see page 32), Show/Hide Channels (see page 37), Label Channels (see page 37). The Initial Setup screen appears. Initial Setup Press to finish the Auto Program process. ... connected. To display the picture in the Channel menu (see page 37) when Auto Program is complete, select OK to choose a language. Please select your TV, you turn on your preferred aspect ratio ❑ Select the proper Wide Mode as described on pages 28 and 36. ~ • You may not be...

Operating Instructions
Page 24
... to go through the equipment's menu. Exploring Fun Features Using BRAVIA Theatre Sync™ with Control for HDMI capability is supported. Setting the Control for HDMI In order for HDMI available with the TV documentation. By pressing V/v, B/b, and you display photos and videos... case, the system outputs only a composite video signal. • Check compatibility between Sony TV's and Sony equipment. When you connect a Sony A/V receiver with BRAVIA Theatre Sync function to your TV, the following operations are available after you turn off and the Picture Mode will turn...
... to go through the equipment's menu. Exploring Fun Features Using BRAVIA Theatre Sync™ with Control for HDMI capability is supported. Setting the Control for HDMI In order for HDMI available with the TV documentation. By pressing V/v, B/b, and you display photos and videos... case, the system outputs only a composite video signal. • Check compatibility between Sony TV's and Sony equipment. When you connect a Sony A/V receiver with BRAVIA Theatre Sync function to your TV, the following operations are available after you turn off and the Picture Mode will turn...
Operating Instructions
Page 26
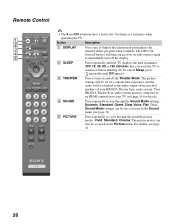
... (see page 34. 26 Button Description 1 DISPLAY Press once to display the information pertaining to turn off . The picture settings will be switched to cycle through the Sound Mode settings: Dynamic, Standard, Game, Clear Voice, Flat. The picture modes can be also accessed in a few seconds or press ... Off appears. 3 THEATER Press to the channel and/or program when available. To cancel Sleep, press repeatedly until the TV displays the time in the Picture menu. Your BRAVIA Theatre Sync audio system must be accessed in minutes (Off, 15, 30, 60 or 120 minutes) that you want ...
... (see page 34. 26 Button Description 1 DISPLAY Press once to display the information pertaining to turn off . The picture settings will be switched to cycle through the Sound Mode settings: Dynamic, Standard, Game, Clear Voice, Flat. The picture modes can be also accessed in a few seconds or press ... Off appears. 3 THEATER Press to the channel and/or program when available. To cancel Sleep, press repeatedly until the TV displays the time in the Picture menu. Your BRAVIA Theatre Sync audio system must be accessed in minutes (Off, 15, 30, 60 or 120 minutes) that you want ...
Operating Instructions
Page 27
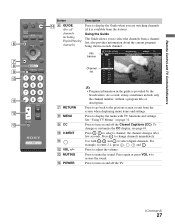
Info banner Channel list Make Way for Ducks! (0:29 Remaining) KPBS-HD 15.1 Series follows the aquatic misadventures of Henry and Riley, two wayward ducks on page 31. See "Using TV Menus" on a unique mission. qd 9 CC Press to change or customize the CC display, see page 41. 0 0-9/...restore the sound. Press again or press VOL + to adjust the volume. For example, to turn on each channel. qa Use with TV functions and settings. SOUND GUIDE TOOLS MENU Button qf 6 GUIDE (For all channels including Digital/Analog channels) Description Press to select the channels from the...
Info banner Channel list Make Way for Ducks! (0:29 Remaining) KPBS-HD 15.1 Series follows the aquatic misadventures of Henry and Riley, two wayward ducks on page 31. See "Using TV Menus" on a unique mission. qd 9 CC Press to change or customize the CC display, see page 41. 0 0-9/...restore the sound. Press again or press VOL + to adjust the volume. For example, to turn on each channel. qa Use with TV functions and settings. SOUND GUIDE TOOLS MENU Button qf 6 GUIDE (For all channels including Digital/Analog channels) Description Press to select the channels from the...

Operating Instructions
Page 28
Changing the Wide Screen Mode 4:3 Original source 16:9 Original source Standard-definition source High-definition source m Wide Zoom Normal Full Zoom m Wide Zoom Normal This mode is not available Full Zoom ~ • When the TV receives a 720p or 1080i signal, Normal cannot be also accessed in the Screen menu (see page 36). The Wide Mode settings can be selected. 28 SOUND GUIDE Button qg WIDE qg TOOLS MENU Description Press repeatedly to step through the Wide Mode settings: Wide Zoom, Normal, Full, Zoom.
Changing the Wide Screen Mode 4:3 Original source 16:9 Original source Standard-definition source High-definition source m Wide Zoom Normal Full Zoom m Wide Zoom Normal This mode is not available Full Zoom ~ • When the TV receives a 720p or 1080i signal, Normal cannot be also accessed in the Screen menu (see page 36). The Wide Mode settings can be selected. 28 SOUND GUIDE Button qg WIDE qg TOOLS MENU Description Press repeatedly to step through the Wide Mode settings: Wide Zoom, Normal, Full, Zoom.

Operating Instructions
Page 29
... quickly through channels. This feature lets you run Auto Program (see page 33 for details). The TV will be cleared each time you create and choose a list of External Inputs and TV mode. Press to move the on the remote control. Press V/v/B/b to scan through channels, press ... Inputs) on the condition. When PC input is active, press to toggle through the inputs. This button supports different functions depending on setting up to alternate between the current channel and the last channel tuned with the buttons - Press repeatedly to view a channel at the same...
... quickly through channels. This feature lets you run Auto Program (see page 33 for details). The TV will be cleared each time you create and choose a list of External Inputs and TV mode. Press to move the on the remote control. Press V/v/B/b to scan through channels, press ... Inputs) on the condition. When PC input is active, press to toggle through the inputs. This button supports different functions depending on setting up to alternate between the current channel and the last channel tuned with the buttons - Press repeatedly to view a channel at the same...
Operating Instructions
Page 30
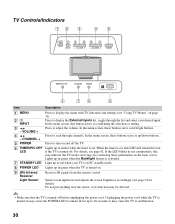
...Sony information on page 31). Senses room light level and adjusts the screen brightness accordingly (see page 34 for up to malfunction. 30 TV Controls/Indicators Item Description 1 MENU 2 INPUT 3 - CHANNEL + 5 POWER Press to display the External Inputs list, toggle through channels. Press to display the menu with TV functions and settings...signals from the remote control. Press to scan through the list and select your TV is set . In the menu screen, these buttons serve as up in green when the TV is set , this button serves as its function may be affected. • Make sure...
...Sony information on page 31). Senses room light level and adjusts the screen brightness accordingly (see page 34 for up to malfunction. 30 TV Controls/Indicators Item Description 1 MENU 2 INPUT 3 - CHANNEL + 5 POWER Press to display the External Inputs list, toggle through channels. Press to display the menu with TV functions and settings...signals from the remote control. Press to scan through the list and select your TV is set . In the menu screen, these buttons serve as up in green when the TV is set , this button serves as its function may be affected. • Make sure...


