
Child Safety: It Makes A Difference Where Your TV Stands
Page 1
...larger televisions are popular purchases and are not always supported on dressers, bookcases, shelves, desks, audio speakers, chests or carts. As a result, TV sets may fall over and may pique the children's curiosity. 6 Remember that is a Sector of the home with your furniture to the wall (but...your television (and other electronic components). 2 Use appropriate angle braces, straps and anchors to climb on or play with furniture and television sets. 5 Avoid placing any items on this hidden hazard of the Electronic Industries Alliance The Industry Cares! Tune Into Safety 1 One size ...
...larger televisions are popular purchases and are not always supported on dressers, bookcases, shelves, desks, audio speakers, chests or carts. As a result, TV sets may fall over and may pique the children's curiosity. 6 Remember that is a Sector of the home with your furniture to the wall (but...your television (and other electronic components). 2 Use appropriate angle braces, straps and anchors to climb on or play with furniture and television sets. 5 Avoid placing any items on this hidden hazard of the Electronic Industries Alliance The Industry Cares! Tune Into Safety 1 One size ...

Limited Warranty (U.S. Only)
Page 1
4-103-056-11(1) x S® LCD Television LIMITED WARRANTY(US ONLY) SONY ELECTRONICS INC. ("SONY") warrants this product against defects in the Product; Pursuant to this Limited Warranty, "refurbished" means a product or part that has been returned to obtain ...reason, including but not limited to, product issues due to the SONY authorized service facility specified. it does not cover any part of SONY. This Limited Warranty does not cover SONY products sold AS IS or WITH ALL FAULTS or consumables (such as set up adjustments or signal reception issues; (iv) limitations of technology...
4-103-056-11(1) x S® LCD Television LIMITED WARRANTY(US ONLY) SONY ELECTRONICS INC. ("SONY") warrants this product against defects in the Product; Pursuant to this Limited Warranty, "refurbished" means a product or part that has been returned to obtain ...reason, including but not limited to, product issues due to the SONY authorized service facility specified. it does not cover any part of SONY. This Limited Warranty does not cover SONY products sold AS IS or WITH ALL FAULTS or consumables (such as set up adjustments or signal reception issues; (iv) limitations of technology...
Operating Instructions
Page 2
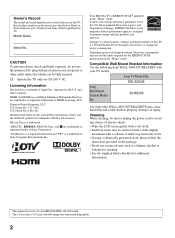
...Depending upon your TV model. KDL-32L504 Sony Wall-Mount Bracket Model No. Owner's Record The model and serial numbers are trademarks or registered marks of Sony Corporation. Record these government agencies, designed to certain features, settings, and functionalities of this TV. Your BRAVIA TV is a trademark ...in the U.S. Sony TV Model No. CAUTION To prevent electric shock and blade exposure, do not use strong solvents such as a thinner, alcohol or benzine for cleaning. • See the supplied Safety Booklet for the 32 class BRAVIA KDL-32L504 model. Compatible Wall...
...Depending upon your TV model. KDL-32L504 Sony Wall-Mount Bracket Model No. Owner's Record The model and serial numbers are trademarks or registered marks of Sony Corporation. Record these government agencies, designed to certain features, settings, and functionalities of this TV. Your BRAVIA TV is a trademark ...in the U.S. Sony TV Model No. CAUTION To prevent electric shock and blade exposure, do not use strong solvents such as a thinner, alcohol or benzine for cleaning. • See the supplied Safety Booklet for the 32 class BRAVIA KDL-32L504 model. Compatible Wall...
Operating Instructions
Page 3
Contents Introducing Your New BRAVIA® Welcome to the World of BRAVIA 4 Experiencing Stunning HD with Your BRAVIA 4 The Four Steps to a Stunning HD Experience 5 TV Feature Highlights 5 Getting Started Setting Up Your TV 6 Locating Inputs and Outputs 7 Adjusting the viewing angle of the TV 8 Connecting the TV 9 Connecting Other Equipment 12 Bundling the Connecting Cables 13 When Installing...
Contents Introducing Your New BRAVIA® Welcome to the World of BRAVIA 4 Experiencing Stunning HD with Your BRAVIA 4 The Four Steps to a Stunning HD Experience 5 TV Feature Highlights 5 Getting Started Setting Up Your TV 6 Locating Inputs and Outputs 7 Adjusting the viewing angle of the TV 8 Connecting the TV 9 Connecting Other Equipment 12 Bundling the Connecting Cables 13 When Installing...
Operating Instructions
Page 4
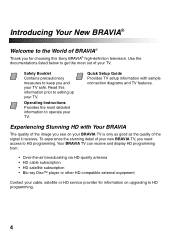
...see on upgrading to keep you and your TV safe. Read this Sony BRAVIA® high-definition television. Safety Booklet Contains precautionary measures to HD programming. 4 Experiencing Stunning HD with sample connection diagrams and TV features. Your BRAVIA TV can receive and display HD programming from: &#... Operating Instructions Provides the most out of your BRAVIA TV is only as good as the quality of BRAVIA® Thank you need access to setting up your TV. Introducing Your New BRAVIA® Welcome to operate your TV. Use the documentations listed below to get the...
...see on upgrading to keep you and your TV safe. Read this Sony BRAVIA® high-definition television. Safety Booklet Contains precautionary measures to HD programming. 4 Experiencing Stunning HD with sample connection diagrams and TV features. Your BRAVIA TV can receive and display HD programming from: &#... Operating Instructions Provides the most out of your BRAVIA TV is only as good as the quality of BRAVIA® Thank you need access to setting up your TV. Introducing Your New BRAVIA® Welcome to operate your TV. Use the documentations listed below to get the...
Operating Instructions
Page 5
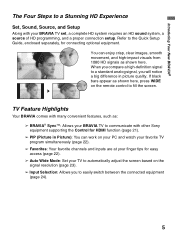
..., you to easily switch between the connected equipment (page 24). 5 Introducing Your New BRAVIA® The Four Steps to a Stunning HD Experience Set, Sound, Source, and Setup Along with other Sony equipment supporting the Control for HDMI function (page 21). ➢ PIP (Picture in picture... as : ➢ BRAVIA® SyncTM: Allows your BRAVIA TV to communicate with your TV to automatically adjust the screen based on the remote control to the Quick Setup Guide, enclosed separately, for easy access (page 22). ➢ Auto Wide Mode: Set your BRAVIA TV set, a complete HD system...
..., you to easily switch between the connected equipment (page 24). 5 Introducing Your New BRAVIA® The Four Steps to a Stunning HD Experience Set, Sound, Source, and Setup Along with other Sony equipment supporting the Control for HDMI function (page 21). ➢ PIP (Picture in picture... as : ➢ BRAVIA® SyncTM: Allows your BRAVIA TV to communicate with your TV to automatically adjust the screen based on the remote control to the Quick Setup Guide, enclosed separately, for easy access (page 22). ➢ Auto Wide Mode: Set your BRAVIA TV set, a complete HD system...
Operating Instructions
Page 6
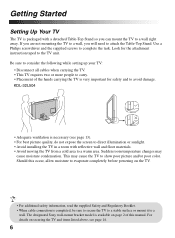
...TV unit. The designated Sony wall-mount bracket model is necessary (see page 14. 6 Use a Philips screwdriver and the supplied screws to show poor picture and/or poor color. Look for safety and to avoid damage. If you are not mounting the TV to a wall, you can mount the TV to a wall right away. KDL-32L504...Table-Top Stand. For details on page 2 of the hands carrying the TV is completed, be sure to secure the TV to a stable surface or mount it to a wall. Getting Started Setting Up Your TV The TV is packaged with reflective wall and floor materials. • Avoid moving ...
...TV unit. The designated Sony wall-mount bracket model is necessary (see page 14. 6 Use a Philips screwdriver and the supplied screws to show poor picture and/or poor color. Look for safety and to avoid damage. If you are not mounting the TV to a wall, you can mount the TV to a wall right away. KDL-32L504...Table-Top Stand. For details on page 2 of the hands carrying the TV is completed, be sure to secure the TV to a stable surface or mount it to a wall. Getting Started Setting Up Your TV The TV is packaged with reflective wall and floor materials. • Avoid moving ...

Operating Instructions
Page 7
...For some Apple Macintosh computers, it may need to adjust the TV settings or your PC to other analog RGB equipment. You may be connected to this TV and any HDMI-equipped audio/video equipment, such as a set-top box, DVD player, and A/V receiver. Equipment using ... 37 for service only. 2 HDMI IN 1/2/3 L-AUDIO-R HDMI (High-Definition Multimedia Interface) provides an uncompressed, alldigital audio/video interface between this TV. 5 DIGITAL AUDIO Connects to the S VIDEO output jack of Dolby Laboratories. (Continued) 7 Getting Started Locating Inputs and Outputs Side Panel SERVICE ...
...For some Apple Macintosh computers, it may need to adjust the TV settings or your PC to other analog RGB equipment. You may be connected to this TV and any HDMI-equipped audio/video equipment, such as a set-top box, DVD player, and A/V receiver. Equipment using ... 37 for service only. 2 HDMI IN 1/2/3 L-AUDIO-R HDMI (High-Definition Multimedia Interface) provides an uncompressed, alldigital audio/video interface between this TV. 5 DIGITAL AUDIO Connects to the S VIDEO output jack of Dolby Laboratories. (Continued) 7 Getting Started Locating Inputs and Outputs Side Panel SERVICE ...

Operating Instructions
Page 8
...COMPONENT component video input (COMPONENT 1). To set to Auto. 7 COMPONENT Component video provides better picture quality than the S Video and composite IN 2 video. (1080p/1080i/ Audio connection is required for video and use these outputs to listen to your TV's audio through your stereo system. 9 ...required to Y/Video for the COMPONENT IN ports, connect audio (L/R). 720p/480p/480i)/ L-AUDIO-R 8 AUDIO OUT (FIX) L/R Connects to the Setup settings. You can use audio L (mono) and R for audio signal. Item Description 6 VIDEO IN 1/ This input port can auto detect and switch ...
...COMPONENT component video input (COMPONENT 1). To set to Auto. 7 COMPONENT Component video provides better picture quality than the S Video and composite IN 2 video. (1080p/1080i/ Audio connection is required for video and use these outputs to listen to your TV's audio through your stereo system. 9 ...required to Y/Video for the COMPONENT IN ports, connect audio (L/R). 720p/480p/480i)/ L-AUDIO-R 8 AUDIO OUT (FIX) L/R Connects to the Setup settings. You can use audio L (mono) and R for audio signal. Item Description 6 VIDEO IN 1/ This input port can auto detect and switch ...

Operating Instructions
Page 9
Cable or VHF/UHF (or VHF only) 75-ohm coaxial cable Rear of TV CABLE/ANTENNA • It is capable of TV CABLE/ANTENNA • Be sure to set the Signal Type setting to Cable or Antenna found under the Channel settings for both cable (QAM and 8VSB) and external VHF/UHF antenna (ATSC).... using a 75-ohm coaxial cable to switch between the cable and over-the-air antenna programming, as indicated below. Getting Started Connecting the TV Cable System or VHF/UHF Antenna System You can easily be affected by radio frequency interference, resulting in your input signal (see page 30)....
Cable or VHF/UHF (or VHF only) 75-ohm coaxial cable Rear of TV CABLE/ANTENNA • It is capable of TV CABLE/ANTENNA • Be sure to set the Signal Type setting to Cable or Antenna found under the Channel settings for both cable (QAM and 8VSB) and external VHF/UHF antenna (ATSC).... using a 75-ohm coaxial cable to switch between the cable and over-the-air antenna programming, as indicated below. Getting Started Connecting the TV Cable System or VHF/UHF Antenna System You can easily be affected by radio frequency interference, resulting in your input signal (see page 30)....

Operating Instructions
Page 13
... connecting cables as illustrated below . Use the same plastic cable band to overheating of the TV and may cause TV damage or cause a fire. 13 Avoid operating the TV at least this much space around the set. Do not bundle the AC power cord with stand 4 inches (10 cm) 11 7/8... inches (30 cm) 4 inches (10 cm) 2 3/8 inches (6 cm) Leave at least this much space around the TV as follows: Air circulation is ...
... connecting cables as illustrated below . Use the same plastic cable band to overheating of the TV and may cause TV damage or cause a fire. 13 Avoid operating the TV at least this much space around the set. Do not bundle the AC power cord with stand 4 inches (10 cm) 11 7/8... inches (30 cm) 4 inches (10 cm) 2 3/8 inches (6 cm) Leave at least this much space around the TV as follows: Air circulation is ...

Operating Instructions
Page 14
...cords and connecting cables so that they are not accessible to play or climb on furniture and TV sets. ❑ Avoid placing or hanging items on the TV. ❑ Never install the TV on: • slippery, unstable and/or uneven surfaces. • furniture that can adequately support... side to a TV stand (not supplied). 1 Secure the stand for the TV. Angle braces Stand 14 Securing the TV Sony strongly recommends taking measures to secure the stand. Recommended Measures to Secure the TV Consider the following measures when securing your TV to the TV stand. Unsecured TVs may topple and ...
...cords and connecting cables so that they are not accessible to play or climb on furniture and TV sets. ❑ Avoid placing or hanging items on the TV. ❑ Never install the TV on: • slippery, unstable and/or uneven surfaces. • furniture that can adequately support... side to a TV stand (not supplied). 1 Secure the stand for the TV. Angle braces Stand 14 Securing the TV Sony strongly recommends taking measures to secure the stand. Recommended Measures to Secure the TV Consider the following measures when securing your TV to the TV stand. Unsecured TVs may topple and ...

Operating Instructions
Page 15
...all three measures recommended above. • If an electric screwdriver is used, set the torque to the wall. United States call: 1-800-488-7669 or visit: www.sony.com/accessories • Measure 2 provides minimal protection against the TV toppling over. Use the optional hardware listed below (not supplied). • ... anchor bolts, size M6 × 10-12 mm. Anchor bolts Wall-mount holes Rope or chain Wall-anchor • Contact Sony Customer Support to secure the TV is no excess slack in the rope or chain. An alternative way to obtain the optional Support Belt Kit by providing your...
...all three measures recommended above. • If an electric screwdriver is used, set the torque to the wall. United States call: 1-800-488-7669 or visit: www.sony.com/accessories • Measure 2 provides minimal protection against the TV toppling over. Use the optional hardware listed below (not supplied). • ... anchor bolts, size M6 × 10-12 mm. Anchor bolts Wall-mount holes Rope or chain Wall-anchor • Contact Sony Customer Support to secure the TV is no excess slack in the rope or chain. An alternative way to obtain the optional Support Belt Kit by providing your...

Operating Instructions
Page 16
...or press MENU and set the Auto Wide to navigate and highlight options where applicable. "Retail" optimizes the picture for the screen display. for more details, see page 9. • Select your preferred aspect ratio for store display. Follow the help text provided on the TV. "Home" optimizes ...buttons described below to stop or cancel the Auto Program. Retail Home • Connect either your cable or antenna to the TV (you to On under Channel settings. The Auto Program can connect Select both using an A-B RF switch (not supplied); Please select the type of use ...
...or press MENU and set the Auto Wide to navigate and highlight options where applicable. "Retail" optimizes the picture for the screen display. for more details, see page 9. • Select your preferred aspect ratio for store display. Follow the help text provided on the TV. "Home" optimizes ...buttons described below to stop or cancel the Auto Program. Retail Home • Connect either your cable or antenna to the TV (you to On under Channel settings. The Auto Program can connect Select both using an A-B RF switch (not supplied); Please select the type of use ...

Operating Instructions
Page 18
...are watching. The picture settings will be set for a cinemalike experience and the audio will time out in fast rewind mode. Use them as a reference when operating the TV. 18 Press to turn On, turn on the remote control may also operate BRAVIA® SyncTM equipment. ...Control Button Description 1 2 3 DISPLAY CC POWER 4 5 WIDE INPUT 6 7 TOOLS Button Description 1 DISPLAY 2 CC 3 BRAVIA Sync Press once to display the banner with TV functions and settings. Some other buttons on and off the Theater Mode. THEATER: Press to turn On when Muting or Off the Closed...
...are watching. The picture settings will be set for a cinemalike experience and the audio will time out in fast rewind mode. Use them as a reference when operating the TV. 18 Press to turn On, turn on the remote control may also operate BRAVIA® SyncTM equipment. ...Control Button Description 1 2 3 DISPLAY CC POWER 4 5 WIDE INPUT 6 7 TOOLS Button Description 1 DISPLAY 2 CC 3 BRAVIA Sync Press once to display the banner with TV functions and settings. Some other buttons on and off the Theater Mode. THEATER: Press to turn On when Muting or Off the Closed...
Operating Instructions
Page 20
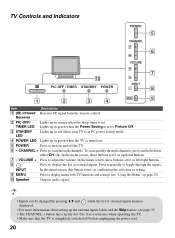
... list of external inputs. Press repeatedly to turn on and off before unplugging the power cord. 20 VOLUME + Press to display menu with TV functions and settings (see page 35. • The CHANNEL + button has a tactile dot. INPUT In the menu screen, this button serves as up ... Receives IR signal from the remote control. In the menu screen, these buttons serve as a reference when operating the TV. • Make sure that the TV is displayed. • For more information about setting up /down either CH -/+. Receiver 2 PIC OFF/ Lights up in orange when the sleep timer is...
... list of external inputs. Press repeatedly to turn on and off before unplugging the power cord. 20 VOLUME + Press to display menu with TV functions and settings (see page 35. • The CHANNEL + button has a tactile dot. INPUT In the menu screen, this button serves as up ... Receives IR signal from the remote control. In the menu screen, these buttons serve as a reference when operating the TV. • Make sure that the TV is displayed. • For more information about setting up /down either CH -/+. Receiver 2 PIC OFF/ Lights up in orange when the sleep timer is...
Operating Instructions
Page 21
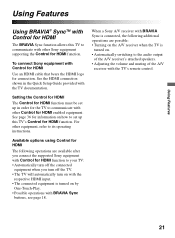
... Using Features Using Features Using BRAVIA® SyncTM with Control for HDMI The BRAVIA Sync function allows this TV's Control for HDMI function. See page 36 for information on . • Automatically switching to communicate with the TV documentation. Setting the Control for HDMI The Control for connection. To connect Sony equipment with Control for HDMI Use...
... Using Features Using Features Using BRAVIA® SyncTM with Control for HDMI The BRAVIA Sync function allows this TV's Control for HDMI function. See page 36 for information on . • Automatically switching to communicate with the TV documentation. Setting the Control for HDMI The Control for connection. To connect Sony equipment with Control for HDMI Use...
Operating Instructions
Page 23
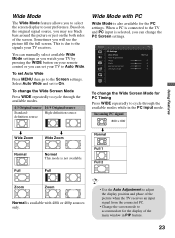
.... 23 Sometimes you will see black bars around the picture or just on your remote control or you can set your preference. To change the Wide Screen Mode Press WIDE repeatedly to your TV to Auto Wide. Incoming PC signal 800 × 600 m Wide Zoom m Wide Zoom m Normal Normal Full Normal This... you may see the picture fill the full screen. You can change the Wide Screen Mode for the PC settings. Select Auto Wide and set Auto Wide Press MENU then go to the TV and PC input is also available for PC Timing Press WIDE repeatedly to On. This is not available. When...
.... 23 Sometimes you will see black bars around the picture or just on your remote control or you can set your preference. To change the Wide Screen Mode Press WIDE repeatedly to your TV to Auto Wide. Incoming PC signal 800 × 600 m Wide Zoom m Wide Zoom m Normal Normal Full Normal This... you may see the picture fill the full screen. You can change the Wide Screen Mode for the PC settings. Select Auto Wide and set Auto Wide Press MENU then go to the TV and PC input is also available for PC Timing Press WIDE repeatedly to On. This is not available. When...

Operating Instructions
Page 24
The inputs list consists of the displayed labels that corresponds to your connected equipment, then press . 3 If you can label your External Inputs to Setup settings. Press V/v to highlight the video input (Video 1-2, Component 1-2, HDMI 1-3, PC) to assign a label; To Label an Input 1 Press MENU then go to.... When you assign Skip, your video signal for viewing including the TV mode. press to select the input of your choice. 2 Press V/v to highlight one of TV mode and other equipment connected to select your TV will skip over this input when you want to which you press ...
The inputs list consists of the displayed labels that corresponds to your connected equipment, then press . 3 If you can label your External Inputs to Setup settings. Press V/v to highlight the video input (Video 1-2, Component 1-2, HDMI 1-3, PC) to assign a label; To Label an Input 1 Press MENU then go to.... When you assign Skip, your video signal for viewing including the TV mode. press to select the input of your choice. 2 Press V/v to highlight one of TV mode and other equipment connected to select your TV will skip over this input when you want to which you press ...
Operating Instructions
Page 25
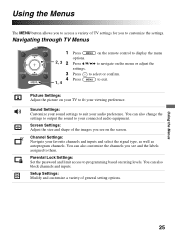
... your connected audio equipment. You can also change the settings to output the sound to exit. Channel Settings: Navigate your sound settings to them. Parental Lock Settings: Set the password and limit access to programming based on your TV to fit your audio preference. Using the Menus 25 ... the channels you see on the menu or adjust the settings. Picture Settings: Adjust the picture on rating levels. Setup Settings: Modify and customize a variety of TV settings for you to customize the settings. Screen Settings: Adjust the size and shape of the images you see...
... your connected audio equipment. You can also change the settings to output the sound to exit. Channel Settings: Navigate your sound settings to them. Parental Lock Settings: Set the password and limit access to programming based on your TV to fit your audio preference. Using the Menus 25 ... the channels you see on the menu or adjust the settings. Picture Settings: Adjust the picture on rating levels. Setup Settings: Modify and customize a variety of TV settings for you to customize the settings. Screen Settings: Adjust the size and shape of the images you see...


