Operating Instructions
Page 3
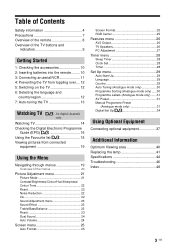
... 23 Dual Sound 24 Auto Volume 24 Screen menu 25 Auto Format 25 Screen Format 25 RGB Center 25 Features menu 26 AV2 Output 26 TV Speakers 26 PC Adjustment 27 Timer menu 28 Sleep Timer 28 Clock Set 28 Timer 28 Set Up menu 29 Auto Start Up 29 Language... Programme Preset (Analogue mode only 31 Digital Set Up 34 Using Optional Equipment Connecting optional equipment 37 Additional Information Optimum Viewing area 40 Replacing the lamp 41 Specifications 44 Troubleshooting 46 Index 48 3 GB
... 23 Dual Sound 24 Auto Volume 24 Screen menu 25 Auto Format 25 Screen Format 25 RGB Center 25 Features menu 26 AV2 Output 26 TV Speakers 26 PC Adjustment 27 Timer menu 28 Sleep Timer 28 Clock Set 28 Timer 28 Set Up menu 29 Auto Start Up 29 Language... Programme Preset (Analogue mode only 31 Digital Set Up 34 Using Optional Equipment Connecting optional equipment 37 Additional Information Optimum Viewing area 40 Replacing the lamp 41 Specifications 44 Troubleshooting 46 Index 48 3 GB

Operating Instructions
Page 9
Input select (page 15) • In TV mode: Selects the input source from equipment connected to the TV sockets. • In TV menu: OK 3 2 +/-/ Overview of the TV buttons and indicators W E G A TGE A PUSH O PEN T V /V ID E O VO L U M E CANNEL T IM E R L A M PP OW E R A/S NT D B Y P OW E R MENU OK 12 3 4 5 6 78 9 1 (page 19) 2 / -
Input select (page 15) • In TV mode: Selects the input source from equipment connected to the TV sockets. • In TV menu: OK 3 2 +/-/ Overview of the TV buttons and indicators W E G A TGE A PUSH O PEN T V /V ID E O VO L U M E CANNEL T IM E R L A M PP OW E R A/S NT D B Y P OW E R MENU OK 12 3 4 5 6 78 9 1 (page 19) 2 / -

Operating Instructions
Page 41
...Sony service center to obtain a new lamp. • Always remember to dispose of the lamp compartment. If the glass become dark. • Do not touch or stain the front glass of the new lamp or the glass of used lamps in proximity to allow it becomes cool. on the TV set flashes. 2 Replace the lamp...power cord, the standby indicator Disconnect the power cord to the TV set. • Do not remove the lamp except when replacing it. • Before replacing the lamp, turn on the TV set . • Consult your hand inside the lamp. If it is not securely attached, the picture may cause ...
...Sony service center to obtain a new lamp. • Always remember to dispose of the lamp compartment. If the glass become dark. • Do not touch or stain the front glass of the new lamp or the glass of used lamps in proximity to allow it becomes cool. on the TV set flashes. 2 Replace the lamp...power cord, the standby indicator Disconnect the power cord to the TV set. • Do not remove the lamp except when replacing it. • Before replacing the lamp, turn on the TV set . • Consult your hand inside the lamp. If it is not securely attached, the picture may cause ...

Operating Instructions
Page 42
... knob back to go dark. 6 Pull out the lamp. Never put the used lamp has cooled, place it into its place. Then pull the lamp straight out.. Tip • If the lamp is very hot immediately after use. Tips • The lamp is not securely reattached, the self-diagnostic function may cause... a fire or the screen to CLOSE and secure the cover. 42 GB Hook a finger through the loop...
... knob back to go dark. 6 Pull out the lamp. Never put the used lamp has cooled, place it into its place. Then pull the lamp straight out.. Tip • If the lamp is very hot immediately after use. Tips • The lamp is not securely reattached, the self-diagnostic function may cause... a fire or the screen to CLOSE and secure the cover. 42 GB Hook a finger through the loop...

Operating Instructions
Page 43
Tips • Consult your Sony dealer for a Sony XL-2400 replacement lamp. • Take great care when replacing the lamp or plugging in its place. 9 Put the outside lamp cover back in /unplugging the connecting cords. Rough handling may cause the TV to fall, damaging the TV, the TV stand and the floor. 43 GB Additional Information
Tips • Consult your Sony dealer for a Sony XL-2400 replacement lamp. • Take great care when replacing the lamp or plugging in its place. 9 Put the outside lamp cover back in /unplugging the connecting cords. Rough handling may cause the TV to fall, damaging the TV, the TV stand and the floor. 43 GB Additional Information
Operating Instructions
Page 45
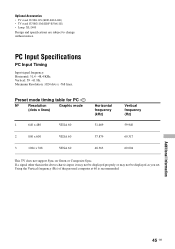
Optional Accessories • TV stand SU-RG11S (KDF-E42A11E) • TV stand SU-RG11M (KDF-E50A11E) • Lamp: XL-2400 Design and specifications are subject to change without notice. PC Input Specifications PC Input Timing Input signal frequency: Horizontal: 31,4 - 48,4 KHz. Vertical: ... VESA 60 VESA 60 VESA 60 Horizontal frequency (kHz) 31.469 37.879 48.363 Vertical frequency (Hz) 59.940 60.317 60.004 This TV does not support Sync on Green or Composite Sync. If a signal other than in the above chart is recommended. Additional Information 45 GB Maximum Resolution...
Optional Accessories • TV stand SU-RG11S (KDF-E42A11E) • TV stand SU-RG11M (KDF-E50A11E) • Lamp: XL-2400 Design and specifications are subject to change without notice. PC Input Specifications PC Input Timing Input signal frequency: Horizontal: 31,4 - 48,4 KHz. Vertical: ... VESA 60 VESA 60 VESA 60 Horizontal frequency (kHz) 31.469 37.879 48.363 Vertical frequency (Hz) 59.940 60.317 60.004 This TV does not support Sync on Green or Composite Sync. If a signal other than in the above chart is recommended. Additional Information 45 GB Maximum Resolution...
Operating Instructions
Page 47
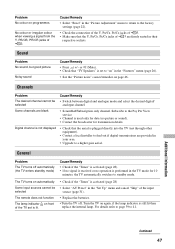
... Problem The desired channel cannot be selected The remote does not function The lamp indicator on front of the TV set to a higher gain aerial. Digital channel is not displayed • Check that "TV Speakers" is plugged directly into the TV (not through other equipment). • Contact a local installer to find out if digital...
... Problem The desired channel cannot be selected The remote does not function The lamp indicator on front of the TV set to a higher gain aerial. Digital channel is not displayed • Check that "TV Speakers" is plugged directly into the TV (not through other equipment). • Contact a local installer to find out if digital...
Operating Instructions
Page 48
... Up 34 Digital Set-up 36 Text hold ( ) button 8 Text reveal ( ) button 8 Timer list 17 Timer menu 28 Timer REC 16 Treble 23 TV Speakers 26 TV standby (\/1) button 8 V VCR connecting 11 recording 16 Volume (2) +/- buttons 8, 9 W Wide 15 Z Zoom 15 48 GB buttons 8, 9 Programme 32 ... Features menu 26 H Headphones connecting 37 Hue 21 I Info ( ) button 8 Input select ( ) button 8, 9 Input signal index table 19 Iris 22 L Label 32 Lamp, replacing 41 Language 29 M Manual Programme Preset 31 Manual Timer REC 17 MENU button 8 Mute (%) button 8 N Noise Reduction 22 Number buttons 8 O OK button 8, 9...
... Up 34 Digital Set-up 36 Text hold ( ) button 8 Text reveal ( ) button 8 Timer list 17 Timer menu 28 Timer REC 16 Treble 23 TV Speakers 26 TV standby (\/1) button 8 V VCR connecting 11 recording 16 Volume (2) +/- buttons 8, 9 W Wide 15 Z Zoom 15 48 GB buttons 8, 9 Programme 32 ... Features menu 26 H Headphones connecting 37 Hue 21 I Info ( ) button 8 Input select ( ) button 8, 9 Input signal index table 19 Iris 22 L Label 32 Lamp, replacing 41 Language 29 M Manual Programme Preset 31 Manual Timer REC 17 MENU button 8 Mute (%) button 8 N Noise Reduction 22 Number buttons 8 O OK button 8, 9...


