
Operating Instructions
Page 2
... USER-SERVICEABLE PARTS INSIDE. REFER SERVICING TO QUALIFIED SERVICE PERSONNEL. These limits are located at the rear of the LCD Projection TV, below . This symbol is no guarantee that interference will not occur in the spaces provided below the Sony logo, on the sticker, and also on a circuit different from the broadcaster/cable company and/or program owner. Record these numbers in a particular installation. MODEL: KDF-60XBR950, KDF-70XBR950 Please keep this...
... USER-SERVICEABLE PARTS INSIDE. REFER SERVICING TO QUALIFIED SERVICE PERSONNEL. These limits are located at the rear of the LCD Projection TV, below . This symbol is no guarantee that interference will not occur in the spaces provided below the Sony logo, on the sticker, and also on a circuit different from the broadcaster/cable company and/or program owner. Record these numbers in a particular installation. MODEL: KDF-60XBR950, KDF-70XBR950 Please keep this...
Operating Instructions
Page 3
... the cord. In this product meets the ENERGY STAR® guidelines for energy efficiency. It is desirable to cover the windows that this case, please wait a few hours to let the moisture evaporate before operating it checked by qualified service personnel before turning on the LCD Projection TV. ❑ To obtain the best picture, do not block the ventilation openings. ❑ Do not install the LCD Projection TV...
... the cord. In this product meets the ENERGY STAR® guidelines for energy efficiency. It is desirable to cover the windows that this case, please wait a few hours to let the moisture evaporate before operating it checked by qualified service personnel before turning on the LCD Projection TV. ❑ To obtain the best picture, do not block the ventilation openings. ❑ Do not install the LCD Projection TV...

Operating Instructions
Page 4
...Use only with the cart, stand, tripod, bracket, or table specified by forcing it in. Carefully observe and comply with all warnings, cautions and instructions placed on the set should be observed in the operating instructions or service manual. For those sets designed to operate from the apparatus. 11) Only use... such as power-supply cord or plug is equipped with a polarized AC power cord plug (a plug having a third pin for replacement of the obsolete outlet. 10) Protect the power cord from tip-over. 13) Unplug this manual for the set . This is a safety feature. Install in any ...
...Use only with the cart, stand, tripod, bracket, or table specified by forcing it in. Carefully observe and comply with all warnings, cautions and instructions placed on the set should be observed in the operating instructions or service manual. For those sets designed to operate from the apparatus. 11) Only use... such as power-supply cord or plug is equipped with a polarized AC power cord plug (a plug having a third pin for replacement of the obsolete outlet. 10) Protect the power cord from tip-over. 13) Unplug this manual for the set . This is a safety feature. Install in any ...

Operating Instructions
Page 5
... a swimming pool, etc. Always turn the set . Attachments Do not use the supplied cleaning cloth or a glass cleaning cloth moistened with a soft cloth. Consult qualified service personnel. Installation Water and Moisture Do not use any kind on the set on the screen surface The screen surface has a special coating to reduce a picture displayed by the manufacturer for the specific model of the LCD Projection TV with a cloth or other...
... a swimming pool, etc. Always turn the set . Attachments Do not use the supplied cleaning cloth or a glass cleaning cloth moistened with a soft cloth. Consult qualified service personnel. Installation Water and Moisture Do not use any kind on the set on the screen surface The screen surface has a special coating to reduce a picture displayed by the manufacturer for the specific model of the LCD Projection TV with a cloth or other...

Operating Instructions
Page 6
... an antenna discharge unit, size of grounding conductors, location of antenna discharge unit, connection to lightning and power-line surges. Improper adjustment of other electric light or power circuits, or where it indicates a need for the grounding electrode. 6 Antenna Grounding According to the NEC Refer to section 54-300 of the Canadian Electrical Code in damage and will prevent damage to the receiver due...
... an antenna discharge unit, size of grounding conductors, location of antenna discharge unit, connection to lightning and power-line surges. Improper adjustment of other electric light or power circuits, or where it indicates a need for the grounding electrode. 6 Antenna Grounding According to the NEC Refer to section 54-300 of the Canadian Electrical Code in damage and will prevent damage to the receiver due...

Operating Instructions
Page 7
... be affected by your LCD projection TV according to dangerous voltage or other hazards. For the best picture quality, install your viewing position. If the lamp replacement indicator of the front panel blinks in fire, electric shock or other hazards. Servicing Do not attempt to service the set by yourself since opening the cabinet may expose you to the operating instructions. Replacement Parts When replacement parts are required, be careful...
... be affected by your LCD projection TV according to dangerous voltage or other hazards. For the best picture quality, install your viewing position. If the lamp replacement indicator of the front panel blinks in fire, electric shock or other hazards. Servicing Do not attempt to service the set by yourself since opening the cabinet may expose you to the operating instructions. Replacement Parts When replacement parts are required, be careful...

Operating Instructions
Page 8
... or Antenna 25 Connecting a VCR and Cable 32 Connecting a VCR and Cable Box 33 Connecting Two VCRs for Tape Editing 35 Connecting a Satellite Receiver 36 Connecting a Satellite Receiver with a VCR.........37 Connecting an Audio Receiver 39 Connecting a DVD Player with Component Video Connectors 40 Connecting a DVD Player with A/V Connectors ..41 Connecting a Camcorder 42 Connecting a Device with an Optical IN Connector 43 Using the CONTROL S Feature 44 Setting Up the LCD Projection TV Automatically 45 Using the Features Using the Remote Control 46 Programming the Remote Control 48...
... or Antenna 25 Connecting a VCR and Cable 32 Connecting a VCR and Cable Box 33 Connecting Two VCRs for Tape Editing 35 Connecting a Satellite Receiver 36 Connecting a Satellite Receiver with a VCR.........37 Connecting an Audio Receiver 39 Connecting a DVD Player with Component Video Connectors 40 Connecting a DVD Player with A/V Connectors ..41 Connecting a Camcorder 42 Connecting a Device with an Optical IN Connector 43 Using the CONTROL S Feature 44 Setting Up the LCD Projection TV Automatically 45 Using the Features Using the Remote Control 46 Programming the Remote Control 48...

Operating Instructions
Page 9
... images (for models KDF-60XBR950 and KDF-70XBR950. This manual is not intended for use with your LCD Projection TV screen digital photos (JPEG) and movies (MPEG1) that are stored on one picture and listen to obtain a smooth picture movement when playing back movies or other devices (such as digital set-top boxes) that you for younger viewers. ❑ Digital Visual Interface (DVI-HDTV): Can accommodate a copyprotected digital connection (HDCP*) to other video...
... images (for models KDF-60XBR950 and KDF-70XBR950. This manual is not intended for use with your LCD Projection TV screen digital photos (JPEG) and movies (MPEG1) that are stored on one picture and listen to obtain a smooth picture movement when playing back movies or other devices (such as digital set-top boxes) that you for younger viewers. ❑ Digital Visual Interface (DVI-HDTV): Can accommodate a copyprotected digital connection (HDCP*) to other video...
Operating Instructions
Page 10
... transfer of your new LCD projection TV. 1 Installing and Connecting the LCD Projection TV This section guides you how to begin using your LCD projection TV. Instructions in wide screen mode (16:9 aspect ratio). ❑ Auto Wide: Allows you to access on the LCD projection TV console. 10 Introducing the Sony LCD Projection TV ❑ i.LINK: Provides a secure digital interface to watch 4:3 normal broadcasts in this manual are also found on -screen menus and adjust your initial setup. The i.LINK is...
... transfer of your new LCD projection TV. 1 Installing and Connecting the LCD Projection TV This section guides you how to begin using your LCD projection TV. Instructions in wide screen mode (16:9 aspect ratio). ❑ Auto Wide: Allows you to access on the LCD projection TV console. 10 Introducing the Sony LCD Projection TV ❑ i.LINK: Provides a secure digital interface to watch 4:3 normal broadcasts in this manual are also found on -screen menus and adjust your initial setup. The i.LINK is...

Operating Instructions
Page 12
... To remove dust from the front of time ❑ Turn off . This is placed in a damaged screen. ✍ To clean the screen, please use any type of contact may result in a humid room, or if the room temperature changes suddenly, the picture may be blurred or show poor color. When carrying the LCD Projection TV ❑ Before carrying, unplug the power cord and disconnect all cables...
... To remove dust from the front of time ❑ Turn off . This is placed in a damaged screen. ✍ To clean the screen, please use any type of contact may result in a humid room, or if the room temperature changes suddenly, the picture may be blurred or show poor color. When carrying the LCD Projection TV ❑ Before carrying, unplug the power cord and disconnect all cables...

Operating Instructions
Page 13
... than replacement. The used lamp Used lamp contains Mercury, Dispose According to blow for any object inside the lamp receptacle of the LCD projection TV after the power has been turned off. ❑ Do not leave the removed lamp near flammable materials or within the reach of the lamp receptacle. If the screen becomes dark, the color looks unusual, or the LAMP indicator on the front of the LCD projection TV flashes, it cool...
... than replacement. The used lamp Used lamp contains Mercury, Dispose According to blow for any object inside the lamp receptacle of the LCD projection TV after the power has been turned off. ❑ Do not leave the removed lamp near flammable materials or within the reach of the lamp receptacle. If the screen becomes dark, the color looks unusual, or the LAMP indicator on the front of the LCD projection TV flashes, it cool...

Operating Instructions
Page 14
... the Sony LCD Projection TV 1 Turn off the power switch on the LCD projection TV and after several minutes, unplug the power cord. (The cooling fan will continue to open it . Push and release the center in the upper of the control panel cover to blow for about two minutes after turning off .) ✍ Do not touch the front glass of a new lamp or the glass of the box. 3 Remove the control panel cover...
... the Sony LCD Projection TV 1 Turn off the power switch on the LCD projection TV and after several minutes, unplug the power cord. (The cooling fan will continue to open it . Push and release the center in the upper of the control panel cover to blow for about two minutes after turning off .) ✍ Do not touch the front glass of a new lamp or the glass of the box. 3 Remove the control panel cover...

Operating Instructions
Page 24
... and using it with the CONTROL S cable. See the instruction manual that have compatible interfaces. Provides a secure digital connection between your LCD projection TV and your i.LINK-compatible portable device. Installing and Connecting the LCD Projection TV Connection Description 6 DIGITAL AUDIO (OPTICAL) OUT (PCM/DOLBY* DIGITAL) Connects to the optical audio input of a digital audio component that is not intended for use with the CONTROL S cable. 9 AUDIO OUT (VAR/FIX) L/R Connects to the left and right audio inputs of your audio or video component. 0 DVI-HDTV VIDEO Can...
... and using it with the CONTROL S cable. See the instruction manual that have compatible interfaces. Provides a secure digital connection between your LCD projection TV and your i.LINK-compatible portable device. Installing and Connecting the LCD Projection TV Connection Description 6 DIGITAL AUDIO (OPTICAL) OUT (PCM/DOLBY* DIGITAL) Connects to the optical audio input of a digital audio component that is not intended for use with the CONTROL S cable. 9 AUDIO OUT (VAR/FIX) L/R Connects to the left and right audio inputs of your audio or video component. 0 DVI-HDTV VIDEO Can...
Operating Instructions
Page 41
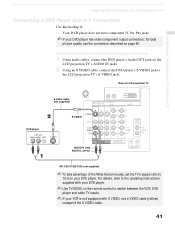
... projection TV's AUDIO IN jacks. 2 Using an S VIDEO cable, connect the DVD player's S VIDEO jack to switch between the VCR, DVD player and cable TV inputs. ✍ If your DVD player. Rear of LCD projection TV S video cable (not supplied) DVD player S VIDEO AUDIO-R (red) AUDIO-L (white) RK-C310/C320/C330 (not supplied) ✍ To take advantage of the S VIDEO cable. 41 Installing and Connecting the LCD Projection TV Installing and Connecting the LCD Projection TV Connecting a DVD Player with S VIDEO, use a VIDEO cable (yellow) instead of the Wide Screen modes, set the TV's aspect...
... projection TV's AUDIO IN jacks. 2 Using an S VIDEO cable, connect the DVD player's S VIDEO jack to switch between the VCR, DVD player and cable TV inputs. ✍ If your DVD player. Rear of LCD projection TV S video cable (not supplied) DVD player S VIDEO AUDIO-R (red) AUDIO-L (white) RK-C310/C320/C330 (not supplied) ✍ To take advantage of the S VIDEO cable. 41 Installing and Connecting the LCD Projection TV Installing and Connecting the LCD Projection TV Connecting a DVD Player with S VIDEO, use a VIDEO cable (yellow) instead of the Wide Screen modes, set the TV's aspect...

Operating Instructions
Page 47
... SAT/CABLE Displays index of your LCD projection TV's video inputs: TV, VIDEO 1, VIDEO 2, VIDEO 3, VIDEO 4, VIDEO 5, VIDEO 6 and VIDEO 7. Press to select immediately. Press ENTER to jump back and forth between two channels. Press again to display the i.LINK Control Panel. If FUNCTION is switched on -screen menu. Turn on page 54. Displays the Favorite Channels list. Cycles through the video equipment connected to display the current time and channel label (if set) and channel number. Press to restore the picture. z To scan rapidly through channels. Using...
... SAT/CABLE Displays index of your LCD projection TV's video inputs: TV, VIDEO 1, VIDEO 2, VIDEO 3, VIDEO 4, VIDEO 5, VIDEO 6 and VIDEO 7. Press to select immediately. Press ENTER to jump back and forth between two channels. Press again to display the i.LINK Control Panel. If FUNCTION is switched on -screen menu. Turn on page 54. Displays the Favorite Channels list. Cycles through the video equipment connected to display the current time and channel label (if set) and channel number. Press to restore the picture. z To scan rapidly through channels. Using...

Operating Instructions
Page 111
... screen. "Black box" on screen ❏ You have selected a text option in aspect ratios that came with your DVD (or contact your screen. the screen ❏ Try another channel; Double images ❏ Using a highly directional outdoor antenna or a cable may need service. Dark, poor or no text is available. (See page 102 to show these sources. Only snow and noise appear on , and a red light keeps flashing, your LCD projection TV's large screen and ability to reset Setup...
... screen. "Black box" on screen ❏ You have selected a text option in aspect ratios that came with your DVD (or contact your screen. the screen ❏ Try another channel; Double images ❏ Using a highly directional outdoor antenna or a cable may need service. Dark, poor or no text is available. (See page 102 to show these sources. Only snow and noise appear on , and a red light keeps flashing, your LCD projection TV's large screen and ability to reset Setup...

Operating Instructions
Page 112
... Information Audio Problem Good picture, no sound Audio noise Cannot gain enough volume when using a cable box Sound seems weak or insufficient Cannot raise the volume on external speakers Possible Remedies ❏ Press MUTING so that are not when using cable TV presently in the LCD projection TV's memory (see page 96). ❏ Press ANT to select the CABLE input (see page 47). Cannot receive any channels ❏ Use Auto Program in the Channel Menu to add receivable channels that Muting...
... Information Audio Problem Good picture, no sound Audio noise Cannot gain enough volume when using a cable box Sound seems weak or insufficient Cannot raise the volume on external speakers Possible Remedies ❏ Press MUTING so that are not when using cable TV presently in the LCD projection TV's memory (see page 96). ❏ Press ANT to select the CABLE input (see page 47). Cannot receive any channels ❏ Use Auto Program in the Channel Menu to add receivable channels that Muting...

Operating Instructions
Page 117
... button 47 Freeze, using with TV remote control 51 Camcorder, connecting 42 Caption Vision 102 Caption Vision menu, for digital channels 62 CATV. See cable Channel menu 87, 96 Channel Show/Hide 62 Channel Skip/Add 97 Channels Auto Program 96 creating labels 97 setting up 45 Cinema Black 91 CineMotion 89 Cleaning Cloth 12 Clear White 90 Clock/Timers 104 Closed caption modes 102 Color Corrector 90 Color temperature, adjusting 89 Color, adjusting 88 Connecting Audio receiver 39 Cable box 32-34 Cable or antenna 25 Camcorder 42 DVD player...
... button 47 Freeze, using with TV remote control 51 Camcorder, connecting 42 Caption Vision 102 Caption Vision menu, for digital channels 62 CATV. See cable Channel menu 87, 96 Channel Show/Hide 62 Channel Skip/Add 97 Channels Auto Program 96 creating labels 97 setting up 45 Cinema Black 91 CineMotion 89 Cleaning Cloth 12 Clear White 90 Clock/Timers 104 Closed caption modes 102 Color Corrector 90 Color temperature, adjusting 89 Color, adjusting 88 Connecting Audio receiver 39 Cable box 32-34 Cable or antenna 25 Camcorder 42 DVD player...

Operating Instructions
Page 118
...89 P Parental control, described 9 Password, changing 99 PICTURE button 46 Picture contrast, adjusting 88 Picture size, adjusting in Twin View 57 POWER buttons (GREEN) 47 POWER/STANDBY 114 Presetting channels 45 problems, troubleshooting 108-113 Program Guide 60 Program Options menu 61 progressive 107 R Ratings setting 99 viewing blocked programs 99 Rear panel controls and connections 23 Remote control Function of buttons 52 inserting batteries 17 programming 48 Removing channels from the channel list 97 RESET button 47 Resetting Audio options 92 Video options 88 S SAT/CABLE function button 46
...89 P Parental control, described 9 Password, changing 99 PICTURE button 46 Picture contrast, adjusting 88 Picture size, adjusting in Twin View 57 POWER buttons (GREEN) 47 POWER/STANDBY 114 Presetting channels 45 problems, troubleshooting 108-113 Program Guide 60 Program Options menu 61 progressive 107 R Ratings setting 99 viewing blocked programs 99 Rear panel controls and connections 23 Remote control Function of buttons 52 inserting batteries 17 programming 48 Removing channels from the channel list 97 RESET button 47 Resetting Audio options 92 Video options 88 S SAT/CABLE function button 46

Operating Instructions
Page 119
...VOL +/- SAT/CABLE power button 47 Satellite receiver connecting 36 satellite receiver, using with TV remote control 50 Screen menu 94 Setting up channels 45 Setup menu 87, 102 Sharpness, adjusting 89 Specifications 115-116 Steady Sound adjusting 92 Surround sound 92 T Timer set current 104 Timer setting 104 Treble, adjusting 92 troubleshooting 108-113 TV function button 46 TV power button 47 TV/VIDEO button 47 Twin View™ activating a picture 55 described 9 using 55 V VCR using with TV remote control 50 with cable box, connecting 33 with cable, connecting 32 with Twin View 57 119 Other...
...VOL +/- SAT/CABLE power button 47 Satellite receiver connecting 36 satellite receiver, using with TV remote control 50 Screen menu 94 Setting up channels 45 Setup menu 87, 102 Sharpness, adjusting 89 Specifications 115-116 Steady Sound adjusting 92 Surround sound 92 T Timer set current 104 Timer setting 104 Treble, adjusting 92 troubleshooting 108-113 TV function button 46 TV power button 47 TV/VIDEO button 47 Twin View™ activating a picture 55 described 9 using 55 V VCR using with TV remote control 50 with cable box, connecting 33 with cable, connecting 32 with Twin View 57 119 Other...


