Operating Instructions
Page 2
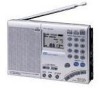
..., if not installed and used in stereo using the optional stereo headphones. 2GB Features Auto scan tuning for help. Refer servicing to rain or moisture. Record the serial number in this manual could void your choice. • Sleep timer The sleep timer will not occur in to Part 15 of a button. - You can select the time for MW (medium wave) broadcasts The MW channel step differs...
..., if not installed and used in stereo using the optional stereo headphones. 2GB Features Auto scan tuning for help. Refer servicing to rain or moisture. Record the serial number in this manual could void your choice. • Sleep timer The sleep timer will not occur in to Part 15 of a button. - You can select the time for MW (medium wave) broadcasts The MW channel step differs...
Operating Instructions
Page 3
... Searching available stations from presets - Standby function 28 Falling asleep listening to the radio or alarm - Sleep timer function 31 Other convenient uses Preventing operation errors - Manual tuning 18 Searching the station automatically - Hold function ....... 32 Recording broadcasts 33 Using the supplied SW external antenna 34 Using the optional external antenna 35 Additional information Precautions and maintenance 36 Troubleshooting 38 Specifications 40 Tips on AC power adaptor 10 Setting the clock Setting the Current Time 11...
... Searching available stations from presets - Standby function 28 Falling asleep listening to the radio or alarm - Sleep timer function 31 Other convenient uses Preventing operation errors - Manual tuning 18 Searching the station automatically - Hold function ....... 32 Recording broadcasts 33 Using the supplied SW external antenna 34 Using the optional external antenna 35 Additional information Precautions and maintenance 36 Troubleshooting 38 Specifications 40 Tips on AC power adaptor 10 Setting the clock Setting the Current Time 11...
Operating Instructions
Page 4
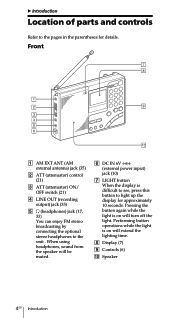
... using headphones, sound from the speaker will be muted. 6 DC IN 6V ! (external power input) jack (10) 7 LIGHT button When the display is on will extend the lighting time. 8 Display (7) 9 Controls (6) 0 Speaker 4GB Introduction Front 1 AM EXT ANT (AM external antenna) jack (35) 2 ATT (attenuator) control (21) 3 ATT (attenuator) ON/ OFF switch (21) 4 LINE OUT (recording output) jack (33) 5 2 (headphones) jack (17, 33) You can enjoy FM stereo broadcasting by connecting the optional stereo headphones to the unit...
... using headphones, sound from the speaker will be muted. 6 DC IN 6V ! (external power input) jack (10) 7 LIGHT button When the display is on will extend the lighting time. 8 Display (7) 9 Controls (6) 0 Speaker 4GB Introduction Front 1 AM EXT ANT (AM external antenna) jack (35) 2 ATT (attenuator) control (21) 3 ATT (attenuator) ON/ OFF switch (21) 4 LINE OUT (recording output) jack (33) 5 2 (headphones) jack (17, 33) You can enjoy FM stereo broadcasting by connecting the optional stereo headphones to the unit...
Operating Instructions
Page 7
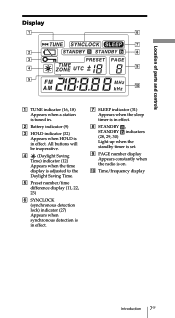
... (synchronous detection lock) indicator (27) Appears when synchronous detection is in effect. 7 SLEEP indicator (31) Appears when the sleep timer is in effect. 8 STANDBY , STANDBY indicators (28, 29, 30) Light up when the standby timer is set. 9 PAGE number display Appears constantly when the radio is in . 2 Battery indicator (9) 3 HOLD indicator (32) Appears when HOLD is on. 0 Time/frequency display Introduction 7GB Display Location of parts and controls 1 TUNE indicator (16...
... (synchronous detection lock) indicator (27) Appears when synchronous detection is in effect. 7 SLEEP indicator (31) Appears when the sleep timer is in effect. 8 STANDBY , STANDBY indicators (28, 29, 30) Light up when the standby timer is set. 9 PAGE number display Appears constantly when the radio is in . 2 Battery indicator (9) 3 HOLD indicator (32) Appears when HOLD is on. 0 Time/frequency display Introduction 7GB Display Location of parts and controls 1 TUNE indicator (16...
Operating Instructions
Page 9
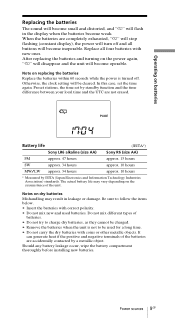
.... 34 hours approx. 10 hours * Measured by standby function and the time difference between your local time and the UTC are not erased. Do not mix different types of the batteries are completely exhausted, "E" will stop flashing (constant display), the power will turn off . After replacing the batteries and turning on the power again, "E" will disappear and the unit will become inoperable. It can generate heat if...
.... 34 hours approx. 10 hours * Measured by standby function and the time difference between your local time and the UTC are not erased. Do not mix different types of the batteries are completely exhausted, "E" will stop flashing (constant display), the power will turn off . After replacing the batteries and turning on the power again, "E" will disappear and the unit will become inoperable. It can generate heat if...
Operating Instructions
Page 10
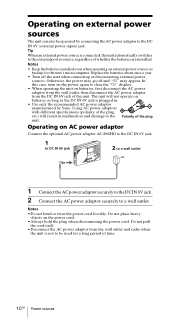
... from the wall outlet and radio when the unit is connected, the unit automatically switches to be operated by Sony. Notes • Keep the batteries installed even when operating on external power sources as the DC IN 6V jack is plugged in malfunction and damage to clear the "E" display. • When operating the unit on the power cord. •Always hold the plug when disconnecting the power cord. Notes •Do not...
... from the wall outlet and radio when the unit is connected, the unit automatically switches to be operated by Sony. Notes • Keep the batteries installed even when operating on external power sources as the DC IN 6V jack is plugged in malfunction and damage to clear the "E" display. • When operating the unit on the power cord. •Always hold the plug when disconnecting the power cord. Notes •Do not...
Operating Instructions
Page 11
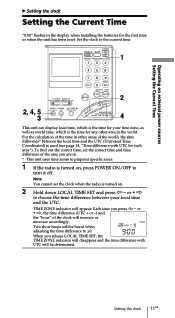
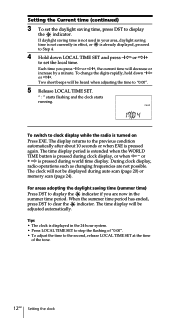
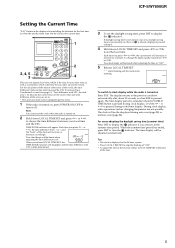
... choose the time difference between the local time and the UTC (Universal Time Coordinated) is used (see page 14, "Time difference with UTC will appear. Operating on external power sources Setting the Current Time B Setting the clock Setting the Current Time "0:00" flashes in other area in . * This unit uses time zones to pinpoint specific areas. 1 If the radio is turned on . 2 Hold down LOCAL TIME SET and press K - or + k, the time difference (UTC...
... choose the time difference between the local time and the UTC (Universal Time Coordinated) is used (see page 14, "Time difference with UTC will appear. Operating on external power sources Setting the Current Time B Setting the clock Setting the Current Time "0:00" flashes in other area in . * This unit uses time zones to pinpoint specific areas. 1 If the radio is turned on . 2 Hold down LOCAL TIME SET and press K - or + k, the time difference (UTC...
Operating Instructions
Page 12
... adjusting the time to clock display while the radio is pressed during auto scan (page 20) or memory scan (page 24). " : " starts flashing and the clock starts running. To switch to "0:00". 5 Release LOCAL TIME SET. Tips • The clock is displayed in effect, or is not currently in the 24 hour system. • Press LOCAL TIME SET to stop the flashing of "0:00". • To adjust the time to clear the indicator. Setting...
... adjusting the time to clock display while the radio is pressed during auto scan (page 20) or memory scan (page 24). " : " starts flashing and the clock starts running. To switch to "0:00". 5 Release LOCAL TIME SET. Tips • The clock is displayed in effect, or is not currently in the 24 hour system. • Press LOCAL TIME SET to stop the flashing of "0:00". • To adjust the time to clear the indicator. Setting...
Operating Instructions
Page 17
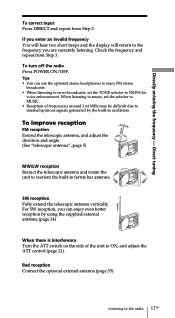
... ON, and adjust the ATT control (page 21). To turn off the radio Press POWER ON/OFF. Directly entering the frequency - If you can use the optional stereo headphones to enjoy FM stereo broadcasts. • When listening to news broadcasts, set the selector to MUSIC. • Reception of the unit to the frequency you are currently listening. Bad reception Connect the optional external antenna (page...
... ON, and adjust the ATT control (page 21). To turn off the radio Press POWER ON/OFF. Directly entering the frequency - If you can use the optional stereo headphones to enjoy FM stereo broadcasts. • When listening to news broadcasts, set the selector to MUSIC. • Reception of the unit to the frequency you are currently listening. Bad reception Connect the optional external antenna (page...
Operating Instructions
Page 25
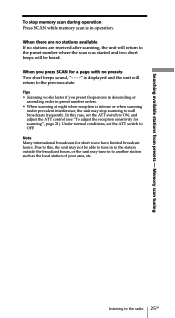
...; Scanning works faster if you press SCAN for a page with no stations are received after scanning, the unit will return to the preset number where the scan was started and two short beeps will return to OFF. Under normal conditions, set the ATT switch to this case, set the ATT switch to the previous state. Due to ON, and adjust the ATT control...
...; Scanning works faster if you press SCAN for a page with no stations are received after scanning, the unit will return to the preset number where the scan was started and two short beeps will return to OFF. Under normal conditions, set the ATT switch to this case, set the ATT switch to the previous state. Due to ON, and adjust the ATT control...
Operating Instructions
Page 28
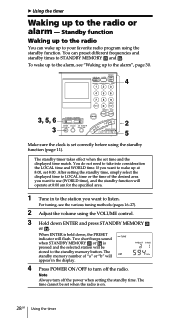
...). 2 Adjust the volume using the VOLUME control. 3 Hold down , the PRESET indicator will appear in to the station you want to listen. If you want to wake up to the alarm", page 30. 4 3, 5, 6 2 3 5 Make sure the clock is held down ENTER and press STANDBY MEMORY or . When ENTER is set 8:00. The standby memory number of the desired area you want to use (WORLD time), and the standby function will...
...). 2 Adjust the volume using the VOLUME control. 3 Hold down , the PRESET indicator will appear in to the station you want to listen. If you want to wake up to the alarm", page 30. 4 3, 5, 6 2 3 5 Make sure the clock is held down ENTER and press STANDBY MEMORY or . When ENTER is set 8:00. The standby memory number of the desired area you want to use (WORLD time), and the standby function will...

Operating Instructions
Page 29
... the display (see "Preventing operation errors - Even when the standby function is canceled, the station and time stored in STANDBY MEMORY or are not erased until new settings are overwritten. • If the standby memory is in the display. 6 Release STANDBY MEMORY or . Waking up and the standby setting is received. The timer goes back to set the standby time. The time changes by clearing STANDBY or STANDBY . To change the digits. The clock indication returns to the current time. 7 Display the time...
... the display (see "Preventing operation errors - Even when the standby function is canceled, the station and time stored in STANDBY MEMORY or are not erased until new settings are overwritten. • If the standby memory is in the display. 6 Release STANDBY MEMORY or . Waking up and the standby setting is received. The timer goes back to set the standby time. The time changes by clearing STANDBY or STANDBY . To change the digits. The clock indication returns to the current time. 7 Display the time...
Operating Instructions
Page 31
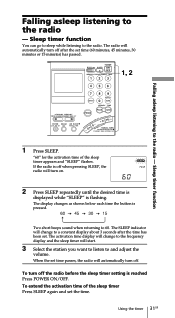
... Press SLEEP again and set the time. The radio will start. 3 Select the station you want to listen to and adjust the volume. If the radio is off when pressing SLEEP, the radio will turn off. Using the timer 31GB Sleep timer function You can go to sleep while listening to the radio - The activation time display will change to the frequency display and the sleep timer...
... Press SLEEP again and set the time. The radio will start. 3 Select the station you want to listen to and adjust the volume. If the radio is off when pressing SLEEP, the radio will turn off. Using the timer 31GB Sleep timer function You can go to sleep while listening to the radio - The activation time display will change to the frequency display and the sleep timer...
Operating Instructions
Page 35
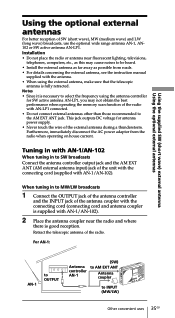
... Connect the antenna controller output jack and the AM EXT ANT (AM external antenna input) jack of the external antenna during a thunderstorm. Installation • Do not place the radio or antenna near the radio and where there is fully retracted. Furthermore, immediately disconnect the AC power adaptor from roads. • For details concerning the external antenna, see the instruction manual supplied with AN-1/AN-102). 2 Place the antenna coupler near fluorescent lighting...
... Connect the antenna controller output jack and the AM EXT ANT (AM external antenna input) jack of the external antenna during a thunderstorm. Installation • Do not place the radio or antenna near the radio and where there is fully retracted. Furthermore, immediately disconnect the AC power adaptor from roads. • For details concerning the external antenna, see the instruction manual supplied with AN-1/AN-102). 2 Place the antenna coupler near fluorescent lighting...
Operating Instructions
Page 38
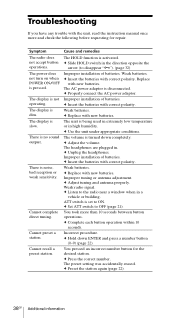
... correct number. The display is slow. Weak batteries. The volume is disconnected. c Insert the batteries with new batteries. Cannot complete direct tuning. c Insert the batteries with correct polarity. c Insert the batteries with correct polarity. The AC power adaptor is turned down ENTER and press a number button (0-9) (page 22). Weak radio signal. Troubleshooting If you have any trouble with the unit, read the instruction manual once more than 10 seconds between button operations.
... correct number. The display is slow. Weak batteries. The volume is disconnected. c Insert the batteries with new batteries. Cannot complete direct tuning. c Insert the batteries with correct polarity. c Insert the batteries with correct polarity. The AC power adaptor is turned down ENTER and press a number button (0-9) (page 22). Weak radio signal. Troubleshooting If you have any trouble with the unit, read the instruction manual once more than 10 seconds between button operations.

Operating Instructions
Page 39
... control. c Set the correct time. c Press STANDBY MEMORY or (page 29). The HOLD function is turned down completely. c Slide HOLD switch in the STANDBY MEMORY. c Adjust the volume. ATT switch is only one preset. You took more stations in the STANDBY MEMORY (page 28). Troubleshooting Additional information 39GB The volume is activated. c Set ATT switch to replace the batteries. Cause and remedies You forgot to press STANDBY MEMORY or . Cannot perform memory scan. Auto scan will not stop...
... control. c Set the correct time. c Press STANDBY MEMORY or (page 29). The HOLD function is turned down completely. c Slide HOLD switch in the STANDBY MEMORY. c Adjust the volume. ATT switch is only one preset. You took more stations in the STANDBY MEMORY (page 28). Troubleshooting Additional information 39GB The volume is activated. c Set ATT switch to replace the batteries. Cause and remedies You forgot to press STANDBY MEMORY or . Cannot perform memory scan. Auto scan will not stop...
Service Manual
Page 1
four R6 (size AA) batteries) Supplied accessories Carrying case (1) Compact antenna AN-71 (1) Wave Handbook (1) Design and specifications are subject to change without notice. 9-873-099-11 2001C1600-1 © 2001.3 Sony Corporation Audio Entertainment Group General Engineering Dept. projecting parts (w/h/d) Mass Approx. 536 g Approx. 608 g (incl. ICF-SW7600GR SERVICE MANUAL Ver 1.0 2001. 03 US Model Canadian Model AEP Model Chinese Model E Model Tourist Model SPECIFICATIONS Circuit system FM: Super...
four R6 (size AA) batteries) Supplied accessories Carrying case (1) Compact antenna AN-71 (1) Wave Handbook (1) Design and specifications are subject to change without notice. 9-873-099-11 2001C1600-1 © 2001.3 Sony Corporation Audio Entertainment Group General Engineering Dept. projecting parts (w/h/d) Mass Approx. 536 g Approx. 608 g (incl. ICF-SW7600GR SERVICE MANUAL Ver 1.0 2001. 03 US Model Canadian Model AEP Model Chinese Model E Model Tourist Model SPECIFICATIONS Circuit system FM: Super...
Service Manual
Page 3
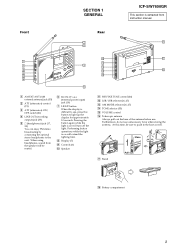
... instruction manual. 1 AM EXT ANT (AM external antenna) jack (35) 2 ATT (attenuator) control (21) 3 ATT (attenuator) ON/ OFF switch (21) 4 LINE OUT (recording output) jack (33) 5 2 (headphones) jack (17, 33) You can enjoy FM stereo broadcasting by connecting the optional stereo headphones to the unit . Furthermore, do not use . Front SECTION 1 GENERAL Rear ICF-SW7600GR This section is extracted from the speaker will be muted. 6 DC IN 6V ! (external power input) jack (10) 7 LIGHT button...
... instruction manual. 1 AM EXT ANT (AM external antenna) jack (35) 2 ATT (attenuator) control (21) 3 ATT (attenuator) ON/ OFF switch (21) 4 LINE OUT (recording output) jack (33) 5 2 (headphones) jack (17, 33) You can enjoy FM stereo broadcasting by connecting the optional stereo headphones to the unit . Furthermore, do not use . Front SECTION 1 GENERAL Rear ICF-SW7600GR This section is extracted from the speaker will be muted. 6 DC IN 6V ! (external power input) jack (10) 7 LIGHT button...
Service Manual
Page 4
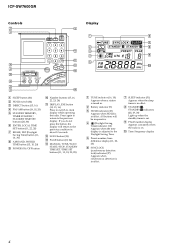
... press the button, the display will be inoperative. 4 (Daylight Saving Time) indicator (12) Appears when the time display is adjusted to clock display while operating the radio. ICF-SW7600GR Controls Display 1 SLEEP button (31) 2 HOLD switch (32) 3 DIRECT button (15, 16) 4 FM/AM button (16, 18, 20) 5 STANDBY MEMORY, TIMER STANDBY/ STANDBY TIME SET buttons (28, 30) 6 ENTER, LOCAL TIME SET button (11, 22, 28) 7 ERASE, DST (Daylight Saving Time) button (11, 13, 30) 8 AM BAND, WORLD TIME button (13, 18, 20) 9 POWER ON/OFF button 0 Number buttons (15...
... press the button, the display will be inoperative. 4 (Daylight Saving Time) indicator (12) Appears when the time display is adjusted to clock display while operating the radio. ICF-SW7600GR Controls Display 1 SLEEP button (31) 2 HOLD switch (32) 3 DIRECT button (15, 16) 4 FM/AM button (16, 18, 20) 5 STANDBY MEMORY, TIMER STANDBY/ STANDBY TIME SET buttons (28, 30) 6 ENTER, LOCAL TIME SET button (11, 22, 28) 7 ERASE, DST (Daylight Saving Time) button (11, 13, 30) 8 AM BAND, WORLD TIME button (13, 18, 20) 9 POWER ON/OFF button 0 Number buttons (15...
Service Manual
Page 5
... time, set the daylight saving time, press DST to turn it off. The time display will not be adjusted automatically. or + k is pressed during auto scan (page 20) or memory scan (page 24). For areas adopting the daylight saving time (summer time) Press DST to display the indicator if you are now in . * This unit uses time zones to pinpoint specific areas. 1 If the radio is turned on, press POWER...
... time, set the daylight saving time, press DST to turn it off. The time display will not be adjusted automatically. or + k is pressed during auto scan (page 20) or memory scan (page 24). For areas adopting the daylight saving time (summer time) Press DST to display the indicator if you are now in . * This unit uses time zones to pinpoint specific areas. 1 If the radio is turned on, press POWER...


