Marketing Specifications
Page 1
...pitch. Digital Pitch Control allows playback of voice-quality audio in flash memory3 stores up to 535 songs5 , or use the voice recorder as individuals or group meetings. Voice Operated Recording (VOR) stops the recording during silent pauses and begins recording again when the conversation resumes. ICD-UX300 Record files ... recorded audio slower or faster without the need for cables. Direct USB connection allows you store up to plug the voice recorder into a USB port on a compatible PC and other audio devices.1 4 GB built-in LP mode. Ideal for: Classes, lectures, recording ...
...pitch. Digital Pitch Control allows playback of voice-quality audio in flash memory3 stores up to 535 songs5 , or use the voice recorder as individuals or group meetings. Voice Operated Recording (VOR) stops the recording during silent pauses and begins recording again when the conversation resumes. ICD-UX300 Record files ... recorded audio slower or faster without the need for cables. Direct USB connection allows you store up to plug the voice recorder into a USB port on a compatible PC and other audio devices.1 4 GB built-in LP mode. Ideal for: Classes, lectures, recording ...
Marketing Specifications
Page 2
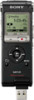
ICD-UX300 Features ADDITIONAL FEATURES Large capacity Long recording time Music player Compatible with: Voice operated recording (VOR) Additional features: Ideal for: Specifications General Type of Sony...Voice Recorder Recording Media: Built-In Flash Memory 4GB Recording and Playback Times: ST-44.1kHz/192k: 44H 40M STSP-44.1kHz/128k: 67H STLP-22.025kHz/48k: 178H 40M SP-44.1kHz/32k: 268H 5M LP-11.025kHz/8k: 1072H 25M2 Function: Switch: Rec/Pause, Cue, Review, Stop, Play/Stop Audio Recording System: Digital Stereo, Monaural Recording... Memory Memory Size: 4 GB (approx. 3.59 GB=3,860,922,368 Byte) ...
ICD-UX300 Features ADDITIONAL FEATURES Large capacity Long recording time Music player Compatible with: Voice operated recording (VOR) Additional features: Ideal for: Specifications General Type of Sony...Voice Recorder Recording Media: Built-In Flash Memory 4GB Recording and Playback Times: ST-44.1kHz/192k: 44H 40M STSP-44.1kHz/128k: 67H STLP-22.025kHz/48k: 178H 40M SP-44.1kHz/32k: 268H 5M LP-11.025kHz/8k: 1072H 25M2 Function: Switch: Rec/Pause, Cue, Review, Stop, Play/Stop Audio Recording System: Digital Stereo, Monaural Recording... Memory Memory Size: 4 GB (approx. 3.59 GB=3,860,922,368 Byte) ...
Operating Instructions
Page 2
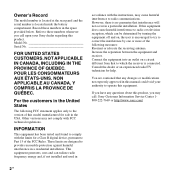
Record these numbers whenever you may not comply with the limits for a Class B digital device, pursuant to Part 15 of this equipment does cause ...limits are cautioned that any questions about this product, you call : Sony Customer Information Service Center 1800-222-7669 or http://www.sony.com/ 2 GB This equipment generates, uses and can be determined by one or more ...for sale in a particular installation. NOT APPLICABLE IN CANADA, INCLUDING IN THE PROVINCE OF QUEBEC. Owner's Record The model number is located at the rear panel and the serial number is connected. Refer to these...
Record these numbers whenever you may not comply with the limits for a Class B digital device, pursuant to Part 15 of this equipment does cause ...limits are cautioned that any questions about this product, you call : Sony Customer Information Service Center 1800-222-7669 or http://www.sony.com/ 2 GB This equipment generates, uses and can be determined by one or more ...for sale in a particular installation. NOT APPLICABLE IN CANADA, INCLUDING IN THE PROVINCE OF QUEBEC. Owner's Record The model number is located at the rear panel and the serial number is connected. Refer to these...
Operating Instructions
Page 4
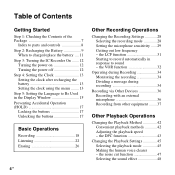
... to charge/replace the battery ....11 Step 3: Turning the IC Recorder On .......12 Turning the power on 12 Turning the power off ... during Recording 34 Monitoring the recording 34 Dividing a message during recording 34 Recording via Other Devices 36 Recording with an external microphone 36 Recording from ... playback speed - the LCF function 31 Starting to record automatically in response to Be Used in the Display ... 17 Basic Operations Recording 18 Listening 22 Erasing 26 4 GB Other Recording Operations Changing the Recording Settings 28 Selecting the recording mode 28 Setting...
... to charge/replace the battery ....11 Step 3: Turning the IC Recorder On .......12 Turning the power on 12 Turning the power off ... during Recording 34 Monitoring the recording 34 Dividing a message during recording 34 Recording via Other Devices 36 Recording with an external microphone 36 Recording from ... playback speed - the LCF function 31 Starting to record automatically in response to Be Used in the Display ... 17 Basic Operations Recording 18 Listening 22 Erasing 26 4 GB Other Recording Operations Changing the Recording Settings 28 Selecting the recording mode 28 Setting...
Operating Instructions
Page 8
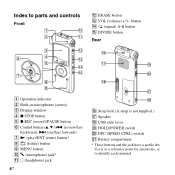
... O DIVIDE button Rear A Operation indicator B Built-in microphones (stereo) C Display window D x STOP button E z REC (record)/PAUSE button F Control button (v, V / . (review/fast backward), > (cue/fast forward)) G N (play)/ENT (enter) button* H (folder) button I MENU button J m (microphone) jack* K i (headphone) jack 8 GB P Strap hole (A strap is not supplied.) Q Speaker R USB slide lever S HOLD/POWER switch T DPC...
... O DIVIDE button Rear A Operation indicator B Built-in microphones (stereo) C Display window D x STOP button E z REC (record)/PAUSE button F Control button (v, V / . (review/fast backward), > (cue/fast forward)) G N (play)/ENT (enter) button* H (folder) button I MENU button J m (microphone) jack* K i (headphone) jack 8 GB P Strap hole (A strap is not supplied.) Q Speaker R USB slide lever S HOLD/POWER switch T DPC...
Operating Instructions
Page 10
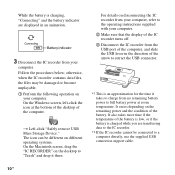
...battery is charging, "Connecting" and the battery indicator are transferring data to the IC recorder. *2 If the IC recorder cannot be connected to a computer directly, use the supplied USB connection support cable. 10 GB It varies depending on your computer. While the battery is charged while you are ...displayed in the direction of the battery. It also takes more time if the temperature of the computer. otherwise, when the IC recorder contains data files, the ...
...battery is charging, "Connecting" and the battery indicator are transferring data to the IC recorder. *2 If the IC recorder cannot be connected to a computer directly, use the supplied USB connection support cable. 10 GB It varies depending on your computer. While the battery is charged while you are ...displayed in the direction of the battery. It also takes more time if the temperature of the computer. otherwise, when the IC recorder contains data files, the ...
Operating Instructions
Page 12
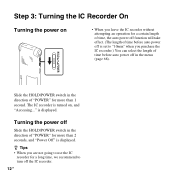
... can select the length of "POWER" for more than 2 seconds, and "Power Off" is turned on • When you leave the IC recorder without attempting an operation for a long time, we recommend to turn off in the direction of time before auto power off Slide the HOLD/POWER ...switch in the menu (page 68). The IC recorder is displayed. is set to "10min" when you are not going to use the IC recorder for a certain length of time, the auto power off function will take effect. (The length of time...
... can select the length of "POWER" for more than 2 seconds, and "Power Off" is turned on • When you leave the IC recorder without attempting an operation for a long time, we recommend to turn off in the direction of time before auto power off Slide the HOLD/POWER ...switch in the menu (page 68). The IC recorder is displayed. is set to "10min" when you are not going to use the IC recorder for a certain length of time, the auto power off function will take effect. (The length of time...

Operating Instructions
Page 14
... then press N/ ENT. 4 Press x STOP to return to the stop mode. The menu mode window will return to display the current date and time. 14 GB
... then press N/ ENT. 4 Press x STOP to return to the stop mode. The menu mode window will return to display the current date and time. 14 GB

Operating Instructions
Page 16
English, Español (Spanish), Français (French) 16 GB You can select the following languages.
English, Español (Spanish), Français (French) 16 GB You can select the following languages.

Operating Instructions
Page 18
N/ENT 18 GB Basic Operations Recording P Note • Before making a recording, exit HOLD mode and turn on the control button to record messages ( FOLDER01-10). Selecting a folder 1 Press to display the folder selection window. 2 Press v or V on the power. V There are 10 folders already available when you want to select the folder in v which you purchase the IC recorder. 3 Press N/ENT.
N/ENT 18 GB Basic Operations Recording P Note • Before making a recording, exit HOLD mode and turn on the control button to record messages ( FOLDER01-10). Selecting a folder 1 Press to display the folder selection window. 2 Press v or V on the power. V There are 10 folders already available when you want to select the folder in v which you purchase the IC recorder. 3 Press N/ENT.
Operating Instructions
Page 20
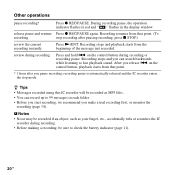
... resume Press z REC/PAUSE again. During recording pause, the operation indicator flashes in red and " " flashes in each folder. • Before you start recording, we recommend you pause recording, recording pause is automatically released and the IC recorder enters the stop recording after you make a trial recording first, or monitor the recording (page 34). Other operations pause recording* Press z REC/PAUSE.
... resume Press z REC/PAUSE again. During recording pause, the operation indicator flashes in red and " " flashes in each folder. • Before you start recording, we recommend you pause recording, recording pause is automatically released and the IC recorder enters the stop recording after you make a trial recording first, or monitor the recording (page 34). Other operations pause recording* Press z REC/PAUSE.

Operating Instructions
Page 22
V 22 GB To start playback 1 Press . 2 Press v or V on the control button to play. v V 3 Press > on the control button. > 4 Press v or V on the power. Listening P Note • Before playback starts, exit HOLD mode and turn on the control button to select the message v you want to select the folder.
V 22 GB To start playback 1 Press . 2 Press v or V on the control button to play. v V 3 Press > on the control button. > 4 Press v or V on the power. Listening P Note • Before playback starts, exit HOLD mode and turn on the control button to select the message v you want to select the folder.

Operating Instructions
Page 24
...when "Easy Search" is displayed as follows. : Folder name: FOLDER01-FOLDER10 : Title: Date_file number (e.g. 090101_001 or FM_090101_001) : Artist name: My Recording : File name: Date_file number (e.g. 090101_001 or FM_090101_001) You can change the folder name, title, artist name, and/or file name using a computer. 24... GB Display when playing back the messages A File information Press v or V on the control button to the succeeding messages Press > on the...
...when "Easy Search" is displayed as follows. : Folder name: FOLDER01-FOLDER10 : Title: Date_file number (e.g. 090101_001 or FM_090101_001) : Artist name: My Recording : File name: Date_file number (e.g. 090101_001 or FM_090101_001) You can change the folder name, title, artist name, and/or file name using a computer. 24... GB Display when playing back the messages A File information Press v or V on the control button to the succeeding messages Press > on the...

Operating Instructions
Page 26
"Erase?" Erasing P Notes • Once a recording has been erased, you want to select "Execute." Selecting a message and erasing it 1 Select the message you cannot retrieve it. • Before erasing a message, exit HOLD mode and turn on the control button to erase when the IC recorder is in the stop or playback mode. 2 Press ERASE. ERASE v V 26 GB appears with the message title. 3 Press v or V on the power.
"Erase?" Erasing P Notes • Once a recording has been erased, you want to select "Execute." Selecting a message and erasing it 1 Select the message you cannot retrieve it. • Before erasing a message, exit HOLD mode and turn on the control button to erase when the IC recorder is in the stop or playback mode. 2 Press ERASE. ERASE v V 26 GB appears with the message title. 3 Press v or V on the power.

Operating Instructions
Page 28
The menu mode window will be displayed. 3 Press v or V on the control button to select "REC Mode," and then press N/ ENT. x STOP N/ENT MENU v, V You can select the recording mode in the menu when the IC recorder is in the stop mode. 1 Press MENU to exit the menu mode. 28 GB Other Recording Operations Changing the Recording Settings Selecting the recording mode 2 Press v or V on the control button to select "ST," "STSP," "STLP," "SP," or "LP," and then press N/ENT. 4 Press x STOP to enter the menu mode.
The menu mode window will be displayed. 3 Press v or V on the control button to select "REC Mode," and then press N/ ENT. x STOP N/ENT MENU v, V You can select the recording mode in the menu when the IC recorder is in the stop mode. 1 Press MENU to exit the menu mode. 28 GB Other Recording Operations Changing the Recording Settings Selecting the recording mode 2 Press v or V on the control button to select "ST," "STSP," "STLP," "SP," or "LP," and then press N/ENT. 4 Press x STOP to enter the menu mode.

Operating Instructions
Page 30
...sensitivity is set to exit the menu mode. S-High High To record a sound far away from the IC recorder or a low sound, such as a recording made in a spacious room. To record the sound of a normal conversation or meeting, such as a recording made in front of your mouth, a sound near the IC... recorder, or a loud sound. 2 Press v or V on the control button to select "Mic Sensitivity," and then press N/ENT. 3 Press v or V on the control button to select "S-High ," "High ," "Low ," and then press N/ENT. 4 Press x STOP to "High " when you purchase the IC recorder. 30 GB
...sensitivity is set to exit the menu mode. S-High High To record a sound far away from the IC recorder or a low sound, such as a recording made in a spacious room. To record the sound of a normal conversation or meeting, such as a recording made in front of your mouth, a sound near the IC... recorder, or a loud sound. 2 Press v or V on the control button to select "Mic Sensitivity," and then press N/ENT. 3 Press v or V on the control button to select "S-High ," "High ," "Low ," and then press N/ENT. 4 Press x STOP to "High " when you purchase the IC recorder. 30 GB
Operating Instructions
Page 32
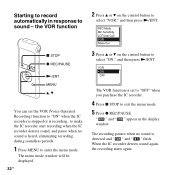
... menu mode window will be displayed. 32 GB The VOR function is detected and " " and " " flash. The recording pauses when no sound is set the VOR (Voice Operated Recording) function to "ON" when the IC recorder is stopped or is recording, to make the IC recorder start recording when the IC recorder detects sound, and pause when no sound is...
... menu mode window will be displayed. 32 GB The VOR function is detected and " " and " " flash. The recording pauses when no sound is set the VOR (Voice Operated Recording) function to "ON" when the IC recorder is stopped or is recording, to make the IC recorder start recording when the IC recorder detects sound, and pause when no sound is...

Operating Instructions
Page 34
You can divide a message during recording VOL +/- Once a message is divided, you can monitor the recording. You can adjust the monitoring volume by pressing VOL +/-, but the recording level is fixed. Operating during Recording Monitoring the recording i (headphone) jack Dividing a message during recording so that the message is divided into two parts, and a new message number is added to the i (headphone) jack before you start, you cannot re-combine the divided messages. 34 GB DIVIDE If you connect the supplied stereo headphones to the newer part of the divided message.
You can divide a message during recording VOL +/- Once a message is divided, you can monitor the recording. You can adjust the monitoring volume by pressing VOL +/-, but the recording level is fixed. Operating during Recording Monitoring the recording i (headphone) jack Dividing a message during recording so that the message is divided into two parts, and a new message number is added to the i (headphone) jack before you start, you cannot re-combine the divided messages. 34 GB DIVIDE If you connect the supplied stereo headphones to the newer part of the divided message.
Operating Instructions
Page 36
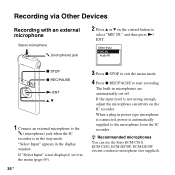
... stop mode. If the input level is automatically supplied to the m (microphone) jack when the IC recorder is not displayed, set it in the display window. "Select Input" appears in the menu (page 69). 36 GB 3 Press x STOP to exit the menu mode. 4 Press z REC/PAUSE to select "MIC IN," and ...then press N/ ENT. If "Select Input" is in microphones are automatically cut off. z Recommended microphones You can use the Sony ECM-CS10, ECM-CZ10, ECM-DS70P, ECM-...
... stop mode. If the input level is automatically supplied to the m (microphone) jack when the IC recorder is not displayed, set it in the display window. "Select Input" appears in the menu (page 69). 36 GB 3 Press x STOP to exit the menu mode. 4 Press z REC/PAUSE to select "MIC IN," and ...then press N/ ENT. If "Select Input" is in microphones are automatically cut off. z Recommended microphones You can use the Sony ECM-CS10, ECM-CZ10, ECM-DS70P, ECM-...

Operating Instructions
Page 38
...5 Press x STOP to exit the menu mode. 6 Connect other equipment to the m (microphone) jack of the IC recorder using the synchronized recording function 1 Press MENU to select "ON," and then press N/ENT. 38 GB If "Select Input" is in the stop mode. Connect the audio output connector (stereo mini-plug) of other... equipment to the IC recorder when the IC recorder is not displayed, set it in the display window. "Select Input" ...
...5 Press x STOP to exit the menu mode. 6 Connect other equipment to the m (microphone) jack of the IC recorder using the synchronized recording function 1 Press MENU to select "ON," and then press N/ENT. 38 GB If "Select Input" is in the stop mode. Connect the audio output connector (stereo mini-plug) of other... equipment to the IC recorder when the IC recorder is not displayed, set it in the display window. "Select Input" ...
