Operating Instructions
Page 1
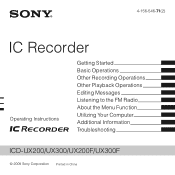
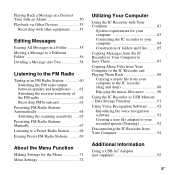
4-156-546-71(2) IC Recorder Operating Instructions Getting Started Basic Operations Other Recording Operations Other Playback Operations Editing Messages Listening to the FM Radio About the Menu Function Utilizing Your Computer Additional Information Troubleshooting ICD-UX200/UX300/UX200F/UX300F © 2009 Sony Corporation Printed in China
4-156-546-71(2) IC Recorder Operating Instructions Getting Started Basic Operations Other Recording Operations Other Playback Operations Editing Messages Listening to the FM Radio About the Menu Function Utilizing Your Computer Additional Information Troubleshooting ICD-UX200/UX300/UX200F/UX300F © 2009 Sony Corporation Printed in China
Operating Instructions
Page 3
... Canada This class B digital apparatus complies with part 15 of the FCC Rules. Content information is written in the language or the character that may not be displayed properly on the IC recorder may cause undesired operation. The IC recorder is not supported by ... (2) this limit requires permission of the copyright holders. • Sony is subject to problems of the IC recorder or computer. • Depending on the types of Conformity Trade Name : SONY Model : ICD-UX200/UX300 Responsible Party : Sony Electronics Inc. The capacity of rechargeable batteries, call toll free 1-...
... Canada This class B digital apparatus complies with part 15 of the FCC Rules. Content information is written in the language or the character that may not be displayed properly on the IC recorder may cause undesired operation. The IC recorder is not supported by ... (2) this limit requires permission of the copyright holders. • Sony is subject to problems of the IC recorder or computer. • Depending on the types of Conformity Trade Name : SONY Model : ICD-UX200/UX300 Responsible Party : Sony Electronics Inc. The capacity of rechargeable batteries, call toll free 1-...
Operating Instructions
Page 4
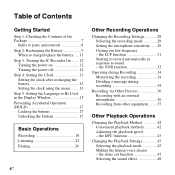
... 45 Selecting the playback mode 45 Making the human voice clearer - Table of Contents Getting Started Step 1: Checking the Contents of the Package 7 Index to parts and controls 8 Step 2: Recharging the Battery 9 When to charge/replace the battery ....11 Step 3: Turning the IC Recorder On .......12 Turning the power on 12 Turning the...
... 45 Selecting the playback mode 45 Making the human voice clearer - Table of Contents Getting Started Step 1: Checking the Contents of the Package 7 Index to parts and controls 8 Step 2: Recharging the Battery 9 When to charge/replace the battery ....11 Step 3: Turning the IC Recorder On .......12 Turning the power on 12 Turning the...
Operating Instructions
Page 5
... Computer to Save Them 87 Copying Music Files from Your Computer to the IC recorder (drag and drop 88 Enjoying the music files more 90 Using the IC Recorder as USB Memory - Data Storage Function 91 Using Voice Recognition Software .........92 Introducing the voice recognition software 92 Creating a user file adapted to your computer to the...
... Computer to Save Them 87 Copying Music Files from Your Computer to the IC recorder (drag and drop 88 Enjoying the music files more 90 Using the IC Recorder as USB Memory - Data Storage Function 91 Using Voice Recognition Software .........92 Introducing the voice recognition software 92 Creating a user file adapted to your computer to the...
Operating Instructions
Page 6
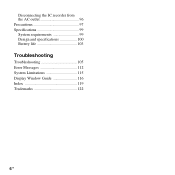
Disconnecting the IC recorder from the AC outlet 96 Precautions 97 Specifications 99 System requirements 99 Design and specifications 100 Battery life 103 Troubleshooting Troubleshooting 105 Error Messages 112 System Limitations 115 Display Window Guide 116 Index 119 Trademarks 122 6 GB
Disconnecting the IC recorder from the AC outlet 96 Precautions 97 Specifications 99 System requirements 99 Design and specifications 100 Battery life 103 Troubleshooting Troubleshooting 105 Error Messages 112 System Limitations 115 Display Window Guide 116 Index 119 Trademarks 122 6 GB
Operating Instructions
Page 7
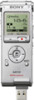
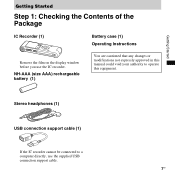
NH-AAA (size AAA) rechargeable battery (1) You are cautioned that any changes or modifications not expressly approved in this manual could void your authority to a computer directly, use the IC recorder. Stereo headphones (1) USB connection support cable (1) If the IC recorder cannot be connected to operate this equipment. Getting Started Getting Started Step 1: Checking the Contents of the Package IC Recorder (1) Battery case (1) Operating Instructions Remove the film on the display window before you use the supplied USB connection support cable. 7GB
NH-AAA (size AAA) rechargeable battery (1) You are cautioned that any changes or modifications not expressly approved in this manual could void your authority to a computer directly, use the IC recorder. Stereo headphones (1) USB connection support cable (1) If the IC recorder cannot be connected to operate this equipment. Getting Started Getting Started Step 1: Checking the Contents of the Package IC Recorder (1) Battery case (1) Operating Instructions Remove the film on the display window before you use the supplied USB connection support cable. 7GB
Operating Instructions
Page 9
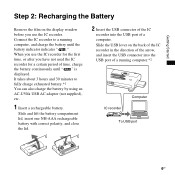
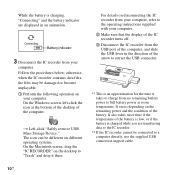
...lift the battery compartment lid, insert one NH-AAA rechargeable battery with correct polarity, and close the lid. 2 Insert the USB connector of the IC recorder into the USB port of a running computer, and charge the battery until " " is displayed. Getting Started Step 2: Recharging the Battery Remove ...the film on the back of the IC recorder in the direction of the arrow, and insert the USB connector into the USB port of a computer. It takes about 3 hours and 30 ...
...lift the battery compartment lid, insert one NH-AAA rechargeable battery with correct polarity, and close the lid. 2 Insert the USB connector of the IC recorder into the USB port of a running computer, and charge the battery until " " is displayed. Getting Started Step 2: Recharging the Battery Remove ...the film on the back of the IC recorder in the direction of the arrow, and insert the USB connector into the USB port of a computer. It takes about 3 hours and 30 ...
Operating Instructions
Page 10
...-click "Safely remove USB Mass Storage Device." The icon can be different on different operating systems. On the Macintosh screen, drag the "IC RECORDER" on the remaining power and the condition of the computer, and slide the USB lever in an animation. It varies depending on the desktop... of the arrow to retract the USB connector. *1 This is charging, "Connecting" and the battery indicator are transferring data to the IC recorder. *2 If the IC recorder cannot be connected to a computer directly, use the supplied USB connection support cable. 10 GB It also takes more time if the...
...-click "Safely remove USB Mass Storage Device." The icon can be different on different operating systems. On the Macintosh screen, drag the "IC RECORDER" on the remaining power and the condition of the computer, and slide the USB lever in an animation. It varies depending on the desktop... of the arrow to retract the USB connector. *1 This is charging, "Connecting" and the battery indicator are transferring data to the IC recorder. *2 If the IC recorder cannot be connected to a computer directly, use the supplied USB connection support cable. 10 GB It also takes more time if the...
Operating Instructions
Page 11
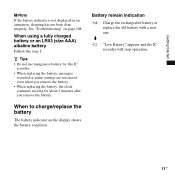
... P Note If the battery indicator is not displayed in an animation, charging has not been done properly. m : "Low Battery" appears and the IC recorder will stop operation. 11GB When using a fully charged battery or an LR03 (size AAA) alkaline battery Follow the step 1. z Tips • Do... not use manganese battery for this IC recorder. • When replacing the battery, messages recorded or alarm settings are not erased even when you remove the battery. • When replacing the battery, the clock continues ...
... P Note If the battery indicator is not displayed in an animation, charging has not been done properly. m : "Low Battery" appears and the IC recorder will stop operation. 11GB When using a fully charged battery or an LR03 (size AAA) alkaline battery Follow the step 1. z Tips • Do... not use manganese battery for this IC recorder. • When replacing the battery, messages recorded or alarm settings are not erased even when you remove the battery. • When replacing the battery, the clock continues ...
Operating Instructions
Page 12
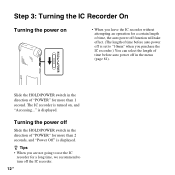
... time before auto power off is set to "10min" when you are not going to use the IC recorder for more than 2 seconds, and "Power Off" is turned on • When you leave the IC recorder without attempting an operation for a certain length of time, the auto power off function will take effect.... (The length of time before auto power off the IC recorder. 12 GB z Tips • When you purchase the IC recorder.) You can select the length of "POWER" for a long time, we recommend to turn off in the menu (page 81)....
... time before auto power off is set to "10min" when you are not going to use the IC recorder for more than 2 seconds, and "Power Off" is turned on • When you leave the IC recorder without attempting an operation for a certain length of time, the auto power off function will take effect.... (The length of time before auto power off the IC recorder. 12 GB z Tips • When you purchase the IC recorder.) You can select the length of "POWER" for a long time, we recommend to turn off in the menu (page 81)....
Operating Instructions
Page 13
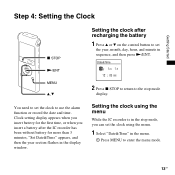
...Clock x STOP Setting the clock after recharging the battery 1 Press v or V on the control button to the stop mode, you insert a battery after the IC recorder has been without battery for the first time, or when you can set the year, month, day, hour, and minute in the menu. 1 Press MENU... alarm function or record the date and time. Clock setting display appears when you insert battery for more than 3 minutes, "Set Date&Time" appears, and then the year section flashes in the display window. 2 Press x STOP to return to set the clock using the menu While the IC recorder is in the ...
...Clock x STOP Setting the clock after recharging the battery 1 Press v or V on the control button to the stop mode, you insert a battery after the IC recorder has been without battery for the first time, or when you can set the year, month, day, hour, and minute in the menu. 1 Press MENU... alarm function or record the date and time. Clock setting display appears when you insert battery for more than 3 minutes, "Set Date&Time" appears, and then the year section flashes in the display window. 2 Press x STOP to return to set the clock using the menu While the IC recorder is in the ...
Operating Instructions
Page 18
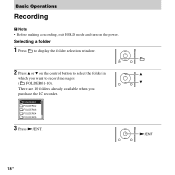
Basic Operations Recording P Note • Before making a recording, exit HOLD mode and turn on the control button to record messages ( FOLDER01-10). V There are 10 folders already available when you want to select the folder in v which you purchase the IC recorder. 3 Press N/ENT. Selecting a folder 1 Press to display the folder selection window. 2 Press v or V on the power. N/ENT 18 GB
Basic Operations Recording P Note • Before making a recording, exit HOLD mode and turn on the control button to record messages ( FOLDER01-10). V There are 10 folders already available when you want to select the folder in v which you purchase the IC recorder. 3 Press N/ENT. Selecting a folder 1 Press to display the folder selection window. 2 Press v or V on the power. N/ENT 18 GB
Operating Instructions
Page 19
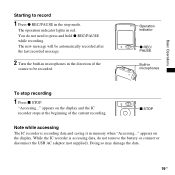
...the USB AC adaptor (not supplied). x STOP Note while accessing The IC recorder is accessing data, do not need to be automatically recorded after the last recorded message. 2 Turn the built-in microphones in the stop recording 1 Press x STOP. The operation indicator lights in microphones To stop ... may damage the data. 19GB While the IC recorder is recording data and saving it in memory when "Accessing..." The new message will be recorded. Operation indicator z REC/ PAUSE Built-in red. appears on the display and the IC recorder stops at the beginning of the source to...
...the USB AC adaptor (not supplied). x STOP Note while accessing The IC recorder is accessing data, do not need to be automatically recorded after the last recorded message. 2 Turn the built-in microphones in the stop recording 1 Press x STOP. The operation indicator lights in microphones To stop ... may damage the data. 19GB While the IC recorder is recording data and saving it in memory when "Accessing..." The new message will be recorded. Operation indicator z REC/ PAUSE Built-in red. appears on the display and the IC recorder stops at the beginning of the source to...
Operating Instructions
Page 20
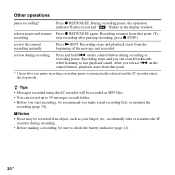
.... z Tips • Messages recorded using this IC recorder will be sure to 99 messages in the display window. on the control button, playback starts from that point. (To recording stop mode. During recording pause, the operation indicator flashes in red and " " flashes in each folder. • Before you start recording, we recommend you release . Recording resumes from the beginning...
.... z Tips • Messages recorded using this IC recorder will be sure to 99 messages in the display window. on the control button, playback starts from that point. (To recording stop mode. During recording pause, the operation indicator flashes in red and " " flashes in each folder. • Before you start recording, we recommend you release . Recording resumes from the beginning...
Operating Instructions
Page 24
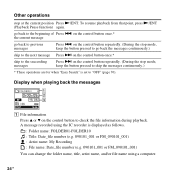
... "Easy Search" is displayed as follows. : Folder name: FOLDER01-FOLDER10 : Title: Date_file number (e.g. 090101_001 or FM_090101_001) : Artist name: My Recording : File name: Date_file number (e.g. 090101_001 or FM_090101_001) You can change the folder name, title, artist name, and/or file name using a... control button to previous messages Press . To resume playback from that point, press N/ENT (Playback Pause function) again. A message recorded using the IC recorder is set to "OFF" (page 76). Display when playing back the messages A File information Press v or V on the control...
... "Easy Search" is displayed as follows. : Folder name: FOLDER01-FOLDER10 : Title: Date_file number (e.g. 090101_001 or FM_090101_001) : Artist name: My Recording : File name: Date_file number (e.g. 090101_001 or FM_090101_001) You can change the folder name, title, artist name, and/or file name using a... control button to previous messages Press . To resume playback from that point, press N/ENT (Playback Pause function) again. A message recorded using the IC recorder is set to "OFF" (page 76). Display when playing back the messages A File information Press v or V on the control...

Operating Instructions
Page 26
ERASE v V 26 GB "Erase?" Selecting a message and erasing it . • Before erasing a message, exit HOLD mode and turn on the control button to erase when the IC recorder is in the stop or playback mode. 2 Press ERASE. Erasing P Notes • Once a recording has been erased, you cannot retrieve it 1 Select the message you want to select "Execute." appears with the message title. 3 Press v or V on the power.
ERASE v V 26 GB "Erase?" Selecting a message and erasing it . • Before erasing a message, exit HOLD mode and turn on the control button to erase when the IC recorder is in the stop or playback mode. 2 Press ERASE. Erasing P Notes • Once a recording has been erased, you cannot retrieve it 1 Select the message you want to select "Execute." appears with the message title. 3 Press v or V on the power.
Operating Instructions
Page 28
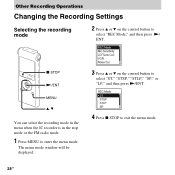
Other Recording Operations Changing the Recording Settings Selecting the recording mode 2 Press v or V on the control button to select "ST," "STSP," "STLP," "SP," or "LP," and then press N/ENT. 4 Press x STOP to exit the menu mode. 28 GB The menu mode window will be displayed. 3 Press v or V on the control button to enter the menu mode. x STOP N/ENT MENU v, V You can select the recording mode in the menu when the IC recorder is in the stop mode or the FM radio mode. 1 Press MENU to select "REC Mode," and then press N/ ENT.
Other Recording Operations Changing the Recording Settings Selecting the recording mode 2 Press v or V on the control button to select "ST," "STSP," "STLP," "SP," or "LP," and then press N/ENT. 4 Press x STOP to exit the menu mode. 28 GB The menu mode window will be displayed. 3 Press v or V on the control button to enter the menu mode. x STOP N/ENT MENU v, V You can select the recording mode in the menu when the IC recorder is in the stop mode or the FM radio mode. 1 Press MENU to select "REC Mode," and then press N/ ENT.
Operating Instructions
Page 29
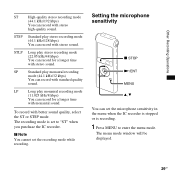
... N/ENT MENU v, V You can set the microphone sensitivity in the menu when the IC recorder is stopped or is set the recording mode while recording. To record with stereo sound. LP Long play stereo recording mode (44.1 kHz/128 kbps) You can record with better sound quality, select the ST or STSP mode. SP Standard play stereo...
... N/ENT MENU v, V You can set the microphone sensitivity in the menu when the IC recorder is stopped or is set the recording mode while recording. To record with stereo sound. LP Long play stereo recording mode (44.1 kHz/128 kbps) You can record with better sound quality, select the ST or STSP mode. SP Standard play stereo...
Operating Instructions
Page 30
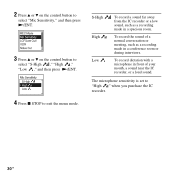
... a microphone in a spacious room. S-High High To record a sound far away from the IC recorder or a low sound, such as a recording made in front of a normal conversation or meeting, such as a recording made in a conference room or during interviews. To record the sound of your mouth, a sound near the IC recorder, or a loud sound. 2 Press v or V on the...
... a microphone in a spacious room. S-High High To record a sound far away from the IC recorder or a low sound, such as a recording made in front of a normal conversation or meeting, such as a recording made in a conference room or during interviews. To record the sound of your mouth, a sound near the IC recorder, or a loud sound. 2 Press v or V on the...
Operating Instructions
Page 31
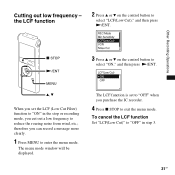
The menu mode window will be displayed. 3 Press v or V on the control button to exit the menu mode. Other Recording Operations x STOP N/ENT MENU v, V When you set to "OFF" when you purchase the IC recorder. 4 Press x STOP to select "LCF(Low Cut)," and then press N/ENT. Cutting out low frequency - therefore you cut out... LCF (Low Cut Filter) function to enter the menu mode. To cancel the LCF function Set "LCF(Low Cut)" to "OFF" in the stop or recording mode, you can record a message more clearly. 1 Press MENU to "ON" in step 3. 31GB
The menu mode window will be displayed. 3 Press v or V on the control button to exit the menu mode. Other Recording Operations x STOP N/ENT MENU v, V When you set to "OFF" when you purchase the IC recorder. 4 Press x STOP to select "LCF(Low Cut)," and then press N/ENT. Cutting out low frequency - therefore you cut out... LCF (Low Cut Filter) function to enter the menu mode. To cancel the LCF function Set "LCF(Low Cut)" to "OFF" in the stop or recording mode, you can record a message more clearly. 1 Press MENU to "ON" in step 3. 31GB


