Operating Instructions
Page 2
...interference to Part 15 of Conformity Trade Name : SONY Model : ICD-PX820 Responsible Party : Sony Electronics Inc. Connect the equipment into an outlet on...GB Consult the dealer or an experienced radio/TV technician for a Class B digital device, pursuant to radio communications. Owner's Record... The model number is located at the rear panel and the serial number is subject to the following measures: Reorient or relocate the receiving antenna. NOT APPLICABLE IN CANADA, INCLUDING IN THE PROVINCE OF QUEBEC. ICD-PX820...
...interference to Part 15 of Conformity Trade Name : SONY Model : ICD-PX820 Responsible Party : Sony Electronics Inc. Connect the equipment into an outlet on...GB Consult the dealer or an experienced radio/TV technician for a Class B digital device, pursuant to radio communications. Owner's Record... The model number is located at the rear panel and the serial number is subject to the following measures: Reorient or relocate the receiving antenna. NOT APPLICABLE IN CANADA, INCLUDING IN THE PROVINCE OF QUEBEC. ICD-PX820...
Operating Instructions
Page 4
... EVENT SHALL SONY CORPORATION BE LIABLE FOR ANY INCIDENTAL, CONSEQUENTIAL OR SPECIAL DAMAGES, WHETHER BASED ON TORT, CONTRACT, OR OTHERWISE, ARISING OUT OF OR IN CONNECTION WITH THIS MANUAL, THE SOFTWARE OR OTHER INFORMATION CONTAINED HEREIN OR THE USE THEREOF. You cannot connect other IC recorders. Notice for the IC recorder ICD-PX820/PX820M/ PX820D...
... EVENT SHALL SONY CORPORATION BE LIABLE FOR ANY INCIDENTAL, CONSEQUENTIAL OR SPECIAL DAMAGES, WHETHER BASED ON TORT, CONTRACT, OR OTHERWISE, ARISING OUT OF OR IN CONNECTION WITH THIS MANUAL, THE SOFTWARE OR OTHER INFORMATION CONTAINED HEREIN OR THE USE THEREOF. You cannot connect other IC recorders. Notice for the IC recorder ICD-PX820/PX820M/ PX820D...
Operating Instructions
Page 6
... Additional Information Using a USB AC Adaptor (not supplied 73 Disconnecting the IC recorder from Your Computer to the IC Recorder 64 Using the Supplied Digital Voice Editor Software 65 What you can do using the Digital Voice Editor software 65 System requirements 67 Installing the software 68 Referring to the help... for your computer 59 Connecting the IC recorder to your computer 60 Structure of folders and files 61 Disconnecting the IC recorder from your computer 61 Copying Messages from the IC Recorder to Your Computer to Save Them 63 6 GB Copying MP3 Files from the AC outlet ...
... Additional Information Using a USB AC Adaptor (not supplied 73 Disconnecting the IC recorder from Your Computer to the IC Recorder 64 Using the Supplied Digital Voice Editor Software 65 What you can do using the Digital Voice Editor software 65 System requirements 67 Installing the software 68 Referring to the help... for your computer 59 Connecting the IC recorder to your computer 60 Structure of folders and files 61 Disconnecting the IC recorder from your computer 61 Copying Messages from the IC Recorder to Your Computer to Save Them 63 6 GB Copying MP3 Files from the AC outlet ...
Operating Instructions
Page 8
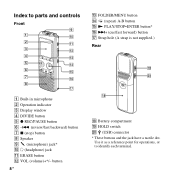
button 8 GB R Battery compartment S HOLD switch T (USB) connector * These buttons and the jack have a tactile dot. Use it as a reference point for operations, or to parts and ...
button 8 GB R Battery compartment S HOLD switch T (USB) connector * These buttons and the jack have a tactile dot. Use it as a reference point for operations, or to parts and ...
Operating Instructions
Page 10
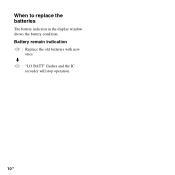
When to replace the batteries The battery indicator in the display window shows the battery condition. m : "LO BATT" flashes and the IC recorder will stop operation. 10 GB Battery remain indication : Replace the old batteries with new ones.
When to replace the batteries The battery indicator in the display window shows the battery condition. m : "LO BATT" flashes and the IC recorder will stop operation. 10 GB Battery remain indication : Replace the old batteries with new ones.
Operating Instructions
Page 12
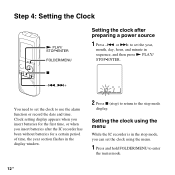
... 4: Setting the Clock N PLAY/ STOP•ENTER FOLDER/MENU Setting the clock after the IC recorder has been without batteries for the first time, or when you can set the clock to enter the menu mode. 12 GB or >+ to set the year, month, day, hour, and minute in the display window... when you insert batteries for a certain period of time, the year section flashes in sequence, and then press N PLAY/ STOP•ENTER. Setting the clock using the menu. 1 Press and hold FOLDER/MENU to use the alarm function or record the date and time. x -., >+ You need to set the clock using ...
... 4: Setting the Clock N PLAY/ STOP•ENTER FOLDER/MENU Setting the clock after the IC recorder has been without batteries for the first time, or when you can set the clock to enter the menu mode. 12 GB or >+ to set the year, month, day, hour, and minute in the display window... when you insert batteries for a certain period of time, the year section flashes in sequence, and then press N PLAY/ STOP•ENTER. Setting the clock using the menu. 1 Press and hold FOLDER/MENU to use the alarm function or record the date and time. x -., >+ You need to set the clock using ...

Operating Instructions
Page 14
...the HOLD function first. z Tip Even if the HOLD function is activated during recording, all the functions of the buttons are locked to prevent accidental operation. To stop normal playback.) 14 GB Preventing Accidental Operation (HOLD) Locking the buttons Slide the HOLD switch in the ...direction of the arrow in the opposite direction from that of the arrow so that all the functions of the buttons are locked. "HOLD" will flash indicating that all...
...the HOLD function first. z Tip Even if the HOLD function is activated during recording, all the functions of the buttons are locked to prevent accidental operation. To stop normal playback.) 14 GB Preventing Accidental Operation (HOLD) Locking the buttons Slide the HOLD switch in the ...direction of the arrow in the opposite direction from that of the arrow so that all the functions of the buttons are locked. "HOLD" will flash indicating that all...

Operating Instructions
Page 16
... and "PAUSE" flashes in microphone To stop recording 1 Press x (stop ).) review the current recording instantly Press N PLAY/STOP•ENTER. 2 Turn the built-in microphone in the direction of the source to be recorded as MP3 files. • You can search backwards while listening to 99 messages in each folder. 16 GB After you release...
... and "PAUSE" flashes in microphone To stop recording 1 Press x (stop ).) review the current recording instantly Press N PLAY/STOP•ENTER. 2 Turn the built-in microphone in the direction of the source to be recorded as MP3 files. • You can search backwards while listening to 99 messages in each folder. 16 GB After you release...

Operating Instructions
Page 18
To start soon, and the operation indicator will light in the menu (page 57), the operation indicator does not light.) FOLDER/ MENU -., >+ Operation indicator N PLAY/ STOP•ENTER 18 GB Playback will start playback 1 Press FOLDER/MENU to "OFF" in green. (When "LED" is set to select the folder ( , , , , or ). 2 Press -. or >+ to select the message you want to play. 3 Press N PLAY/STOP•ENTER. Listening P Note Before playback starts, exit HOLD mode and turn on the power.
To start soon, and the operation indicator will light in the menu (page 57), the operation indicator does not light.) FOLDER/ MENU -., >+ Operation indicator N PLAY/ STOP•ENTER 18 GB Playback will start playback 1 Press FOLDER/MENU to "OFF" in green. (When "LED" is set to select the folder ( , , , , or ). 2 Press -. or >+ to select the message you want to play. 3 Press N PLAY/STOP•ENTER. Listening P Note Before playback starts, exit HOLD mode and turn on the power.
Operating Instructions
Page 20
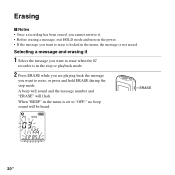
ERASE 20 GB Erasing P Notes • Once a recording has been erased, you cannot retrieve it 1 Select the message you want to "OFF," no beep sound will flash. A beep will sound and the message number and "ERASE" will be heard. When "BEEP" in the menu is set to erase is not erased. Selecting a ... and hold ERASE during the stop or playback mode. 2 Press ERASE while you are playing back the message you want to erase when the IC recorder is in the menu, the message is locked in the stop mode.
ERASE 20 GB Erasing P Notes • Once a recording has been erased, you cannot retrieve it 1 Select the message you want to "OFF," no beep sound will flash. A beep will sound and the message number and "ERASE" will be heard. When "BEEP" in the menu is set to erase is not erased. Selecting a ... and hold ERASE during the stop or playback mode. 2 Press ERASE while you are playing back the message you want to erase when the IC recorder is in the menu, the message is locked in the stop mode.

Operating Instructions
Page 22
The menu mode window will be displayed. 22 GB 4 Press x (stop mode. 1 Press and hold FOLDER/MENU to exit the menu mode. You can select the recording mode in the menu when the IC recorder is in the stop ) to enter the menu mode. or >+ to select "SHQ," "HQ," "SP," or "LP" and then press N PLAY/STOP•ENTER. or >+ to select "MODE," and then press N PLAY/ STOP•ENTER. Other Recording Operations Changing the Recording Settings Selecting the recording mode 2 Press -. N PLAY/ STOP•ENTER FOLDER/MENU x -., >+ 3 Press -.
The menu mode window will be displayed. 22 GB 4 Press x (stop mode. 1 Press and hold FOLDER/MENU to exit the menu mode. You can select the recording mode in the menu when the IC recorder is in the stop ) to enter the menu mode. or >+ to select "SHQ," "HQ," "SP," or "LP" and then press N PLAY/STOP•ENTER. or >+ to select "MODE," and then press N PLAY/ STOP•ENTER. Other Recording Operations Changing the Recording Settings Selecting the recording mode 2 Press -. N PLAY/ STOP•ENTER FOLDER/MENU x -., >+ 3 Press -.

Operating Instructions
Page 24
... when no sound is set the VOR (Voice Operated Recording) function to "ON" when the IC recorder is stopped or is recording, to sound - the VOR function z REC/PAUSE 3 Press -. To record dictation with a microphone in a spacious room. The microphone sensitivity is heard, eliminating recording during soundless periods. 24 GB or >+ to select " " or " ," and then press...
... when no sound is set the VOR (Voice Operated Recording) function to "ON" when the IC recorder is stopped or is recording, to sound - the VOR function z REC/PAUSE 3 Press -. To record dictation with a microphone in a spacious room. The microphone sensitivity is heard, eliminating recording during soundless periods. 24 GB or >+ to select " " or " ," and then press...

Operating Instructions
Page 26
... combine the divided messages, use the supplied application software. 1 Press DIVIDE during recording VOL +/- "DIVIDE" and a new message number flash in the display window and the new message number is divided, you can monitor the recording. The message will 26 GB DIVIDE If you connect commercially available headphones to the newer part of the...
... combine the divided messages, use the supplied application software. 1 Press DIVIDE during recording VOL +/- "DIVIDE" and a new message number flash in the display window and the new message number is divided, you can monitor the recording. The message will 26 GB DIVIDE If you connect commercially available headphones to the newer part of the...

Operating Instructions
Page 28
...set to "ADD," you can add a recording to select "REC-OP," and then press N PLAY/ STOP•ENTER. The added recording will be placed after the current message,... and will be counted as a part of Message 3 Message 3 Message 4 After adding a recording Message 3 Message 4 Added recording ...1 Press and hold FOLDER/MENU to enter the menu mode. The menu mode window will be displayed. 2 Press -. Adding a Recording Adding a recording to a previously recorded message z ...
...set to "ADD," you can add a recording to select "REC-OP," and then press N PLAY/ STOP•ENTER. The added recording will be placed after the current message,... and will be counted as a part of Message 3 Message 3 Message 4 After adding a recording Message 3 Message 4 Added recording ...1 Press and hold FOLDER/MENU to enter the menu mode. The menu mode window will be displayed. 2 Press -. Adding a Recording Adding a recording to a previously recorded message z ...

Operating Instructions
Page 30
... >+ When "REC-OP" in the menu is deleted. The remainder of Message 2 Message 2 Message 3 Message 4 Added overwrite recording in a recorded message. The starting point of an overwrite recording Message 2 Message 3 Message 4 The deleted part of the message after the selected point is set to "OVER," you can add ...an overwrite recording after a selected point in Message 2 1 Press and hold FOLDER/MENU to select "REC-OP," and then press N PLAY/ STOP•ENTER. 30 GB The menu window will be displayed. 2 Press -. or >+ to enter...
... >+ When "REC-OP" in the menu is deleted. The remainder of Message 2 Message 2 Message 3 Message 4 Added overwrite recording in a recorded message. The starting point of an overwrite recording Message 2 Message 3 Message 4 The deleted part of the message after the selected point is set to "OVER," you can add ...an overwrite recording after a selected point in Message 2 1 Press and hold FOLDER/MENU to select "REC-OP," and then press N PLAY/ STOP•ENTER. 30 GB The menu window will be displayed. 2 Press -. or >+ to enter...
Operating Instructions
Page 32
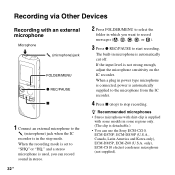
If the input level is automatically supplied to the microphone from the IC recorder. 4 Press x (stop) to select the folder in which you can use the Sony ECM-CZ10, ECM-DS70P, ECM-DS30P (U.S.A., Canada, Latin America and Korea only), ECM-DM5P, ECM-Z60 (U.S.A. When a plug in power ... FOLDER/MENU z REC/PAUSE x 1 Connect an external microphone to the (microphone) jack when the IC recorder is detachable.) • You can record sound in stereo. 32 GB 2 Press FOLDER/MENU to stop mode. Recording via Other Devices Recording with some models in some regions only. (The clip is in the stop...
If the input level is automatically supplied to the microphone from the IC recorder. 4 Press x (stop) to select the folder in which you can use the Sony ECM-CZ10, ECM-DS70P, ECM-DS30P (U.S.A., Canada, Latin America and Korea only), ECM-DM5P, ECM-Z60 (U.S.A. When a plug in power ... FOLDER/MENU z REC/PAUSE x 1 Connect an external microphone to the (microphone) jack when the IC recorder is detachable.) • You can record sound in stereo. 32 GB 2 Press FOLDER/MENU to stop mode. Recording via Other Devices Recording with some models in some regions only. (The clip is in the stop...

Operating Instructions
Page 34
...Press FOLDER/MENU to select the folder in which you want to record messages ( , , , , or ). 3 Press z REC/PAUSE to stop mode. Please ask the dealer for detailed information. 34 GB (microphone) jack of the IC recorder and adjust the volume level on the piece of equipment connected to... the IC recorder. 1 Connect other equipment to the IC recorder when the IC recorder is automatically cut off. 4 Press x (stop) to ...
...Press FOLDER/MENU to select the folder in which you want to record messages ( , , , , or ). 3 Press z REC/PAUSE to stop mode. Please ask the dealer for detailed information. 34 GB (microphone) jack of the IC recorder and adjust the volume level on the piece of equipment connected to... the IC recorder. 1 Connect other equipment to the IC recorder when the IC recorder is automatically cut off. 4 Press x (stop) to ...

Operating Instructions
Page 36
... to enter the menu mode. the DPC function N PLAY/ STOP•ENTER FOLDER/MENU x -., >+ When you set the DPC (Digital Pitch Control) function to "ON," you can adjust the playback speed between +100% and -50% of normal speed in natural tones thanks to...END" is long and you wish to start playback at the point you release the button. • If the last message is flashing to go back to the desired point. • For messages other than the last one, go to the end of the message,... To resume normal playback, press N PLAY/STOP•ENTER again. The menu mode window will be displayed. 36 GB
... to enter the menu mode. the DPC function N PLAY/ STOP•ENTER FOLDER/MENU x -., >+ When you set the DPC (Digital Pitch Control) function to "ON," you can adjust the playback speed between +100% and -50% of normal speed in natural tones thanks to...END" is long and you wish to start playback at the point you release the button. • If the last message is flashing to go back to the desired point. • For messages other than the last one, go to the end of the message,... To resume normal playback, press N PLAY/STOP•ENTER again. The menu mode window will be displayed. 36 GB

Operating Instructions
Page 38
... play N PLAY/ STOP•ENTER FOLDER/MENU 1 Press and hold FOLDER/MENU to "ON," you set "CONT" to enter the menu mode when the IC recorder is in the stop ) to exit the menu mode. 38...
... play N PLAY/ STOP•ENTER FOLDER/MENU 1 Press and hold FOLDER/MENU to "ON," you set "CONT" to enter the menu mode when the IC recorder is in the stop ) to exit the menu mode. 38...

Operating Instructions
Page 40
or >+ to select "ON," and then press N PLAY/STOP•ENTER. 4 Press x (stop) to "OFF" in speaker or monitoring the recording, the noise cut function may not be effective. P Notes • The effect of the recorded voice. 40 GB or >+ to select "N-CUT," and then press N PLAY/ STOP•ENTER. • When you are using the built-in step 3. 3 Press -. The menu mode window will be different depending on the condition of the noise cut function may be displayed. 2 Press -. To cancel the noise cut function Set "N-CUT" to exit the menu mode.
or >+ to select "ON," and then press N PLAY/STOP•ENTER. 4 Press x (stop) to "OFF" in speaker or monitoring the recording, the noise cut function may not be effective. P Notes • The effect of the recorded voice. 40 GB or >+ to select "N-CUT," and then press N PLAY/ STOP•ENTER. • When you are using the built-in step 3. 3 Press -. The menu mode window will be different depending on the condition of the noise cut function may be displayed. 2 Press -. To cancel the noise cut function Set "N-CUT" to exit the menu mode.
