User Manual
Page 3
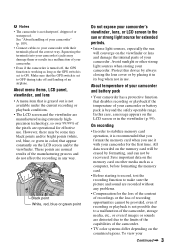
... GPS switch is set to make sure the picture and sound are recorded without any way. All data recorded on the memory card will converge on the viewfinder or lens and damage the internal parts of the camcorder. • TV color systems differ depending on other strong light sources when storing your Continued , 3 Black point White, red, blue or green point Do not expose your camcorder. Save important data on the memory card on...
... GPS switch is set to make sure the picture and sound are recorded without any way. All data recorded on the memory card will converge on the viewfinder or lens and damage the internal parts of the camcorder. • TV color systems differ depending on other strong light sources when storing your Continued , 3 Black point White, red, blue or green point Do not expose your camcorder. Save important data on the memory card on...
User Manual
Page 4
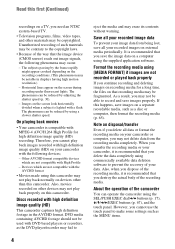
... displays having high motion resolution.) - Save all your recorded image data To prevent your camcorder or computer, you may fail to make some settings such as a disc or computer, then format the recording media (p. 65). Devices which are not recorded or played back properly If you continue recording and deleting images on the screen look horizontally divided when a subject is recommended that recording media may be reduced by adjusting the shutter speed (p. 30). - Discs recorded with DVD...
... displays having high motion resolution.) - Save all your recorded image data To prevent your camcorder or computer, you may fail to make some settings such as a disc or computer, then format the recording media (p. 65). Devices which are not recorded or played back properly If you continue recording and deleting images on the screen look horizontally divided when a subject is recommended that recording media may be reduced by adjusting the shutter speed (p. 30). - Discs recorded with DVD...

User Manual
Page 6
... the recording format 25 Changing the settings of your camcorder recordings 27 Adjusting the zoom 27 Adjusting the focus manually 28 Adjusting the image brightness 29 Adjusting to natural color (White balance 31 Customizing the picture quality (Picture profile 33 Audio setup 40 Acquiring location information 42 Recording with the SMOOTH SLOW REC function 43 Setting time data 44 Assigning the functions to the ASSIGN buttons 47 Playback 49 Viewing still images 51 Changing/checking the settings in your camcorder 53 Changing the screen 53 Displaying recording data (Data code 53...
... the recording format 25 Changing the settings of your camcorder recordings 27 Adjusting the zoom 27 Adjusting the focus manually 28 Adjusting the image brightness 29 Adjusting to natural color (White balance 31 Customizing the picture quality (Picture profile 33 Audio setup 40 Acquiring location information 42 Recording with the SMOOTH SLOW REC function 43 Setting time data 44 Assigning the functions to the ASSIGN buttons 47 Playback 49 Viewing still images 51 Changing/checking the settings in your camcorder 53 Changing the screen 53 Displaying recording data (Data code 53...
User Manual
Page 7
... a movie 61 Deleting movies and still images 62 Dubbing movies/copying still images 63 Dubbing movies 63 Copying still images 64 Formatting the recording media 65 Preventing data on recording media from being recovered 65 Repairing the image database file 66 Using the Menu Operating the menu 67 Menu items 69 (CAMERA SET) menu 71 Settings to adjust your camcorder to the recording conditions (GAIN SET/ BACK LIGHT/STEADYSHOT, etc.) (REC/OUT SET) menu 77 Recording settings, input and output settings (REC SET/VIDEO OUT) (AUDIO SET) menu 78 Settings for the audio recording (AUDIO FORMAT...
... a movie 61 Deleting movies and still images 62 Dubbing movies/copying still images 63 Dubbing movies 63 Copying still images 64 Formatting the recording media 65 Preventing data on recording media from being recovered 65 Repairing the image database file 66 Using the Menu Operating the menu 67 Menu items 69 (CAMERA SET) menu 71 Settings to adjust your camcorder to the recording conditions (GAIN SET/ BACK LIGHT/STEADYSHOT, etc.) (REC/OUT SET) menu 77 Recording settings, input and output settings (REC SET/VIDEO OUT) (AUDIO SET) menu 78 Settings for the audio recording (AUDIO FORMAT...
User Manual
Page 10
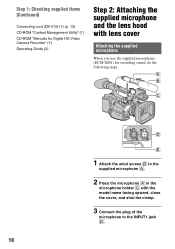
...-ROM "Manuals for Digital HD Video Camera Recorder" (1) Operating Guide (2) Step 2: Attaching the supplied microphone and the lens hood with lens cover Attaching the supplied microphone When you use the supplied microphone (ECM-XM1) for recording sound, do the following steps. 1 Attach the wind screen B to the supplied microphone A. 2 Place the microphone A in the microphone holder C with the model name facing upward, close the cover, and shut the clamp. 3 Connect the plug of...
...-ROM "Manuals for Digital HD Video Camera Recorder" (1) Operating Guide (2) Step 2: Attaching the supplied microphone and the lens hood with lens cover Attaching the supplied microphone When you use the supplied microphone (ECM-XM1) for recording sound, do the following steps. 1 Attach the wind screen B to the supplied microphone A. 2 Place the microphone A in the microphone holder C with the model name facing upward, close the cover, and shut the clamp. 3 Connect the plug of...

User Manual
Page 20
... media has been attached. To remove the flash memory unit Turn off your camcorder again. It is fully recorded during recording, the camcorder continues recording automatically on the memory card inserted in the direction of the arrow, remove the flash memory unit jack cover. 2 Align the mark on the camcorder and that already has a memory card inserted. • While movies are being recorded on the screen, touch [YES]. Step 7: Inserting a memory card/Attaching a flash memory unit...
... media has been attached. To remove the flash memory unit Turn off your camcorder again. It is fully recorded during recording, the camcorder continues recording automatically on the memory card inserted in the direction of the arrow, remove the flash memory unit jack cover. 2 Align the mark on the camcorder and that already has a memory card inserted. • While movies are being recorded on the screen, touch [YES]. Step 7: Inserting a memory card/Attaching a flash memory unit...

User Manual
Page 44
Setting time data The camcorder records movies accompanied by pressing the MENU button t select (TC/UB SET) with the SEL/PUSH EXEC dial. You can set the time code between 0 and 23. 4 Set other digits by repeating step 3. 5 Select [OK] with the time code of another camcorder You can reset the time code (00:00:00:00). To reset the user bit You can reset the time code (00:00:00:00) also by pressing the...
Setting time data The camcorder records movies accompanied by pressing the MENU button t select (TC/UB SET) with the SEL/PUSH EXEC dial. You can set the time code between 0 and 23. 4 Set other digits by repeating step 3. 5 Select [OK] with the time code of another camcorder You can reset the time code (00:00:00:00). To reset the user bit You can reset the time code (00:00:00:00) also by pressing the...
User Manual
Page 71
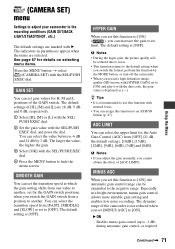
... recommended to use this function to [ON] ( ), you can select the value between -6 dB and 21 dB by the MODE button, or turn off the camcorder. • When you record a high definition image quality (HD) movie with the data code, the gain value is not reduced when you switch the GAIN switch from a position to [ON] and play it with [HYPER GAIN] set gain values...
... recommended to use this function to [ON] ( ), you can select the value between -6 dB and 21 dB by the MODE button, or turn off the camcorder. • When you record a high definition image quality (HD) movie with the data code, the gain value is not reduced when you switch the GAIN switch from a position to [ON] and play it with [HYPER GAIN] set gain values...
User Manual
Page 73
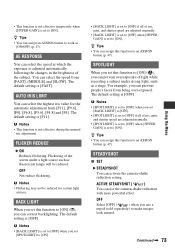
...] when you use the camera-shake reduction with more powerful effect. b Notes • [SPOTLIGHT] is set to [OFF] when you can assign an ASSIGN button to [ON] ( ), you set [BACK LIGHT] to [ON]. • [SPOTLIGHT] is set to [OFF] if all of iris, gain, and shutter speed are adjusted manually. • [BACK LIGHT] is set to [OFF] when [HYPER GAIN] is set this function to work as...
...] when you use the camera-shake reduction with more powerful effect. b Notes • [SPOTLIGHT] is set to [OFF] when you can assign an ASSIGN button to [ON] ( ), you set [BACK LIGHT] to [ON]. • [SPOTLIGHT] is set to [OFF] if all of iris, gain, and shutter speed are adjusted manually. • [BACK LIGHT] is set to [OFF] when [HYPER GAIN] is set this function to work as...

User Manual
Page 92
... camcorder is displayed. The camcorder does not operate with new one of all recording media, and repair the database file. Images on the recording media cannot be deleted on the recording media. Finish playback operation (p. 49). • There is extremely low. The handle zoom does not work. • Set the handle zoom switch to one , delete unnecessary images (p. 62) or format the recording media (p. 65). • Total number of movie scenes exceeds the recordable capacity of your camcorder (p. 102). The access...
... camcorder is displayed. The camcorder does not operate with new one of all recording media, and repair the database file. Images on the recording media cannot be deleted on the recording media. Finish playback operation (p. 49). • There is extremely low. The handle zoom does not work. • Set the handle zoom switch to one , delete unnecessary images (p. 62) or format the recording media (p. 65). • Total number of movie scenes exceeds the recordable capacity of your camcorder (p. 102). The access...

User Manual
Page 93
... POWER switch was set the POWER switch to enable the automatic focus function (p. 28). • Adjust the focus manually if the automatic focus does not work . • You cannot select grayed out display items in the recorded movies. Before disconnecting the battery or the AC Adaptor/Charger, set to [ : : ] or [ : : ], there may be slight time lags in the current recording/playback situation. The actual recording time for movies is turned off (p. 69). • The LCD backlight setting...
... POWER switch was set the POWER switch to enable the automatic focus function (p. 28). • Adjust the focus manually if the automatic focus does not work . • You cannot select grayed out display items in the recorded movies. Before disconnecting the battery or the AC Adaptor/Charger, set to [ : : ] or [ : : ], there may be slight time lags in the current recording/playback situation. The actual recording time for movies is turned off (p. 69). • The LCD backlight setting...
User Manual
Page 94
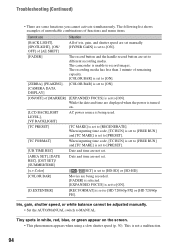
...; There are set to different recording media. The record button and the handle record button are some functions you cannot activate simultaneously. The camcorder is set to [PRESET]. When inputting time code, [TC RUN] is set to [FREE RUN] and [TC MAKE] is set to [PRESET]. [TC FORMAT] [UB TIME REC] When inputting time code, [TC RUN] is set to record images. While the date and time are set manually. [HYPER GAIN] is set to [FREE RUN] and [TC MAKE] is...
...; There are set to different recording media. The record button and the handle record button are some functions you cannot activate simultaneously. The camcorder is set to [PRESET]. When inputting time code, [TC RUN] is set to [FREE RUN] and [TC MAKE] is set to [PRESET]. [TC FORMAT] [UB TIME REC] When inputting time code, [TC RUN] is set to record images. While the date and time are set manually. [HYPER GAIN] is set to [FREE RUN] and [TC MAKE] is...

User Manual
Page 103
... SET], then set the time difference (p. 86). Using your camcorder abroad Power supply You can use your camcorder in any country/region using the AC Adaptor/ Charger supplied with component and AUDIO/VIDEO input jacks. On TV color systems Your camcorder is supported, you can view the movies with the same high definition image quality (HD) as that of the clock by time difference When you are abroad, you need an NTSC...
... SET], then set the time difference (p. 86). Using your camcorder abroad Power supply You can use your camcorder in any country/region using the AC Adaptor/ Charger supplied with component and AUDIO/VIDEO input jacks. On TV color systems Your camcorder is supported, you can view the movies with the same high definition image quality (HD) as that of the clock by time difference When you are abroad, you need an NTSC...
User Manual
Page 104
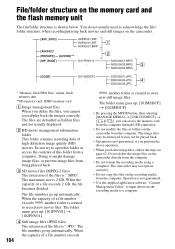
... usually displayed. The maximum size is ".JPG". The folder name goes up : [101MSDCF] t [102MSDCF] • By pressing the MODE button, then selecting [MANAGE MEDIA] t [USB CONNECT] t [ ]/[ ], you can access the memory card from the computer through USB connection. • Do not modify the files or folders on the camcorder. * "Memory Stick PRO Duo" media, flash memory unit **SD memory card, SDHC memory card A Image management files When you delete the files, you delete image files, follow the steps on the recording media from...
... usually displayed. The maximum size is ".JPG". The folder name goes up : [101MSDCF] t [102MSDCF] • By pressing the MODE button, then selecting [MANAGE MEDIA] t [USB CONNECT] t [ ]/[ ], you can access the memory card from the computer through USB connection. • Do not modify the files or folders on the camcorder. * "Memory Stick PRO Duo" media, flash memory unit **SD memory card, SDHC memory card A Image management files When you delete the files, you delete image files, follow the steps on the recording media from...
User Manual
Page 106
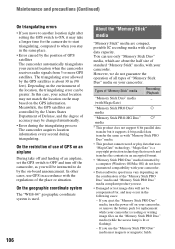
... do not have guaranteed compatibility with the regulations of GPS on your camcorder. If you eject the "Memory Stick PRO Duo" media, turn off on your camcorder, or remove the battery pack for replacement while your camcorder is reading or writing image files on the combination of accuracy may vary depending on the "Memory Stick PRO Duo" media (while the access lamp is used. 106 About the "Memory Stick" media "Memory Stick" media are controlled by the Unites...
... do not have guaranteed compatibility with the regulations of GPS on your camcorder. If you eject the "Memory Stick PRO Duo" media, turn off on your camcorder, or remove the battery pack for replacement while your camcorder is reading or writing image files on the combination of accuracy may vary depending on the "Memory Stick PRO Duo" media (while the access lamp is used. 106 About the "Memory Stick" media "Memory Stick" media are controlled by the Unites...
User Manual
Page 125
... BLACK LEVEL 35 Button-type lithium battery 122 C CALIBRATION 110 CAMERA DATA DISPLAY 82, 94 CAMERA SET menu........... 71 CENTER 81 CH1 (INT MIC/INPUT1) switch 40 CH2 (INT MIC/INPUT1/ INPUT2) switch 40 Channel setting 40 Charge lamp 12 Charging time 13 CLOCK SET 17 COLOR BAR 76, 94 COLOR DEPTH 37 COLOR LEVEL 36 COLOR MODE 36 COLOR PHASE 36 Connect Computer 88 TV 55 Connecting cord 13 COPY 39 D DATA CODE button 53 Date and time 18, 124 DATE REC 87, 94 DELETE 62 DETAIL 38 DISPLAY button...
... BLACK LEVEL 35 Button-type lithium battery 122 C CALIBRATION 110 CAMERA DATA DISPLAY 82, 94 CAMERA SET menu........... 71 CENTER 81 CH1 (INT MIC/INPUT1) switch 40 CH2 (INT MIC/INPUT1/ INPUT2) switch 40 Channel setting 40 Charge lamp 12 Charging time 13 CLOCK SET 17 COLOR BAR 76, 94 COLOR DEPTH 37 COLOR LEVEL 36 COLOR MODE 36 COLOR PHASE 36 Connect Computer 88 TV 55 Connecting cord 13 COPY 39 D DATA CODE button 53 Date and time 18, 124 DATE REC 87, 94 DELETE 62 DETAIL 38 DISPLAY button...

User Manual
Page 126
... NTSC 103 O One push button 32 OPERATION TIME 87 OTHERS menu 86 OUTDOOR 32 Outdoor 32 OUTPUT SELECT 77 Outside power source ...........13 P PAL 103 PEAKING 81, 94 PHOTO CAPTURE 60 PHOTO COPY 64 Picture profile 33 PICTURE PROFILE button 33 Playback 49 PLAYLIST 59 PLAYLIST EDIT 59 Power cord (mains lead)....... 13 POWER switch 14 Pre-installed rechargeable battery 111 PROTECT 58 PUSH AUTO button 28 Push auto focus 28 PUSH (lens hood release) button 11 R REC BUTTON SET...
... NTSC 103 O One push button 32 OPERATION TIME 87 OTHERS menu 86 OUTDOOR 32 Outdoor 32 OUTPUT SELECT 77 Outside power source ...........13 P PAL 103 PEAKING 81, 94 PHOTO CAPTURE 60 PHOTO COPY 64 Picture profile 33 PICTURE PROFILE button 33 Playback 49 PLAYLIST 59 PLAYLIST EDIT 59 Power cord (mains lead)....... 13 POWER switch 14 Pre-installed rechargeable battery 111 PROTECT 58 PUSH AUTO button 28 Push auto focus 28 PUSH (lens hood release) button 11 R REC BUTTON SET...
Brochure
Page 11
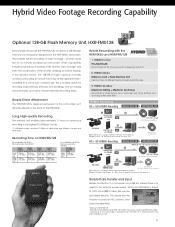
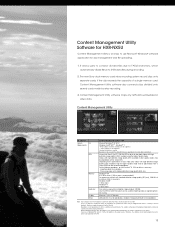
... be used by one shot 5. incredible in different format for different purposes 2 Ingest SD data to edit today A 3 Archive HD data for tomorrow at the same time Simple Data Transfer and Input Simple connection to edit A 3 Copy for archiving at the highest bit-rate - HYBRID Media Memory Card + Flash Memory Unit Identical clips on HXR-FMU128 - DVD-VIDEO, Web contents 1 Simultaneous recording in a unit of the camcorder is needed when...
... be used by one shot 5. incredible in different format for different purposes 2 Ingest SD data to edit today A 3 Archive HD data for tomorrow at the same time Simple Data Transfer and Input Simple connection to edit A 3 Copy for archiving at the highest bit-rate - HYBRID Media Memory Card + Flash Memory Unit Identical clips on HXR-FMU128 - DVD-VIDEO, Web contents 1 Simultaneous recording in a unit of the camcorder is needed when...
Brochure
Page 13
.... However, imported images will not work properly due to the AC Adaptor as standard, Hi-Speed USB (USB 2.0 compatible)) Notes: Your computer must meet hardware requirements other open or background applications running on all the recommended environments. Operations are not supported. ** Starter (Edition) is an easy to use a Notebook PC, connect it to the power saving function of your video card, videos with a slower CPU. Otherwise, the software will...
.... However, imported images will not work properly due to the AC Adaptor as standard, Hi-Speed USB (USB 2.0 compatible)) Notes: Your computer must meet hardware requirements other open or background applications running on all the recommended environments. Operations are not supported. ** Starter (Edition) is an easy to use a Notebook PC, connect it to the power saving function of your video card, videos with a slower CPU. Otherwise, the software will...
Brochure
Page 20
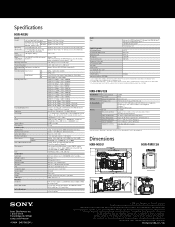
... Battery operating Continuous recording time time Recording format Video Format HD SD Audio Format HD SD Recording frame rate*1 Recording/Playback time Zoom ratio Focal length Iris Focus Image stabilizer Filter diameter Camera Section Imaging device Effective picture elements Built-in optical filters Minimum illumination Shutter speed Auto Manual Slow & Quick Motion function White balance Gain Inputs/Outputs Audio input Composite output Audio output Comonent output SDI output USB Headphone output Speaker output DC input Remote HDMI output Monitoring View...
... Battery operating Continuous recording time time Recording format Video Format HD SD Audio Format HD SD Recording frame rate*1 Recording/Playback time Zoom ratio Focal length Iris Focus Image stabilizer Filter diameter Camera Section Imaging device Effective picture elements Built-in optical filters Minimum illumination Shutter speed Auto Manual Slow & Quick Motion function White balance Gain Inputs/Outputs Audio input Composite output Audio output Comonent output SDI output USB Headphone output Speaker output DC input Remote HDMI output Monitoring View...


