Operation Guide
Page 2
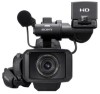
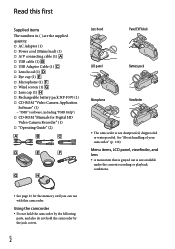
... panel, viewfinder, and lens A menu item that is grayed out is not dustproofed, dripproofed or waterproofed. Read this first Supplied items The numbers in ( ) are the supplied quantity. AC Adaptor (1) Power cord (Mains lead) (1) A/V connecting cable (1) USB cable (1) USB Adaptor Cable (1) Lens hood...
... panel, viewfinder, and lens A menu item that is grayed out is not dustproofed, dripproofed or waterproofed. Read this first Supplied items The numbers in ( ) are the supplied quantity. AC Adaptor (1) Power cord (Mains lead) (1) A/V connecting cable (1) USB cable (1) USB Adaptor Cable (1) Lens hood...
Operation Guide
Page 6
... this first 2 Notes on use 5 Getting started Step 1: Attaching the supplied microphone, eyecup and the lens hood 10 Attaching the supplied microphone 10 Attaching the eyecup 11 Attaching the lens hood 11 Step 2: Charging the battery pack 13 Step 3: Turning the power on, and setting the date and time 16 Changing the language...
... this first 2 Notes on use 5 Getting started Step 1: Attaching the supplied microphone, eyecup and the lens hood 10 Attaching the supplied microphone 10 Attaching the eyecup 11 Attaching the lens hood 11 Step 2: Charging the battery pack 13 Step 3: Turning the power on, and setting the date and time 16 Changing the language...
Operation Guide
Page 14
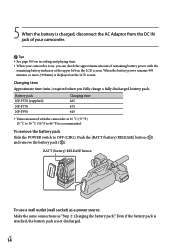
Battery pack NP-F570 (supplied) NP-F770 NP-F970 Charging time 265 475 645 Times measured with the ... discharged. Push the [BATT (battery) RELEASE] button () and remove the battery pack (). When the battery power remains 999 minutes or more, [999min] is on, you fully charge a fully discharged battery pack. 5 When the ...battery is charged, disconnect the AC Adaptor from the DC IN jack of remaining battery power with the camcorder at the upper left on the LCD screen. Charging time Approximate time (min.) required when you...
Battery pack NP-F570 (supplied) NP-F770 NP-F970 Charging time 265 475 645 Times measured with the ... discharged. Push the [BATT (battery) RELEASE] button () and remove the battery pack (). When the battery power remains 999 minutes or more, [999min] is on, you fully charge a fully discharged battery pack. 5 When the ...battery is charged, disconnect the AC Adaptor from the DC IN jack of remaining battery power with the camcorder at the upper left on the LCD screen. Charging time Approximate time (min.) required when you...
Operation Guide
Page 15
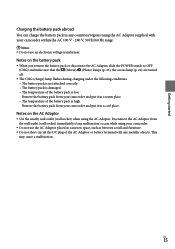
... not use an electronic voltage transformer. Notes on the battery pack When you remove the battery pack or disconnect the AC Adaptor, slide the POWER switch to OFF (CHG) and make sure that the (Movie)/ (Photo) lamps (p. 23), the access lamp (p. 22) are turned off. The CHG (... This may cause a malfunction. Getting started Charging the battery pack abroad You can charge the battery pack in any countries/regions using the AC Adaptor supplied with your camcorder. Do not use the AC Adaptor placed in a narrow space, such as between a wall and furniture. Do not...
... not use an electronic voltage transformer. Notes on the battery pack When you remove the battery pack or disconnect the AC Adaptor, slide the POWER switch to OFF (CHG) and make sure that the (Movie)/ (Photo) lamps (p. 23), the access lamp (p. 22) are turned off. The CHG (... This may cause a malfunction. Getting started Charging the battery pack abroad You can charge the battery pack in any countries/regions using the AC Adaptor supplied with your camcorder. Do not use the AC Adaptor placed in a narrow space, such as between a wall and furniture. Do not...
Operation Guide
Page 32
.... You can also assign menu items to the RING by pressing MANUAL during movie recording. In this case, change the shutter speed according to the power supply frequency in your camcorder attached to a tripod is recommended. When you record images under [SHOOTING SET] category) [RING SETTING]. Even if you...
.... You can also assign menu items to the RING by pressing MANUAL during movie recording. In this case, change the shutter speed according to the power supply frequency in your camcorder attached to a tripod is recommended. When you record images under [SHOOTING SET] category) [RING SETTING]. Even if you...
Operation Guide
Page 40
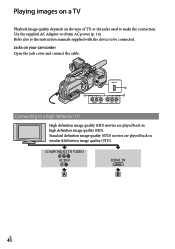
... image quality (STD). HDMI OUT R-AUDIO-L VIDEO Y Pb/Cb Pr/Cr Connecting to make the connection. Refer also to the instruction manuals supplied with the device to obtain AC power (p. 14). Playing images on a TV Playback image quality depends on your camcorder Open the jack cover and connect the cable. Use the...
... image quality (STD). HDMI OUT R-AUDIO-L VIDEO Y Pb/Cb Pr/Cr Connecting to make the connection. Refer also to the instruction manuals supplied with the device to obtain AC power (p. 14). Playing images on a TV Playback image quality depends on your camcorder Open the jack cover and connect the cable. Use the...
Operation Guide
Page 48
... from running out of the photo will be the date and time you captured from has no data code, the recording date and time of power during dubbing. Tips The original movie will be deleted after dubbing. All included images in 4:3 with standard definition...; [REPAIR IMG.DB F.] (under [MANAGE MEDIA] category) [MEMORY CARD]. Connect your camcorder to the wall outlet (wall socket) using the supplied AC Adaptor to prevent your camcorder to save photos should have enough free space. The recording date and time of captured photos is the...
... from running out of the photo will be the date and time you captured from has no data code, the recording date and time of power during dubbing. Tips The original movie will be deleted after dubbing. All included images in 4:3 with standard definition...; [REPAIR IMG.DB F.] (under [MANAGE MEDIA] category) [MEMORY CARD]. Connect your camcorder to the wall outlet (wall socket) using the supplied AC Adaptor to prevent your camcorder to save photos should have enough free space. The recording date and time of captured photos is the...

Operation Guide
Page 49
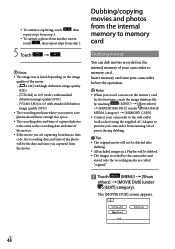
... card. Insert a memory card into your camcorder before the operation. Notes Connect your camcorder to the wall outlet (wall socket) using the supplied AC Adaptor to prevent your camcorder Touch the type of dubbing. [DUB by select]: To select movies and dub [DUB by date]: To dub... Select the movie to be dubbed. [DUB by date]: Select the recording date of the camcorder to be dubbed, then touch . Remaining capacity of power during copying. Touch (MENU) [Show others] [PHOTO COPY] (under [EDIT] category).
... card. Insert a memory card into your camcorder before the operation. Notes Connect your camcorder to the wall outlet (wall socket) using the supplied AC Adaptor to prevent your camcorder Touch the type of dubbing. [DUB by select]: To select movies and dub [DUB by date]: To dub... Select the movie to be dubbed. [DUB by date]: Select the recording date of the camcorder to be dubbed, then touch . Remaining capacity of power during copying. Touch (MENU) [Show others] [PHOTO COPY] (under [EDIT] category).
Operation Guide
Page 64
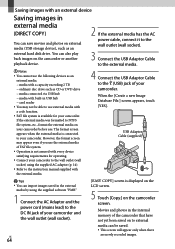
...media. media with a capacity exceeding 2 TB ordinary disc drive such as an external hard disk drive. USB Adaptor Cable (supplied) Tips You can save movies and photos on to NTFS file system, etc., format the external media on the camcorder screen... the external media is available for operating. Connect your camcorder to the wall outlet (wall socket) using the supplied software "PMB." 1 Connect the AC Adaptor and the power cord (mains lead) to your camcorder. When the [Create a new Image Database File.] screen appears, touch [YES]....
...media. media with a capacity exceeding 2 TB ordinary disc drive such as an external hard disk drive. USB Adaptor Cable (supplied) Tips You can save movies and photos on to NTFS file system, etc., format the external media on the camcorder screen... the external media is available for operating. Connect your camcorder to the wall outlet (wall socket) using the supplied software "PMB." 1 Connect the AC Adaptor and the power cord (mains lead) to your camcorder. When the [Create a new Image Database File.] screen appears, touch [YES]....

Operation Guide
Page 67
...back only on AVCHD format compatible devices. The AVCHD disc should not be used in this section. Connect the AC Adaptor and the power cord (mains lead) to the DC IN jack of your camcorder and the wall outlet (wall socket) (p. 14). Turn on a created disc...referred to as "DVD writer" in DVD players/recorders. Saving images with the USB cable of the DVD writer. Refer also to the instruction manual supplied with the DVD writer. Notes Connect your camcorder with an external device US 67 Ordinary DVD device Player DVD player &#...
...back only on AVCHD format compatible devices. The AVCHD disc should not be used in this section. Connect the AC Adaptor and the power cord (mains lead) to the DC IN jack of your camcorder and the wall outlet (wall socket) (p. 14). Turn on a created disc...referred to as "DVD writer" in DVD players/recorders. Saving images with the USB cable of the DVD writer. Refer also to the instruction manual supplied with the DVD writer. Notes Connect your camcorder with an external device US 67 Ordinary DVD device Player DVD player &#...

Operation Guide
Page 70
... camcorder, and connect a DVD writer, etc. writer. Refer also to the instruction manuals supplied with the device to the wall outlet (wall socket) using the supplied AC Adaptor for this operation (p. 14). http://sony.storagesupport.com/ Connect the AC Adaptor and the power cord (mains lead) to the DC IN jack of the...
... camcorder, and connect a DVD writer, etc. writer. Refer also to the instruction manuals supplied with the device to the wall outlet (wall socket) using the supplied AC Adaptor for this operation (p. 14). http://sony.storagesupport.com/ Connect the AC Adaptor and the power cord (mains lead) to the DC IN jack of the...
Operation Guide
Page 96
... conditions are not suitable for [ACTIVE] (p. 82). [LCD BL LEVEL] cannot be adjusted. You cannot adjust [LCD BL LEVEL] when the power is not a malfunction. This is not a malfunction. The horizontal to vertical ratio of the movie (16:9 (wide)/4:3) cannot be changed. The...screen. Set [ STEADYSHOT] to compensate for excessive vibrations. Black bands appear when you disconnect an external microphone, etc. This is supplied from the AC Adaptor. The subjects passing by the lens rapidly might appear crooked depending on the images. This occurs when recording...
... conditions are not suitable for [ACTIVE] (p. 82). [LCD BL LEVEL] cannot be adjusted. You cannot adjust [LCD BL LEVEL] when the power is not a malfunction. This is not a malfunction. The horizontal to vertical ratio of the movie (16:9 (wide)/4:3) cannot be changed. The...screen. Set [ STEADYSHOT] to compensate for excessive vibrations. Black bands appear when you disconnect an external microphone, etc. This is supplied from the AC Adaptor. The subjects passing by the lens rapidly might appear crooked depending on the images. This occurs when recording...
Operation Guide
Page 106
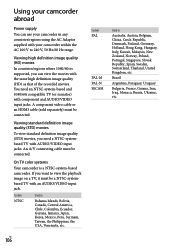
...-systembased TV with an AUDIO/VIDEO input jack. Brazil Argentina, Paraguay, Uruguay Bulgaria, France, Guiana, Iran, Iraq, Monaco, Russia, Ukraine, etc. Using your camcorder abroad Power supply You can view the movies with the same high definition image quality (HD) as that of the recorded movies. If you can use your camcorder... in any countries/regions using the AC Adaptor supplied with your camcorder within the AC 100 V to view the playback image on a TV, it must be connected.
...-systembased TV with an AUDIO/VIDEO input jack. Brazil Argentina, Paraguay, Uruguay Bulgaria, France, Guiana, Iran, Iraq, Monaco, Russia, Ukraine, etc. Using your camcorder abroad Power supply You can view the movies with the same high definition image quality (HD) as that of the recorded movies. If you can use your camcorder... in any countries/regions using the AC Adaptor supplied with your camcorder within the AC 100 V to view the playback image on a TV, it must be connected.
Operation Guide
Page 111
... it on and let it run by placing anything heavy on it by the plug and not the cord. Do not damage the power cord (mains lead) such as by recording and playing back images about 1 hour). US 111 Additional information Be particularly careful of the touch ...Keep metal contacts clean. If the battery electrolytic liquid has leaked: Consult your local authorized Sony service facility. Wash off any liquid that you are not using the supplied AC Adaptor during the operation. Doing so might cause heat to the wall outlet (wall socket) using your ...
... it on and let it run by placing anything heavy on it by the plug and not the cord. Do not damage the power cord (mains lead) such as by recording and playing back images about 1 hour). US 111 Additional information Be particularly careful of the touch ...Keep metal contacts clean. If the battery electrolytic liquid has leaked: Consult your local authorized Sony service facility. Wash off any liquid that you are not using the supplied AC Adaptor during the operation. Doing so might cause heat to the wall outlet (wall socket) using your ...
Operation Guide
Page 112
...after charging the pre-installed rechargeable battery. How to somebody, it is rotated, or closed . When you transfer the camcorder, it is closed with the POWER switch OFF (CHG) for a long period of time About care and storage of the lens Wipe the surface of the camcorder. On charging ... if it with the screen facing out. US 112 To prevent mold, periodically clean the lens as you delete date completely using the supplied AC Adaptor, and leave it is recommended that you delete data in about 3 months if you may not delete data from the memory card completely...
...after charging the pre-installed rechargeable battery. How to somebody, it is rotated, or closed . When you transfer the camcorder, it is closed with the POWER switch OFF (CHG) for a long period of time About care and storage of the lens Wipe the surface of the camcorder. On charging ... if it with the screen facing out. US 112 To prevent mold, periodically clean the lens as you delete date completely using the supplied AC Adaptor, and leave it is recommended that you delete data in about 3 months if you may not delete data from the memory card completely...
Operation Guide
Page 123
... 86 Playing 33 Playing AVCHD disc 62 Playlist 50 PLAYLIST EDIT 50 PMB (Picture Motion Browser 53, 56 PMB Help 56 PORTRAIT 77 Power on 16 POWER SETTINGS 92 Precautions 108 PRIORITY SETTING..........83, 99 PROTECT 45 R REC LAMP 92 REC MODE 29 Recording 23 Recording and playback time 103.../DISP SET 90 Specifications 113 SPOT FOCUS 79 SPOTLIGHT 77 SPOT METER 78 SPOT MTR/FCS 78 STEADYSHOT 82, 85 SUMMERTIME 92 SUNRISE&SUNSET 77 Supplied items 2 T TELE MACRO 80 Telephoto 27 Thumbnail 44 Troubleshooting 93 TV 40 TV color systems 106 TV TYPE 90 TWILIGHT 77 U USB cable ...
... 86 Playing 33 Playing AVCHD disc 62 Playlist 50 PLAYLIST EDIT 50 PMB (Picture Motion Browser 53, 56 PMB Help 56 PORTRAIT 77 Power on 16 POWER SETTINGS 92 Precautions 108 PRIORITY SETTING..........83, 99 PROTECT 45 R REC LAMP 92 REC MODE 29 Recording 23 Recording and playback time 103.../DISP SET 90 Specifications 113 SPOT FOCUS 79 SPOTLIGHT 77 SPOT METER 78 SPOT MTR/FCS 78 STEADYSHOT 82, 85 SUMMERTIME 92 SUNRISE&SUNSET 77 Supplied items 2 T TELE MACRO 80 Telephoto 27 Thumbnail 44 Troubleshooting 93 TV 40 TV color systems 106 TV TYPE 90 TWILIGHT 77 U USB cable ...


