Brochure and Specifications
Page 3
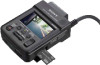
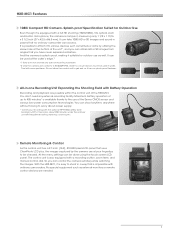
... by the camera are at the water's edge.*2 *1 Sony does not provide any external recording facility. Under no circumstances must it has no ordinary camcorder can access. You don't need any special mounting hardware. *2 Only the camera unit conforms to...recording with frequent recording start/stop, zooming etc, Remote Monitoring & Control As the control unit has a 2.7-inch (16:9), 210,000 pixels LCD panel that no splash-proof features. Splash-proof Specification Suited for outdoor use with the optional NP-FH100 battery (LCD backlight =OFF). HXR-MC1 Features 1080i Compact HD Camera...
... by the camera are at the water's edge.*2 *1 Sony does not provide any external recording facility. Under no circumstances must it has no ordinary camcorder can access. You don't need any special mounting hardware. *2 Only the camera unit conforms to...recording with frequent recording start/stop, zooming etc, Remote Monitoring & Control As the control unit has a 2.7-inch (16:9), 210,000 pixels LCD panel that no splash-proof features. Splash-proof Specification Suited for outdoor use with the optional NP-FH100 battery (LCD backlight =OFF). HXR-MC1 Features 1080i Compact HD Camera...
Brochure and Specifications
Page 5
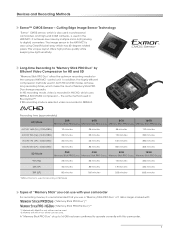
...Recording to digital) converters. In HD recording mode, video is recommended that you use with your camcorder For recording movies, it is recorded in both HD and SD modes achieve long recording times, which make the most of up to 16 GB has been confirmed to operate correctly with HX or not, either can be used for the compact HXR-MC1... methods used . The image sensor in MPEG-2. If SD recording mode is selected, video is recorded in the HXR-MC1 is used in professional camcorders and high-end D-SLR cameras, is also using ClearVid pixel array which uses MPEG-4 AVC...
...Recording to digital) converters. In HD recording mode, video is recommended that you use with your camcorder For recording movies, it is recorded in both HD and SD modes achieve long recording times, which make the most of up to 16 GB has been confirmed to operate correctly with HX or not, either can be used for the compact HXR-MC1... methods used . The image sensor in MPEG-2. If SD recording mode is selected, video is recorded in the HXR-MC1 is used in professional camcorders and high-end D-SLR cameras, is also using ClearVid pixel array which uses MPEG-4 AVC...
Brochure and Specifications
Page 7
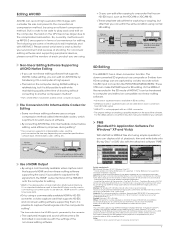
...recording *Letterbox mode or squeeze mode can be compressed again. System requirements OS: Microsoft Windows XP SP3*1/Windows Vista SP1*2 *1 64-bit editions and Starter (Edition) are using an efficient compression method. Attention This camcorder...consult the vendors of your environment and purpose of methods to digital converter. Operation is required when creating a DVD video by using . CPU: Intel Pentium 4 2.8 GHz or faster...copying to a recorder that , you can edit an AVCHD file by a video recorder which is possible to capture the HD signals from HXR-MC1 can be ...
...recording *Letterbox mode or squeeze mode can be compressed again. System requirements OS: Microsoft Windows XP SP3*1/Windows Vista SP1*2 *1 64-bit editions and Starter (Edition) are using an efficient compression method. Attention This camcorder...consult the vendors of your environment and purpose of methods to digital converter. Operation is required when creating a DVD video by using . CPU: Intel Pentium 4 2.8 GHz or faster...copying to a recorder that , you can edit an AVCHD file by a video recorder which is possible to capture the HD signals from HXR-MC1 can be ...
Operating Guide / Important Safety Instructions
Page 1
...(1) σδλϧHD Digital HD Video Camera Recorder Caméscope numérique HD Operating Guide/Mode d'emploi du caméscope /Bedienungsanleitung/Manuale delle istruzioni/Manual de instrucciones / HXR-MC1/MC1P ©2009 Sony Corporation Printed in Japan 70 ... fabricant ou vendu avec l'appareil. The Authorized Representative for using your camcorder. Even if your Sony dealer regarding recycling of materials will help to conserve natural resources. The recycling of ...
...(1) σδλϧHD Digital HD Video Camera Recorder Caméscope numérique HD Operating Guide/Mode d'emploi du caméscope /Bedienungsanleitung/Manuale delle istruzioni/Manual de instrucciones / HXR-MC1/MC1P ©2009 Sony Corporation Printed in Japan 70 ... fabricant ou vendu avec l'appareil. The Authorized Representative for using your camcorder. Even if your Sony dealer regarding recycling of materials will help to conserve natural resources. The recycling of ...

Operating Guide / Read This First
Page 2
..." media adaptor. • Insert the "Memory Stick PRO Duo" media into the "Memory Stick Duo" media adaptor when using "Memory Stick PRO Duo" media with : - Camera Cable "Memory Stick" (You cannot use Handling the images recorded on your camcorder on a computer Refer to as "Memory Stick PRO Duo" media in your...
..." media adaptor. • Insert the "Memory Stick PRO Duo" media into the "Memory Stick Duo" media adaptor when using "Memory Stick PRO Duo" media with : - Camera Cable "Memory Stick" (You cannot use Handling the images recorded on your camcorder on a computer Refer to as "Memory Stick PRO Duo" media in your...

Operating Guide / Read This First
Page 3
...The LCD screen is lit or flashing. On recording • Before starting to record, test the recording function to insert the connector plug in each local language are recorded without any way. Apply mechanical shock or vibration to a malfunction of the camcorder, storage media, etc. • TV color ...in any problems. • Compensation for the contents of recordings cannot be provided, even if recording or playback is not possible due to the camcorder. • When connecting your camcorder. • Do not do not affect the recording in low light conditions, such as at the sun....
...The LCD screen is lit or flashing. On recording • Before starting to record, test the recording function to insert the connector plug in each local language are recorded without any way. Apply mechanical shock or vibration to a malfunction of the camcorder, storage media, etc. • TV color ...in any problems. • Compensation for the contents of recordings cannot be provided, even if recording or playback is not possible due to the camcorder. • When connecting your camcorder. • Do not do not affect the recording in low light conditions, such as at the sun....
Operating Guide / Read This First
Page 4
... camcorder and accessories are captured using your image data periodically, after recording. It is recommended that you repeat recording/deleting images for video cameras and offers a quality typical of such materials may be saved or recorded. It adopts the MTF measurement system for a long time, fragmentation of data may occur on a disc such as DVD-R using a digital...
... camcorder and accessories are captured using your image data periodically, after recording. It is recommended that you repeat recording/deleting images for video cameras and offers a quality typical of such materials may be saved or recorded. It adopts the MTF measurement system for a long time, fragmentation of data may occur on a disc such as DVD-R using a digital...

Operating Guide / Read This First
Page 5
...camcorder 2 Getting Started Step 1: Checking supplied items 8 Step 2: Charging the battery pack 9 Step 3: Turning the power on, and setting the date and time 12 Changing the language setting 13 Step 4: Inserting "Memory Stick PRO Duo" media 14 Recording/Playback Using the HOME MENU 16 Recording... 18 Preventing operation errors 20 Zooming 20 Recording high quality still images during movie recording (Dual Rec 21 Recording the fast action in slow-motion (SMTH SLW REC 21 Controlling...
...camcorder 2 Getting Started Step 1: Checking supplied items 8 Step 2: Charging the battery pack 9 Step 3: Turning the power on, and setting the date and time 12 Changing the language setting 13 Step 4: Inserting "Memory Stick PRO Duo" media 14 Recording/Playback Using the HOME MENU 16 Recording... 18 Preventing operation errors 20 Zooming 20 Recording high quality still images during movie recording (Dual Rec 21 Recording the fast action in slow-motion (SMTH SLW REC 21 Controlling...

Operating Guide / Read This First
Page 6
...image quality 43 Checking the "Memory Stick PRO Duo" media information 44 Deleting all images (Formatting 44 Repairing the image database file 45 Customizing Your Camcorder What you can do with the (SETTINGS) category of the HOME MENU 46 Using the HOME MENU 46 List of the (SETTINGS) category items...(Items to set clock and language) GENERAL SET 56 (Other setup items) Activating functions using the OPTION MENU 58 Using the OPTION MENU 58 Recording items on the OPTION MENU 59 Viewing items on the OPTION MENU 59 Functions set in the OPTION MENU 60 Enjoying with a computer Performing with...
...image quality 43 Checking the "Memory Stick PRO Duo" media information 44 Deleting all images (Formatting 44 Repairing the image database file 45 Customizing Your Camcorder What you can do with the (SETTINGS) category of the HOME MENU 46 Using the HOME MENU 46 List of the (SETTINGS) category items...(Items to set clock and language) GENERAL SET 56 (Other setup items) Activating functions using the OPTION MENU 58 Using the OPTION MENU 58 Recording items on the OPTION MENU 59 Viewing items on the OPTION MENU 59 Functions set in the OPTION MENU 60 Enjoying with a computer Performing with...
Operating Guide / Read This First
Page 7
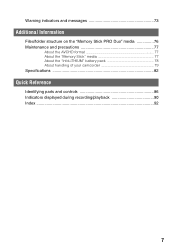
Warning indicators and messages 73 Additional Information Files/folder structure on the "Memory Stick PRO Duo" media 76 Maintenance and precautions 77 About the AVCHD format 77 About the "Memory Stick" media 77 About the "InfoLITHIUM" battery pack 78 About handling of your camcorder 79 Specifications 82 Quick Reference Identifying parts and controls 86 Indicators displayed during recording/playback 90 Index ...92 7
Warning indicators and messages 73 Additional Information Files/folder structure on the "Memory Stick PRO Duo" media 76 Maintenance and precautions 77 About the AVCHD format 77 About the "Memory Stick" media 77 About the "InfoLITHIUM" battery pack 78 About handling of your camcorder 79 Specifications 82 Quick Reference Identifying parts and controls 86 Indicators displayed during recording/playback 90 Index ...92 7
Operating Guide / Read This First
Page 8
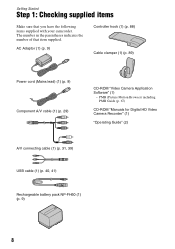
... Software" (1) - The number in the parentheses indicates the number of that you have the following items supplied with your camcorder. PMB (Picture Motion Browser) including PMB Guide (p. 67) CD-ROM "Manuals for Digital HD Video Camera Recorder" (1) "Operating Guide" (2) A/V connecting cable (1) (p. 31, 39) USB cable (1) (p. 40, 41) Rechargeable battery pack NP-FH60 (1) (p. 9) 8 Getting Started Step 1: Checking...
... Software" (1) - The number in the parentheses indicates the number of that you have the following items supplied with your camcorder. PMB (Picture Motion Browser) including PMB Guide (p. 67) CD-ROM "Manuals for Digital HD Video Camera Recorder" (1) "Operating Guide" (2) A/V connecting cable (1) (p. 31, 39) USB cable (1) (p. 40, 41) Rechargeable battery pack NP-FH60 (1) (p. 9) 8 Getting Started Step 1: Checking...

Operating Guide / Read This First
Page 9
... the DC plug. 9 b Notes • You cannot attach any "InfoLITHIUM" battery pack other than H series to your camcorder. Power cord (Mains lead) POWER switch To the wall outlet (wall socket) 3 Slide the POWER switch to OFF (the default setting). 4 Attach the battery pack ...by sliding it in the direction of the DC IN jack on the camcorder, then connect the DC plug to the DC IN jack on the camcorder. 2 Connect the power cord (mains lead) to your camcorder. 1 Open the jack cover, then align the v mark of the DC plug with the V of...
... the DC plug. 9 b Notes • You cannot attach any "InfoLITHIUM" battery pack other than H series to your camcorder. Power cord (Mains lead) POWER switch To the wall outlet (wall socket) 3 Slide the POWER switch to OFF (the default setting). 4 Attach the battery pack ...by sliding it in the direction of the DC IN jack on the camcorder, then connect the DC plug to the DC IN jack on the camcorder. 2 Connect the power cord (mains lead) to your camcorder. 1 Open the jack cover, then align the v mark of the DC plug with the V of...
Operating Guide / Read This First
Page 11
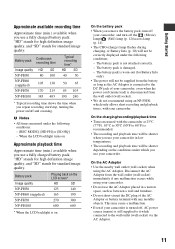
... not be correctly displayed under the following conditions: - [REC MODE]: [HD FH] or [SD HQ] - This may cause a malfunction. • Even if your camcorder is turned off and zooming. Battery pack Continuous recording time Image quality HD SD NP-FH50 80 100 NP-FH60 (supplied) 105 130 NP-FH70 170... 215 NP-FH100 385 485 Typical recording time* HD SD 40 50 50 65 85 105 190 240 ...
... not be correctly displayed under the following conditions: - [REC MODE]: [HD FH] or [SD HQ] - This may cause a malfunction. • Even if your camcorder is turned off and zooming. Battery pack Continuous recording time Image quality HD SD NP-FH50 80 100 NP-FH60 (supplied) 105 130 NP-FH70 170... 215 NP-FH100 385 485 Typical recording time* HD SD 40 50 50 65 85 105 190 240 ...

Operating Guide / Read This First
Page 12
... switch to ON. 2 Press the (Movie)/ (Still) select button and turn on the desired mode lamp. (Movie): To record movies (Still): To record still images Go to step 4 when you turn on your camcorder for the first time. If you do not set the date and time, the [CLOCK SET] screen appears every... time you turn on your camcorder or press the (Movie)/ (Still) select button. Step 3: Turning the power on, and setting...
... switch to ON. 2 Press the (Movie)/ (Still) select button and turn on the desired mode lamp. (Movie): To record movies (Still): To record still images Go to step 4 when you turn on your camcorder for the first time. If you do not set the date and time, the [CLOCK SET] screen appears every... time you turn on your camcorder or press the (Movie)/ (Still) select button. Step 3: Turning the power on, and setting...

Operating Guide / Read This First
Page 13
...battery last longer Press and hold DISPLAY/BATT INFO for a few seconds until disappears. This setting is practical when you use your camcorder during recording, but they are automatically recorded on the "Memory Stick PRO Duo" media, and can set any year up to the year 2037. Getting Started 9 Make sure... that case, charge the built-in rechargeable battery and then set the date and time again (p. 82). • It takes a few seconds for your camcorder in...
...battery last longer Press and hold DISPLAY/BATT INFO for a few seconds until disappears. This setting is practical when you use your camcorder during recording, but they are automatically recorded on the "Memory Stick PRO Duo" media, and can set any year up to the year 2037. Getting Started 9 Make sure... that case, charge the built-in rechargeable battery and then set the date and time again (p. 82). • It takes a few seconds for your camcorder in...

Operating Guide / Read This First
Page 14
... careful so that formatting will delete all the way in once. z Tips • You can use with your camcorder • Do not open the "Memory Stick Duo" media cover during recording. • If you insert new "Memory Stick PRO Duo" media, the [Create a new Image Database File.]...3 Touch [YES]. Shake or knock your camcorder. Still images (p. 51) 1 Insert the "Memory Stick PRO Duo" media. 1 Open the "Memory Stick Duo" media cover. 2 Insert the "Memory Stick PRO Duo" media all data recorded on the recordable time of movies and recordable number of the following pages on the "...
... careful so that formatting will delete all the way in once. z Tips • You can use with your camcorder • Do not open the "Memory Stick Duo" media cover during recording. • If you insert new "Memory Stick PRO Duo" media, the [Create a new Image Database File.]...3 Touch [YES]. Shake or knock your camcorder. Still images (p. 51) 1 Insert the "Memory Stick PRO Duo" media. 1 Open the "Memory Stick Duo" media cover. 2 Insert the "Memory Stick PRO Duo" media all data recorded on the recordable time of movies and recordable number of the following pages on the "...
Operating Guide / Read This First
Page 18
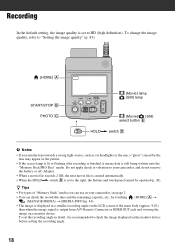
... written onto the "Memory Stick PRO Duo" media. switch D is set to HD (high definition). switch D b Notes • If you can check the recordable time and the remaining capacity, etc., by the lens may appear in your camcorder, and do not remove the battery or AC Adaptor. • When a movie... the image displayed on a monitor device. Do not apply shock or vibration to your camcorder, see page 2. • You can use in the picture. • If the access lamp is lit or flashing after recording is finished, it is created automatically. • When the HOLD. To change the ...
... written onto the "Memory Stick PRO Duo" media. switch D is set to HD (high definition). switch D b Notes • If you can check the recordable time and the remaining capacity, etc., by the lens may appear in your camcorder, and do not remove the battery or AC Adaptor. • When a movie... the image displayed on a monitor device. Do not apply shock or vibration to your camcorder, see page 2. • You can use in the picture. • If the access lamp is lit or flashing after recording is finished, it is created automatically. • When the HOLD. To change the ...

Operating Guide / Read This First
Page 20
...zoom lever. Touch panel - DISPLAY/BATT INFO button (p. 10) - b Notes • The minimum possible distance between camcorder and subject while maintaining sharp focus is set to the right. - Preventing operation errors If you want to zoom to... a level greater than 10 × when recording movies. 20 PHOTO button (p. 18) - (Movie)/ (Still) select button (p. 18) - Move it further for a slower... (p. 10) (displays the Battery Info when the POWER switch is set [DIGITAL ZOOM] (p. 49) if you slide the HOLD.
...zoom lever. Touch panel - DISPLAY/BATT INFO button (p. 10) - b Notes • The minimum possible distance between camcorder and subject while maintaining sharp focus is set to the right. - Preventing operation errors If you want to zoom to... a level greater than 10 × when recording movies. 20 PHOTO button (p. 18) - (Movie)/ (Still) select button (p. 18) - Move it further for a slower... (p. 10) (displays the Battery Info when the POWER switch is set [DIGITAL ZOOM] (p. 49) if you slide the HOLD.

Operating Guide / Read This First
Page 21
... pressed. To change . • [TIMING] Select the recording start point after START/STOP is recorded as a golf or tennis swing. 1 Touch (HOME) t t [SMTH SLW REC]. (CAMERA) 2 Press START/STOP. Touch to change the setting Touch (OPTION) t tab, then select the setting you record still images continuously. Your camcorder records sounds for about 3 seconds. b Notes • Sounds...
... pressed. To change . • [TIMING] Select the recording start point after START/STOP is recorded as a golf or tennis swing. 1 Touch (HOME) t t [SMTH SLW REC]. (CAMERA) 2 Press START/STOP. Touch to change the setting Touch (OPTION) t tab, then select the setting you record still images continuously. Your camcorder records sounds for about 3 seconds. b Notes • Sounds...

Operating Guide / Read This First
Page 23
Appears with the image on the tab that was lastly played back/recorded (B for the still image) HOME MENU Previous 6 images Selects images by date (p. 27) Next 6 images Returns to display the thumbnails). The VISUAL INDEX screen appears on your camcorder. 2 Touch (VIEW IMAGES) B. Playback Recording/Playback (HOME) A (VIEW IMAGES) B Power zoom lever C 1 While pressing the green button, then slide the POWER switch to ON to turn on the LCD screen (It may take some time to the recording screen (OPTION) 23
Appears with the image on the tab that was lastly played back/recorded (B for the still image) HOME MENU Previous 6 images Selects images by date (p. 27) Next 6 images Returns to display the thumbnails). The VISUAL INDEX screen appears on your camcorder. 2 Touch (VIEW IMAGES) B. Playback Recording/Playback (HOME) A (VIEW IMAGES) B Power zoom lever C 1 While pressing the green button, then slide the POWER switch to ON to turn on the LCD screen (It may take some time to the recording screen (OPTION) 23


