Operating Instructions
Page 2
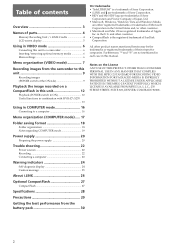
... Overview 3 Names of parts 4 Memory Recording Unit / i.LINK Cradle 4 LCD screen display 5 Using in VIDEO mode 6 Connecting this unit to a camcorder 6 Inserting/removing optional memory media 6 Menu settings 6 Menu organization (VIDEO mode 7 Recording images from the camcorder to this unit 9 Recording images (POWER switch at the ON side 9 Playback the image recorded on the License ANY USE OF THIS PRODUCT OTHER THAN CONSUMER PERSONAL USE IN ANY MANNER THAT COMPLIES WITH THE MPEG-2 STANDARD FOR ENCODING VIDEO INFORMATION FOR PACKAGED...
... Overview 3 Names of parts 4 Memory Recording Unit / i.LINK Cradle 4 LCD screen display 5 Using in VIDEO mode 6 Connecting this unit to a camcorder 6 Inserting/removing optional memory media 6 Menu settings 6 Menu organization (VIDEO mode 7 Recording images from the camcorder to this unit 9 Recording images (POWER switch at the ON side 9 Playback the image recorded on the License ANY USE OF THIS PRODUCT OTHER THAN CONSUMER PERSONAL USE IN ANY MANNER THAT COMPLIES WITH THE MPEG-2 STANDARD FOR ENCODING VIDEO INFORMATION FOR PACKAGED...
Operating Instructions
Page 3
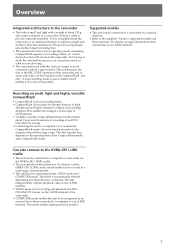
... be checked on the CompactFlash unit only. Supported models • This unit can be recognized as an external drive when connected to a computer via an i.LINK terminal. The data transfer time depends on which enables you to record repeatedly. The unit independently outputs playback video to the i.LINK interface. • VIDEO mode is for details on what you are shooting. • The camcorder used as recording media • CompactFlash is less subject...
... be checked on the CompactFlash unit only. Supported models • This unit can be recognized as an external drive when connected to a computer via an i.LINK terminal. The data transfer time depends on which enables you to record repeatedly. The unit independently outputs playback video to the i.LINK interface. • VIDEO mode is for details on what you are shooting. • The camcorder used as recording media • CompactFlash is less subject...
Operating Instructions
Page 4
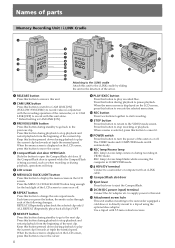
... screen. q; qa STOP button Press this unit. qs POWER switch Press this button to turn the power of this unit on or off . 7 REPEAT button Press this button to change the auto repeat mode. qj DC IN (DC power input) terminal Connect the AC adaptor etc. to supply power to this button to return to the VIDEO mode screen. Press this button during playback to stop . 5 LCD screen 6 MENU/LCD BACK LIGHT button Press this button to display the menu screen...
... screen. q; qa STOP button Press this unit. qs POWER switch Press this button to turn the power of this unit on or off . 7 REPEAT button Press this button to change the auto repeat mode. qj DC IN (DC power input) terminal Connect the AC adaptor etc. to supply power to this button to return to the VIDEO mode screen. Press this button during playback to stop . 5 LCD screen 6 MENU/LCD BACK LIGHT button Press this button to display the menu screen...
Operating Instructions
Page 5
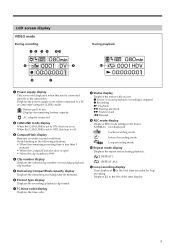
... Recording N Playback u Pausing playback M Fast-forward m Rewind 9 REC mode display Displays REC mode setting in minutes). 6 Format type display Displays the recording/playback clip format. 7 TC (time code) display Displays the time code. 8 Status display Displays the status with an icon. Cache recording mode Interval recording mode Loop recording mode q; Battery pack in use Display the remaining battery capacity. LCD screen display VIDEO mode During recording 12 3 4 5qa 9 6 During playback q; 8 7 1 Power supply display This icon is not displayed when this unit is connected directly...
... Recording N Playback u Pausing playback M Fast-forward m Rewind 9 REC mode display Displays REC mode setting in minutes). 6 Format type display Displays the recording/playback clip format. 7 TC (time code) display Displays the time code. 8 Status display Displays the status with an icon. Cache recording mode Interval recording mode Loop recording mode q; Battery pack in use Display the remaining battery capacity. LCD screen display VIDEO mode During recording 12 3 4 5qa 9 6 During playback q; 8 7 1 Power supply display This icon is not displayed when this unit is connected directly...
Operating Instructions
Page 6
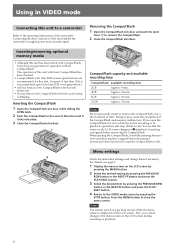
... while the menu screen is displayed on the LCD screen changes to x (playback/recording is not guaranteed; The operation of this unit with Sony CompactFlash has been checked. • CompactFlash with all CompactFlash. Press the MENU button to remove the CompactFlash. 2 Close the CompactFlash slot door. Inserting/removing optional memory media • Although this unit before removing the CompactFlash. Doing so may cause mis-recognition of time. When...
... while the menu screen is displayed on the LCD screen changes to x (playback/recording is not guaranteed; The operation of this unit with Sony CompactFlash has been checked. • CompactFlash with all CompactFlash. Press the MENU button to remove the CompactFlash. 2 Close the CompactFlash slot door. Inserting/removing optional memory media • Although this unit before removing the CompactFlash. Doing so may cause mis-recognition of time. When...
Operating Instructions
Page 7
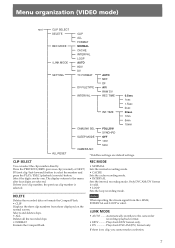
... LOOP i.LINK MODE AUTO HDV DV SETTING TC FORMAT AUTO NDF DF DV FILETYPE AVI RAW DV INTERVAL REC TIME 0.5sec 1sec 1.5sec 2sec INT.TIME 30sec 1min 5min 10min CAMLINK SEL FOLLOW SYNCHRO SLEEP MODE OFF 1min 5min CAMERA NO ALL RESET * Boldface settings are selected. CLIP SELECT You can select the clip number directly. The display returns to the menu after four digits are default settings. i.LINK MODE •...
... LOOP i.LINK MODE AUTO HDV DV SETTING TC FORMAT AUTO NDF DF DV FILETYPE AVI RAW DV INTERVAL REC TIME 0.5sec 1sec 1.5sec 2sec INT.TIME 30sec 1min 5min 10min CAMLINK SEL FOLLOW SYNCHRO SLEEP MODE OFF 1min 5min CAMERA NO ALL RESET * Boldface settings are selected. CLIP SELECT You can select the clip number directly. The display returns to the menu after four digits are default settings. i.LINK MODE •...
Operating Instructions
Page 8
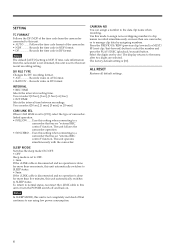
... unit. • AUTO ....... The display returns to the data clip name when recording. If time code information from the camcorder connected to the most recent recording setting. Records video in DV format. To return to normal status, reconnect the i.LINK cable to this unit or turn the POWER switch off but continues to [ON], select the type of camcorderlinked operation. • FOLLOW ...... CAMERA NO You can assign a number to the menu...
... unit. • AUTO ....... The display returns to the data clip name when recording. If time code information from the camcorder connected to the most recent recording setting. Records video in DV format. To return to normal status, reconnect the i.LINK cable to this unit or turn the POWER switch off but continues to [ON], select the type of camcorderlinked operation. • FOLLOW ...... CAMERA NO You can assign a number to the menu...
Operating Instructions
Page 9
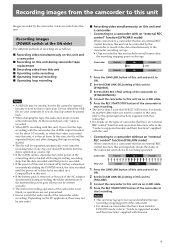
... the "Guide to supported models and their functions" supplied with the camcorder, the i.LINK output stream is cut form. Depending on another camcorder you want to connect to this unit, refer to the operating instructions supplied with an "external REC control" function (SYNCHRO mode) When connected to a camcorder that video is recorded onto this unit, it to ON. 2 Set the [CAM LINK SEL] setting of this unit to [SYNCHRO]. 3 Set the [EXT REC CTRL] setting of...
... the "Guide to supported models and their functions" supplied with the camcorder, the i.LINK output stream is cut form. Depending on another camcorder you want to connect to this unit, refer to the operating instructions supplied with an "external REC control" function (SYNCHRO mode) When connected to a camcorder that video is recorded onto this unit, it to ON. 2 Set the [CAM LINK SEL] setting of this unit to [SYNCHRO]. 3 Set the [EXT REC CTRL] setting of...
Operating Instructions
Page 10
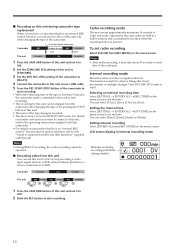
... the "Guide to supported models and their functions" supplied with that camcorder. • For details on camcorders that has an external REC control function, you want to connect to this unit, refer to the operating instructions supplied with this unit. You can select [0.5sec], [1sec], [1.5sec] or [2sec]. Notes • During RELAY recording, the cache recording cannot be stopped from [REC MODE] on the menu screen to set the time. This...
... the "Guide to supported models and their functions" supplied with that camcorder. • For details on camcorders that has an external REC control function, you want to connect to this unit, refer to the operating instructions supplied with this unit. You can select [0.5sec], [1sec], [1.5sec] or [2sec]. Notes • During RELAY recording, the cache recording cannot be stopped from [REC MODE] on the menu screen to set the time. This...
Operating Instructions
Page 12
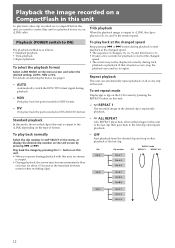
... changed speed Keep pressing . Playback (POWER switch to ON) The playback method is output to a playback device via an i.LINK cable. For details on this unit. • When you need to connect this unit to the i.LINK depending on the LCD screen by pressing . Play back the image by pressing the H button on selecting the menu, see page 6. - Trick playback When the playback image is output to replay. REPEAT 1 The recorded image in the desired clip is played...
... changed speed Keep pressing . Playback (POWER switch to ON) The playback method is output to a playback device via an i.LINK cable. For details on this unit. • When you need to connect this unit to the i.LINK depending on the LCD screen by pressing . Play back the image by pressing the H button on selecting the menu, see page 6. - Trick playback When the playback image is output to replay. REPEAT 1 The recorded image in the desired clip is played...
Operating Instructions
Page 13
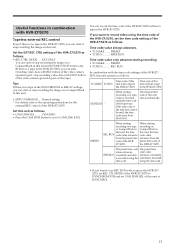
... internal time code of the HVR-Z7/S270. You can start recording video data with STOP button of the video camera operation part on this unit to the operating instructions for the external REC control of this unit as follows. • REC CTRL MODE ..... using the time code of the HVR-Z7/S270, set CAM LINK SEL of the HVR-Z7/S270 without a tape in the HVR-Z7/S270, you can start or stop recording video data with REC button of the video camera operation part, stop recording the image...
... internal time code of the HVR-Z7/S270. You can start recording video data with STOP button of the video camera operation part on this unit to the operating instructions for the external REC control of this unit as follows. • REC CTRL MODE ..... using the time code of the HVR-Z7/S270, set CAM LINK SEL of the HVR-Z7/S270 without a tape in the HVR-Z7/S270, you can start or stop recording video data with REC button of the video camera operation part, stop recording the image...
Operating Instructions
Page 15
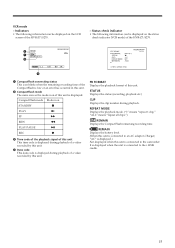
... mode icon of a video recorded by this unit. 4 Data code This data code is connected to the camcorder. CompactFlash mode Mode icon STANDBY x PLAY N FF M REW m PLAY PAUSE u REC z 3 Time code of the playback signal of this unit This time code is displayed during playback of a video recorded by this unit is displayed.) Not displayed when this unit. REMAIN Displays the battery level. (When this unit is connected to an AC adaptor/charger, "AC" is connected to the i.LINK cradle. 15 PB FORMAT Displays the playback format of the HVR...
... mode icon of a video recorded by this unit. 4 Data code This data code is connected to the camcorder. CompactFlash mode Mode icon STANDBY x PLAY N FF M REW m PLAY PAUSE u REC z 3 Time code of the playback signal of this unit This time code is displayed during playback of a video recorded by this unit is displayed.) Not displayed when this unit. REMAIN Displays the battery level. (When this unit is connected to an AC adaptor/charger, "AC" is connected to the i.LINK cradle. 15 PB FORMAT Displays the playback format of the HVR...

Operating Instructions
Page 16
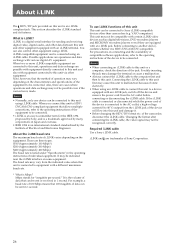
...) / Windows Vista Standard installation is not assured if the above OS has been upgraded. For Macintosh users • OS: Mac OS X (v10.3 or later) 16 Operation is required. Using in HDV or DV format to a nonlinear editing system or computer. 1 Attach the HVRA-CR1 i.LINK cradle and optional AC adaptor to this unit is set to ON. Note This unit cannot receive power from...
...) / Windows Vista Standard installation is not assured if the above OS has been upgraded. For Macintosh users • OS: Mac OS X (v10.3 or later) 16 Operation is required. Using in HDV or DV format to a nonlinear editing system or computer. 1 Attach the HVRA-CR1 i.LINK cradle and optional AC adaptor to this unit is set to ON. Note This unit cannot receive power from...
Operating Instructions
Page 17
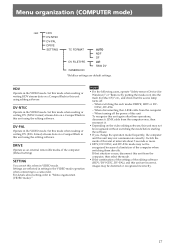
... When turning off . - If that the access lamp turns off the power of the computer when switching them directly. Settings are default settings. Switch the mode of the computer. (Default setting) SETTING You can set this unit using the editing software. Set this mode when reading or writing DV (PAL format) stream data on a CompactFlash in this when in the VIDEO mode. Menu organization (COMPUTER mode) root HDV DV-NTSC DV-PAL DRIVE SETTING TC FORMAT DV FILETYPE CAMERA NO...
... When turning off . - If that the access lamp turns off the power of the computer when switching them directly. Settings are default settings. Switch the mode of the computer. (Default setting) SETTING You can set this unit using the editing software. Set this mode when reading or writing DV (PAL format) stream data on a CompactFlash in this when in the VIDEO mode. Menu organization (COMPUTER mode) root HDV DV-NTSC DV-PAL DRIVE SETTING TC FORMAT DV FILETYPE CAMERA NO...
Operating Instructions
Page 18
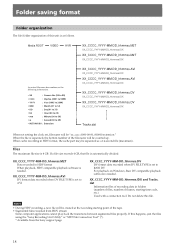
... recording starting time code, etc.) Used with a connection tool. XX_CCCC_YYYY-MM-DD_hhmmss.AVI DV format data recorded when DV FILE TYPE is set to RAW DV For playback on Windows, Raw DV compatible playback software is automatically divided. XX_CCCC_YYYY-MM-DD_hhmmss.M2T Data recorded in HDV format When playback, HDV compatible playback software is 4 GB. XX_CCCC_YYYY-MM-DD_hhmmss.IDX and Tracks. Do not delete this happens, join the files using the "Sony Recording Unit Utility" or "M2T File Connection Tool" (*). * Available from HDV...
... recording starting time code, etc.) Used with a connection tool. XX_CCCC_YYYY-MM-DD_hhmmss.AVI DV format data recorded when DV FILE TYPE is set to RAW DV For playback on Windows, Raw DV compatible playback software is automatically divided. XX_CCCC_YYYY-MM-DD_hhmmss.M2T Data recorded in HDV format When playback, HDV compatible playback software is 4 GB. XX_CCCC_YYYY-MM-DD_hhmmss.IDX and Tracks. Do not delete this happens, join the files using the "Sony Recording Unit Utility" or "M2T File Connection Tool" (*). * Available from HDV...

Operating Instructions
Page 19
...] again.) 6 Exit Disk Utility. 19 To use Disk Utility. Delete data or format a CompactFlash on this unit to increase the capacity of the CompactFlash. • When removing the CompactFlash media by streaming. Notes regarding COMPUTER mode • Do not save other data files in the HVR folder. • Do not transfer data from a computer to this unit in the menu. • Do not change folder or file names on...
...] again.) 6 Exit Disk Utility. 19 To use Disk Utility. Delete data or format a CompactFlash on this unit to increase the capacity of the CompactFlash. • When removing the CompactFlash media by streaming. Notes regarding COMPUTER mode • Do not save other data files in the HVR folder. • Do not transfer data from a computer to this unit in the menu. • Do not change folder or file names on...
Operating Instructions
Page 20
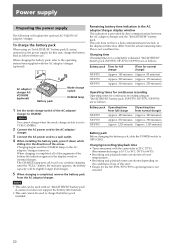
...). 2 AC adaptor/ charger ACVQ1050B (optional) 3 4 1 Battery pack Mode change switch CHARGE lamp 1 Set the mode change switch is set to VCR/CAMERA. 2 Connect the AC power cord to the AC adaptor/ charger. 3 Connect the AC power cord to CHARGE. This unit does not have a data communications function, so the displayed time may differ from the actual remaining time. Battery pack Operating time from full charge (Operating time from normal charge) NP-F570 Approx. 420...
...). 2 AC adaptor/ charger ACVQ1050B (optional) 3 4 1 Battery pack Mode change switch CHARGE lamp 1 Set the mode change switch is set to VCR/CAMERA. 2 Connect the AC power cord to the AC adaptor/ charger. 3 Connect the AC power cord to CHARGE. This unit does not have a data communications function, so the displayed time may differ from the actual remaining time. Battery pack Operating time from full charge (Operating time from normal charge) NP-F570 Approx. 420...
Operating Instructions
Page 21
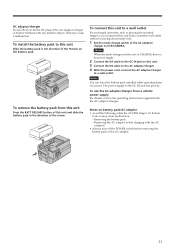
... a malfunction. To connect this unit to a wall outlet For prolonged operation, such as playing the recorded images, you can leave the battery pack installed while operating from a domestic wall outlet without worrying about battery life. 1 Set the mode change switch is set to a wall outlet. To install the battery pack to this unit. 3 Connect the DK cable to the AC adaptor/charger. 4 With the power cord, connect the AC...
... a malfunction. To connect this unit to a wall outlet For prolonged operation, such as playing the recorded images, you can leave the battery pack installed while operating from a domestic wall outlet without worrying about battery life. 1 Set the mode change switch is set to a wall outlet. To install the battery pack to this unit. 3 Connect the DK cable to the AC adaptor/charger. 4 With the power cord, connect the AC...
Operating Instructions
Page 22
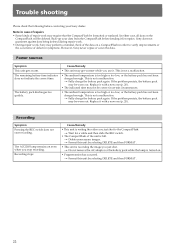
... in case of repairs • Some kinds of repair work , Sony may be formatted or replaced. Recording stops. t Delete unnecessary images. In either case, all data on . • Fragmentation has occurred. The remaining battery time indicator does not indicate the correct time. The battery pack discharges too quickly. Cause/Remedy • This unit may be deleted. Power sources Symptom This unit gets warm. Replace it with a new one (p. 20). This...
... in case of repairs • Some kinds of repair work , Sony may be formatted or replaced. Recording stops. t Delete unnecessary images. In either case, all data on . • Fragmentation has occurred. The remaining battery time indicator does not indicate the correct time. The battery pack discharges too quickly. Cause/Remedy • This unit may be deleted. Power sources Symptom This unit gets warm. Replace it with a new one (p. 20). This...
Operating Instructions
Page 26
... unit may not be compatible with certain i.LINK video devices such as digital televisions, DVD recorders/players and MICROMV recorders/players even if they are cases where operations and data exchange may not be possible even if the connection is connected to the AC outlet, a high-voltage current (8 to another device, confirm whether it . • Before changing the HDV/DV format etc. If the i.LINK cable is connected or disconnected while the power cord...
... unit may not be compatible with certain i.LINK video devices such as digital televisions, DVD recorders/players and MICROMV recorders/players even if they are cases where operations and data exchange may not be possible even if the connection is connected to the AC outlet, a high-voltage current (8 to another device, confirm whether it . • Before changing the HDV/DV format etc. If the i.LINK cable is connected or disconnected while the power cord...


