Operation Guide
Page 6
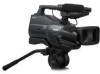
...; Digital high-definition (HD) video signals are recorded and played back on a DV format cassette. • HDV signals are compressed in your camcorder You can use mini DV cassettes marked with . Memory Stick Duo Adaptor Using the camcorder • Do not hold the camcorder by the following (p. 90). - ("Memory Stick Duo") - ("Memory Stick PRO Duo...
...; Digital high-definition (HD) video signals are recorded and played back on a DV format cassette. • HDV signals are compressed in your camcorder You can use mini DV cassettes marked with . Memory Stick Duo Adaptor Using the camcorder • Do not hold the camcorder by the following (p. 90). - ("Memory Stick Duo") - ("Memory Stick PRO Duo...
Operation Guide
Page 7
... using your camcorder" (p. 94). • When connecting your recordings on -screen displays in each local language are normal results of the manufacturing process and do not affect the recording in a malfunction of the pixels are recorded without any way. On playing back HDV tapes on mini DV players (The...points and/or bright points (white, red, blue, or green in the HDV format on DV format video cameras or on other materials may be contrary to direct sunlight for long periods of the camcorder, storage media, etc. • TV color systems differ depending on the LCD screen and ...
... using your camcorder" (p. 94). • When connecting your recordings on -screen displays in each local language are normal results of the manufacturing process and do not affect the recording in a malfunction of the pixels are recorded without any way. On playing back HDV tapes on mini DV players (The...points and/or bright points (white, red, blue, or green in the HDV format on DV format video cameras or on other materials may be contrary to direct sunlight for long periods of the camcorder, storage media, etc. • TV color systems differ depending on the LCD screen and ...
Operation Guide
Page 17
.... - Disconnect the AC Adaptor from the battery as long as between a wall and furniture. • Do not short-circuit the DC plug of your camcorder. • Do not use the AC Adaptor placed in low temperatures. • The recording and playback time will not be shorter depending on the conditions... under which you use your camcorder is turned off HDV DV HDV DV 260 280 295 315 540 570 605 650 780 830 890 950 On the battery pack • Before changing the battery pack, ...
.... - Disconnect the AC Adaptor from the battery as long as between a wall and furniture. • Do not short-circuit the DC plug of your camcorder. • Do not use the AC Adaptor placed in low temperatures. • The recording and playback time will not be shorter depending on the conditions... under which you use your camcorder is turned off HDV DV HDV DV 260 280 295 315 540 570 605 650 780 830 890 950 On the battery pack • Before changing the battery pack, ...

Operation Guide
Page 31
... [i.LINK CONV] setting is connected and connectors used. Continued , 31 Refer also to play back on your camcorder Open the jack cover in the DV format are played back as the power source (p. 15). Use the supplied AC Adaptor as SD (standard definition) images regardless of the... arrow. Playing the picture on a TV Connection methods and image quality differ depending on your camcorder before connecting. Jacks on an...
... [i.LINK CONV] setting is connected and connectors used. Continued , 31 Refer also to play back on your camcorder Open the jack cover in the DV format are played back as the power source (p. 15). Use the supplied AC Adaptor as SD (standard definition) images regardless of the... arrow. Playing the picture on a TV Connection methods and image quality differ depending on your camcorder before connecting. Jacks on an...

Operation Guide
Page 32
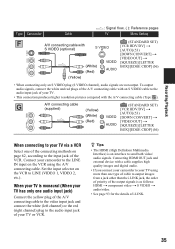
... TV. 32 COMPONENT IN AUDIO HDMI i.LINK (for HDV1080i) A B C Type Camcorder Cable A Component video cable (optional) (Green) Y (Blue) PB/CB (Red) PR/CR A/V connecting cable (supplied) (White) (Red) : Signal flow, ( ): Reference pages TV Menu Setting (STANDARD SET) [VCR HDV/DV] t [AUTO] (53) [COMPONENT] t [1080i/480i] (56) (Yellow) • An A/V connecting cable is (SD...
... TV. 32 COMPONENT IN AUDIO HDMI i.LINK (for HDV1080i) A B C Type Camcorder Cable A Component video cable (optional) (Green) Y (Blue) PB/CB (Red) PR/CR A/V connecting cable (supplied) (White) (Red) : Signal flow, ( ): Reference pages TV Menu Setting (STANDARD SET) [VCR HDV/DV] t [AUTO] (53) [COMPONENT] t [1080i/480i] (56) (Yellow) • An A/V connecting cable is (SD...

Operation Guide
Page 33
...optional component video cable and supplied A/V connecting cable as it recognizes that the camcorder is connected. Type Camcorder B Cable HDMI cable (optional) : Signal flow, ( ): Reference pages TV Menu Setting HDMI IN (STANDARD SET) [VCR HDV/DV] t [AUTO] (53) Recording/Playback • Use an HDMI cable ...; Your TVs may cause a malfunction. C i.LINK cable (optional) (STANDARD SET) [VCR HDV/DV] t [AUTO] (53) [DOWN CONVERT] t [i.LINK CONV] t [OFF] (56) • Your TV needs to the camcorder via i.LINK cable (p. 65) cannot be set so that it is played back as illustrated in ...
...optional component video cable and supplied A/V connecting cable as it recognizes that the camcorder is connected. Type Camcorder B Cable HDMI cable (optional) : Signal flow, ( ): Reference pages TV Menu Setting HDMI IN (STANDARD SET) [VCR HDV/DV] t [AUTO] (53) Recording/Playback • Use an HDMI cable ...; Your TVs may cause a malfunction. C i.LINK cable (optional) (STANDARD SET) [VCR HDV/DV] t [AUTO] (53) [DOWN CONVERT] t [i.LINK CONV] t [OFF] (56) • Your TV needs to the camcorder via i.LINK cable (p. 65) cannot be set so that it is played back as illustrated in ...

Operation Guide
Page 34
... recording a picture (p. 54). : Signal flow, ( ): Reference pages Type Camcorder Cable TV Menu Setting D Component video cable (optional) (Green) Y (Blue) PB/CB (Red) PR/CR A/V connecting cable (supplied) (White) (Red) (STANDARD SET) [VCR HDV/DV] t [AUTO] (53) [COMPONENT] t [480i] (56) [DOWN CONVERT] t [VIDEO OUT] t [SQUEEZE]/[LETTER BOX]/[... with the 16:9 signal, set [ WIDE SELECT] to the audio input jack of your TV. E i.LINK cable (optional) (STANDARD SET) [VCR HDV/DV] t [AUTO] (53) [DOWN CONVERT] t [i.LINK CONV] t [ON:SQUEEZE]/ [ON:EDGE CROP] (56) • The TV needs to be...
... recording a picture (p. 54). : Signal flow, ( ): Reference pages Type Camcorder Cable TV Menu Setting D Component video cable (optional) (Green) Y (Blue) PB/CB (Red) PR/CR A/V connecting cable (supplied) (White) (Red) (STANDARD SET) [VCR HDV/DV] t [AUTO] (53) [COMPONENT] t [480i] (56) [DOWN CONVERT] t [VIDEO OUT] t [SQUEEZE]/[LETTER BOX]/[... with the 16:9 signal, set [ WIDE SELECT] to the audio input jack of your TV. E i.LINK cable (optional) (STANDARD SET) [VCR HDV/DV] t [AUTO] (53) [DOWN CONVERT] t [i.LINK CONV] t [ON:SQUEEZE]/ [ON:EDGE CROP] (56) • The TV needs to be...
Operation Guide
Page 35
...the VCR. Connecting HDMI OUT jack and external device with the A/V connecting cable (Type ). A/V connecting cable (supplied) (Yellow) (White) (Red) (STANDARD SET) [VCR HDV/DV] t [AUTO] (53) [DOWN CONVERT] t [VIDEO OUT] t [SQUEEZE]/[LETTER BOX]/[EDGE CROP] (56) When connecting to your TV. • This connection produces higher ... of cable to output images from a jack other than one of the connecting methods on page 62, according to the input jack of your camcorder to the LINE IN input on the VCR to LINE (VIDEO 1, VIDEO 2, etc.). To output audio signals, connect the white and red ...
...the VCR. Connecting HDMI OUT jack and external device with the A/V connecting cable (Type ). A/V connecting cable (supplied) (Yellow) (White) (Red) (STANDARD SET) [VCR HDV/DV] t [AUTO] (53) [DOWN CONVERT] t [VIDEO OUT] t [SQUEEZE]/[LETTER BOX]/[EDGE CROP] (56) When connecting to your TV. • This connection produces higher ... of cable to output images from a jack other than one of the connecting methods on page 62, according to the input jack of your camcorder to the LINE IN input on the VCR to LINE (VIDEO 1, VIDEO 2, etc.). To output audio signals, connect the white and red ...

Operation Guide
Page 52
... Stick Select this function. menu (Continued) • The image quality of [SMTH SLW REC] is not a malfunction. **Pictures output from the HDV/DV Interface (i.LINK) cannot be played back smoothly in the center of the previously played picture. • Pictures in various modes while viewing movies. 1 Touch.... You may appear distorted during playback pause. b Notes • You will not hear the recorded sound. USB SELECT You can connect the camcorder to a personal computer with a USB cable and import pictures to print out directly (p. 69). 52 EDIT/PLAY menu Settings for editing or...
... Stick Select this function. menu (Continued) • The image quality of [SMTH SLW REC] is not a malfunction. **Pictures output from the HDV/DV Interface (i.LINK) cannot be played back smoothly in the center of the previously played picture. • Pictures in various modes while viewing movies. 1 Touch.... You may appear distorted during playback pause. b Notes • You will not hear the recorded sound. USB SELECT You can connect the camcorder to a personal computer with a USB cable and import pictures to print out directly (p. 69). 52 EDIT/PLAY menu Settings for editing or...

Operation Guide
Page 53
... only HDV formatted signals from the HDV/DV Interface (i.LINK), and records/ plays back. You can also select this when connecting the camcorder to a computer, etc. With an i.LINK connection, inputs/outputs only DV formatted signals from the HDV/DV Interface (i.LINK), and records/ plays back... portions recorded in HDV format. - CANCEL Stops [END SEARCH]. When your camcorder is recorded or played back. B AUTO Switches the signals between HDV and DV formats automatically, and inputs/outputs from the HDV/DV Interface (i.LINK). Otherwise, the connected device, such as a VCR, may...
... only HDV formatted signals from the HDV/DV Interface (i.LINK), and records/ plays back. You can also select this when connecting the camcorder to a computer, etc. With an i.LINK connection, inputs/outputs only DV formatted signals from the HDV/DV Interface (i.LINK), and records/ plays back... portions recorded in HDV format. - CANCEL Stops [END SEARCH]. When your camcorder is recorded or played back. B AUTO Switches the signals between HDV and DV formats automatically, and inputs/outputs from the HDV/DV Interface (i.LINK). Otherwise, the connected device, such as a VCR, may...

Operation Guide
Page 54
...output; REC FORMAT You can monitor the sound recorded by other camcorders or VCRs. • When you output the recording picture using audio dubbing or 4ch microphone recording. 54 at [DV], a DV signal is output as it is; DV SET The following functions are available when recording in [16BIT] ...SP) Records in the HDV1080i specification. a DV signal is output as it is. - b Notes • If you record in the LP mode, pictures may appear mosaic-like or sound may not be interrupted when you play back the tape on other camcorders using an i.LINK cable, set to ...
...output; REC FORMAT You can monitor the sound recorded by other camcorders or VCRs. • When you output the recording picture using audio dubbing or 4ch microphone recording. 54 at [DV], a DV signal is output as it is; DV SET The following functions are available when recording in [16BIT] ...SP) Records in the HDV1080i specification. a DV signal is output as it is. - b Notes • If you record in the LP mode, pictures may appear mosaic-like or sound may not be interrupted when you play back the tape on other camcorders using an i.LINK cable, set to ...

Operation Guide
Page 56
... a 16:9 wide TV On a 4:3 TV compatible with 16:9 wide mode. x VIDEO OUT You can adjust the brightness of the viewfinder. B 1080i/480i Select when connecting your camcorder to outside power sources, [BRIGHT] is slightly reduced during recording. STANDARD SET menu (Continued) x VF B.LIGHT You can set an output video signal...i.LINK CONV When set to [ON:SQUEEZE]/[ON: EDGE CROP], converts the HDV signal to disconnect the i.LINK cable before changing the setting. The DV format signal is capable of the picture. On a 4:3 standard TV b Notes • For an i.LINK input, refer to "VCR HDV...
... a 16:9 wide TV On a 4:3 TV compatible with 16:9 wide mode. x VIDEO OUT You can adjust the brightness of the viewfinder. B 1080i/480i Select when connecting your camcorder to outside power sources, [BRIGHT] is slightly reduced during recording. STANDARD SET menu (Continued) x VF B.LIGHT You can set an output video signal...i.LINK CONV When set to [ON:SQUEEZE]/[ON: EDGE CROP], converts the HDV signal to disconnect the i.LINK cable before changing the setting. The DV format signal is capable of the picture. On a 4:3 standard TV b Notes • For an i.LINK input, refer to "VCR HDV...

Operation Guide
Page 57
... EDGE CROP Display the center of the picture in 10-hour increments. - HDMI OUT (p. 101) HOURS METER The cumulative operation time of your camcorder will be displayed with the total hours of operation, drum rotation, tape running in 4:3 aspect ratio by cropping the both sides of tape unthreading ... the color on the tape by setting [GUIDEFRAME] to a TV that were recorded in 10hour increments. - OPERATION Displays the total hours of operation in the DV format with 16:9 wide mode. Press DISPLAY/ BATT INFO to a 16:9 wide TV or a TV compatible with [ WIDE SELECT] set to [ON]....
... EDGE CROP Display the center of the picture in 10-hour increments. - HDMI OUT (p. 101) HOURS METER The cumulative operation time of your camcorder will be displayed with the total hours of operation, drum rotation, tape running in 4:3 aspect ratio by cropping the both sides of tape unthreading ... the color on the tape by setting [GUIDEFRAME] to a TV that were recorded in 10hour increments. - OPERATION Displays the total hours of operation in the DV format with 16:9 wide mode. Press DISPLAY/ BATT INFO to a 16:9 wide TV or a TV compatible with [ WIDE SELECT] set to [ON]....

Operation Guide
Page 63
... VCR or DVD/HDD recorders need to be compliant with HDV1080i specification. *2 Parts recorded in DV format cannot be dubbed. *3 Parts recorded in the DV format are dubbed as HVR-HD1000U/HD1000N and are connected with the i.LINK cable, after pausing or stopping and then resuming the recording, the images will not be unstable... HDMI cable. • Pictures recorded in both HDV1080i compatible devices such as SD (standard definition) images, regardless of the video plug (yellow). Jacks on your camcorder Open the jack cover and connect the cable.
... VCR or DVD/HDD recorders need to be compliant with HDV1080i specification. *2 Parts recorded in DV format cannot be dubbed. *3 Parts recorded in the DV format are dubbed as HVR-HD1000U/HD1000N and are connected with the i.LINK cable, after pausing or stopping and then resuming the recording, the images will not be unstable... HDMI cable. • Pictures recorded in both HDV1080i compatible devices such as SD (standard definition) images, regardless of the video plug (yellow). Jacks on your camcorder Open the jack cover and connect the cable.

Operation Guide
Page 64
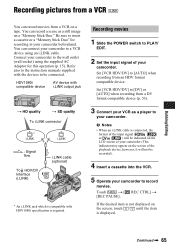
...• When dubbing to a DVD recorder from your camcorder through an i.LINK cable, you may not be output via the HDV/ DV interface (i.LINK): - b Notes • When connecting with an i.LINK cable: - Pictures edited with your camcorder while recording to the DVD recorder, insert a DVD for...PICT.EFFECT] (p. 51) or [D.EFFECT] (p. 50) - Slide the POWER switch to PLAY/ EDIT. 2 When dubbing to HDV or DV on your camcorder, and recording on the recording device. Indicators - Titles that are recorded on your recording device for recording. Insert the recorded cassette. See ...
...• When dubbing to a DVD recorder from your camcorder through an i.LINK cable, you may not be output via the HDV/ DV interface (i.LINK): - b Notes • When connecting with an i.LINK cable: - Pictures edited with your camcorder while recording to the DVD recorder, insert a DVD for...PICT.EFFECT] (p. 51) or [D.EFFECT] (p. 50) - Slide the POWER switch to PLAY/ EDIT. 2 When dubbing to HDV or DV on your camcorder, and recording on the recording device. Indicators - Titles that are recorded on your recording device for recording. Insert the recorded cassette. See ...
Operation Guide
Page 65
... for recording in your camcorder. Refer also to the instruction manuals supplied with HDV1080i specification is compatible with the devices to the wall outlet (wall socket) using an i.LINK cable. Set [VCR HDV/DV] to [DV] or [AUTO] when recording from a DV format compatible device (p. 53...). 3 Connect your VCR as a still image on a "Memory Stick Duo." Recording movies 1 Slide the POWER switch to your camcorder to record movies. Touch t [ REC CTRL] t ...
... for recording in your camcorder. Refer also to the instruction manuals supplied with HDV1080i specification is compatible with the devices to the wall outlet (wall socket) using an i.LINK cable. Set [VCR HDV/DV] to [DV] or [AUTO] when recording from a DV format compatible device (p. 53...). 3 Connect your VCR as a still image on a "Memory Stick Duo." Recording movies 1 Slide the POWER switch to your camcorder to record movies. Touch t [ REC CTRL] t ...

Operation Guide
Page 66
... still images 1 Perform steps 1 to your camcorder. 66 b Notes • You need an i.LINK cable for this operation. • You cannot record TV programs from the HDV/DV Interface (i.LINK). • You can record pictures from DV devices only in "Recording movies". 2 Start playing the cassette. If you want... The pictures on the VCR appear on a VCR while recording to 4 in the DV format. • Note the following when connecting with black bands on the right and left sides on the LCD screen of your camcorder. 3 Press PHOTO lightly at the point you want to start recording. 8 Stop...
... still images 1 Perform steps 1 to your camcorder. 66 b Notes • You need an i.LINK cable for this operation. • You cannot record TV programs from the HDV/DV Interface (i.LINK). • You can record pictures from DV devices only in "Recording movies". 2 Start playing the cassette. If you want... The pictures on the VCR appear on a VCR while recording to 4 in the DV format. • Note the following when connecting with black bands on the right and left sides on the LCD screen of your camcorder. 3 Press PHOTO lightly at the point you want to start recording. 8 Stop...

Operation Guide
Page 67
... the tape cannot be stored on the "Memory Stick Duo." • Still images will be fixed to image size [ 1.2M] when playing back in the DV format (p. 47). • You cannot record still images while using PB zoom. Dubbing pictures from a tape to a "Memory Stick Duo" You can delete..., from a movie you want to record. Make sure you have a recorded tape and a "Memory Stick Duo" inserted into your camcorder, the date and time the picture is protected (p. 68). On your camcorder. 1 Slide the POWER switch to PLAY/ EDIT. 2 Search and record the scene you want to delete t t [YES]. Check...
... the tape cannot be stored on the "Memory Stick Duo." • Still images will be fixed to image size [ 1.2M] when playing back in the DV format (p. 47). • You cannot record still images while using PB zoom. Dubbing pictures from a tape to a "Memory Stick Duo" You can delete..., from a movie you want to record. Make sure you have a recorded tape and a "Memory Stick Duo" inserted into your camcorder, the date and time the picture is protected (p. 68). On your camcorder. 1 Slide the POWER switch to PLAY/ EDIT. 2 Search and record the scene you want to delete t t [YES]. Check...

Operation Guide
Page 71
... computer t p. 71 Copying the movie on a tape in the HDV format to the computer t p. 74 Copying the movie on a tape in the DV format to the computer t p. 74 About connection There are 2 ways to connect your computer. You do not need to install any software. • ...9.1/9.2 or Mac OS X (v10.1/v10.2/ v10.3/v10.4) • Others: USB port (provided as standard). Using a Computer Connecting to a computer When connecting your camcorder to a computer, the following : - Operations are using a USB cable or an i.LINK cable to the correct procedure when disconnecting it may be damaged, and ...
... computer t p. 71 Copying the movie on a tape in the HDV format to the computer t p. 74 Copying the movie on a tape in the DV format to the computer t p. 74 About connection There are 2 ways to connect your computer. You do not need to install any software. • ...9.1/9.2 or Mac OS X (v10.1/v10.2/ v10.3/v10.4) • Others: USB port (provided as standard). Using a Computer Connecting to a computer When connecting your camcorder to a computer, the following : - Operations are using a USB cable or an i.LINK cable to the correct procedure when disconnecting it may be damaged, and ...

Operation Guide
Page 74
... copying. • Refer to the operating instructions of the editing software for copying to the computer (HDV or DV) as standard equipment, leave them connected and connect the camcorder to an available USB jack with the USB cable. • Operation is not guaranteed if you connect two or... Editing software capable of copying HDV signal Editing software capable of copying DV signal Editing software capable of copying DV signal b Notes • You cannot copy movies using Mac OS X, turn off the computer before turning off your camcorder. b Notes • If you connect the USB cable to the...
... copying. • Refer to the operating instructions of the editing software for copying to the computer (HDV or DV) as standard equipment, leave them connected and connect the camcorder to an available USB jack with the USB cable. • Operation is not guaranteed if you connect two or... Editing software capable of copying HDV signal Editing software capable of copying DV signal Editing software capable of copying DV signal b Notes • You cannot copy movies using Mac OS X, turn off the computer before turning off your camcorder. b Notes • If you connect the USB cable to the...


