
Operation Guide
Page 1
3-278-988-12(1) Digital HD Video Camera Recorder Operating Guide Before operating the unit, please read this manual thoroughly, and retain it for future reference The supplied CD-ROM includes Operating Guide for the HVR-HD1000 series. (English, French, German, Italian, Spanish, and Simplified Chinese versions). For more details, see "Using the CD-ROM Manual" on page 11. HVR-HD1000U/HD1000N © 2007 Sony Corporation
3-278-988-12(1) Digital HD Video Camera Recorder Operating Guide Before operating the unit, please read this manual thoroughly, and retain it for future reference The supplied CD-ROM includes Operating Guide for the HVR-HD1000 series. (English, French, German, Italian, Spanish, and Simplified Chinese versions). For more details, see "Using the CD-ROM Manual" on page 11. HVR-HD1000U/HD1000N © 2007 Sony Corporation

Operation Guide
Page 2
Model No. ACSerial No. IMPORTANT SAFEGUARDS For your protection, please read these numbers whenever you call your Sony dealer regarding this product. Carefully observe all warnings, precautions and instructions on the marking label. For those sets designed to operate from ...be operated only from battery power, or other ). Attachments Do not use attachments not recommended by forcing it in fire or electric shock. Model No. If you are unable to persons. Polarization This set may cause hazards. 2 HVR-HD1000U/HD1000N Serial No. This symbol is intended to alert the user to...
Model No. ACSerial No. IMPORTANT SAFEGUARDS For your protection, please read these numbers whenever you call your Sony dealer regarding this product. Carefully observe all warnings, precautions and instructions on the marking label. For those sets designed to operate from ...be operated only from battery power, or other ). Attachments Do not use attachments not recommended by forcing it in fire or electric shock. Model No. If you are unable to persons. Polarization This set may cause hazards. 2 HVR-HD1000U/HD1000N Serial No. This symbol is intended to alert the user to...
Operation Guide
Page 3
... particular attention to the set. this set during a lightning storm, or when it is provided. - Installation Water and Moisture Do not use liquid cleaners or aerosol cleaners. Never cover the slots and openings with water for cleaning the exterior of any service or repairs to the ...) to determine that it is in safe operating condition. 3 Replacement parts When replacement parts are required, be sure the service technician has used replacement parts specified by placing the set , and to lightning and power-line surges. Never block the slots and openings by the manufacturer ...
... particular attention to the set. this set during a lightning storm, or when it is provided. - Installation Water and Moisture Do not use liquid cleaners or aerosol cleaners. Never cover the slots and openings with water for cleaning the exterior of any service or repairs to the ...) to determine that it is in safe operating condition. 3 Replacement parts When replacement parts are required, be sure the service technician has used replacement parts specified by placing the set , and to lightning and power-line surges. Never block the slots and openings by the manufacturer ...
Operation Guide
Page 4
...cautioned that to which can radiate radio frequency energy and, if not installed and used rechargeable batteries to Part 15 of Conformity Trade Name: SONY Model No.: HVR-HD1000U Responsible Party: Sony Electronics Inc. Increase the separation between the equipment and receiver. - CAUTION Replace ...(2) this device must accept any interference received, including interference that interference will not occur in this manual could void your used in a residential installation. Consult the dealer or an experienced radio/TV technician for future reference. For customers in the U.S.A....
...cautioned that to which can radiate radio frequency energy and, if not installed and used rechargeable batteries to Part 15 of Conformity Trade Name: SONY Model No.: HVR-HD1000U Responsible Party: Sony Electronics Inc. Increase the separation between the equipment and receiver. - CAUTION Replace ...(2) this device must accept any interference received, including interference that interference will not occur in this manual could void your used in a residential installation. Consult the dealer or an experienced radio/TV technician for future reference. For customers in the U.S.A....

Operation Guide
Page 5
The supplied interface cable must be used with the equipment in order to comply with the limits for a digital device pursuant to Subpart B of Part 15 of FCC Rules. Continued , 5
The supplied interface cable must be used with the equipment in order to comply with the limits for a digital device pursuant to Subpart B of Part 15 of FCC Rules. Continued , 5
Operation Guide
Page 6
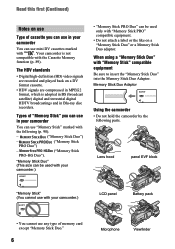
... HDTV broadcastings and in your camcorder You can use mini DV cassettes marked with the following parts. Types of "Memory Stick" you can use in your camcorder You can use in Blu-ray disc recorders. "Memory Stick Duo" (This size can be used with "Memory Stick" compatible ...Memory Stick PRO" compatible equipment. • Do not attach a label or the like on use Type of cassette you can use "Memory Stick" marked with . Memory Stick Duo Adaptor Using the camcorder • Do not hold the camcorder by the following (p. 90). - ("Memory Stick Duo") - ("Memory Stick PRO Duo")...
... HDTV broadcastings and in your camcorder You can use mini DV cassettes marked with the following parts. Types of "Memory Stick" you can use in your camcorder You can use in Blu-ray disc recorders. "Memory Stick Duo" (This size can be used with "Memory Stick" compatible ...Memory Stick PRO" compatible equipment. • Do not attach a label or the like on use Type of cassette you can use "Memory Stick" marked with . Memory Stick Duo Adaptor Using the camcorder • Do not hold the camcorder by the following (p. 90). - ("Memory Stick Duo") - ("Memory Stick PRO Duo")...
Operation Guide
Page 7
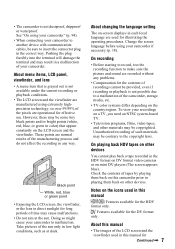
...images of such materials may result in color) that is grayed out is not possible due to malfunction. See "On using your camcorder" (p. 94). • When connecting your camcorder to the copyright laws. About menu items, LCD panel, viewfinder, and lens • A menu item that appear ... recording • Before starting to record, test the recording function to insert the connector plug in this camcorder prior to direct sunlight for effective use. • The camcorder is not dustproof, dripproof or waterproof. Doing so might cause your recordings on -screen displays in each ...
...images of such materials may result in color) that is grayed out is not possible due to malfunction. See "On using your camcorder" (p. 94). • When connecting your camcorder to the copyright laws. About menu items, LCD panel, viewfinder, and lens • A menu item that appear ... recording • Before starting to record, test the recording function to insert the connector plug in this camcorder prior to direct sunlight for effective use. • The camcorder is not dustproof, dripproof or waterproof. Doing so might cause your recordings on -screen displays in each ...
Operation Guide
Page 8
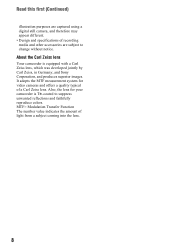
It adopts the MTF measurement system for your camcorder is equipped with a Carl Zeiss lens, which was developed jointly by Carl Zeiss, in Germany, and Sony Corporation, and produces superior images. Read this first (Continued) illustration purposes are captured using a digital still camera, and therefore may appear different. • Design and specifications of recording... a subject coming into the lens. 8 MTF= Modulation Transfer Function The number value indicates the amount of a Carl Zeiss lens. About the Carl Zeiss lens Your camcorder is T -coated to change without notice.
It adopts the MTF measurement system for your camcorder is equipped with a Carl Zeiss lens, which was developed jointly by Carl Zeiss, in Germany, and Sony Corporation, and produces superior images. Read this first (Continued) illustration purposes are captured using a digital still camera, and therefore may appear different. • Design and specifications of recording... a subject coming into the lens. 8 MTF= Modulation Transfer Function The number value indicates the amount of a Carl Zeiss lens. About the Carl Zeiss lens Your camcorder is T -coated to change without notice.
Operation Guide
Page 9
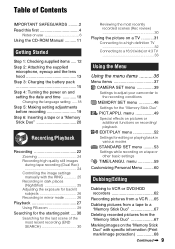
... a high definition TV 32 Connecting to a 16:9 (wide) or 4:3 TV 33 Using the Menu Using the menu items .......... 36 Menu items 37 CAMERA SET menu 39 Settings to adjust your camcorder to the recording conditions MEMORY SET menu 46 Settings for backlit subjects 26 Recording in various... 29 Searching for the starting point ..... 30 Searching for the last scene of Contents IMPORTANT SAFEGUARDS .........2 Read this first 4 Notes on use 6 Using the CD-ROM Manual .......... 11 Getting Started Step 1: Checking supplied items ..... 12 Step 2: Attaching the supplied microphone, eyecup and the...
... a high definition TV 32 Connecting to a 16:9 (wide) or 4:3 TV 33 Using the Menu Using the menu items .......... 36 Menu items 37 CAMERA SET menu 39 Settings to adjust your camcorder to the recording conditions MEMORY SET menu 46 Settings for backlit subjects 26 Recording in various... 29 Searching for the starting point ..... 30 Searching for the last scene of Contents IMPORTANT SAFEGUARDS .........2 Read this first 4 Notes on use 6 Using the CD-ROM Manual .......... 11 Getting Started Step 1: Checking supplied items ..... 12 Step 2: Attaching the supplied microphone, eyecup and the...
Operation Guide
Page 10
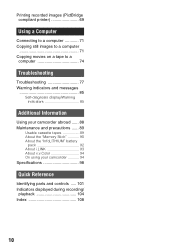
... a computer 71 Copying movies on a tape to a computer 74 Troubleshooting Troubleshooting 77 Warning indicators and messages 85 Self-diagnosis display/Warning indicators 85 Additional Information Using your camcorder abroad ...... 88 Maintenance and precautions ...... 89 Usable cassette tapes 89 About the "Memory Stick 90 About the "InfoLITHIUM" battery pack 92 About i.LINK 93...
... a computer 71 Copying movies on a tape to a computer 74 Troubleshooting Troubleshooting 77 Warning indicators and messages 85 Self-diagnosis display/Warning indicators 85 Additional Information Using your camcorder abroad ...... 88 Maintenance and precautions ...... 89 Usable cassette tapes 89 About the "Memory Stick 90 About the "InfoLITHIUM" battery pack 92 About i.LINK 93...

Operation Guide
Page 11
... a case, install the latest version you want to read the Operating Guide contained on the version of Adobe Systems Incorporated in PDF format. ROM drive. Using the CD-ROM Manual English The supplied CD-ROM includes versions of the Operating Guide. Preparation The following program must be displayed properly, depending on...
... a case, install the latest version you want to read the Operating Guide contained on the version of Adobe Systems Incorporated in PDF format. ROM drive. Using the CD-ROM Manual English The supplied CD-ROM includes versions of the Operating Guide. Preparation The following program must be displayed properly, depending on...
Operation Guide
Page 16
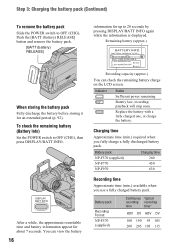
Charging time Approximate time (min.) required when you use a fully charged battery pack. Battery pack Recording Format NP-F570 (supplied) Continuous Typical recording recording time time* HDV DV HDV DV 180 190 95 105 ...
Charging time Approximate time (min.) required when you use a fully charged battery pack. Battery pack Recording Format NP-F570 (supplied) Continuous Typical recording recording time time* HDV DV HDV DV 180 190 95 105 ...
Operation Guide
Page 17
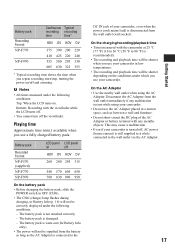
... Battery pack Recorded Format NP-F570 (supplied) NP-F770 NP-F970 LCD panel LCD panel on the conditions under which you use your camcorder. • Do not use the AC Adaptor placed in low temperatures. • The recording and playback time will not be shorter when you...if any metallic objects. On the AC Adaptor • Use the nearby wall outlet when using your camcorder. This may cause a malfunction. • Even if your camcorder is turned off and zooming. Playing time Approximate time (min.) available when you use your camcorder in a narrow space, such as the AC Adaptor ...
... Battery pack Recorded Format NP-F570 (supplied) NP-F770 NP-F970 LCD panel LCD panel on the conditions under which you use your camcorder. • Do not use the AC Adaptor placed in low temperatures. • The recording and playback time will not be shorter when you...if any metallic objects. On the AC Adaptor • Use the nearby wall outlet when using your camcorder. This may cause a malfunction. • Even if your camcorder is turned off and zooming. Playing time Approximate time (min.) available when you use your camcorder in a narrow space, such as the AC Adaptor ...
Operation Guide
Page 18
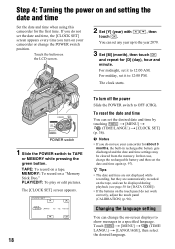
... or edit pictures. CLOCK SET DATE 2007Y JAN M 1D 12: 00 AM OK 18 To turn on your camcorder for [DATA CODE]). • If the buttons on the touch panel do not use your camcorder or change the on-screen displays to 12:00 PM. In that case, charge the rechargeable battery and... . / , then You can set it to OFF (CHG). Step 4: Turning the power on and setting the date and time Set the date and time when using this camcorder for [D] (day), hour and minute. TAPE: To record on a "Memory Stick Duo." To reset the date and time You can set the date and...
... or edit pictures. CLOCK SET DATE 2007Y JAN M 1D 12: 00 AM OK 18 To turn on your camcorder for [DATA CODE]). • If the buttons on the touch panel do not use your camcorder or change the on-screen displays to 12:00 PM. In that case, charge the rechargeable battery and... . / , then You can set it to OFF (CHG). Step 4: Turning the power on and setting the date and time Set the date and time when using this camcorder for [D] (day), hour and minute. TAPE: To record on a "Memory Stick Duo." To reset the date and time You can set the date and...

Operation Guide
Page 19
You can adjust the brightness of the viewfinder backlight by selecting [LCD/VF SET] - [VF B.LIGHT] (p. 55). z Tips • You can view pictures using the viewfinder to avoid wearing down the battery, or when the picture seen on the LCD screen is poor. 1 2 180 degrees (max.) 1 To turn on ...
You can adjust the brightness of the viewfinder backlight by selecting [LCD/VF SET] - [VF B.LIGHT] (p. 55). z Tips • You can view pictures using the viewfinder to avoid wearing down the battery, or when the picture seen on the LCD screen is poor. 1 2 180 degrees (max.) 1 To turn on ...
Operation Guide
Page 20
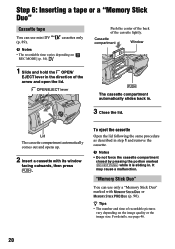
...compartment closed by pressing the portion marked {DO NOT PUSH} while it is sliding in . 3 Close the lid. "Memory Stick Duo" You can use only a "Memory Stick Duo" marked with its window facing outwards, then press . Push the center of the back of the arrow and open ...as described in the direction of the cassette lightly. It may cause a malfunction. Step 6: Inserting a tape or a "Memory Stick Duo" Cassette tape You can use mini DV (p. 89). Cassette compartment Window 1 Slide and hold the OPEN/ EJECT lever in step 1 and remove the cassette. cassettes only b Notes •...
...compartment closed by pressing the portion marked {DO NOT PUSH} while it is sliding in . 3 Close the lid. "Memory Stick Duo" You can use only a "Memory Stick Duo" marked with its window facing outwards, then press . Push the center of the back of the arrow and open ...as described in the direction of the cassette lightly. It may cause a malfunction. Step 6: Inserting a tape or a "Memory Stick Duo" Cassette tape You can use mini DV (p. 89). Cassette compartment Window 1 Slide and hold the OPEN/ EJECT lever in step 1 and remove the cassette. cassettes only b Notes •...
Operation Guide
Page 24
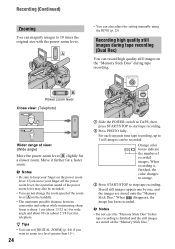
...Stored still images appear one by one, and the images are stored on the power zoom lever. A • You can also adjust the setting manually using the RING (p. 25) Recording high quality still images during tape recording. When disappears, the image has been recorded. B Power zoom lever Close view: ... to keep your finger off the power zoom lever, the operation sound of the zoom lever A on the handdle. • The minimum possible distance between camcorder and subject while maintaining sharp focus is about 1 cm (about 13/32 in.) for wide angle and about 80 cm (about 2 5/8 feet) for...
...Stored still images appear one by one, and the images are stored on the power zoom lever. A • You can also adjust the setting manually using the RING (p. 25) Recording high quality still images during tape recording. When disappears, the image has been recorded. B Power zoom lever Close view: ... to keep your finger off the power zoom lever, the operation sound of the zoom lever A on the handdle. • The minimum possible distance between camcorder and subject while maintaining sharp focus is about 1 cm (about 13/32 in.) for wide angle and about 80 cm (about 2 5/8 feet) for...
Operation Guide
Page 25
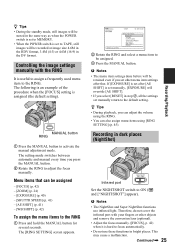
... activate the manual adjustment mode. b Notes • The NightShot and Super NightShot functions use these functions in bright places. Therefore, do not cover the infrared port with the RING It is useful to assign a frequently used menu item to the RING. If [EXPOSURE] is set after that can also assign...RING 1 Press and hold the MANUAL button for several seconds. The setting mode switches between automatic and manual every time you can adjust the volume using the RING. • You can be retained even if you select [RESET] in step 2, all the settings set other objects and remove ...
... activate the manual adjustment mode. b Notes • The NightShot and Super NightShot functions use these functions in bright places. Therefore, do not cover the infrared port with the RING It is useful to assign a frequently used menu item to the RING. If [EXPOSURE] is set after that can also assign...RING 1 Press and hold the MANUAL button for several seconds. The setting mode switches between automatic and manual every time you can adjust the volume using the RING. • You can be retained even if you select [RESET] in step 2, all the settings set other objects and remove ...
Operation Guide
Page 26
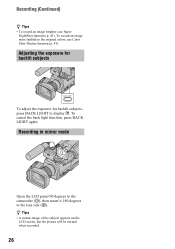
... normal when recorded. 26 Recording (Continued) z Tips • To record an image brighter, use Color Slow Shutter function (p. 43). Recording in mirror mode Open the LCD panel 90 degrees to the camcorder (1), then rotate it 180 degrees to display .. To record an image more faithful to the ...original colors, use Super NightShot function (p. 43). Adjusting the exposure for backlit subjects To adjust the exposure ...
... normal when recorded. 26 Recording (Continued) z Tips • To record an image brighter, use Color Slow Shutter function (p. 43). Recording in mirror mode Open the LCD panel 90 degrees to the camcorder (1), then rotate it 180 degrees to display .. To record an image more faithful to the ...original colors, use Super NightShot function (p. 43). Adjusting the exposure for backlit subjects To adjust the exposure ...

Operation Guide
Page 29
... size. Magnification can magnify images from about 1.5 to 5 times in the center of the displayed frame. 4 Adjust the magnification with W (Wide angle)/T (Telephoto). Recording/Playback Using PB zoom You can be affected. 29 To cancel, touch [END]. b Notes • While...
... size. Magnification can magnify images from about 1.5 to 5 times in the center of the displayed frame. 4 Adjust the magnification with W (Wide angle)/T (Telephoto). Recording/Playback Using PB zoom You can be affected. 29 To cancel, touch [END]. b Notes • While...


