Operating Instructions (DVP-NC60P CD/DVD Player)
Page 4
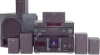
... disconnect the antenna or cable system. Replacement parts When replacement parts are specified in fire, electric shock, or other electric light or power circuits, or where it from the wall outlet and refer servicing to qualified service personnel under the following the operating instructions. Section 810 of antenna-discharge unit, connection to proper grounding of the mast and supporting structure, grounding of the lead-in Wire Antenna Discharge...
... disconnect the antenna or cable system. Replacement parts When replacement parts are specified in fire, electric shock, or other electric light or power circuits, or where it from the wall outlet and refer servicing to qualified service personnel under the following the operating instructions. Section 810 of antenna-discharge unit, connection to proper grounding of the mast and supporting structure, grounding of the lead-in Wire Antenna Discharge...
Operating Instructions (DVP-NC60P CD/DVD Player)
Page 6
... Manual 7 This Player Can Play the Following Discs 8 Index to Parts and Controls 10 Guide to the Control Menu Display 13 Hookups 16 Hooking Up the Player 16 Step 1: Unpacking 16 Step 2: Inserting Batteries Into the Remote 16 Step 3: Connecting the Video Cords 17 Step 4: Connecting the Audio Cords 20 Step 5: Connecting the Power Cord 22 Step 6: Quick Setup 22 Playing Discs 24 Playing Discs 24 Resuming Playback From the Point Where You Stopped the Disc (Multi-disc Resume 27 Using the DVD's Menu 28 Selecting...
... Manual 7 This Player Can Play the Following Discs 8 Index to Parts and Controls 10 Guide to the Control Menu Display 13 Hookups 16 Hooking Up the Player 16 Step 1: Unpacking 16 Step 2: Inserting Batteries Into the Remote 16 Step 3: Connecting the Video Cords 17 Step 4: Connecting the Audio Cords 20 Step 5: Connecting the Power Cord 22 Step 6: Quick Setup 22 Playing Discs 24 Playing Discs 24 Resuming Playback From the Point Where You Stopped the Disc (Multi-disc Resume 27 Using the DVD's Menu 28 Selecting...
Operating Instructions (DVP-NC60P CD/DVD Player)
Page 7
... Controlling Your TV with the Supplied Remote 59 Settings and Adjustments 61 Using the Setup Display 61 Setting the Display or Sound Track Language (LANGUAGE SETUP) . . . . . 62 Settings for the Display (SCREEN SETUP 63 Custom Settings (CUSTOM SETUP 64 Settings for the Sound (AUDIO SETUP 65 Additional Information 67 Troubleshooting 67 Self-diagnosis Function (When letters/numbers appear in the display). . . . . 70 Glossary 70 Specifications 72 Language Code List 73 Index 74 About This Manual • Instructions in music CD format Functions...
... Controlling Your TV with the Supplied Remote 59 Settings and Adjustments 61 Using the Setup Display 61 Setting the Display or Sound Track Language (LANGUAGE SETUP) . . . . . 62 Settings for the Display (SCREEN SETUP 63 Custom Settings (CUSTOM SETUP 64 Settings for the Sound (AUDIO SETUP 65 Additional Information 67 Troubleshooting 67 Self-diagnosis Function (When letters/numbers appear in the display). . . . . 70 Glossary 70 Specifications 72 Language Code List 73 Index 74 About This Manual • Instructions in music CD format Functions...
Operating Instructions (DVP-NC60P CD/DVD Player)
Page 11
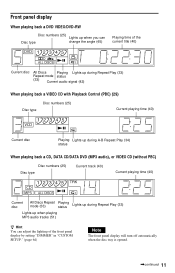
... DVD (MP3 audio), or VIDEO CD (without PBC) Disc numbers (25) Disc type Current track (40) Current playing time (40) Current disc All Discs Repeat mode (33) Playing status Lights up during Repeat Play (33) Lights up when playing MP3 audio tracks (51) z Hint You can adjust the lighting of the front panel display by setting "DIMMER" in "CUSTOM SETUP." (page 64) Note The front panel display will turn off automatically when the disc tray is opened...
... DVD (MP3 audio), or VIDEO CD (without PBC) Disc numbers (25) Disc type Current track (40) Current playing time (40) Current disc All Discs Repeat mode (33) Playing status Lights up during Repeat Play (33) Lights up when playing MP3 audio tracks (51) z Hint You can adjust the lighting of the front panel display by setting "DIMMER" in "CUSTOM SETUP." (page 64) Note The front panel display will turn off automatically when the disc tray is opened...

Operating Instructions (DVP-NC60P CD/DVD Player)
Page 23
...amplifier (receiver) has a Dolby Digital decoder, select "DOLBY DIGITAL." All connections and setup operations are using a digital coaxial or optical cord, select "YES: DIGITAL OUTPUT." 10Press X/x to select the type of jack used to connect your amplifier (receiver). Is this player connected to your amplifier (receiver) appears. If you have a 4:3 standard TV • 4:3 LETTER BOX or 4:3 PAN SCAN (page 63) ◆ If you connected an AV amplifier (receiver) using just an audio cord, select "YES: LINE OUTPUT L/R (AUDIO)," then go to step 13. If you connected an AV amplifier...
...amplifier (receiver) has a Dolby Digital decoder, select "DOLBY DIGITAL." All connections and setup operations are using a digital coaxial or optical cord, select "YES: DIGITAL OUTPUT." 10Press X/x to select the type of jack used to connect your amplifier (receiver). Is this player connected to your amplifier (receiver) appears. If you have a 4:3 standard TV • 4:3 LETTER BOX or 4:3 PAN SCAN (page 63) ◆ If you connected an AV amplifier (receiver) using just an audio cord, select "YES: LINE OUTPUT L/R (AUDIO)," then go to step 13. If you connected an AV amplifier...
Operating Instructions (DVP-NC60P CD/DVD Player)
Page 26
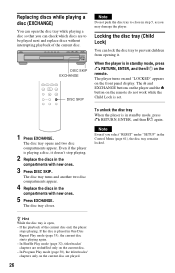
... 5, as you select "RESET" under "SETUP" in standby mode, press O RETURN, ENTER, and then [/1 on the remote do not work while the Child Lock is played in standby mode, press O RETURN, ENTER, and then [/1 again. If the playback of the current disc. If the disc is set. 1 Press EXCHANGE. The A and EXCHANGE buttons on the player and the Z button on the remote. The disc tray opens and two disc compartments appear...
... 5, as you select "RESET" under "SETUP" in standby mode, press O RETURN, ENTER, and then [/1 on the remote do not work while the Child Lock is played in standby mode, press O RETURN, ENTER, and then [/1 again. If the playback of the current disc. If the disc is set. 1 Press EXCHANGE. The A and EXCHANGE buttons on the player and the Z button on the remote. The disc tray opens and two disc compartments appear...

Operating Instructions (DVP-NC60P CD/DVD Player)
Page 61
... LEVEL (COMPONENT OUT): OFF 4:3 OUTPUT: FULL 1 Press DISPLAY when the player is selected. Example: "TV TYPE" SCREEN SETUP TV TYPE: 4:3 LETTER BOX SCREEN SAVER: 4:3 LETTER BOX BACKGROUND: 4:3 PAN SCAN BLACK LEVEL: 16:9 BLACK LEVEL (COMPONENT OUT): OFF 4:3 OUTPUT: FULL Options Settings and Adjustments QUICK CUSTOM RESET QUICK ,continued 61 Then press ENTER. The Setup item is in the disc take priority over the Setup Display settings and not all of the functions described may work. 3 Press X/x to select (SETUP...
... LEVEL (COMPONENT OUT): OFF 4:3 OUTPUT: FULL 1 Press DISPLAY when the player is selected. Example: "TV TYPE" SCREEN SETUP TV TYPE: 4:3 LETTER BOX SCREEN SAVER: 4:3 LETTER BOX BACKGROUND: 4:3 PAN SCAN BLACK LEVEL: 16:9 BLACK LEVEL (COMPONENT OUT): OFF 4:3 OUTPUT: FULL Options Settings and Adjustments QUICK CUSTOM RESET QUICK ,continued 61 Then press ENTER. The Setup item is in the disc take priority over the Setup Display settings and not all of the functions described may work. 3 Press X/x to select (SETUP...

Operating Instructions (DVP-NC60P CD/DVD Player)
Page 63
... Turns off the portions that do not fit. 16:9 Select this when you connect a wide-screen TV or a TV with bands on the disc (CDEXTRA, etc.). BLUE The background color is black. ◆ BLACK LEVEL Selects the black level (setup level) for 15 minutes, or when you connect a 4:3 screen TV. To use the display, see "Using the Setup Display" (page 61). The default settings are underlined. Displays a wide picture with a wide mode function. 4:3 LETTER BOX...
... Turns off the portions that do not fit. 16:9 Select this when you connect a wide-screen TV or a TV with bands on the disc (CDEXTRA, etc.). BLUE The background color is black. ◆ BLACK LEVEL Selects the black level (setup level) for 15 minutes, or when you connect a 4:3 screen TV. To use the display, see "Using the Setup Display" (page 61). The default settings are underlined. Displays a wide picture with a wide mode function. 4:3 LETTER BOX...
Operating Instructions (DVP-NC60P CD/DVD Player)
Page 64
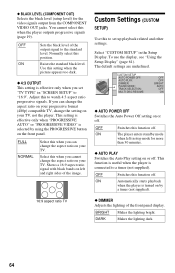
... SETUP AUTO POWER OFF: AUTO PLAY: DIMMER: PAUSE MODE: TRACK SELECTION: MULTI-DISC RESUME: OFF OFF BRIGHT AUTO OFF ON ◆ AUTO POWER OFF Switches the Auto Power Off setting on left in stop mode for the video signals output from the COMPONENT VIDEO OUT jacks. Shows a 16:9 aspect ratio signal with black bands on or off. The default settings are underlined. DARK Makes the lighting dark. 64 If you set up playback related and other settings. This function is useful when...
... SETUP AUTO POWER OFF: AUTO PLAY: DIMMER: PAUSE MODE: TRACK SELECTION: MULTI-DISC RESUME: OFF OFF BRIGHT AUTO OFF ON ◆ AUTO POWER OFF Switches the Auto Power Off setting on left in stop mode for the video signals output from the COMPONENT VIDEO OUT jacks. Shows a 16:9 aspect ratio signal with black bands on or off. The default settings are underlined. DARK Makes the lighting dark. 64 If you set up playback related and other settings. This function is useful when...
Operating Instructions (DVP-NC60P CD/DVD Player)
Page 65
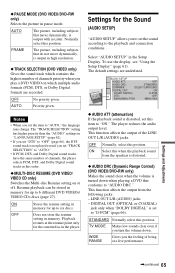
... DTS sound track is set this order. ◆ MULTI-DISC RESUME (DVD VIDEO/ VIDEO CD only) Switches the Multi-disc Resume setting on which multiple audio formats (PCM, DTS, or Dolby Digital format) are underlined. OFF Normally, select this position. ON Select this position. STANDARD Normally select this position. TV MODE Makes low sounds clear even if you the feeling of the LINE OUT L/R (AUDIO) jacks. To use the display, see "Using the Setup Display" (page 61). This function affects the output of...
... DTS sound track is set this order. ◆ MULTI-DISC RESUME (DVD VIDEO/ VIDEO CD only) Switches the Multi-disc Resume setting on which multiple audio formats (PCM, DTS, or Dolby Digital format) are underlined. OFF Normally, select this position. ON Select this position. STANDARD Normally select this position. TV MODE Makes low sounds clear even if you the feeling of the LINE OUT L/R (AUDIO) jacks. To use the display, see "Using the Setup Display" (page 61). This function affects the output of...
Operating Instructions (DVP-NC60P CD/DVD Player)
Page 66
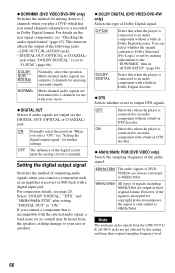
...) Selects the sampling frequency of the audio signal. 48kHz/16bit The audio signals of DVD VIDEOs are not affected by making adjustments to an audio component without a built-in Dolby Digital decoder. DIGITAL OUT (OPTICAL or COAXIAL) jack when "DOLBY DIGITAL" is connected to the "DOWNMIX" item in Dolby Digital decoder. ◆ DTS Selects whether or not to 48kHz/16bit. 96kHz/24bit All types of the following jacks: - DOLBY SURROUND Normally, select this setting and keep their original format. Multi-channel audio signals...
...) Selects the sampling frequency of the audio signal. 48kHz/16bit The audio signals of DVD VIDEOs are not affected by making adjustments to an audio component without a built-in Dolby Digital decoder. DIGITAL OUT (OPTICAL or COAXIAL) jack when "DOLBY DIGITAL" is connected to the "DOWNMIX" item in Dolby Digital decoder. ◆ DTS Selects whether or not to 48kHz/16bit. 96kHz/24bit All types of the following jacks: - DOLBY SURROUND Normally, select this setting and keep their original format. Multi-channel audio signals...
Operating Instructions (DVP-NC60P CD/DVD Player)
Page 67
..., select "NORMAL (INTERLACE)" using the PROGRESSIVE button on the front panel so that the PROGRESSIVE indicator turns off and the player is not correctly set the player to your TV (page 17) and switch the input selector on some DVD programs could affect picture quality. The sound volume may be affected when you set . , The player is in pause mode or in "AUDIO SETUP" to the wrong input jack on the amplifier (receiver) (page...
..., select "NORMAL (INTERLACE)" using the PROGRESSIVE button on the front panel so that the PROGRESSIVE indicator turns off and the player is not correctly set the player to your TV (page 17) and switch the input selector on some DVD programs could affect picture quality. The sound volume may be affected when you set . , The player is in pause mode or in "AUDIO SETUP" to the wrong input jack on the amplifier (receiver) (page...
HT5950DP Instructions (entire HT system)
Page 3
... ) - Surround back speaker - Center speaker - Any difference in operation is clearly indicated in the text, for example, "HT-9900M only" • The instructions in this manual describe the controls on the use the controls on the supplied remote if they have the same or similar names as those on the remote are clearly indicated in the text, for example, "Models of the front panel. Sub woofer • DVD player...
... ) - Surround back speaker - Center speaker - Any difference in operation is clearly indicated in the text, for example, "HT-9900M only" • The instructions in this manual describe the controls on the use the controls on the supplied remote if they have the same or similar names as those on the remote are clearly indicated in the text, for example, "Models of the front panel. Sub woofer • DVD player...

HT5950DP Instructions (entire HT system)
Page 4
... with digital audio output jacks 7 1b: Connecting components with multi channel output jacks........ 10 1c: Connecting components with only analog audio jacks 12 2: Connecting the antennas 14 3: Connecting speakers 15 4: Connecting the AC power cord ........ 17 5: Setting up the speakers 19 6: Setting up the sub woofer 21 7: Adjusting the speaker levels and balance 22 - TEST TONE Amplifier Operation Selecting the component 23 Listening to FM/AM radio 24 Presetting radio stations 25 Changing the display 26 About the indications in the display...... 27 Enjoying Surround Sound Using...
... with digital audio output jacks 7 1b: Connecting components with multi channel output jacks........ 10 1c: Connecting components with only analog audio jacks 12 2: Connecting the antennas 14 3: Connecting speakers 15 4: Connecting the AC power cord ........ 17 5: Setting up the speakers 19 6: Setting up the sub woofer 21 7: Adjusting the speaker levels and balance 22 - TEST TONE Amplifier Operation Selecting the component 23 Listening to FM/AM radio 24 Presetting radio stations 25 Changing the display 26 About the indications in the display...... 27 Enjoying Surround Sound Using...
HT5950DP Instructions (entire HT system)
Page 23
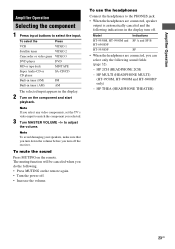
.... HP THEA (HEADPHONE THEATER) 23US Note If you select any video components, set the TV's video input to adjust the volume. To use the headphones Connect the headphones to select the input. HP MULTI (HEADPHONE MULTI) (HT-9950M, HT-9900M and HT-6900DP only) - The muting function will be canceled when you can select only the following . • Press MUTING on the remote. Amplifier Operation Amplifier Operation Selecting the component 1 Press input buttons to the PHONES jack. • When the...
.... HP THEA (HEADPHONE THEATER) 23US Note If you select any video components, set the TV's video input to adjust the volume. To use the headphones Connect the headphones to select the input. HP MULTI (HEADPHONE MULTI) (HT-9950M, HT-9900M and HT-6900DP only) - The muting function will be canceled when you can select only the following . • Press MUTING on the remote. Amplifier Operation Amplifier Operation Selecting the component 1 Press input buttons to the PHONES jack. • When the...
HT5950DP Instructions (entire HT system)
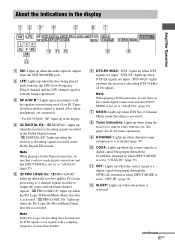
Page 27
... does not function for DTS signals or for tuner operations. F DTS-ES 96/24: "DTS" lights up when the Pro Logic II Movie/Music/Game decoder is set to "COAX IN" (page 35). G NEO:6: Lights up in the Dolby Digital format. K OPT: Lights up when the source signal is a digital signal being input through the OPTICAL terminal or when INPUT MODE is decoding signals recorded in the display. Turns off when speaker output is turned off...
... does not function for DTS signals or for tuner operations. F DTS-ES 96/24: "DTS" lights up when the Pro Logic II Movie/Music/Game decoder is set to "COAX IN" (page 35). G NEO:6: Lights up in the Dolby Digital format. K OPT: Lights up when the source signal is a digital signal being input through the OPTICAL terminal or when INPUT MODE is decoding signals recorded in the display. Turns off when speaker output is turned off...

HT5950DP Instructions (entire HT system)
Page 41
...; Sound adjustments do not affect the signal output from the MD/TAPE OUT jacks. • The analog audio signals of the current or previously used . Other Operations Selecting the speaker system You can record on a cassette tape or MiniDisc using the receiver. Model HT-9950M, HT-9900M and HT-6900DP HT-5950DP Button SPEAKERS (OFF/A/B/A+B) Indications SP A SP B SPEAKERS SP (ON/OFF) To turn off. The speaker system (HT-5950DP only) • SP The speakers connected to the SPEAKERS...
...; Sound adjustments do not affect the signal output from the MD/TAPE OUT jacks. • The analog audio signals of the current or previously used . Other Operations Selecting the speaker system You can record on a cassette tape or MiniDisc using the receiver. Model HT-9950M, HT-9900M and HT-6900DP HT-5950DP Button SPEAKERS (OFF/A/B/A+B) Indications SP A SP B SPEAKERS SP (ON/OFF) To turn off. The speaker system (HT-5950DP only) • SP The speakers connected to the SPEAKERS...

HT5950DP Instructions (entire HT system)
Page 45
... Remote 2 To set up the remote. Blu-ray disc recorder/ Hard disc recorder/PSX TUNER wl Receiver To listen to the LD player/ previous menu. continued 45US Operations Using the Remote RM-AAP001 SB Receiver DECODING wh Selects the surround back decoding modes. SUBTITLE DVD player Changes the subtitles. 8 SYSTEM STANDBY (Press AV ?/1 ed and ?/1 ef at the same time) Receiver/ Turns off automatically. TV/VIDEO TV qj Selects input signal: TV input or video input. RETURN/ EXIT qa VCD player/ Returns to radio programs...
... Remote 2 To set up the remote. Blu-ray disc recorder/ Hard disc recorder/PSX TUNER wl Receiver To listen to the LD player/ previous menu. continued 45US Operations Using the Remote RM-AAP001 SB Receiver DECODING wh Selects the surround back decoding modes. SUBTITLE DVD player Changes the subtitles. 8 SYSTEM STANDBY (Press AV ?/1 ed and ?/1 ef at the same time) Receiver/ Turns off automatically. TV/VIDEO TV qj Selects input signal: TV input or video input. RETURN/ EXIT qa VCD player/ Returns to radio programs...

HT5950DP Instructions (entire HT system)
Page 54
... this receiver, check the audio setting (settings for receiver operation, press MAIN MENU. If you set the tuning interval correctly (when tuning in . • Check that the frequency appears in Dolby Digital or DTS format. • When connecting the DVD player, etc. Outdoor FM antenna Receiver ANTENNA AM Ground wire (not supplied) To ground Radio stations cannot be done. • Check that the playing DVD, etc. To operate other components, press TOP MENU/GUIDE or AV MENU after pressing the input button. ** HT-5950DP...
... this receiver, check the audio setting (settings for receiver operation, press MAIN MENU. If you set the tuning interval correctly (when tuning in . • Check that the frequency appears in Dolby Digital or DTS format. • When connecting the DVD player, etc. Outdoor FM antenna Receiver ANTENNA AM Ground wire (not supplied) To ground Radio stations cannot be done. • Check that the playing DVD, etc. To operate other components, press TOP MENU/GUIDE or AV MENU after pressing the input button. ** HT-5950DP...

HT5950DP Instructions (entire HT system)
Page 56
... k ohms DVD, VIDEO 1, 2, 3 * HT-9950M, HT-9900M and HT-6900DP only. Outputs (Analog) MD/TAPE (OUT), Voltage: 800 mV VIDEO 1 (AUDIO OUT) Impedance: 10 k ohms SUB WOOFER Voltage: 2 V Impedance: 1 k ohm Reproduction frequency range: 28 - 20,000 Hz Tone Gain levels ±6 dB, 1 dB step FM tuner section Tuning range Antenna Antenna terminals Intermediate frequency 87.5 - 108.0 MHz FM wire antenna 75 ohms, unbalanced 10.7 MHz AM tuner section Tuning range Model of area code...
... k ohms DVD, VIDEO 1, 2, 3 * HT-9950M, HT-9900M and HT-6900DP only. Outputs (Analog) MD/TAPE (OUT), Voltage: 800 mV VIDEO 1 (AUDIO OUT) Impedance: 10 k ohms SUB WOOFER Voltage: 2 V Impedance: 1 k ohm Reproduction frequency range: 28 - 20,000 Hz Tone Gain levels ±6 dB, 1 dB step FM tuner section Tuning range Antenna Antenna terminals Intermediate frequency 87.5 - 108.0 MHz FM wire antenna 75 ohms, unbalanced 10.7 MHz AM tuner section Tuning range Model of area code...


