
Operating Guide
Page 8
... the number of that you have the following items supplied with your camcorder. Picture Motion Browser (Software) - Insulation sheet Power cord (1) (p. 9) Handycam Station (1) (p. 9) Rechargeable battery pack NP-FH60 (1) (p. 9) Component video cable (1) (p. 16) A/V connecting cable (1) (p. 16) USB cable (1) (p. 30) CD-ROM "Handycam Application Software" (1) (p. 26) - AC Adaptor (1) (p. 9) Wireless Remote Commander (1) A button-type lithium battery is already...
... the number of that you have the following items supplied with your camcorder. Picture Motion Browser (Software) - Insulation sheet Power cord (1) (p. 9) Handycam Station (1) (p. 9) Rechargeable battery pack NP-FH60 (1) (p. 9) Component video cable (1) (p. 16) A/V connecting cable (1) (p. 16) USB cable (1) (p. 30) CD-ROM "Handycam Application Software" (1) (p. 26) - AC Adaptor (1) (p. 9) Wireless Remote Commander (1) A button-type lithium battery is already...
Operating Guide
Page 14
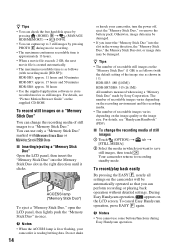
... details, see "Handycam Handbook" (PDF). HDR-SR5: 480 ([4.0M]) HDR-SR7/SR8: 315 ([6.1M]) All numbers measured when using a "Memory Stick Duo" made by pressing PHOTO E during Easy Handycam operation. For details, see "Picture Motion Browser Guide" on the camcorder will be automatically operated... images to 3 still images by Sony Corporation. HDR-SR5: approx. 11 hours and 50 minutes HDR-SR7: approx. 17 hours and 50 minutes HDR-SR8: approx. 30 hours • Use the supplied application software to recording standby mode. During Easy Handycam operation, appears on the "Memory ...
... details, see "Handycam Handbook" (PDF). HDR-SR5: 480 ([4.0M]) HDR-SR7/SR8: 315 ([6.1M]) All numbers measured when using a "Memory Stick Duo" made by pressing PHOTO E during Easy Handycam operation. For details, see "Picture Motion Browser Guide" on the camcorder will be automatically operated... images to 3 still images by Sony Corporation. HDR-SR5: approx. 11 hours and 50 minutes HDR-SR7: approx. 17 hours and 50 minutes HDR-SR8: approx. 30 hours • Use the supplied application software to recording standby mode. During Easy Handycam operation, appears on the "Memory ...
Operating Guide
Page 27
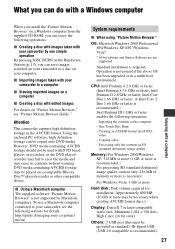
... Windows Vista: 1 GB or more Hard disk: Disk volume required for details. http://guide.d-imaging.sony.co.jp/mac/ ms/us/ System requirements x When using "Picture Motion Browser" OS: Microsoft ... one simple operation By pressing DISC BURN on the Handycam Station (p. 19), you can enjoy the following operations. Using the enclosed PC software, high definition footage can be played on a compatible...may be copied onto DVD media. One Touch Disc Burn - x Importing images taken with your camcorder to the computer - What you can do with a Windows computer Enjoying with a computer When you...
... Windows Vista: 1 GB or more Hard disk: Disk volume required for details. http://guide.d-imaging.sony.co.jp/mac/ ms/us/ System requirements x When using "Picture Motion Browser" OS: Microsoft ... one simple operation By pressing DISC BURN on the Handycam Station (p. 19), you can enjoy the following operations. Using the enclosed PC software, high definition footage can be played on a compatible...may be copied onto DVD media. One Touch Disc Burn - x Importing images taken with your camcorder to the computer - What you can do with a Windows computer Enjoying with a computer When you...
Operating Guide
Page 28
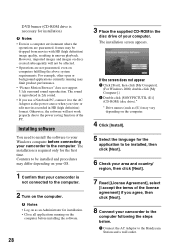
.... 1 Connect the AC Adaptor to the computer. Installing software You need to install the software to your Windows computer before installing the software. 28 3 Place the supplied CD-ROM in the disc drive of your camcorder is required only for the first time. The installation screen...operations are not guaranteed, even on computers fulfilling the above system requirements. Contents to be installed, then click [Next]. 6 Check your camcorder to the Handycam Station and a wall outlet. b Notes • Log on as an Administrator for installation. • Close all applications running may ...
.... 1 Connect the AC Adaptor to the computer. Installing software You need to install the software to your Windows computer before installing the software. 28 3 Place the supplied CD-ROM in the disc drive of your camcorder is required only for the first time. The installation screen...operations are not guaranteed, even on computers fulfilling the above system requirements. Contents to be installed, then click [Next]. 6 Check your camcorder to the Handycam Station and a wall outlet. b Notes • Log on as an Administrator for installation. • Close all applications running may ...

Operating Guide
Page 29
...disc drive of the computer. 10Follow the on-screen instructions to install the software. Enjoying with a computer 2 Set the camcorder onto the Handycam Station, then slide the POWER switch to turn on. 3 Connect the (USB) jack of the Handycam Station to the (USB) jack of the computer using the supplied USB... cable. 4 Touch [ COMPUTER] on the LCD screen of your camcorder. 9 Click [Next] on the connection confirmation screen of your computer appears, you...
...disc drive of the computer. 10Follow the on-screen instructions to install the software. Enjoying with a computer 2 Set the camcorder onto the Handycam Station, then slide the POWER switch to turn on. 3 Connect the (USB) jack of the Handycam Station to the (USB) jack of the computer using the supplied USB... cable. 4 Touch [ COMPUTER] on the LCD screen of your camcorder. 9 Click [Next] on the connection confirmation screen of your computer appears, you...
Operating Guide
Page 30
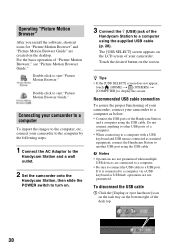
... USB cable. Recommended USB cable connection To assure the proper functioning of your camcorder, connect your camcorder to the computer by the following steps. 1 Connect the AC Adaptor to the Handycam Station and a wall outlet. 2 Set the camcorder onto the Handycam Station, then slide the POWER switch to start "Picture Motion Browser." b ... to a computer using the USB cable. Do not connect anything to display the screen. Operating "Picture Motion Browser" After you install the software, shortcut icons for "Picture Motion Browser" and "Picture Motion Browser Guide" are not guaranteed.
... USB cable. Recommended USB cable connection To assure the proper functioning of your camcorder, connect your camcorder to the computer by the following steps. 1 Connect the AC Adaptor to the Handycam Station and a wall outlet. 2 Set the camcorder onto the Handycam Station, then slide the POWER switch to start "Picture Motion Browser." b ... to a computer using the USB cable. Do not connect anything to display the screen. Operating "Picture Motion Browser" After you install the software, shortcut icons for "Picture Motion Browser" and "Picture Motion Browser Guide" are not guaranteed.


