
Operating Guide
Page 1
Digital HD Video Camera Recorder Operating Guide HDR-SR5/SR7/SR8 3-210-378-11(1) For details on the advanced operations, please refer to "Handycam Handbook" (PDF). © 2007 Sony Corporation
Digital HD Video Camera Recorder Operating Guide HDR-SR5/SR7/SR8 3-210-378-11(1) For details on the advanced operations, please refer to "Handycam Handbook" (PDF). © 2007 Sony Corporation
Operating Guide
Page 2
This symbol is intended to alert the user to the presence of any kind into the set may be operated only from battery power, or other ). IMPORTANT SAFEGUARDS For your protection, please read these safety instructions completely before operating the appliance, and keep this can result in the literature accompanying the appliance. Polarization This set through openings as they may touch dangerous voltage points or short out parts that may cause hazards. 2 Never spill liquid of uninsulated "dangerous voltage" within the product's enclosure that could result in the operating ...
This symbol is intended to alert the user to the presence of any kind into the set may be operated only from battery power, or other ). IMPORTANT SAFEGUARDS For your protection, please read these safety instructions completely before operating the appliance, and keep this can result in the literature accompanying the appliance. Polarization This set through openings as they may touch dangerous voltage points or short out parts that may cause hazards. 2 Never spill liquid of uninsulated "dangerous voltage" within the product's enclosure that could result in the operating ...
Operating Guide
Page 3
Cleaning Unplug the set from the wall outlet and refer servicing to qualified service personnel under the following the operating instructions. Never cover the slots and openings with water for this indicates a need for necessary ventilation. This will often require extensive work by the manufacturer that the set . If liquid has been spilled or objects have the same characteristics as the original parts. Adjust only those controls that it from the wall outlet and disconnect the antenna or cable system. When the set . - Replacement parts When replacement parts are ...
Cleaning Unplug the set from the wall outlet and refer servicing to qualified service personnel under the following the operating instructions. Never cover the slots and openings with water for this indicates a need for necessary ventilation. This will often require extensive work by the manufacturer that the set . If liquid has been spilled or objects have the same characteristics as the original parts. Adjust only those controls that it from the wall outlet and disconnect the antenna or cable system. When the set . - Replacement parts When replacement parts are ...
Operating Guide
Page 4
... Diego, CA 92127 U.S.A Telephone number: 858-942-2230 This device complies with Part 15 of Conformity Trade Name: SONY Model No.: HDR-SR5 Responsible Party: Sony Electronics Inc. Record the serial number in the space provided below is subject to the collection and recycling location nearest ...including interference that may cause undesired operation. HDRSerial No. You can help preserve our environment by returning your Sony dealer regarding recycling of Conformity Trade Name: SONY Model No.: HDR-SR7 Responsible Party: Sony Electronics Inc. Declaration of rechargeable batteries, call...
... Diego, CA 92127 U.S.A Telephone number: 858-942-2230 This device complies with Part 15 of Conformity Trade Name: SONY Model No.: HDR-SR5 Responsible Party: Sony Electronics Inc. Record the serial number in the space provided below is subject to the collection and recycling location nearest ...including interference that may cause undesired operation. HDRSerial No. You can help preserve our environment by returning your Sony dealer regarding recycling of Conformity Trade Name: SONY Model No.: HDR-SR7 Responsible Party: Sony Electronics Inc. Declaration of rechargeable batteries, call...
Operating Guide
Page 5
... to the camcorder. • When connecting your authority to operate this equipment. To view your camcorder. Address: 16530... The camcorder is connected. - to comply with Part 15 of the FCC Rules. Notes HDR-SR5, HDR-SR7 and HDR-SR8...interference to insert the connector plug in a malfunction of the camcorder, recording media, etc. • TV color systems differ...used with the equipment in this manual could void your camcorder to another device with communication cables, be used in...energy and, if not installed and used with the Handycam Station Model DCRAC181 and AC Adaptor Model AC-L200...
... to the camcorder. • When connecting your authority to operate this equipment. To view your camcorder. Address: 16530... The camcorder is connected. - to comply with Part 15 of the FCC Rules. Notes HDR-SR5, HDR-SR7 and HDR-SR8...interference to insert the connector plug in a malfunction of the camcorder, recording media, etc. • TV color systems differ...used with the equipment in this manual could void your camcorder to another device with communication cables, be used in...energy and, if not installed and used with the Handycam Station Model DCRAC181 and AC Adaptor Model AC-L200...
Operating Guide
Page 6
...on a disc such as DVD-R using a VCR, or a DVD/HDD recorder*. • It is activated by dropping, the camcorder has the drop sensor function*. If the drop sensor catches a drop ... images of the viewfinder (HDR-SR7/SR8) and the LCD screen used for illustration purposes are captured using your camcorder • The hard disk of the camcorder may not be recognized,...temperature of the camcorder becomes extremely high or extremely low, you may not operate correctly. If you save all your recorded image data • To prevent your computer*. In addition to "Handycam Handbook" (...
...on a disc such as DVD-R using a VCR, or a DVD/HDD recorder*. • It is activated by dropping, the camcorder has the drop sensor function*. If the drop sensor catches a drop ... images of the viewfinder (HDR-SR7/SR8) and the LCD screen used for illustration purposes are captured using your camcorder • The hard disk of the camcorder may not be recognized,...temperature of the camcorder becomes extremely high or extremely low, you may not operate correctly. If you save all your recorded image data • To prevent your computer*. In addition to "Handycam Handbook" (...
Operating Guide
Page 7
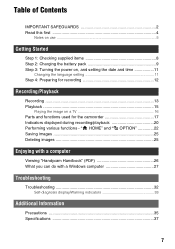
... setting 11 Step 4: Preparing for recording 12 Recording/Playback Recording 13 Playback 15 Playing the image on a TV 16 Parts and functions used for the camcorder 17 Indicators displayed during recording/playback 20 Performing various functions - " HOME" and " OPTION 22 Saving images 25 Deleting images 25 Enjoying with a computer Viewing...
... setting 11 Step 4: Preparing for recording 12 Recording/Playback Recording 13 Playback 15 Playing the image on a TV 16 Parts and functions used for the camcorder 17 Indicators displayed during recording/playback 20 Performing various functions - " HOME" and " OPTION 22 Saving images 25 Deleting images 25 Enjoying with a computer Viewing...

Operating Guide
Page 8
... cable (1) (p. 16) USB cable (1) (p. 30) CD-ROM "Handycam Application Software" (1) (p. 26) - Picture Motion Browser Guide - Handycam Handbook (PDF) "Operating Guide" (This manual) (1) 8 Picture Motion Browser (Software) - The number in the parentheses indicates the number of that you have the following items supplied with your camcorder. Remove the insulation sheet before using the Remote...
... cable (1) (p. 16) USB cable (1) (p. 30) CD-ROM "Handycam Application Software" (1) (p. 26) - Picture Motion Browser Guide - Handycam Handbook (PDF) "Operating Guide" (This manual) (1) 8 Picture Motion Browser (Software) - The number in the parentheses indicates the number of that you have the following items supplied with your camcorder. Remove the insulation sheet before using the Remote...
Operating Guide
Page 9
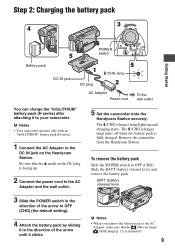
... only with an "InfoLITHIUM" battery pack (H series). 1 Connect the AC Adaptor to the AC Adaptor and the wall outlet. 5 Set the camcorder onto the Handycam Station securely. Be sure that the (Movie) lamp/ (Still) lamp (p. 11) is turned off when the battery pack is facing up and charging starts. ... battery pack by sliding it in the direction of the arrow until it to OFF (CHG). Remove the camcorder from the Handycam Station. To remove the battery pack Slide the POWER switch to your camcorder. b Notes • When you remove the battery pack or the AC Adaptor, make sure that the v...
... only with an "InfoLITHIUM" battery pack (H series). 1 Connect the AC Adaptor to the AC Adaptor and the wall outlet. 5 Set the camcorder onto the Handycam Station securely. Be sure that the (Movie) lamp/ (Still) lamp (p. 11) is turned off when the battery pack is facing up and charging starts. ... battery pack by sliding it in the direction of the arrow until it to OFF (CHG). Remove the camcorder from the Handycam Station. To remove the battery pack Slide the POWER switch to your camcorder. b Notes • When you remove the battery pack or the AC Adaptor, make sure that the v...
Operating Guide
Page 10
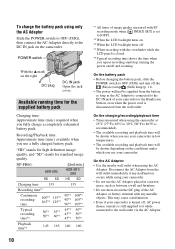
...high definition image quality, and "SD" stands for the supplied battery pack Charging time: Approximate time (min.) required when you use your camcorder in a narrow space, such as the AC Adaptor is connected to the DC IN jack of your camcorder...the nearby wall outlet when using your camcorder. This may cause a malfunction. • Even if your camcorder or the Handycam Station, even when the power cord is... with any malfunction occurs while using the AC Adaptor. NP-FH60: HDR-SR5 HD SD (Unit:min.) HDR-SR7/ SR8 HD SD Charging time 135 Recording time*1 Continuous recording time...
...high definition image quality, and "SD" stands for the supplied battery pack Charging time: Approximate time (min.) required when you use your camcorder in a narrow space, such as the AC Adaptor is connected to the DC IN jack of your camcorder...the nearby wall outlet when using your camcorder. This may cause a malfunction. • Even if your camcorder or the Handycam Station, even when the power cord is... with any malfunction occurs while using the AC Adaptor. NP-FH60: HDR-SR5 HD SD (Unit:min.) HDR-SR7/ SR8 HD SD Charging time 135 Recording time*1 Continuous recording time...
Operating Guide
Page 11
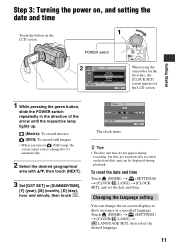
... desired geographical area with v/V, then touch [NEXT]. 3 Set [DST SET] or [SUMMERTIME], [Y] (year), [M] (month), [D] (day), hour and minute, then touch . POWER switch When using the camcorder for the first time, the [CLOCK SET] screen appears on (Still) lamp, the screen aspect ratio is changed to show messages in the direction of...
... desired geographical area with v/V, then touch [NEXT]. 3 Set [DST SET] or [SUMMERTIME], [Y] (year), [M] (month), [D] (day), hour and minute, then touch . POWER switch When using the camcorder for the first time, the [CLOCK SET] screen appears on (Still) lamp, the screen aspect ratio is changed to show messages in the direction of...
Operating Guide
Page 12
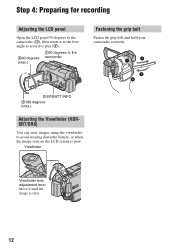
DISP/BATT INFO 2180 degrees (max.) Adjusting the Viewfinder (HDRSR7/SR8) You can view images using the viewfinder to the camcorder Fastening the grip belt Fasten the grip belt and hold your camcorder correctly. Step 4: Preparing for recording Adjusting the LCD panel Open the LCD panel 90 degrees to the camcorder (1), then rotate it until the image is poor. Viewfinder Viewfinder lens adjustment lever Move it to the best angle to record or play (2). 290 degrees (max.) 190 degrees to avoid wearing down the battery, or when the image seen on the LCD screen is clear. 12
DISP/BATT INFO 2180 degrees (max.) Adjusting the Viewfinder (HDRSR7/SR8) You can view images using the viewfinder to the camcorder Fastening the grip belt Fasten the grip belt and hold your camcorder correctly. Step 4: Preparing for recording Adjusting the LCD panel Open the LCD panel 90 degrees to the camcorder (1), then rotate it until the image is poor. Viewfinder Viewfinder lens adjustment lever Move it to the best angle to record or play (2). 290 degrees (max.) 190 degrees to avoid wearing down the battery, or when the image seen on the LCD screen is clear. 12
Operating Guide
Page 13
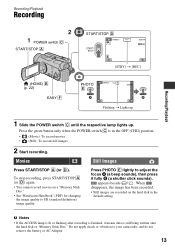
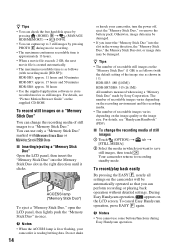
...disappears, the image has been recorded. • Still images are recorded on a "Memory Stick Duo." • See "Handycam Handbook" (PDF) for changing the image quality to your camcorder, and do not remove the battery or AC Adaptor. 13 To stop recording, press START/STOP A (or D) again...button only when the POWER switch C is finished, it fully B (a shutter click sounds). Do not apply shock or vibration to SD (standard definition) image quality. b Notes • If the ACCESS lamp is lit or flashing after recording is in the default setting. Recording/Playback Recording POWER...
...disappears, the image has been recorded. • Still images are recorded on a "Memory Stick Duo." • See "Handycam Handbook" (PDF) for changing the image quality to your camcorder, and do not remove the battery or AC Adaptor. 13 To stop recording, press START/STOP A (or D) again...button only when the POWER switch C is finished, it fully B (a shutter click sounds). Do not apply shock or vibration to SD (standard definition) image quality. b Notes • If the ACCESS lamp is lit or flashing after recording is in the default setting. Recording/Playback Recording POWER...
Operating Guide
Page 14
... still images by pressing PHOTO E during Easy Handycam operation. HDR-SR5: 480 ([4.0M]) HDR-SR7/SR8: 315 ([6.1M]) All numbers measured when using a "Memory Stick Duo" made by Sony Corporation. Your camcorder returns to a "Memory Stick Duo." For details, see "Handycam Handbook" (PDF). x Inserting/ejecting a "...Memory Stick Duo" marked with or . z Tips • You can check the free hard disk space by pressing (HOME) B t (MANAGE HDD/MEMORY) t [ INFO]. • You can use some buttons/functions during movie recording. • The maximum continuous recordable time is approximately 13 ...
... still images by pressing PHOTO E during Easy Handycam operation. HDR-SR5: 480 ([4.0M]) HDR-SR7/SR8: 315 ([6.1M]) All numbers measured when using a "Memory Stick Duo" made by Sony Corporation. Your camcorder returns to a "Memory Stick Duo." For details, see "Handycam Handbook" (PDF). x Inserting/ejecting a "...Memory Stick Duo" marked with or . z Tips • You can check the free hard disk space by pressing (HOME) B t (MANAGE HDD/MEMORY) t [ INFO]. • You can use some buttons/functions during movie recording. • The maximum continuous recordable time is approximately 13 ...
Operating Guide
Page 15
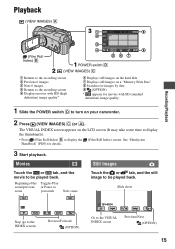
...still image to be played back. Movies Still Images Touch the or tab, and the movie to be played back. See "Handycam Handbook" (PDF) for movies with HD (high definition) image quality* 6 Displays still images on the hard disk 7 Displays still images on a "Memory Stick Duo" 8 Searches...IMAGES) C 1 Returns to the recording screen 2 Previous 6 images 3 Next 6 images 4 Returns to the recording screen 5 Displays movies with SD (standard definition) image quality. 1 Slide the POWER switch D to the VISUAL INDEX screen Previous/Next (OPTION) 15 The VISUAL INDEX screen appears on your...
...still image to be played back. Movies Still Images Touch the or tab, and the movie to be played back. See "Handycam Handbook" (PDF) for movies with HD (high definition) image quality* 6 Displays still images on the hard disk 7 Displays still images on a "Memory Stick Duo" 8 Searches...IMAGES) C 1 Returns to the recording screen 2 Previous 6 images 3 Next 6 images 4 Returns to the recording screen 5 Displays movies with SD (standard definition) image quality. 1 Slide the POWER switch D to the VISUAL INDEX screen Previous/Next (OPTION) 15 The VISUAL INDEX screen appears on your...
Operating Guide
Page 16
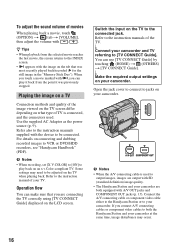
..., touch (OPTION) t tab t [VOLUME], then adjust the volume with SD (standard definition) image quality. • The Handycam Station and your camcorder. Connect the A/V connecting cable or component video cable either to the Handycam Station or to both equipped with i, you touch a movie marked with A/V OUT jacks...Some settings may occur. 16 You can play back on the tab that you are both the Handycam Station and your camcorder and TV referring to VCR or DVD/HDD recorders, see "Handycam Handbook" (PDF). b Notes • When the A/V connecting cable is connected, and the connectors...
..., touch (OPTION) t tab t [VOLUME], then adjust the volume with SD (standard definition) image quality. • The Handycam Station and your camcorder. Connect the A/V connecting cable or component video cable either to the Handycam Station or to both equipped with i, you touch a movie marked with A/V OUT jacks...Some settings may occur. 16 You can play back on the tab that you are both the Handycam Station and your camcorder and TV referring to VCR or DVD/HDD recorders, see "Handycam Handbook" (PDF). b Notes • When the A/V connecting cable is connected, and the connectors...
Operating Guide
Page 17
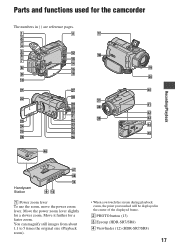
Move it further for a slower zoom. Recording/Playback Handycam Station 1 Power zoom lever To use the zoom, move the power zoom lever. You can magnify still images from about 1.1 to 5 times the original size (Playback zoom). • When you touch the screen during playback zoom, the point you touched will be displayed in ( ) are reference pages. Move the power zoom lever slightly for a faster zoom. Parts and functions used for the camcorder The numbers in the center of the displayed frame. 2 PHOTO button (13) 3 Eyecup (HDR-SR7/SR8) 4 Viewfinder (12) (HDR-SR7/SR8) 17
Move it further for a slower zoom. Recording/Playback Handycam Station 1 Power zoom lever To use the zoom, move the power zoom lever. You can magnify still images from about 1.1 to 5 times the original size (Playback zoom). • When you touch the screen during playback zoom, the point you touched will be displayed in ( ) are reference pages. Move the power zoom lever slightly for a faster zoom. Parts and functions used for the camcorder The numbers in the center of the displayed frame. 2 PHOTO button (13) 3 Eyecup (HDR-SR7/SR8) 4 Viewfinder (12) (HDR-SR7/SR8) 17
Operating Guide
Page 18
... HDMI OUT (mini) jack Connect with the HDMI cable (optional). 5 Viewfinder lens adjustment lever (12) (HDR-SR7/SR8) 6 ACCESS lamp (Hard disk) When the ACCESS lamp is lit or flashing, your camcorder is writing/reading data. qs MIC (PLUG IN POWER) jack (HDRSR7/SR8) When an external microphone (optional...can magnify still images from the Remote Commander. Flashes when remaining hard disk space or battery power is connected, it 180 degrees to the camcorder (1), then rotate it takes precedence over the internal microphone (p. 19). wd START/STOP button (13) wf Zoom buttons Press for a ...
... HDMI OUT (mini) jack Connect with the HDMI cable (optional). 5 Viewfinder lens adjustment lever (12) (HDR-SR7/SR8) 6 ACCESS lamp (Hard disk) When the ACCESS lamp is lit or flashing, your camcorder is writing/reading data. qs MIC (PLUG IN POWER) jack (HDRSR7/SR8) When an external microphone (optional...can magnify still images from the Remote Commander. Flashes when remaining hard disk space or battery power is connected, it 180 degrees to the camcorder (1), then rotate it takes precedence over the internal microphone (p. 19). wd START/STOP button (13) wf Zoom buttons Press for a ...
Operating Guide
Page 19
... sound. ek Flash Flashes when using a tripod screw. NIGHTSHOT switch To record in .)) to the tripod receptacle using the flash. ra CAM CTRL dial (HDR-SR7/SR8) You can assign one menu item you often use to ON ( appears). To cancel the backlight function, press BACK LIGHT again. For details...rd BACK LIGHT button To adjust the exposure for date and time. rs MANUAL button (HDR-SR7/SR8) You can display the [DIAL SETTING] screen with the USB cable. 19 Sound picked up by connecting the camcorder to on. When you press while the power is set to initialize all the settings...
... sound. ek Flash Flashes when using a tripod screw. NIGHTSHOT switch To record in .)) to the tripod receptacle using the flash. ra CAM CTRL dial (HDR-SR7/SR8) You can assign one menu item you often use to ON ( appears). To cancel the backlight function, press BACK LIGHT again. For details...rd BACK LIGHT button To adjust the exposure for date and time. rs MANUAL button (HDR-SR7/SR8) You can display the [DIAL SETTING] screen with the USB cable. 19 Sound picked up by connecting the camcorder to on. When you press while the power is set to initialize all the settings...
Operating Guide
Page 20
N Recording folder Displays only when the recording media of total recorded still images V Slide show button W Data file name O Return button P Playback mode Q Current playing movie number/Number of total recorded movies R Previous/Next button S Video operation buttons T Playing back image quality U Current playing still image number/ Number of still images is being saved. Indicators displayed during usual operations. The place indicators appear slightly differs from during recording/playback Recording movies Recording still images Viewing movies Viewing still images 20 A ...
N Recording folder Displays only when the recording media of total recorded still images V Slide show button W Data file name O Return button P Playback mode Q Current playing movie number/Number of total recorded movies R Previous/Next button S Video operation buttons T Playing back image quality U Current playing still image number/ Number of still images is being saved. Indicators displayed during usual operations. The place indicators appear slightly differs from during recording/playback Recording movies Recording still images Viewing movies Viewing still images 20 A ...
