Operating Guide
Page 4
...Model No. Regulatory Information Declaration of Conformity Trade Name: SONY Model No.: HDR-SR12 Responsible Party: Sony Electronics Inc. Declaration of Conformity Trade Name: SONY Model No.: HDR-SR11 Responsible Party: Sony Electronics Inc. Notes HDR-SR11/HDR-SR12 is for future reference. You can help preserve our...U.S.A. Read this first Before operating the unit, please read this product. US 4 CAUTION Replace the battery with the Handycam Station Model DCRA-C210 and AC Adaptor Model AC-L200/L200B. Excessive sound pressure from earphones and headphones cause hearing loss...
...Model No. Regulatory Information Declaration of Conformity Trade Name: SONY Model No.: HDR-SR12 Responsible Party: Sony Electronics Inc. Declaration of Conformity Trade Name: SONY Model No.: HDR-SR11 Responsible Party: Sony Electronics Inc. Notes HDR-SR11/HDR-SR12 is for future reference. You can help preserve our...U.S.A. Read this first Before operating the unit, please read this product. US 4 CAUTION Replace the battery with the Handycam Station Model DCRA-C210 and AC Adaptor Model AC-L200/L200B. Excessive sound pressure from earphones and headphones cause hearing loss...
Operating Guide
Page 5
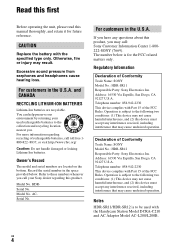
...approved in ( ) are designed to Part 15 of the following measures: - Handycam Handbook (PDF) • "Operating Guide" (This manual) (1) US A B C D Using the camcorder • The camcorder is encouraged to try to radio or television reception, which the receiver is already... installed. • Rechargeable battery pack NP-FH60 (1) • CD-ROM "Handycam Application Software" (1) (p. 26) - US 5 Note This ...
...approved in ( ) are designed to Part 15 of the following measures: - Handycam Handbook (PDF) • "Operating Guide" (This manual) (1) US A B C D Using the camcorder • The camcorder is encouraged to try to radio or television reception, which the receiver is already... installed. • Rechargeable battery pack NP-FH60 (1) • CD-ROM "Handycam Application Software" (1) (p. 26) - US 5 Note This ...
Operating Guide
Page 6
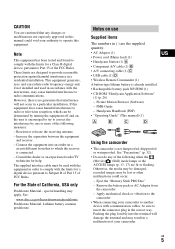
...8226; To adjust the LCD panel, open the LCD panel 90 degrees to the camcorder (1), then rotate it is more than 3,000 meters (9,800 feet). • Connect cables to the connectors of the Handycam Station when using the Remote Commander. When a drop occurs, or under a nongravity ...condition, the block noise made when this camcorder. The internal hard disk of the camcorder may not be recognized or recording/ playback may be stopped....
...8226; To adjust the LCD panel, open the LCD panel 90 degrees to the camcorder (1), then rotate it is more than 3,000 meters (9,800 feet). • Connect cables to the connectors of the Handycam Station when using the Remote Commander. When a drop occurs, or under a nongravity ...condition, the block noise made when this camcorder. The internal hard disk of the camcorder may not be recognized or recording/ playback may be stopped....
Operating Guide
Page 7
.../H.264 High Profile for HD (high definition) image quality recording. Other AVCHD format compatible devices which are called as DVD-R using your camcorder if necessary (p. 11). About language setting • The on-screen displays in each local language are not compatible with the following devices...; Do not try to format the hard disk of the camcorder using a VCR, or a DVD/HDD recorder*. It is not possible due to the copyright laws. Note on external media periodically. When you perform [ EMPTY]* to "Handycam Handbook" (PDF) and "PMB Guide." About this manual....
.../H.264 High Profile for HD (high definition) image quality recording. Other AVCHD format compatible devices which are called as DVD-R using your camcorder if necessary (p. 11). About language setting • The on-screen displays in each local language are not compatible with the following devices...; Do not try to format the hard disk of the camcorder using a VCR, or a DVD/HDD recorder*. It is not possible due to the copyright laws. Note on external media periodically. When you perform [ EMPTY]* to "Handycam Handbook" (PDF) and "PMB Guide." About this manual....
Operating Guide
Page 8
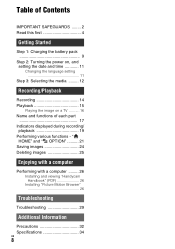
" HOME" and " OPTION 21 Saving images 24 Deleting images 25 Enjoying with a computer Performing with a computer ......... 26 Installing and viewing "Handycam Handbook" (PDF 26 Installing "Picture Motion Browser 26 Troubleshooting Troubleshooting 29 Additional Information Precautions 32 Specifications 34 US 8 Table of Contents IMPORTANT SAFEGUARDS ........ 2 Read this ...
" HOME" and " OPTION 21 Saving images 24 Deleting images 25 Enjoying with a computer Performing with a computer ......... 26 Installing and viewing "Handycam Handbook" (PDF 26 Installing "Picture Motion Browser 26 Troubleshooting Troubleshooting 29 Additional Information Precautions 32 Specifications 34 US 8 Table of Contents IMPORTANT SAFEGUARDS ........ 2 Read this ...
Operating Guide
Page 9
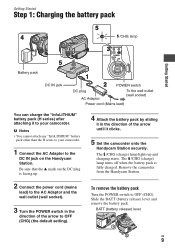
Remove the camcorder from the Handycam Station. 2 Connect the power cord (mains lead) to the AC Adaptor and the wall outlet (wall ... up and charging starts. b Notes • You cannot attach any "InfoLITHIUM" battery pack other than the H series to your camcorder. 1 Connect the AC Adaptor to your camcorder. BATT (battery release) lever US 9 Getting Started Getting Started Step 1: Charging the battery pack 5 4 /CHG lamp 3 5...(Mains lead) You can charge the "InfoLITHIUM" battery pack (H series) after attaching it clicks. 5 Set the camcorder onto the Handycam Station securely.
Remove the camcorder from the Handycam Station. 2 Connect the power cord (mains lead) to the AC Adaptor and the wall outlet (wall ... up and charging starts. b Notes • You cannot attach any "InfoLITHIUM" battery pack other than the H series to your camcorder. 1 Connect the AC Adaptor to your camcorder. BATT (battery release) lever US 9 Getting Started Getting Started Step 1: Charging the battery pack 5 4 /CHG lamp 3 5...(Mains lead) You can charge the "InfoLITHIUM" battery pack (H series) after attaching it clicks. 5 Set the camcorder onto the Handycam Station securely.
Operating Guide
Page 10
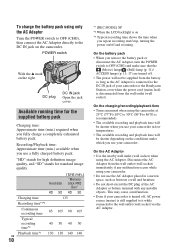
Disconnect the AC Adaptor from the wall outlet (wall socket) immediately if any malfunction occurs while using your camcorder or the Handycam Station, even when the power cord (mains lead) is disconnected from the battery as long as the AC Adaptor is turned off and zooming. "HD" ...
Disconnect the AC Adaptor from the wall outlet (wall socket) immediately if any malfunction occurs while using your camcorder or the Handycam Station, even when the power cord (mains lead) is disconnected from the battery as long as the AC Adaptor is turned off and zooming. "HD" ...
Operating Guide
Page 16
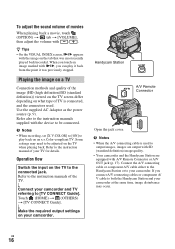
... details. Connect the A/V connecting cable or component A/V cable either to the Handycam Station or to output images, images are output with SD (standard definition) image quality. • Your camcorder and the Handycam Station are equipped with the image on the TV to be connected. b ...) t tab t [VOLUME], then adjust the volume with i/B, you connect A/V connecting cables or component A/ V cable to both the Handycam Station and your camcorder at the same time, image disturbance may need to the connected jack. Operation flow Switch the input on the tab that was previously stopped...
... details. Connect the A/V connecting cable or component A/V cable either to the Handycam Station or to output images, images are output with SD (standard definition) image quality. • Your camcorder and the Handycam Station are equipped with the image on the TV to be connected. b ...) t tab t [VOLUME], then adjust the volume with i/B, you connect A/V connecting cables or component A/ V cable to both the Handycam Station and your camcorder at the same time, image disturbance may need to the connected jack. Operation flow Switch the input on the tab that was previously stopped...

Operating Guide
Page 17
wa ws wd wf wg wj wh wk wl qj Handycam Station wg qs qa Recording/Playback 1 Power zoom lever Move the power zoom lever...keeps flashing during sleep mode. 6 ACCESS lamp (Hard disk) When the ACCESS lamp is lit or flashing, your camcorder is useful when you want to start recording next time. qd Speaker qf NIGHTSHOT switch Set the NIGHTSHOT switch to ON...mode (power saving mode) instead of turning off. The power turns off automatically if you press QUICK ON, the camcorder goes to record in other chapters, are not explained in dark places. Move it further for a slower zoom. Press...
wa ws wd wf wg wj wh wk wl qj Handycam Station wg qs qa Recording/Playback 1 Power zoom lever Move the power zoom lever...keeps flashing during sleep mode. 6 ACCESS lamp (Hard disk) When the ACCESS lamp is lit or flashing, your camcorder is useful when you want to start recording next time. qd Speaker qf NIGHTSHOT switch Set the NIGHTSHOT switch to ON...mode (power saving mode) instead of turning off. The power turns off automatically if you press QUICK ON, the camcorder goes to record in other chapters, are not explained in dark places. Move it further for a slower zoom. Press...
Operating Guide
Page 18
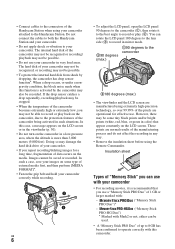
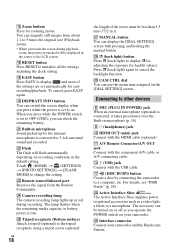
... Flash The flash will be less than 5.5 mm (7/32 in.)). wl CAM CTRL dial You can check the remaining battery. wg Interface connector Connect your camcorder. qs (USB) jack Connect with pressing and holding the manual button. qk EASY button Press EASY to display and most of the settings are set... low. You can display the [DIAL SETTING] screen with the USB cable. wf Camera recording lamp The camera recording lamp lights up by connecting the camcorder to on your camcorder and the Handycam Station. qg Zoom buttons Press for zooming in microphone (p. 18). 9 i (headphones) jack q;
... Flash The flash will be less than 5.5 mm (7/32 in.)). wl CAM CTRL dial You can check the remaining battery. wg Interface connector Connect your camcorder. qs (USB) jack Connect with pressing and holding the manual button. qk EASY button Press EASY to display and most of the settings are set... low. You can display the [DIAL SETTING] screen with the USB cable. wf Camera recording lamp The camera recording lamp lights up by connecting the camcorder to on your camcorder and the Handycam Station. qg Zoom buttons Press for zooming in microphone (p. 18). 9 i (headphones) jack q;
Operating Guide
Page 20
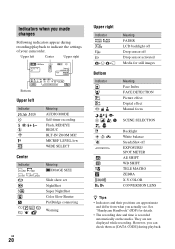
... LCD backlight off Drop sensor off Drop sensor activated Media for details. • The recording date and time is recorded automatically on the media. See "Handycam Handbook" (PDF) for still images Meaning Face Index FACE DETECTION Picture effect Digital effect Manual focus SCENE SELECTION Backlight White balance SteadyShot off EXPOSURE/ SPOT... made changes Following indicators appear during playback. Indicators when you can check them as [DATA CODE] during recording/playback to indicate the settings of your camcorder.
... LCD backlight off Drop sensor off Drop sensor activated Media for details. • The recording date and time is recorded automatically on the media. See "Handycam Handbook" (PDF) for still images Meaning Face Index FACE DETECTION Picture effect Digital effect Manual focus SCENE SELECTION Backlight White balance SteadyShot off EXPOSURE/ SPOT... made changes Following indicators appear during playback. Indicators when you can check them as [DATA CODE] during recording/playback to indicate the settings of your camcorder.
Operating Guide
Page 21
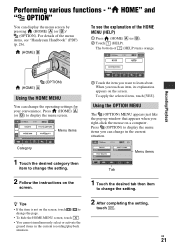
... then item to learn about. " HOME" and " OPTION" You can change the setting. 2 After completing the setting, touch . For details of the menu items, see "Handycam Handbook" (PDF) (p. 26). (HOME) B To see the explanation of (HELP) turns orange. US 21
... then item to learn about. " HOME" and " OPTION" You can change the setting. 2 After completing the setting, touch . For details of the menu items, see "Handycam Handbook" (PDF) (p. 26). (HOME) B To see the explanation of (HELP) turns orange. US 21
Operating Guide
Page 22
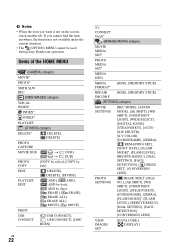
...] VIEW IMAGES SET [DATA CODE], [ DISPLAY] If you want is not available under the current situation. • The (OPTION) MENU cannot be used during Easy Handycam operation.
...] VIEW IMAGES SET [DATA CODE], [ DISPLAY] If you want is not available under the current situation. • The (OPTION) MENU cannot be used during Easy Handycam operation.
Operating Guide
Page 23
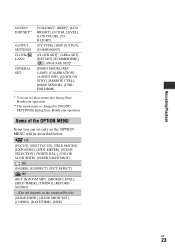
... OFF], [QUICK ON STBY], [REMOTE CTRL], [DROP SENSOR], [CTRL FOR HDMI] * You can set these items also during Easy Handycam operation. ** The menu name is changed to [SOUND SETTINGS] during Easy Handycam operation. Items of the OPTION MENU Items you can set only on the situation/No tab) [SLIDE SHOW], [SLIDE SHOW...
... OFF], [QUICK ON STBY], [REMOTE CTRL], [DROP SENSOR], [CTRL FOR HDMI] * You can set these items also during Easy Handycam operation. ** The menu name is changed to [SOUND SETTINGS] during Easy Handycam operation. Items of the OPTION MENU Items you can set only on the situation/No tab) [SLIDE SHOW], [SLIDE SHOW...
Operating Guide
Page 24
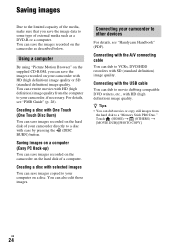
...Touch (One Touch Disc Burn) You can save images recorded on the hard disk of your camcorder directly to movie dubbing compatible DVD writers, etc., with HD (high definition) image quality. US 24 For details, see "Handycam Handbook" (PDF). Connecting with the USB cable You can dub to a disc with ease ...the images recorded on the hard disk of a computer. Saving images on a computer (Easy PC Back-up) You can save images recorded on the camcorder on the camcorder as a DVD-R or a computer. Saving images Due to the limited capacity of the media, make sure that you can save the images recorded ...
...Touch (One Touch Disc Burn) You can save images recorded on the hard disk of your camcorder directly to movie dubbing compatible DVD writers, etc., with HD (high definition) image quality. US 24 For details, see "Handycam Handbook" (PDF). Connecting with the USB cable You can dub to a disc with ease ...the images recorded on the hard disk of a computer. Saving images on a computer (Easy PC Back-up) You can save images recorded on the camcorder on the camcorder as a DVD-R or a computer. Saving images Due to the limited capacity of the media, make sure that you can save the images recorded ...
Operating Guide
Page 26
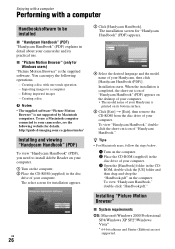
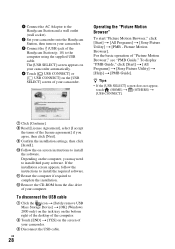
... Creating a disc with a computer Handbook/software to be installed x "Handycam Handbook" (PDF) "Handycam Handbook" (PDF) explains in detail about your camcorder, see the following operations. - To use a Macintosh computer connected to your camcorder and its bottom surface. 5 Click [Exit] t [Exit], then ...remove the CD-ROM from the disc drive of "Handycam Handbook." http://guide.d-imaging.sony.co.jp/mac/ms/us/ Installing and viewing "Handycam Handbook" (PDF) To view "Handycam Handbook" (PDF), ...
... Creating a disc with a computer Handbook/software to be installed x "Handycam Handbook" (PDF) "Handycam Handbook" (PDF) explains in detail about your camcorder, see the following operations. - To use a Macintosh computer connected to your camcorder and its bottom surface. 5 Click [Exit] t [Exit], then ...remove the CD-ROM from the disc drive of "Handycam Handbook." http://guide.d-imaging.sony.co.jp/mac/ms/us/ Installing and viewing "Handycam Handbook" (PDF) To view "Handycam Handbook" (PDF), ...
Operating Guide
Page 28
... [USB SELECT] screen of your camcorder. To display "PMB Guide," click [Start] t [All Programs] t [Sony Picture Utility] t [Help] t [PMB Guide]. 1 Connect the AC Adaptor to the Handycam Station and a wall outlet (wall socket). 2 Set your camcorder onto the Handycam Station, then turn on your camcorder. 3 Connect the (USB) jack of the Handycam Station (p. 18) to complete the...
... [USB SELECT] screen of your camcorder. To display "PMB Guide," click [Start] t [All Programs] t [Sony Picture Utility] t [Help] t [PMB Guide]. 1 Connect the AC Adaptor to the Handycam Station and a wall outlet (wall socket). 2 Set your camcorder onto the Handycam Station, then turn on your camcorder. 3 Connect the (USB) jack of the Handycam Station (p. 18) to complete the...
Operating Guide
Page 29
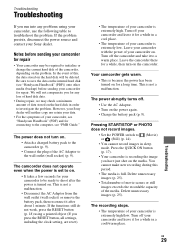
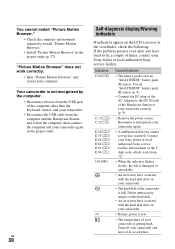
...(see "PMB Guide." In the event of this period. • The media is extremely high/low. However, your Sony dealer will not compensate you for repair • Your camcorder may check a minimum amount of data stored on the hard disk in order to a warm place. Press the QUICK ...to shoot after about 1 minute. Delete unnecessary images (p. 25). We will neither copy nor retain your data. • For the symptoms of your camcorder, see "Handycam Handbook" (PDF) and for repair. This is extremely low. Troubleshooting Troubleshooting If you run into any loss of hard disk data. • During...
...(see "PMB Guide." In the event of this period. • The media is extremely high/low. However, your Sony dealer will not compensate you for repair • Your camcorder may check a minimum amount of data stored on the hard disk in order to a warm place. Press the QUICK ...to shoot after about 1 minute. Delete unnecessary images (p. 25). We will neither copy nor retain your data. • For the symptoms of your camcorder, see "Handycam Handbook" (PDF) and for repair. This is extremely low. Troubleshooting Troubleshooting If you run into any loss of hard disk data. • During...
Operating Guide
Page 30
... pack is low. • The temperature of the Handycam Station or your Sony dealer or local authorized Sony service facility. Reconnect it in the viewfinder, check the following. Turn off your camcorder and leave it and operate your camcorder again in the proper order (p. 27). Contact your camcorder securely (p. 9). • Remove the power source. Delete unnecessary...
... pack is low. • The temperature of the Handycam Station or your Sony dealer or local authorized Sony service facility. Reconnect it in the viewfinder, check the following. Turn off your camcorder and leave it and operate your camcorder again in the proper order (p. 27). Contact your camcorder securely (p. 9). • Remove the power source. Delete unnecessary...
Operating Guide
Page 35
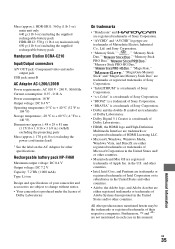
... HDR-SR11: 560 g (1 lb 3 oz) main unit only 640 g (1 lb 6 oz) including the supplied rechargeable battery pack HDR-SR12: 570 g (1 lb 4 oz) main unit only 650 g (1 lb 6 oz) including the supplied rechargeable battery pack Handycam Station...Sony Corporation. • Dolby and the double-D symbol are trademarks of Dolby Laboratories. • Dolby Digital 5.1 Creator is produced under the license of Dolby Laboratories. Rechargeable battery pack NP-FH60 Maximum output voltage: DC 8.4 V Output voltage: DC 7.2 V Capacity: 7.2 Wh (1 000 mAh) Type: Li-ion Design and specifications of your camcorder...
... HDR-SR11: 560 g (1 lb 3 oz) main unit only 640 g (1 lb 6 oz) including the supplied rechargeable battery pack HDR-SR12: 570 g (1 lb 4 oz) main unit only 650 g (1 lb 6 oz) including the supplied rechargeable battery pack Handycam Station...Sony Corporation. • Dolby and the double-D symbol are trademarks of Dolby Laboratories. • Dolby Digital 5.1 Creator is produced under the license of Dolby Laboratories. Rechargeable battery pack NP-FH60 Maximum output voltage: DC 8.4 V Output voltage: DC 7.2 V Capacity: 7.2 Wh (1 000 mAh) Type: Li-ion Design and specifications of your camcorder...


