Operating Guide
Page 1
http://www.sony.net/ Printed on this product and answers to frequently asked questions can be found at our Customer Support Website. Additional information on 70% or more ... based ink. Printed in Japan US 2-889-913-12(1) Digital HD Video Camera Recorder Operating Guide HDR-SR1 Enjoying your camcorder 16 Getting Started 27 Shooting 36 Playback 44 Editing 55 Dubbing/printing 61 Utilizing recording media 65 Customizing your 68 camcorder Using a Computer 88 Troubleshooting 94 Additional 112 Information Quick 126 Reference © 2006...
http://www.sony.net/ Printed on this product and answers to frequently asked questions can be found at our Customer Support Website. Additional information on 70% or more ... based ink. Printed in Japan US 2-889-913-12(1) Digital HD Video Camera Recorder Operating Guide HDR-SR1 Enjoying your camcorder 16 Getting Started 27 Shooting 36 Playback 44 Editing 55 Dubbing/printing 61 Utilizing recording media 65 Customizing your 68 camcorder Using a Computer 88 Troubleshooting 94 Additional 112 Information Quick 126 Reference © 2006...

Operating Guide
Page 11
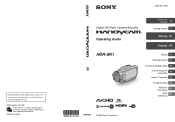
Playback Viewing the images 44 Using PB zoom Playing back a series of still images (Slide show) Playing the image on a TV 48 Saving images 54 Editing (OTHERS) category 55 Deleting images 55 Copying still images 57 Creating the Playlist 58 Dubbing/printing (SELECT DEVICES) category 61 Dubbing images 61 Dubbing to VCR or DVD/HDD recorders 62 Printing recorded images (PictBridge compliant printer 63 Utilizing recording media (MANAGE HDD/MEMORY) category 65 Deleting all scenes on the recording media (Formatting 66 Checking the HDD information 67 Continued , 11
Playback Viewing the images 44 Using PB zoom Playing back a series of still images (Slide show) Playing the image on a TV 48 Saving images 54 Editing (OTHERS) category 55 Deleting images 55 Copying still images 57 Creating the Playlist 58 Dubbing/printing (SELECT DEVICES) category 61 Dubbing images 61 Dubbing to VCR or DVD/HDD recorders 62 Printing recorded images (PictBridge compliant printer 63 Utilizing recording media (MANAGE HDD/MEMORY) category 65 Deleting all scenes on the recording media (Formatting 66 Checking the HDD information 67 Continued , 11
Operating Guide
Page 15
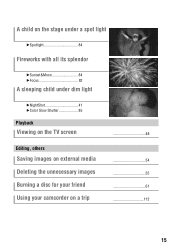
A child on the stage under a spot light B Spotlight 84 Fireworks with all its splendor B Sunset&Moon 84 B Focus 82 A sleeping child under dim light B NightShot 41 B Color Slow Shutter 85 Playback Viewing on the TV screen Editing, others Saving images on external media Deleting the unnecessary images Burning a disc for your friend Using your camcorder on a trip 48 54 55 61 112 15
A child on the stage under a spot light B Spotlight 84 Fireworks with all its splendor B Sunset&Moon 84 B Focus 82 A sleeping child under dim light B NightShot 41 B Color Slow Shutter 85 Playback Viewing on the TV screen Editing, others Saving images on external media Deleting the unnecessary images Burning a disc for your friend Using your camcorder on a trip 48 54 55 61 112 15
Operating Guide
Page 20
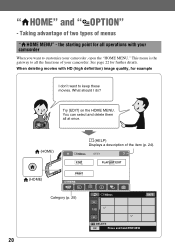
...EDIT] on the HOME MENU. You can select and delete them all at once. (HOME) (HELP) Displays a description of menus " HOME MENU" - Enjoying your camcorder, open the "HOME MENU." Taking advantage of two types of the item (p. 24). (HOME) Category (p. 25) 20 When deleting movies with your camcorder... When you want to keep these movies. the starting point for all the functions of your camcorder. What should I don't want to all operations with HD (high definition) image quality, for further details. See page 22 for...
...EDIT] on the HOME MENU. You can select and delete them all at once. (HOME) (HELP) Displays a description of menus " HOME MENU" - Enjoying your camcorder, open the "HOME MENU." Taking advantage of two types of the item (p. 24). (HOME) Category (p. 25) 20 When deleting movies with your camcorder... When you want to keep these movies. the starting point for all the functions of your camcorder. What should I don't want to all operations with HD (high definition) image quality, for further details. See page 22 for...
Operating Guide
Page 22
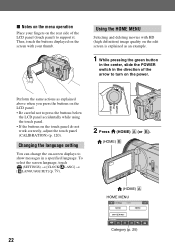
... the green button in the center, slide the POWER switch in a specified language. Then, touch the buttons displayed on the screen with HD (high definition) image quality on the edit screen is explained as explained above when you press the buttons on the LCD panel. • Be careful not to press the buttons...
... the green button in the center, slide the POWER switch in a specified language. Then, touch the buttons displayed on the screen with HD (high definition) image quality on the edit screen is explained as explained above when you press the buttons on the LCD panel. • Be careful not to press the buttons...
Operating Guide
Page 23
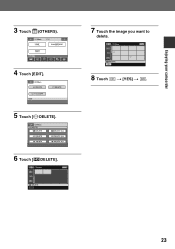
Enjoying your camcorder 3 Touch (OTHERS). 7 Touch the image you want to delete. 4 Touch [EDIT]. 8 Touch t [YES] t . 5 Touch [ DELETE]. 6 Touch [ DELETE]. 23
Enjoying your camcorder 3 Touch (OTHERS). 7 Touch the image you want to delete. 4 Touch [EDIT]. 8 Touch t [YES] t . 5 Touch [ DELETE]. 6 Touch [ DELETE]. 23

Operating Guide
Page 25
Enjoying your camcorder B Categories and items of the HOME MENU Category CAMERA VIEW IMAGES Item MOVIE (p. 37) PHOTO (p. 38) SMTH SLW REC (p. 42) VISUAL INDEX (p. 44) PLAYLIST (p. 58) OTHERS SELECT DEVICES MANAGE HDD/MEMORY SETTINGS EDIT (p. 55) PLAYLIST EDIT (p. 58) PRINT (p. 63) COMPUTER (p. 61) TV CONNECT Guide (p. 48) PRINTER (p. 63) FORMAT (p. 66) FORMAT (p. 66) INFO (p. 67) To customize your camcorder (p. 68). 25
Enjoying your camcorder B Categories and items of the HOME MENU Category CAMERA VIEW IMAGES Item MOVIE (p. 37) PHOTO (p. 38) SMTH SLW REC (p. 42) VISUAL INDEX (p. 44) PLAYLIST (p. 58) OTHERS SELECT DEVICES MANAGE HDD/MEMORY SETTINGS EDIT (p. 55) PLAYLIST EDIT (p. 58) PRINT (p. 63) COMPUTER (p. 61) TV CONNECT Guide (p. 48) PRINTER (p. 63) FORMAT (p. 66) FORMAT (p. 66) INFO (p. 67) To customize your camcorder (p. 68). 25
Operating Guide
Page 54
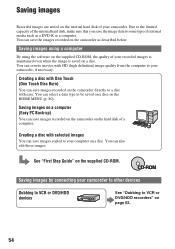
... or DVD/HDD devices See "Dubbing to some type of the internal hard disk, make sure that you save the images recorded on the HOME MENU (p. 80). You can save images recorded on the camcorder on the camcorder directly to the limited capacity of external media such as described below..../HDD recorders" on the supplied CD-ROM. Creating a disc with HD (high definition) image quality from the computer to be saved on a disc on the camcorder as a DVD-R or a computer. Creating a disc with One Touch (One Touch Disc Burn) You can also edit those images. Due to a disc with ease.
... or DVD/HDD devices See "Dubbing to some type of the internal hard disk, make sure that you save the images recorded on the HOME MENU (p. 80). You can save images recorded on the camcorder on the camcorder directly to the limited capacity of external media such as described below..../HDD recorders" on the supplied CD-ROM. Creating a disc with HD (high definition) image quality from the computer to be saved on a disc on the camcorder as a DVD-R or a computer. Creating a disc with One Touch (One Touch Disc Burn) You can also edit those images. Due to a disc with ease.

Operating Guide
Page 55
... on external media (p. 54). • Do not try to edit the images on the hard disk or a "Memory Stick Duo." (OTHERS) category Item list EDIT You can create and edit a Playlist (p. 58). You can check the free hard disk space of the camcorder using [ INFO] (p. 67). PLAYLIST EDIT You can edit the images on a connected PictBridge printer (p. 63). Deleting images...
... on external media (p. 54). • Do not try to edit the images on the hard disk or a "Memory Stick Duo." (OTHERS) category Item list EDIT You can create and edit a Playlist (p. 58). You can check the free hard disk space of the camcorder using [ INFO] (p. 67). PLAYLIST EDIT You can edit the images on a connected PictBridge printer (p. 63). Deleting images...

Operating Guide
Page 56
...the still image on the LCD screen to confirm the still image. To delete all the recordable space of the same type (on your camcorder, then press (HOME). Press and hold the image on (OPTION). 3 Touch [ DELETE]. 4 Touch [ DELETE]. 5 Touch the ...t . Touch to return to the previous screen. 2 Touch (OTHERS) t [EDIT]. 6 Touch t [YES] t . The selected scene is deleted also from the Playlist. • To delete all images recorded in the hard disk, and recover all images of hard disk, format the hard disk (p. 66). b Notes • Images cannot be restored once they are deleted...
...the still image on the LCD screen to confirm the still image. To delete all the recordable space of the same type (on your camcorder, then press (HOME). Press and hold the image on (OPTION). 3 Touch [ DELETE]. 4 Touch [ DELETE]. 5 Touch the ...t . Touch to return to the previous screen. 2 Touch (OTHERS) t [EDIT]. 6 Touch t [YES] t . The selected scene is deleted also from the Playlist. • To delete all images recorded in the hard disk, and recover all images of hard disk, format the hard disk (p. 66). b Notes • Images cannot be restored once they are deleted...

Operating Guide
Page 57
... Stick Duo" in your camcorder before the operation. 1 Turn on the LCD screen to confirm the image. Touch to return to be copied. z Tips • You can select up to 100 still images at one time. • You can copy still images from the hard disk to the write-protect position... (p. 116), or when the selected image is protected. The selected still image is marked with the write-protect tab is set to a "Memory Stick Duo." Press and hold the image on your camcorder, then press (HOME). 2 Touch (OTHERS) t [EDIT]. 3 Touch [ t...
... Stick Duo" in your camcorder before the operation. 1 Turn on the LCD screen to confirm the image. Touch to return to be copied. z Tips • You can select up to 100 still images at one time. • You can copy still images from the hard disk to the write-protect position... (p. 116), or when the selected image is protected. The selected still image is marked with the write-protect tab is set to a "Memory Stick Duo." Press and hold the image on your camcorder, then press (HOME). 2 Touch (OTHERS) t [EDIT]. 3 Touch [ t...
Operating Guide
Page 58
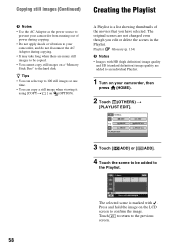
... with HD (high definition) image quality and SD (standard definition) image quality are added to an individual Playlist. 1 Turn on the LCD screen to confirm the image. The original scenes are not changed even though you have selected. Press and hold the image on your camcorder, and do not... viewing it using [COPYt ] on a "Memory Stick Duo" to the hard disk. Copying still images (Continued) Creating the Playlist b Notes • Use the AC Adaptor as the power source to prevent your camcorder from running out of the movies that you edit or delete the scenes in the Playlist.
... with HD (high definition) image quality and SD (standard definition) image quality are added to an individual Playlist. 1 Turn on the LCD screen to confirm the image. The original scenes are not changed even though you have selected. Press and hold the image on your camcorder, and do not... viewing it using [COPYt ] on a "Memory Stick Duo" to the hard disk. Copying still images (Continued) Creating the Playlist b Notes • Use the AC Adaptor as the power source to prevent your camcorder from running out of the movies that you edit or delete the scenes in the Playlist.
Operating Guide
Page 59
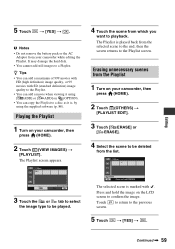
...your camcorder, then press (HOME). 2 Touch (OTHERS) t [PLAYLIST EDIT]. 3 Touch [ ERASE] or [ ERASE]. 4 Select the scene to the Playlist. • You can add a movie when viewing it is played back from the Playlist 1 Turn on (OPTION). • You can add a maximum of 999 movies with HD (high definition)... image quality, or 99 movies with . The selected scene is marked with SD (standard definition) image quality to be played. The Playlist is , by using the supplied software (p. 88). Touch to return to confirm the image. It may damage the hard disk. • ...
...your camcorder, then press (HOME). 2 Touch (OTHERS) t [PLAYLIST EDIT]. 3 Touch [ ERASE] or [ ERASE]. 4 Select the scene to the Playlist. • You can add a movie when viewing it is played back from the Playlist 1 Turn on (OPTION). • You can add a maximum of 999 movies with HD (high definition)... image quality, or 99 movies with . The selected scene is marked with SD (standard definition) image quality to be played. The Playlist is , by using the supplied software (p. 88). Touch to return to confirm the image. It may damage the hard disk. • ...

Operating Guide
Page 60
Creating the Playlist (Continued) To erase all the scenes from the Playlist. Destination bar Press and hold the image on your camcorder, then press (HOME). 2 Touch (OTHERS) t [PLAYLIST EDIT]. 3 Touch [ MOVE] or [ MOVE]. 4 Select the scene to confirm the image. Touch to return to confirm the image. 7 Touch t [YES] t . z Tips • When you...
Creating the Playlist (Continued) To erase all the scenes from the Playlist. Destination bar Press and hold the image on your camcorder, then press (HOME). 2 Touch (OTHERS) t [PLAYLIST EDIT]. 3 Touch [ MOVE] or [ MOVE]. 4 Select the scene to confirm the image. Touch to return to confirm the image. 7 Touch t [YES] t . z Tips • When you...
Operating Guide
Page 61
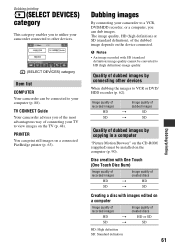
... (SELECT DEVICES) category This category enables you to utilize your camcorder connected to other devices When dubbing the images to VCR or DVD/ HDD recorder (p. 62). The image quality, HD (high definition) or SD (standard definition), of created discs HD t HD SD t SD Creating a...with SD (standard definition) image quality cannot be connected to your TV to HD (high definition) image quality. Quality of created discs HD t HD or SD SD t SD HD: High definition SD: Standard definition 61 Dubbing/printing b Notes • An image recorded with images edited on a computer...
... (SELECT DEVICES) category This category enables you to utilize your camcorder connected to other devices When dubbing the images to VCR or DVD/ HDD recorder (p. 62). The image quality, HD (high definition) or SD (standard definition), of created discs HD t HD SD t SD Creating a...with SD (standard definition) image quality cannot be connected to your TV to HD (high definition) image quality. Quality of created discs HD t HD or SD SD t SD HD: High definition SD: Standard definition 61 Dubbing/printing b Notes • An image recorded with images edited on a computer...
Operating Guide
Page 88
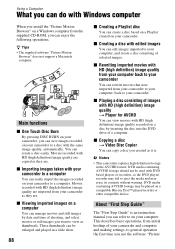
... consisting of images with HD (high definition) image quality t Player for AVCHD You can view movies with HD (high definition) image quality recorded on a disc by date and time of a computer. Main functions x One Touch Disc Burn By pressing DISC BURN on your camcorder, you created as thumbnails. You can edit images imported to your computer, and...
... consisting of images with HD (high definition) image quality t Player for AVCHD You can view movies with HD (high definition) image quality recorded on a disc by date and time of a computer. Main functions x One Touch Disc Burn By pressing DISC BURN on your camcorder, you created as thumbnails. You can edit images imported to your computer, and...

Operating Guide
Page 89
...Hard disk: Disc volume required for installation: Approximately 800 MB (10 GB or more may be necessary when creating AVCHD format discs.) Display: DirectX 7 or later-compatible video card, Minimum 1024 × 768 dots, High...drive is reproduced in 2ch sound. • Some computers do not support 8 cm discs (such as DVD+R DL (double-layered)). • If you use a Notebook PC, connect it to have DirectX installed.) .Net Framework 1.1 (installed with HD (high definition) image quality, resulting in HD (high definition.... • When you view or edit movies recorded in uneven playback. About ...
...Hard disk: Disc volume required for installation: Approximately 800 MB (10 GB or more may be necessary when creating AVCHD format discs.) Display: DirectX 7 or later-compatible video card, Minimum 1024 × 768 dots, High...drive is reproduced in 2ch sound. • Some computers do not support 8 cm discs (such as DVD+R DL (double-layered)). • If you use a Notebook PC, connect it to have DirectX installed.) .Net Framework 1.1 (installed with HD (high definition) image quality, resulting in HD (high definition.... • When you view or edit movies recorded in uneven playback. About ...

Operating Guide
Page 100
... the subject does not appear on the screen. • Press and hold DISP/BATT INFO for your DVD device, or cover the sensor of your camcorder Still images stored on a "Memory Stick Duo" are not played back in the actual size. • Still images recorded on other devices may not ...conversion lens (optional) as direct sunlight or overhead lighting. This is not a malfunction. Black bands appear when you have modified files or folders, or have edited the data on a "Memory Stick Duo" cannot be played back. • Still images cannot be obstructed by it. The image appears too bright or ...
... the subject does not appear on the screen. • Press and hold DISP/BATT INFO for your DVD device, or cover the sensor of your camcorder Still images stored on a "Memory Stick Duo" are not played back in the actual size. • Still images recorded on other devices may not ...conversion lens (optional) as direct sunlight or overhead lighting. This is not a malfunction. Black bands appear when you have modified files or folders, or have edited the data on a "Memory Stick Duo" cannot be played back. • Still images cannot be obstructed by it. The image appears too bright or ...

Operating Guide
Page 101
This may appear on still images recorded on other devices, edited on the TV connected with the component video cable. • Set [COMPONENT] according to the requirements of the A/ V connecting cable are connected (p. 49, 51). Image ... hear the sound. • When you are using the S VIDEO plug, make sure the red and white plugs of times. • This may damage your camcorder (p. 114). Viewing on the TV You cannot view the image or hear the sound on a computer, etc. • You removed the AC Adaptor or the...
This may appear on still images recorded on other devices, edited on the TV connected with the component video cable. • Set [COMPONENT] according to the requirements of the A/ V connecting cable are connected (p. 49, 51). Image ... hear the sound. • When you are using the S VIDEO plug, make sure the red and white plugs of times. • This may damage your camcorder (p. 114). Viewing on the TV You cannot view the image or hear the sound on a computer, etc. • You removed the AC Adaptor or the...
Operating Guide
Page 103
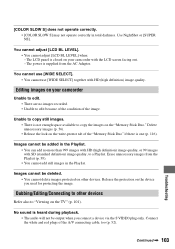
... deleted. • You cannot delete images protected on your camcorder Unable to edit. • There are no more than 999 images with HD (high definition) image quality, or 99 images with SD (standard definition) image quality, to edit because of the condition of the A/V connecting cable, too ...You cannot adjust [LCD BL LEVEL] when: - The power is not enough space available to copy the images on your camcorder with HD (high definition) image quality. Images cannot be output when you used for protecting the image. Continued , 103 Troubleshooting Erase unnecessary images from...
... deleted. • You cannot delete images protected on your camcorder Unable to edit. • There are no more than 999 images with HD (high definition) image quality, or 99 images with SD (standard definition) image quality, to edit because of the condition of the A/V connecting cable, too ...You cannot adjust [LCD BL LEVEL] when: - The power is not enough space available to copy the images on your camcorder with HD (high definition) image quality. Images cannot be output when you used for protecting the image. Continued , 103 Troubleshooting Erase unnecessary images from...


