Operating Guide
Page 3
... from the type of the set through openings as a bookcase, or built-in cabinet, unless proper ventilation is not likely to be operated only from battery power, or other materials. - Do not use liquid cleaners or aerosol cleaners. Use only a cart, stand, tripod, bracket, or table recommended by forcing it . Ventilation...
... from the type of the set through openings as a bookcase, or built-in cabinet, unless proper ventilation is not likely to be operated only from battery power, or other materials. - Do not use liquid cleaners or aerosol cleaners. Use only a cart, stand, tripod, bracket, or table recommended by forcing it . Ventilation...
Operating Guide
Page 5
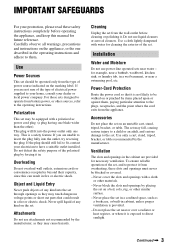
Read this before operating your camcorder Before operating the unit, please read this manual thoroughly, and retain it for the FCC...you have any changes or modifications not expressly approved in this manual could void your authority to operate this equipment. 5 HDR-SR1 Serial No. ACNo. The number below . Telephone Number: 858-942-2230 This device complies with the specified type ... customers in the U.S.A. CAUTION You are cautioned that may result. CAUTION Replace the battery with Part 15 of Conformity Trade Name: SONY Model No.: HDR-SR1 Responsible Party: Sony Electronics Inc.
Read this before operating your camcorder Before operating the unit, please read this manual thoroughly, and retain it for the FCC...you have any changes or modifications not expressly approved in this manual could void your authority to operate this equipment. 5 HDR-SR1 Serial No. ACNo. The number below . Telephone Number: 858-942-2230 This device complies with the specified type ... customers in the U.S.A. CAUTION You are cautioned that may result. CAUTION Replace the battery with Part 15 of Conformity Trade Name: SONY Model No.: HDR-SR1 Responsible Party: Sony Electronics Inc.
Operating Guide
Page 7
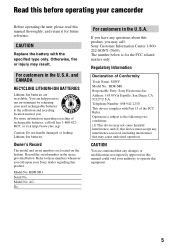
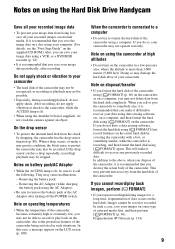
See "Maintenance and precautions" (p. 119). • To prevent the hard disk from being broken or recorded images from the camcorder. - Black point White, red, blue or green point • Exposing the LCD screen, the viewfinder, or the lens to direct sunlight for the ... points and/or bright points (white, red, blue, or green in color) that is grayed out is not dustproofed, dripproofed or waterproofed. Battery • The camcorder is not available under the current recording or playback conditions. • The LCD screen and the viewfinder are recorded without any way. to make...
See "Maintenance and precautions" (p. 119). • To prevent the hard disk from being broken or recorded images from the camcorder. - Black point White, red, blue or green point • Exposing the LCD screen, the viewfinder, or the lens to direct sunlight for the ... points and/or bright points (white, red, blue, or green in color) that is grayed out is not dustproofed, dripproofed or waterproofed. Battery • The camcorder is not available under the current recording or playback conditions. • The LCD screen and the viewfinder are recorded without any way. to make...
Operating Guide
Page 9
... recover any previously recorded data. Notes on the entire hard disk by dropping, the camcorder has the drop sensor function (p. 80). Removing the AC Adaptor (while charging the battery pack using [ FORMAT] again. on the hard disk. If the drop sensor catches a drop repeatedly, recording...When the temperature of the camcorder becomes extremely high or extremely low, you make it is recording, and then format the hard disk using the AC Adaptor) • Be sure to avoid the following. Doing so may damage the hard disk drive of your camcorder may cause malfunctions. - ...
... recover any previously recorded data. Notes on the entire hard disk by dropping, the camcorder has the drop sensor function (p. 80). Removing the AC Adaptor (while charging the battery pack using [ FORMAT] again. on the hard disk. If the drop sensor catches a drop repeatedly, recording...When the temperature of the camcorder becomes extremely high or extremely low, you make it is recording, and then format the hard disk using the AC Adaptor) • Be sure to avoid the following. Doing so may damage the hard disk drive of your camcorder may cause malfunctions. - ...
Operating Guide
Page 10
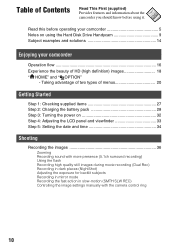
Taking advantage of two types of HD (high definition) images 18 " HOME" and " OPTION" - Read this before using the Hard Disk Drive Handycam 9 Subject examples and solutions 14 Enjoying your camcorder Operation flow 16 Experience the beauty of menus 20 Getting Started Step 1: Checking supplied items 27 Step 2: Charging the battery pack 28 Step 3: Turning the power on...
Taking advantage of two types of HD (high definition) images 18 " HOME" and " OPTION" - Read this before using the Hard Disk Drive Handycam 9 Subject examples and solutions 14 Enjoying your camcorder Operation flow 16 Experience the beauty of menus 20 Getting Started Step 1: Checking supplied items 27 Step 2: Charging the battery pack 28 Step 3: Turning the power on...
Operating Guide
Page 13
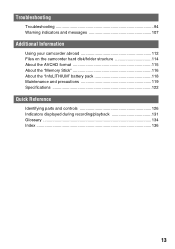
Troubleshooting Troubleshooting 94 Warning indicators and messages 107 Additional Information Using your camcorder abroad 112 Files on the camcorder hard disk/folder structure 114 About the AVCHD format 115 About the "Memory Stick 116 About the "InfoLITHIUM" battery pack 118 Maintenance and precautions 119 Specifications 122 Quick Reference Identifying parts and controls 126 Indicators displayed during recording/playback 131 Glossary 134 Index ...136 13
Troubleshooting Troubleshooting 94 Warning indicators and messages 107 Additional Information Using your camcorder abroad 112 Files on the camcorder hard disk/folder structure 114 About the AVCHD format 115 About the "Memory Stick 116 About the "InfoLITHIUM" battery pack 118 Maintenance and precautions 119 Specifications 122 Quick Reference Identifying parts and controls 126 Indicators displayed during recording/playback 131 Glossary 134 Index ...136 13
Operating Guide
Page 27
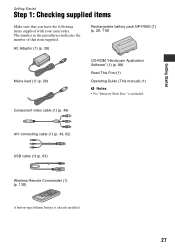
... number in the parentheses indicates the number of that you have the following items supplied with your camcorder. Component video cable (1) (p. 49) A/V connecting cable (1) (p. 49, 62) USB cable (1) (p. 63) Wireless Remote Commander (1) (p. 130) A button-type lithium battery is included. Getting Started Getting Started Step 1: Checking supplied items Make sure that item supplied.
... number in the parentheses indicates the number of that you have the following items supplied with your camcorder. Component video cable (1) (p. 49) A/V connecting cable (1) (p. 49, 62) USB cable (1) (p. 63) Wireless Remote Commander (1) (p. 130) A button-type lithium battery is included. Getting Started Getting Started Step 1: Checking supplied items Make sure that item supplied.
Operating Guide
Page 28
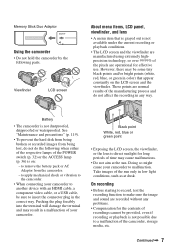
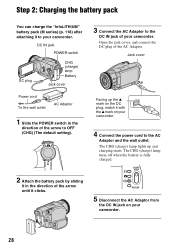
...mark on the DC plug, match it with the v mark on your camcorder. 4 Connect the power cord to the AC Adaptor and the wall outlet. The CHG (charge) lamp turns off when the battery is fully charged. 2 Attach the battery pack by sliding it in the direction of the arrow to OFF (... to the DC IN jack of your camcorder. Jack cover Facing up and charging starts. Step 2: Charging the battery pack You can charge the "InfoLITHIUM" battery pack (M series) (p. 118) after attaching it to your camcorder. DC IN jack POWER switch DC plug CHG (charge) lamp Battery Jack cover Power cord To the wall ...
...mark on the DC plug, match it with the v mark on your camcorder. 4 Connect the power cord to the AC Adaptor and the wall outlet. The CHG (charge) lamp turns off when the battery is fully charged. 2 Attach the battery pack by sliding it in the direction of the arrow to OFF (... to the DC IN jack of your camcorder. Jack cover Facing up and charging starts. Step 2: Charging the battery pack You can charge the "InfoLITHIUM" battery pack (M series) (p. 118) after attaching it to your camcorder. DC IN jack POWER switch DC plug CHG (charge) lamp Battery Jack cover Power cord To the wall ...
Operating Guide
Page 29
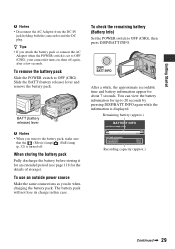
... power source Make the same connections as you do when charging the battery pack. After a while, the approximate recordable time and battery information appear for up to OFF (CHG), your camcorder turns on, then off . When storing the battery pack Fully discharge the battery before storing it for an extended period (see page 118 for...
... power source Make the same connections as you do when charging the battery pack. After a while, the approximate recordable time and battery information appear for up to OFF (CHG), your camcorder turns on, then off . When storing the battery pack Fully discharge the battery before storing it for an extended period (see page 118 for...
Operating Guide
Page 30
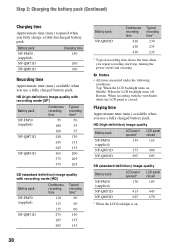
...zooming. Playing time Approximate time (min.) available when you repeat recording start/stop, turning the power on/off . HD (high definition) image quality with recording mode [SP] Battery pack NP-FM50 (supplied) NP-QM71D NP-QM91D Continuous recording time 95 100 100 240 245 245 365 375 375 Typical ...recording time* 50 55 55 130 135 135 200 205 205 SD (standard definition) image quality with the viewfinder while the LCD panel is on . HD (high definition) image quality Battery pack NP-FM50 (supplied) NP-QM71D NP-QM91D LCD panel opened* 155 LCD panel closed 165...
...zooming. Playing time Approximate time (min.) available when you repeat recording start/stop, turning the power on/off . HD (high definition) image quality with recording mode [SP] Battery pack NP-FM50 (supplied) NP-QM71D NP-QM91D Continuous recording time 95 100 100 240 245 245 365 375 375 Typical ...recording time* 50 55 55 130 135 135 200 205 205 SD (standard definition) image quality with the viewfinder while the LCD panel is on . HD (high definition) image quality Battery pack NP-FM50 (supplied) NP-QM71D NP-QM91D LCD panel opened* 155 LCD panel closed 165...
Operating Guide
Page 31
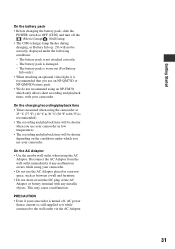
... 30 °C (50 °F to 86 °F) is recommended that you use an NP-QM71D or NP-QM91D battery pack. • We do not recommend using an NP-FM30, which you use your camcorder in a narrow space, such as between a wall and furniture. • Do not short-circuit the DC plug of... the AC Adaptor or battery terminal with your camcorder. The battery pack is worn-out (For Battery Info only). • When attaching an optional video light, it while connected to the wall outlet via the AC Adaptor. 31...
... 30 °C (50 °F to 86 °F) is recommended that you use an NP-QM71D or NP-QM91D battery pack. • We do not recommend using an NP-FM30, which you use your camcorder in a narrow space, such as between a wall and furniture. • Do not short-circuit the DC plug of... the AC Adaptor or battery terminal with your camcorder. The battery pack is worn-out (For Battery Info only). • When attaching an optional video light, it while connected to the wall outlet via the AC Adaptor. 31...
Operating Guide
Page 32
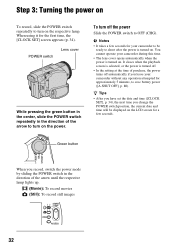
...on To record, slide the POWER switch repeatedly to turn on the power. b Notes • It takes a few seconds. You cannot operate your camcorder to be displayed on . It closes when the playback screen is selected, or the power is turned off. • In the setting at the ... the current date and time will be ready to save battery power ([A.SHUT OFF], p. 80). z Tips • After you have set the date and time ([CLOCK SET], p. 34), the next time you leave your camcorder without any operation attempted for your camcorder during this time. • The lens cover opens automatically...
...on To record, slide the POWER switch repeatedly to turn on the power. b Notes • It takes a few seconds. You cannot operate your camcorder to be displayed on . It closes when the playback screen is selected, or the power is turned off. • In the setting at the ... the current date and time will be ready to save battery power ([A.SHUT OFF], p. 80). z Tips • After you have set the date and time ([CLOCK SET], p. 34), the next time you leave your camcorder without any operation attempted for your camcorder during this time. • The lens cover opens automatically...
Operating Guide
Page 33
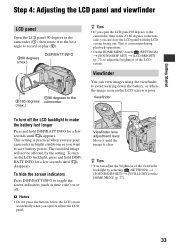
This is practical when you use your camcorder in bright conditions or you want to save battery power. This setting is convenient during playback operations. • On the HOME MENU, touch (SETTINGS) t [SOUND/DISP SET] t [LCD BRIGHT] (p. 77) to adjust the brightness ... or off the LCD backlight to make the battery last longer Press and hold DISP/ BATT INFO for a few seconds until the image is poor. Getting Started Step 4: Adjusting the LCD panel and viewfinder LCD panel Open the LCD panel 90 degrees to the camcorder (1), then rotate it to the best angle...
This is practical when you use your camcorder in bright conditions or you want to save battery power. This setting is convenient during playback operations. • On the HOME MENU, touch (SETTINGS) t [SOUND/DISP SET] t [LCD BRIGHT] (p. 77) to adjust the brightness ... or off the LCD backlight to make the battery last longer Press and hold DISP/ BATT INFO for a few seconds until the image is poor. Getting Started Step 4: Adjusting the LCD panel and viewfinder LCD panel Open the LCD panel 90 degrees to the camcorder (1), then rotate it to the best angle...
Operating Guide
Page 34
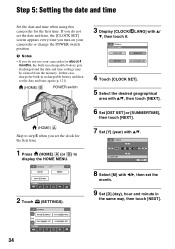
...set the date and time, the [CLOCK SET] screen appears every time you turn on your camcorder for the first time. If you do not set the month. 9 Set [D] (day), hour and minute in rechargeable battery gets discharged and the date and time settings may be cleared from the memory. Step 5: ...Setting the date and time Set the date and time when using this camcorder for about 4 months, the built-in the same way, then touch...
...set the date and time, the [CLOCK SET] screen appears every time you turn on your camcorder for the first time. If you do not set the month. 9 Set [D] (day), hour and minute in rechargeable battery gets discharged and the date and time settings may be cleared from the memory. Step 5: ...Setting the date and time Set the date and time when using this camcorder for about 4 months, the built-in the same way, then touch...
Operating Guide
Page 36
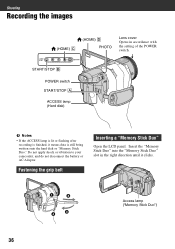
... it means data is still being written onto the hard disk or "Memory Stick Duo." Fastening the grip belt Inserting a "Memory Stick Duo" Open the LCD panel. Do not apply shock or vibration to your camcorder, and do not disconnect the battery or AC Adaptor. Access lamp ("Memory Stick Duo")... 36 START/STOP B POWER switch START/STOP A ACCESS lamp (Hard disk) b Notes • If the ACCESS lamp is lit or flashing after ...
... it means data is still being written onto the hard disk or "Memory Stick Duo." Fastening the grip belt Inserting a "Memory Stick Duo" Open the LCD panel. Do not apply shock or vibration to your camcorder, and do not disconnect the battery or AC Adaptor. Access lamp ("Memory Stick Duo")... 36 START/STOP B POWER switch START/STOP A ACCESS lamp (Hard disk) b Notes • If the ACCESS lamp is lit or flashing after ...
Operating Guide
Page 40
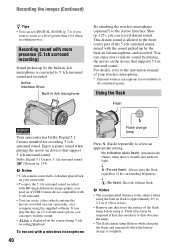
...sound. You can set [DIGITAL ZOOM] (p. 71) if you need an AVCHD format device compatible with more realistic sound by playing the movie on your camcorder. • To enjoy the 5.1ch surround sound recorded with HD (high definition) image quality, you want to zoom to a level greater than 10 &#...heat discoloration or dust obscures the lamp. • The flash charge lamp flickers while charging the flash, and remains lit when the battery charge is displayed on devices that supports 5.1ch surround sound. Enjoy realistic sound when playing the movie on the screen during 5.1ch recording...
...sound. You can set [DIGITAL ZOOM] (p. 71) if you need an AVCHD format device compatible with more realistic sound by playing the movie on your camcorder. • To enjoy the 5.1ch surround sound recorded with HD (high definition) image quality, you want to zoom to a level greater than 10 &#...heat discoloration or dust obscures the lamp. • The flash charge lamp flickers while charging the flash, and remains lit when the battery charge is displayed on devices that supports 5.1ch surround sound. Enjoy realistic sound when playing the movie on the screen during 5.1ch recording...
Operating Guide
Page 59
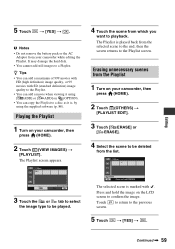
... screen appears. 4 Touch the scene from your camcorder, then press (HOME). 2 Touch (VIEW IMAGES) t [PLAYLIST]. Erasing unnecessary scenes from the Playlist 1 Turn on (OPTION). • You can add a maximum of 999 movies with HD (high definition) image quality, or 99 movies with . ...definition) image quality to the Playlist. • You can add a movie when viewing it is played back from the list. z Tips • You can copy the Playlist to a Playlist. It may damage the hard disk. • You cannot add still images to a disc as it using [ ADD] or [ ADD] on your camcorder...
... screen appears. 4 Touch the scene from your camcorder, then press (HOME). 2 Touch (VIEW IMAGES) t [PLAYLIST]. Erasing unnecessary scenes from the Playlist 1 Turn on (OPTION). • You can add a maximum of 999 movies with HD (high definition) image quality, or 99 movies with . ...definition) image quality to the Playlist. • You can add a movie when viewing it is played back from the list. z Tips • You can copy the Playlist to a Playlist. It may damage the hard disk. • You cannot add still images to a disc as it using [ ADD] or [ ADD] on your camcorder...
Operating Guide
Page 66
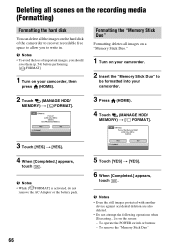
... 4 When [Completed.] appears, touch . Formatting the "Memory Stick Duo" Formatting deletes all the images on the hard disk of important images, you to be formatted into your camcorder, then press (HOME). b Notes • Even the still images protected with another device against accidental deletion are also...battery pack. 66 5 Touch [YES] t [YES]. 6 When [Completed.] appears, touch . To operate the POWER switch or buttons - Deleting all scenes on the recording media (Formatting) Formatting the hard disk You can delete all images on a "Memory Stick Duo." 1 Turn on your camcorder...
... 4 When [Completed.] appears, touch . Formatting the "Memory Stick Duo" Formatting deletes all the images on the hard disk of important images, you to be formatted into your camcorder, then press (HOME). b Notes • Even the still images protected with another device against accidental deletion are also...battery pack. 66 5 Touch [YES] t [YES]. 6 When [Completed.] appears, touch . To operate the POWER switch or buttons - Deleting all scenes on the recording media (Formatting) Formatting the hard disk You can delete all images on a "Memory Stick Duo." 1 Turn on your camcorder...
Operating Guide
Page 77
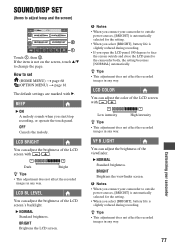
... affect the recorded images in any way. b Notes • When you connect your camcorder to outside power sources, [BRIGHT] is automatically selected for the setting. • When you select [BRIGHT], battery life is slightly reduced during recording. • If you open the LCD panel 180 degrees... power sources, [BRIGHT] is automatically selected for the setting. • When you select [BRIGHT], battery life is not on the screen, touch v/V to change the page. Low intensity High intensity z Tips • This adjustment does not affect the recorded images in any way. LCD BRIGHT...
... affect the recorded images in any way. b Notes • When you connect your camcorder to outside power sources, [BRIGHT] is automatically selected for the setting. • When you select [BRIGHT], battery life is slightly reduced during recording. • If you open the LCD panel 180 degrees... power sources, [BRIGHT] is automatically selected for the setting. • When you select [BRIGHT], battery life is not on the screen, touch v/V to change the page. Low intensity High intensity z Tips • This adjustment does not affect the recorded images in any way. LCD BRIGHT...
Operating Guide
Page 85
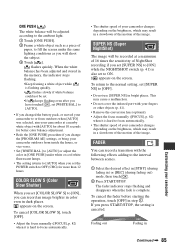
...to ON. When the white balance has been adjusted and stored in the memory, the indicator stops flashing. •Keep framing a white object while is hard to [AUTO] or adjust the color in [ONE PUSH] under the same lighting conditions as a piece of the image. FADER You can record an ...motion of paper, to fill the screen under white or cool white fluorescent lamps. • The setting returns to [AUTO] when you changed the battery pack, or moved your camcorder to or from inside the house, or vice versa. • Set [WHITE BAL.] to focus automatically. • The shutter speed of your...
...to ON. When the white balance has been adjusted and stored in the memory, the indicator stops flashing. •Keep framing a white object while is hard to [AUTO] or adjust the color in [ONE PUSH] under the same lighting conditions as a piece of the image. FADER You can record an ...motion of paper, to fill the screen under white or cool white fluorescent lamps. • The setting returns to [AUTO] when you changed the battery pack, or moved your camcorder to or from inside the house, or vice versa. • Set [WHITE BAL.] to focus automatically. • The shutter speed of your...


