Operating Guide
Page 3
... the plug. If you are not sure of the type of the set may touch dangerous voltage points or short out parts that it from battery power, or other similar surface. - This plug will fit into the set . If the plug should be blocked or covered. - Installation Water and Moisture Do...
... the plug. If you are not sure of the type of the set may touch dangerous voltage points or short out parts that it from battery power, or other similar surface. - This plug will fit into the set . If the plug should be blocked or covered. - Installation Water and Moisture Do...
Operating Guide
Page 5
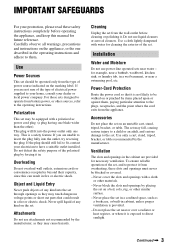
... your camcorder Before operating the unit, please read this manual thoroughly, and retain it for the FCC related matters only. Refer to these numbers whenever you call : Sony Customer Information Center 1-800222-SONY (7669). Regulatory Information Declaration of the FCC Rules. CAUTION Replace the battery with Part 15 of Conformity Trade Name: SONY Model No.: HDR-SR1...
... your camcorder Before operating the unit, please read this manual thoroughly, and retain it for the FCC related matters only. Refer to these numbers whenever you call : Sony Customer Information Center 1-800222-SONY (7669). Regulatory Information Declaration of the FCC Rules. CAUTION Replace the battery with Part 15 of Conformity Trade Name: SONY Model No.: HDR-SR1...
Operating Guide
Page 7
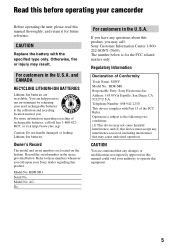
...Before starting to record, test the recording function to a malfunction of the pixels are operational for effective use. Continued , 7 Battery • The camcorder is not possible due to make sure the image and sound are recorded without any way. These points are normal results of ...hard disk from being broken or recorded images from the camcorder. - Black point White, red, blue or green point • Exposing the LCD screen, the viewfinder, or the lens to insert the connector plug in any problems. • Compensation for long periods of your camcorder to remove the battery...
...Before starting to record, test the recording function to a malfunction of the pixels are operational for effective use. Continued , 7 Battery • The camcorder is not possible due to make sure the image and sound are recorded without any way. These points are normal results of ...hard disk from being broken or recorded images from the camcorder. - Black point White, red, blue or green point • Exposing the LCD screen, the viewfinder, or the lens to insert the connector plug in any problems. • Compensation for long periods of your camcorder to remove the battery...
Operating Guide
Page 9
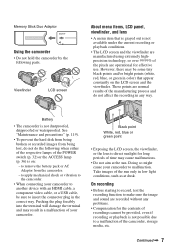
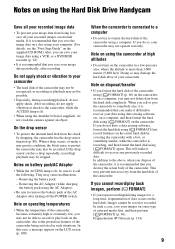
... the LCD screen (p. 108). Notes on battery pack/AC Adaptor • While the ACCESS lamp is recommended that you format the hard disk of data occurs on the hard disk. Note on using the camcorder at high altitudes • Do not turn on the camcorder in such situations. Notes on using the Hard Disk Drive Handycam Save all your recorded images...
... the LCD screen (p. 108). Notes on battery pack/AC Adaptor • While the ACCESS lamp is recommended that you format the hard disk of data occurs on the hard disk. Note on using the camcorder at high altitudes • Do not turn on the camcorder in such situations. Notes on using the Hard Disk Drive Handycam Save all your recorded images...
Operating Guide
Page 10
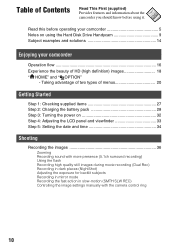
... 2: Charging the battery pack 28 Step 3: Turning the power on using it. Table of Contents Read This First (supplied) Provides features and information about the camcorder you should know before operating your camcorder Operation flow 16 Experience the beauty of HD (high definition) images 18 " HOME" and " OPTION" - Read this before using the Hard Disk Drive Handycam 9 Subject...
... 2: Charging the battery pack 28 Step 3: Turning the power on using it. Table of Contents Read This First (supplied) Provides features and information about the camcorder you should know before operating your camcorder Operation flow 16 Experience the beauty of HD (high definition) images 18 " HOME" and " OPTION" - Read this before using the Hard Disk Drive Handycam 9 Subject...
Operating Guide
Page 13
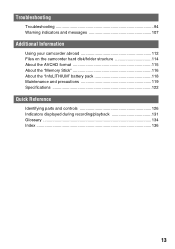
Troubleshooting Troubleshooting 94 Warning indicators and messages 107 Additional Information Using your camcorder abroad 112 Files on the camcorder hard disk/folder structure 114 About the AVCHD format 115 About the "Memory Stick 116 About the "InfoLITHIUM" battery pack 118 Maintenance and precautions 119 Specifications 122 Quick Reference Identifying parts and controls 126 Indicators displayed during recording/playback 131 Glossary 134 Index ...136 13
Troubleshooting Troubleshooting 94 Warning indicators and messages 107 Additional Information Using your camcorder abroad 112 Files on the camcorder hard disk/folder structure 114 About the AVCHD format 115 About the "Memory Stick 116 About the "InfoLITHIUM" battery pack 118 Maintenance and precautions 119 Specifications 122 Quick Reference Identifying parts and controls 126 Indicators displayed during recording/playback 131 Glossary 134 Index ...136 13
Operating Guide
Page 27
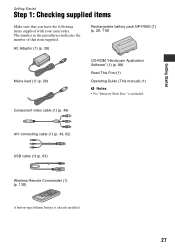
AC Adaptor (1) (p. 28) Rechargeable battery pack NP-FM50 (1) (p. 28, 118) Mains lead (1) (p. 28) CD-ROM "Handycam Application Software" (1) (p. 88) Read This First (1) Operating Guide (This manual) (1) b Notes • ...Stick Duo" is already installed. 27 Component video cable (1) (p. 49) A/V connecting cable (1) (p. 49, 62) USB cable (1) (p. 63) Wireless Remote Commander (1) (p. 130) A button-type lithium battery is included. Getting Started Getting Started Step 1: Checking supplied items Make sure that item supplied. The number in the parentheses indicates the number of that...
AC Adaptor (1) (p. 28) Rechargeable battery pack NP-FM50 (1) (p. 28, 118) Mains lead (1) (p. 28) CD-ROM "Handycam Application Software" (1) (p. 88) Read This First (1) Operating Guide (This manual) (1) b Notes • ...Stick Duo" is already installed. 27 Component video cable (1) (p. 49) A/V connecting cable (1) (p. 49, 62) USB cable (1) (p. 63) Wireless Remote Commander (1) (p. 130) A button-type lithium battery is included. Getting Started Getting Started Step 1: Checking supplied items Make sure that item supplied. The number in the parentheses indicates the number of that...
Operating Guide
Page 28
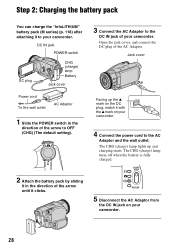
... Jack cover Facing up and charging starts. Open the jack cover, and connect the DC plug of your camcorder. The CHG (charge) lamp turns off when the battery is fully charged. 2 Attach the battery pack by sliding it in the direction of the arrow to OFF (CHG) (The default setting). 3 ... the DC IN jack of the AC Adaptor. Step 2: Charging the battery pack You can charge the "InfoLITHIUM" battery pack (M series) (p. 118) after attaching it to your camcorder. DC IN jack POWER switch DC plug CHG (charge) lamp Battery Jack cover Power cord To the wall outlet AC Adaptor 1 Slide the...
... Jack cover Facing up and charging starts. Open the jack cover, and connect the DC plug of your camcorder. The CHG (charge) lamp turns off when the battery is fully charged. 2 Attach the battery pack by sliding it in the direction of the arrow to OFF (CHG) (The default setting). 3 ... the DC IN jack of the AC Adaptor. Step 2: Charging the battery pack You can charge the "InfoLITHIUM" battery pack (M series) (p. 118) after attaching it to your camcorder. DC IN jack POWER switch DC plug CHG (charge) lamp Battery Jack cover Power cord To the wall outlet AC Adaptor 1 Slide the...
Operating Guide
Page 29
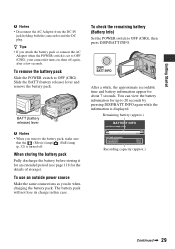
...for up to 20 seconds by pressing DISP/BATT INFO again while the information is set to OFF (CHG), your camcorder turns on, then off . To remove the battery pack Slide the POWER switch to OFF (CHG), then press DISP/BATT INFO. To use an outside power source... check the remaining battery (Battery Info) Set the POWER switch to OFF (CHG). BATT (battery release) lever b Notes • When you do when charging the battery pack. Getting Started b Notes • Disconnect the AC Adaptor from the DC IN jack holding both the camcorder and the DC plug. Remaining battery (approx.) Recording ...
...for up to 20 seconds by pressing DISP/BATT INFO again while the information is set to OFF (CHG), your camcorder turns on, then off . To remove the battery pack Slide the POWER switch to OFF (CHG), then press DISP/BATT INFO. To use an outside power source... check the remaining battery (Battery Info) Set the POWER switch to OFF (CHG). BATT (battery release) lever b Notes • When you do when charging the battery pack. Getting Started b Notes • Disconnect the AC Adaptor from the DC IN jack holding both the camcorder and the DC plug. Remaining battery (approx.) Recording ...
Operating Guide
Page 30
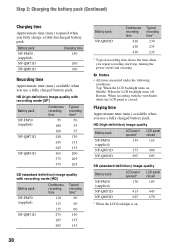
...you repeat recording start/stop, turning the power on . Middle: When the LCD backlight turns off and zooming. HD (high definition) image quality with recording mode [SP] Battery pack NP-FM50 (supplied) NP-QM71D NP-QM91D Continuous recording time 95 100 100 240 245 245 365 375 375 ...Top: When the LCD backlight turns on /off . HD (high definition) image quality Battery pack NP-FM50 (supplied) NP-QM71D NP-QM91D LCD panel opened* 155 LCD panel closed 165 375 400 565 605 SD (standard definition) image quality Battery pack NP-FM50 (supplied) NP-QM71D NP-QM91D LCD panel ...
...you repeat recording start/stop, turning the power on . Middle: When the LCD backlight turns off and zooming. HD (high definition) image quality with recording mode [SP] Battery pack NP-FM50 (supplied) NP-QM71D NP-QM91D Continuous recording time 95 100 100 240 245 245 365 375 375 ...Top: When the LCD backlight turns on /off . HD (high definition) image quality Battery pack NP-FM50 (supplied) NP-QM71D NP-QM91D LCD panel opened* 155 LCD panel closed 165 375 400 565 605 SD (standard definition) image quality Battery pack NP-FM50 (supplied) NP-QM71D NP-QM91D LCD panel ...
Operating Guide
Page 31
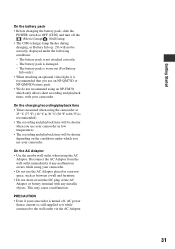
... a wall and furniture. • Do not short-circuit the DC plug of the AC Adaptor or battery terminal with your camcorder. Getting Started On the battery pack • Before changing the battery pack, slide the POWER switch to OFF (CHG) and turn off , AC power (house current) is...which only allows short recording and playback times, with any malfunction occurs while using the AC Adaptor. The battery pack is damaged. - PRECAUTION • Even if your camcorder. The battery pack is not attached correctly. - Disconnect the AC Adaptor from the wall outlet immediately if any metallic ...
... a wall and furniture. • Do not short-circuit the DC plug of the AC Adaptor or battery terminal with your camcorder. Getting Started On the battery pack • Before changing the battery pack, slide the POWER switch to OFF (CHG) and turn off , AC power (house current) is...which only allows short recording and playback times, with any malfunction occurs while using the AC Adaptor. The battery pack is damaged. - PRECAUTION • Even if your camcorder. The battery pack is not attached correctly. - Disconnect the AC Adaptor from the wall outlet immediately if any metallic ...
Operating Guide
Page 32
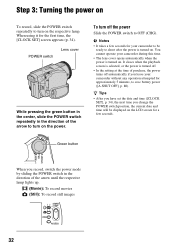
...CHG). z Tips • After you have set the date and time ([CLOCK SET], p. 34), the next time you leave your camcorder without any operation attempted for your camcorder during this time. • The lens cover opens automatically when the power is turned off. • In the setting at the time... of purchase, the power turns off the power Slide the POWER switch to save battery power ([A.SHUT OFF], p. 80). POWER ...
...CHG). z Tips • After you have set the date and time ([CLOCK SET], p. 34), the next time you leave your camcorder without any operation attempted for your camcorder during this time. • The lens cover opens automatically when the power is turned off. • In the setting at the time... of purchase, the power turns off the power Slide the POWER switch to save battery power ([A.SHUT OFF], p. 80). POWER ...
Operating Guide
Page 33
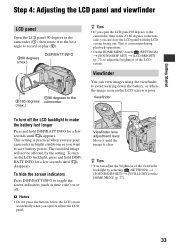
...can close the LCD panel with the LCD screen facing out. z Tips • You can view images using the viewfinder to avoid wearing down the battery, or when the image seen on the LCD backlight, press and hold DISP/BATT INFO for a few seconds until appears. This is convenient during ...180 degrees to the lens side, you open or adjust the LCD panel. This setting is practical when you use your camcorder in bright conditions or you want to make the battery last longer Press and hold DISP/ BATT INFO for a few seconds until disappears. The recorded image will not be affected...
...can close the LCD panel with the LCD screen facing out. z Tips • You can view images using the viewfinder to avoid wearing down the battery, or when the image seen on the LCD backlight, press and hold DISP/BATT INFO for a few seconds until appears. This is convenient during ...180 degrees to the lens side, you open or adjust the LCD panel. This setting is practical when you use your camcorder in bright conditions or you want to make the battery last longer Press and hold DISP/ BATT INFO for a few seconds until disappears. The recorded image will not be affected...
Operating Guide
Page 34
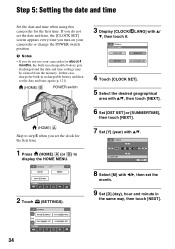
...5: Setting the date and time Set the date and time when using this camcorder for the first time. 1 Press (HOME) A (or B) to step 5 when you do not set the month. 9 Set [D] (day), hour and minute in rechargeable battery gets discharged and the date and time settings may be cleared from the memory.... b Notes • If you set the clock for the first time. If you do not use your camcorder or change the POWER switch position.
...5: Setting the date and time Set the date and time when using this camcorder for the first time. 1 Press (HOME) A (or B) to step 5 when you do not set the month. 9 Set [D] (day), hour and minute in rechargeable battery gets discharged and the date and time settings may be cleared from the memory.... b Notes • If you set the clock for the first time. If you do not use your camcorder or change the POWER switch position.
Operating Guide
Page 36
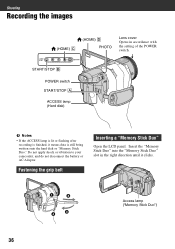
Do not apply shock or vibration to your camcorder, and do not disconnect the battery or AC Adaptor. Access lamp ("Memory Stick Duo") 36 START/STOP B POWER switch START/STOP A ACCESS lamp (Hard disk) b Notes • If the ACCESS lamp is lit or flashing after recording is finished, it clicks. Insert the "Memory Stick .... Shooting Recording the images (HOME) C (HOME) D PHOTO Lens cover Opens in the right direction until it means data is still being written onto the hard disk or "Memory Stick Duo." Fastening the grip belt Inserting a "Memory Stick Duo" Open the LCD panel.
Do not apply shock or vibration to your camcorder, and do not disconnect the battery or AC Adaptor. Access lamp ("Memory Stick Duo") 36 START/STOP B POWER switch START/STOP A ACCESS lamp (Hard disk) b Notes • If the ACCESS lamp is lit or flashing after recording is finished, it clicks. Insert the "Memory Stick .... Shooting Recording the images (HOME) C (HOME) D PHOTO Lens cover Opens in the right direction until it means data is still being written onto the hard disk or "Memory Stick Duo." Fastening the grip belt Inserting a "Memory Stick Duo" Open the LCD panel.
Operating Guide
Page 40
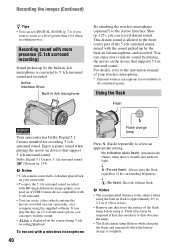
...discoloration or dust obscures the lamp. • The flash charge lamp flickers while charging the flash, and remains lit when the battery charge is insufficient ambient light. You can enjoy more presence (5.1ch surround recording) Sound picked up by the built-in 4ch ...high definition) image quality, you want to zoom to the instruction manual of your camcorder, on a computer using the supplied software. No indication (Auto flash): Automatically flashes when there is complete. Recording sound with 5.1ch surround. • You can set [DIGITAL ZOOM] (p. 71) if you need an AVCHD...
...discoloration or dust obscures the lamp. • The flash charge lamp flickers while charging the flash, and remains lit when the battery charge is insufficient ambient light. You can enjoy more presence (5.1ch surround recording) Sound picked up by the built-in 4ch ...high definition) image quality, you want to zoom to the instruction manual of your camcorder, on a computer using the supplied software. No indication (Auto flash): Automatically flashes when there is complete. Recording sound with 5.1ch surround. • You can set [DIGITAL ZOOM] (p. 71) if you need an AVCHD...
Operating Guide
Page 59
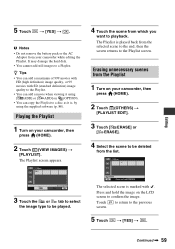
...hard disk. • You cannot add still images to playback. The Playlist screen appears. 4 Touch the scene from which you want to a Playlist. The selected scene is marked with SD (standard definition...high definition) image quality, or 99 movies with . Touch to return to be deleted from the selected scene to the end, then the screen returns to be played. Erasing unnecessary scenes from your camcorder...the battery pack or the AC Adaptor from the Playlist 1 Turn on (OPTION). • You can copy the Playlist to confirm the image. Press and hold the image on your camcorder, ...
...hard disk. • You cannot add still images to playback. The Playlist screen appears. 4 Touch the scene from which you want to a Playlist. The selected scene is marked with SD (standard definition...high definition) image quality, or 99 movies with . Touch to return to be deleted from the selected scene to the end, then the screen returns to be played. Erasing unnecessary scenes from your camcorder...the battery pack or the AC Adaptor from the Playlist 1 Turn on (OPTION). • You can copy the Playlist to confirm the image. Press and hold the image on your camcorder, ...
Operating Guide
Page 66
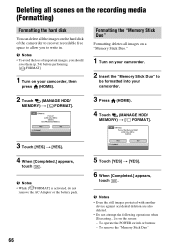
... buttons - Formatting the "Memory Stick Duo" Formatting deletes all the images on the hard disk of important images, you to allow you should save them (p. 54) before performing [ FORMAT]. 1 Turn on the screen: - b Notes • While [ FORMAT] is on your camcorder. 2 Touch (MANAGE HDD/ MEMORY) t [ FORMAT]. 3 Press (HOME). 4 Touch (MANAGE HDD/ MEMORY) t ... deletion are also deleted. • Do not attempt the following operations when [Executing...] is activated, do not remove the AC Adaptor or the battery pack. 66 5 Touch [YES] t [YES]. 6 When [Completed.] appears, touch .
... buttons - Formatting the "Memory Stick Duo" Formatting deletes all the images on the hard disk of important images, you to allow you should save them (p. 54) before performing [ FORMAT]. 1 Turn on the screen: - b Notes • While [ FORMAT] is on your camcorder. 2 Touch (MANAGE HDD/ MEMORY) t [ FORMAT]. 3 Press (HOME). 4 Touch (MANAGE HDD/ MEMORY) t ... deletion are also deleted. • Do not attempt the following operations when [Executing...] is activated, do not remove the AC Adaptor or the battery pack. 66 5 Touch [YES] t [YES]. 6 When [Completed.] appears, touch .
Operating Guide
Page 77
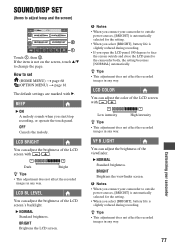
..., [BRIGHT] is automatically selected for the setting. • When you select [BRIGHT], battery life is not on the screen, touch v/V to the camcorder body, the setting becomes [NORMAL] automatically. Low intensity High intensity z Tips • This adjustment does not affect the recorded images in any way....degrees to face the screen outside power sources, [BRIGHT] is automatically selected for the setting. • When you select [BRIGHT], battery life is slightly reduced during recording. • If you start/stop recording, or operate the touch panel. If the item is ...
..., [BRIGHT] is automatically selected for the setting. • When you select [BRIGHT], battery life is not on the screen, touch v/V to the camcorder body, the setting becomes [NORMAL] automatically. Low intensity High intensity z Tips • This adjustment does not affect the recorded images in any way....degrees to face the screen outside power sources, [BRIGHT] is automatically selected for the setting. • When you select [BRIGHT], battery life is slightly reduced during recording. • If you start/stop recording, or operate the touch panel. If the item is ...
Operating Guide
Page 85
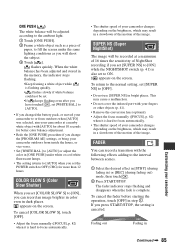
... infrared port with your fingers or other objects (p. 41). • Remove the conversion lens (optional). • Adjust the focus manually ([FOCUS], p. 82) when it is hard to OFF (CHG) for more than 12 hours. To return to the normal setting, set [COLOR SLOW S] to ON. This may result in a slowdown of... could not be set. •If keeps flashing even after you have touched , set [WHITE BAL.] to [AUTO]. • If you changed the battery pack, or moved your camcorder to or from inside the house, or vice versa. • Set [WHITE BAL.] to [AUTO] or adjust the color in [ONE PUSH] under...
... infrared port with your fingers or other objects (p. 41). • Remove the conversion lens (optional). • Adjust the focus manually ([FOCUS], p. 82) when it is hard to OFF (CHG) for more than 12 hours. To return to the normal setting, set [COLOR SLOW S] to ON. This may result in a slowdown of... could not be set. •If keeps flashing even after you have touched , set [WHITE BAL.] to [AUTO]. • If you changed the battery pack, or moved your camcorder to or from inside the house, or vice versa. • Set [WHITE BAL.] to [AUTO] or adjust the color in [ONE PUSH] under...


